Introducing License Keys to Kendo UI for Angular

Today we have a new update in the Kendo UI for Angular components library which introduces the concept of license keys with all Kendo UI for Angular npm packages. Let’s dive into the reasoning behind this change and what this means for you as a developer!
What Is Changing?
With today’s release (December 16th, 2020) Kendo UI for Angular npm packages now have an additional requirement for developers to provide a license key when adding any of our npm packages to their Angular project. While a project will still compile and run as usual, a warning message will appear in the console until a license key has been properly provided.
This message will also provide a link directly to the new Kendo UI for Angular My License page with instructions for how to acquire and install a license. This license is a physical file (in .txt file format) which needs to be included in your project. Once it has been added a single CLI command will have to be executed and all of this together will remove the warning message mentioned above.
Our goal with this is to ensure that acquiring a license and activating it is seamless. In order to give you a look in to what this looks like in practice I’ll cover what these steps are in the “How to Use your License Key” section below, but for those of you interested in why we have added license keys I’ll cover that first.
Why License Keys?
Kendo UI for Angular offers all of our UI components for Angular via npm packages. This ensures that Angular developers can quickly and easily add our UI components to any of their Angular projects. We know that npm is the standard for handling various packages and reference in modern web applications.
One limitation of this setup is that a commercial library such as Kendo UI for Angular does not have any tooling to assist with trials or licensed users.
As a way to continue to offer Kendo UI for Angular through npm and make hosting our packages in a public repository sustainable going forward, we hope that license keys will be a seamless process for our users while managing trial and licensed users alike.
Does This Affect Me Today?
This will affect any developer who downloads and installs the latest version of any of Kendo UI for Angular packages which, as most of you are aware, are versioned separately. If you are not upgrading today, then you will not see this warning message until you have done said upgrade.
Eventually this will of course affect all Kendo UI for Angular users in the future.
How to Use My License Key
If you remember one thing from this blog post it should be to bookmark the Kendo UI for Angular My License Key page. This page will contain all the information that you need in order to understand our licensing setup along with a more detailed FAQ.
As a quick summary in this blog post the process is pretty much three steps:
- Get access to your license key
- Install or update the license key in your projects
- Register said license key
How to Access My License Key
The abovementioned My License page has a “Download Your License Key” section. Sign in with your Telerik account and look for the button labeled kendo-ui-license.txt—this
will download the license file you need.
As a heads-up you will need to either have an active trial, or be a licensed developer, in order to get access to a license key. If, for some reason, you are neither then this page will provide an easy-to-access link to our free trial sign-up page!
Install or Update My License Key
Whether this is your first time starting a Kendo UI for Angular trial, you are looking to upgrade from a trial license to a developer license, or you are a licensed developer updating to the latest version of Kendo UI for Angular, the process is the same.
- Copy the license key file (
kendo-ui-license.txt) to the root folder of your project. - Install
@progress/kendo-licensingas a project dependency by runningnpm install --save @progress/kendo-licensing. - Run
npx kendo-ui-license activatein the console.
Once you have done these three you should be good to go! Easy, right? This is all that you need to do in order to remove the warning message.
This works well for dev machines, but if you need this for CI servers we recommend adding the Kendo UI for Angular license key to your environment variables, as mentioned in this section of our documentation.
For trial users looking to update their license files after they have purchased a license you will have to snag another license key (tied to your purchase) and follow the same instructions again. This will replace the old trial license key and ensure your project is properly licensed.
If you are a licensed developer whose subscription has expired, and you follow the above instructions you may be met with a message that indicates that the current version of Kendo UI for Angular is not available as a part of your inactive subscription. This can be remedied by renewing your license and gaining an active subscription.
A note I want to make here is that Kendo UI for Angular licenses are still perpetual. However, they are perpetual for the versions of Kendo UI for Angular you had as a part of your subscription. So, if your subscription expired in 2020 (say December) then you would not have access to any version released in 2021.
Kendo UI for Angular License Keys in Practice
With all that out of the way, let’s create a project using the Angular CLI and see how these license keys work in practice.
So, for this guide I’ll go ahead and create a new project using ng new command from the Angular CLI. This lets me get up and running with an Angular project in no time flat. So, I’ll just create a new app with:
ng new kendo-ui-licenseWhich then grants me a fresh Angular application to try out the licensing with.
For this sample I’ll use the Kendo UI for Angular DropDownList as its one of our more popular components and it makes for an easy package to add into my project.
Following the instructions on the DropDown package overview docs, I will run the following ng add command:
ng add @progress/kendo-angular-dropdownsSince I used Angular schematics with the above ng add command I should be good to go with all the proper inclusions in my project, but just for reference here is my app.module.ts:
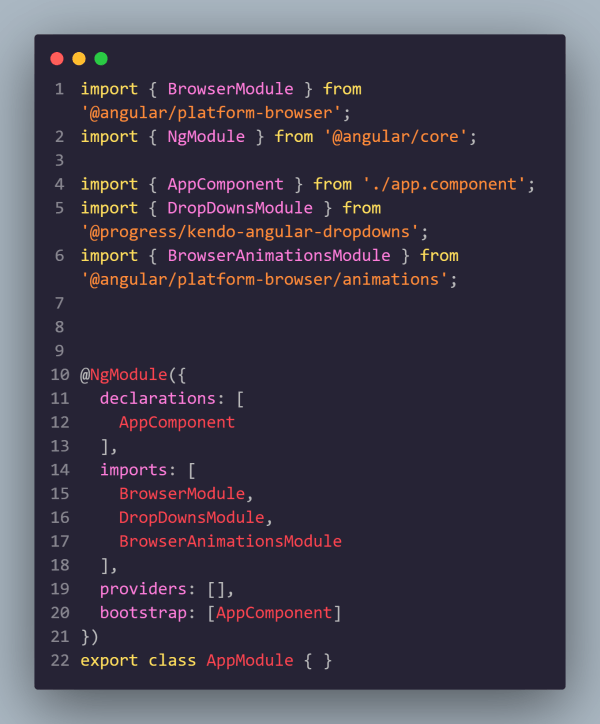
This means we are good to go with referencing any of the Kendo UI for Angular Dropdowns throughout our application. In fact, we even have the Kendo UI for Angular Default theme set up with this command—no need to do any additional configuration.
Additionally, the previous ng add command should already add this to my project, but to be safe (and to highlight it here in the blog post) I’ll also run the following npm install command:
npm install --save @progress/kendo-licensingThis is the package which is responsible for activating our license key and all Kendo UI for Angular packages now require the inclusion of @progress/kendo-licensing as a dependency.
From here I’ll copy and paste code from the Kendo UI for Angular DropDownList Getting Started page. For the sake of this demo I’ll
just remove most of the content already available in my App component and replace it with my DropDownList.
So, lets jump over to my app.component.ts and add in our sample data
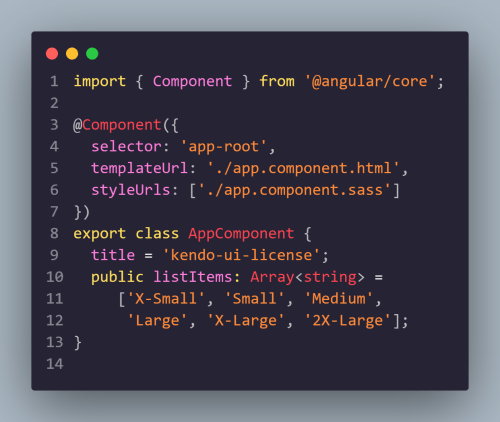
And then in my template which comes from app.component.html I add the markup associated with my component.
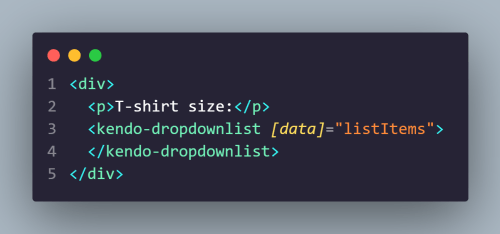
When I run my Angular application, I get a lovely DropDownList. Note that the component is fully functional. When I open the developer console, I see the following message in the console:
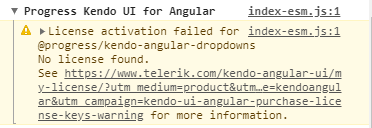
This message lets us know that we need to apply a license key. In case you didn’t bookmark the link previously, the message has a handy link that leads directly to the Kendo UI for Angular licensing page.
From here I can follow the instructions that I mentioned previously and download my license file by finding this button on the page (note that you have to be logged in to a Telerik account to see this):

The next step is to add kendo-ui-license.txt to the root of my project.
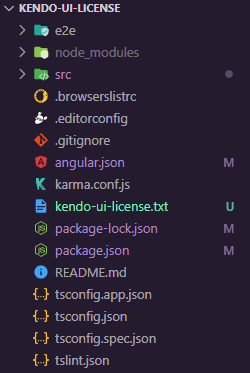
Once this has been added to the project, I just have a quick command to execute:
npx kendo-ui-license activateAnd that should be it! When I rebuild my application and open the developer console, I see that the message is gone, and I can continue on with developing my application. If I add more components they will just check the existing license file and will not prompt another message, so this project is now good to go for further development!
Additional Questions
If you have a question not answered in this blog, please review the Frequently Asked Questions section of the Kendo UI for Angular License Key page, which covers more scenarios. You can also always count on our helpful support team for additional questions about this change.
Got Feedback?
Are there ways we can improve this licensing mechanism for you and your team? We would love to hear it! You’re welcome to leave a comment in the section below or submit a support ticket to interact directly with our support and engineering teams.

Carl Bergenhem
Carl Bergenhem was the Product Manager for Kendo UI.
