How to Deploy a Multi-Tier Application with Kubernetes
A multi-tier application is an application distributed among more than one layer. It logically separates the operational layers. The number of layers varies with business and application requirements. In this article, we will see an application divided into 2 layers, backend and frontend layer. We will use MongoDB as a backend to store data and Python Flask as a frontend Webserver. We will deploy these two applications using deployments in Kubernetes and have services to forward requests to them.
Pre-requisites
- Kubernetes Cluster with at least 1 worker node.
If you want to learn to create a Kubernetes Cluster, click here. This guide will help you create a Kubernetes cluster with 1 Master and 2 Nodes on AWS Ubuntu 18.04 EC2 Instances. - Basic understanding of Deployments and Services.
Refer Deployments and Services to get a basic understanding.
What will we do?
- Deploy a Multi-Tier Application
Deploy a Multi-Tier Application
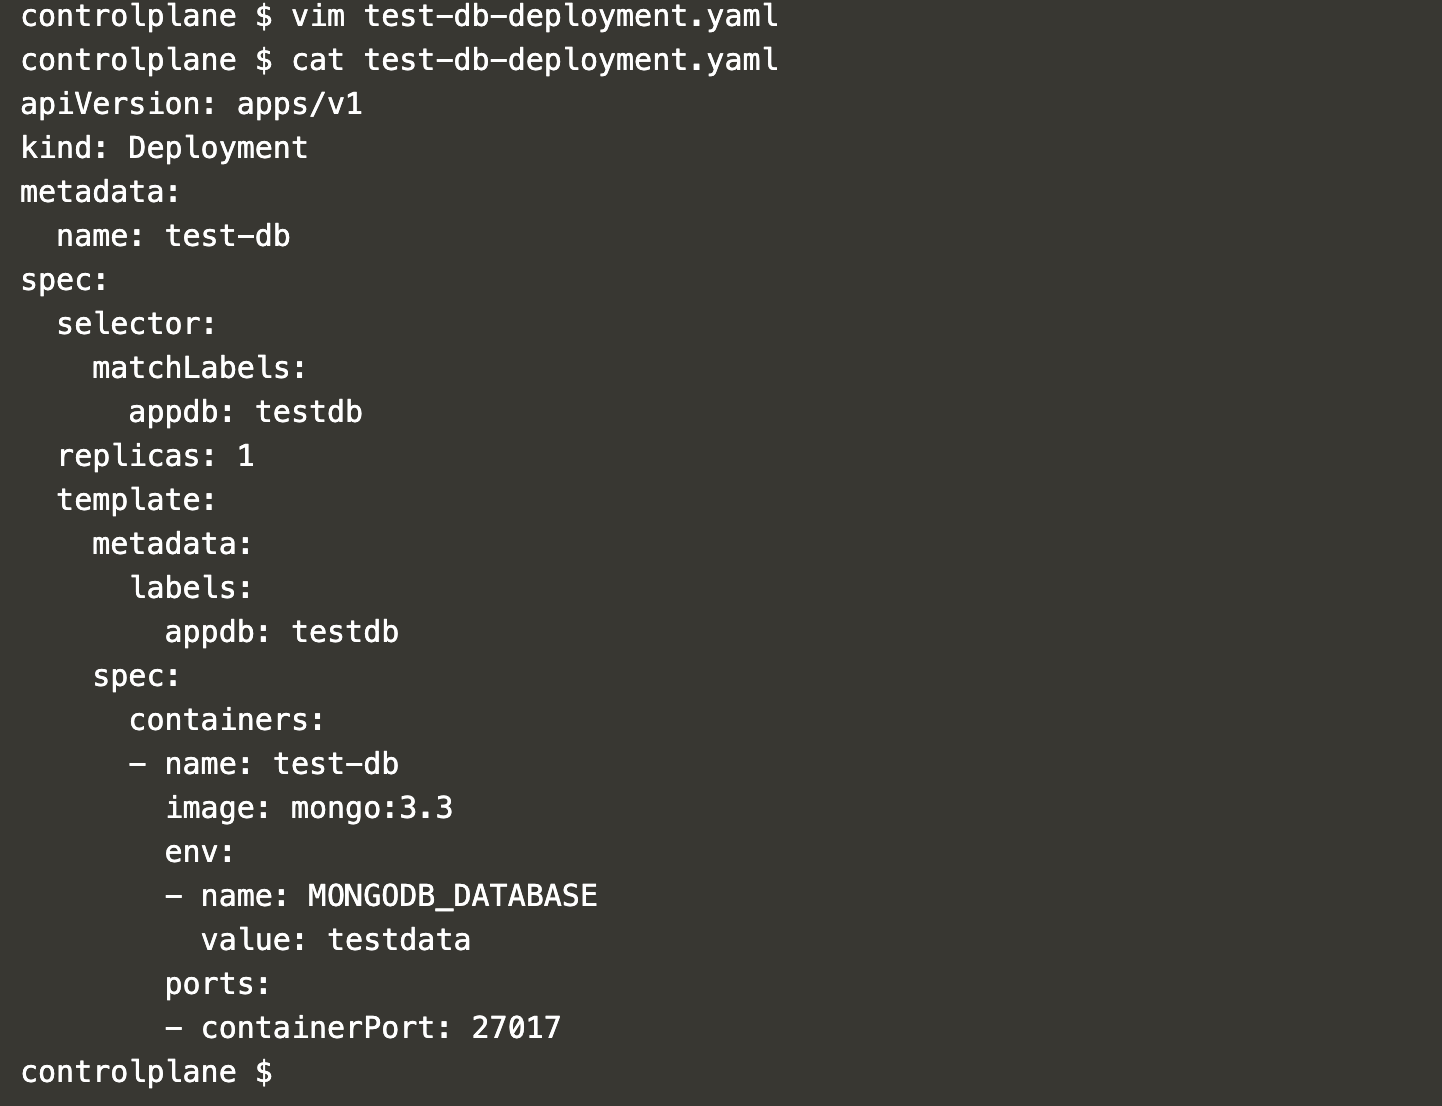
Create a new file named "test-db-deployment.yaml" with the following content. This will define a deployment of MongoDB which will act as a database, a backend layer.
vim test-db-deployment.yaml
apiVersion: apps/v1
kind: Deployment
metadata:
  name: test-db
spec:
  selector:
    matchLabels:
      appdb: testdb
  replicas: 1
  template:
    metadata:
      labels:
        appdb: testdb
    spec:
      containers:
      - name: test-db
        image: mongo:3.3
        env:
        - name: MONGODB_DATABASE
          value: testdata
        ports:
        - containerPort: 27017
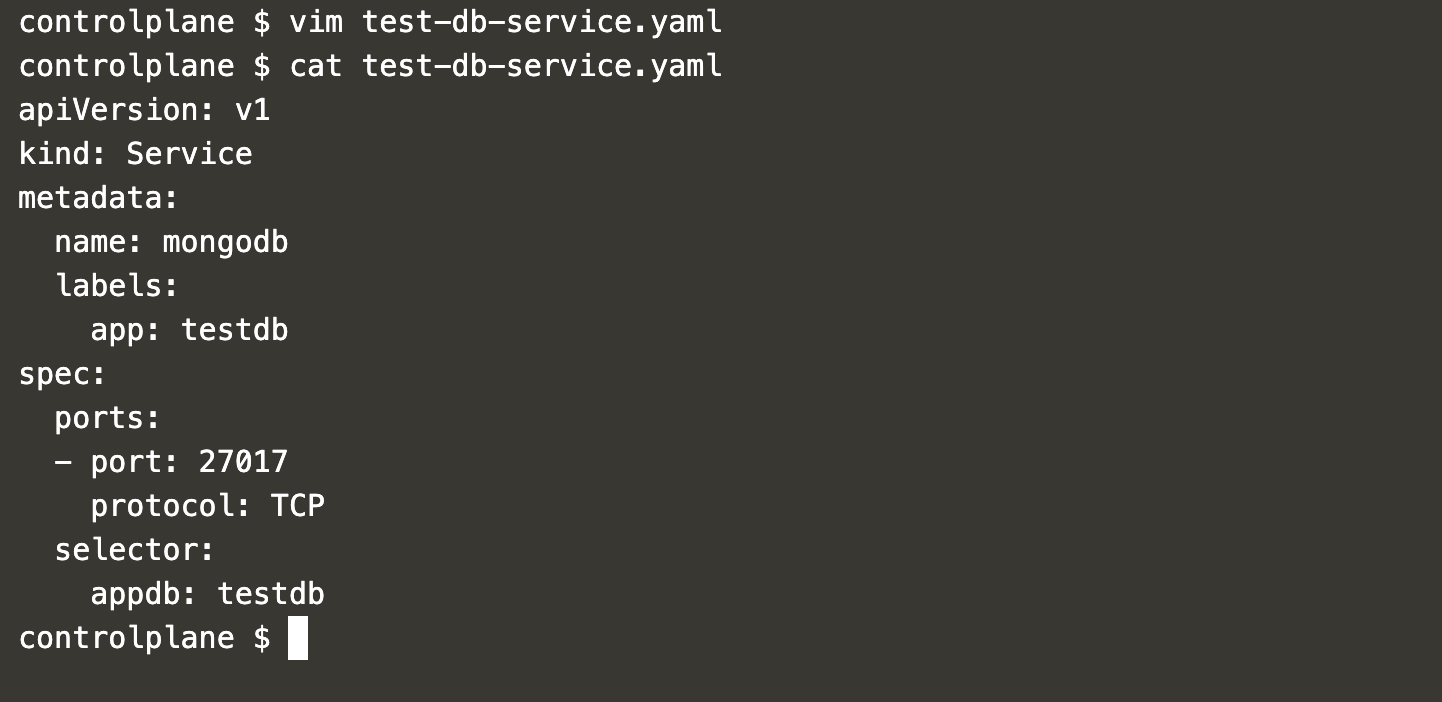
Now, create a service that will serve requests to the MongoDB from our frontend application. This service will listen on Port 27017 and forward requests to MongoDB on the same port.
vim test-db-service.yaml
apiVersion: v1
kind: Service
metadata:
  name: mongodb
  labels:
    app: testdb
spec:
  ports:
  - port: 27017
    protocol: TCP
  selector:
    appdb: testdb
The next step is to define a frontend application. Create a new file containing the following deployment definition.
This will listen on Port 5000.
Requests to MongoDB will be forwarded to MONGODB_HOST i.e. mongodb service.
vim test-web-deployment.yaml
apiVersion: apps/v1
kind: Deployment
metadata:
  name: test
spec:
  selector:
    matchLabels:
      app: test
  replicas: 1
  template:
    metadata:
      labels:
        app: test
    spec:
      containers:
      - name: test-app
        image: teamcloudyuga/rsvpapp
        env:
        - name: MONGODB_HOST
          value: mongodb
        ports:
        - containerPort: 5000
          name: web-port

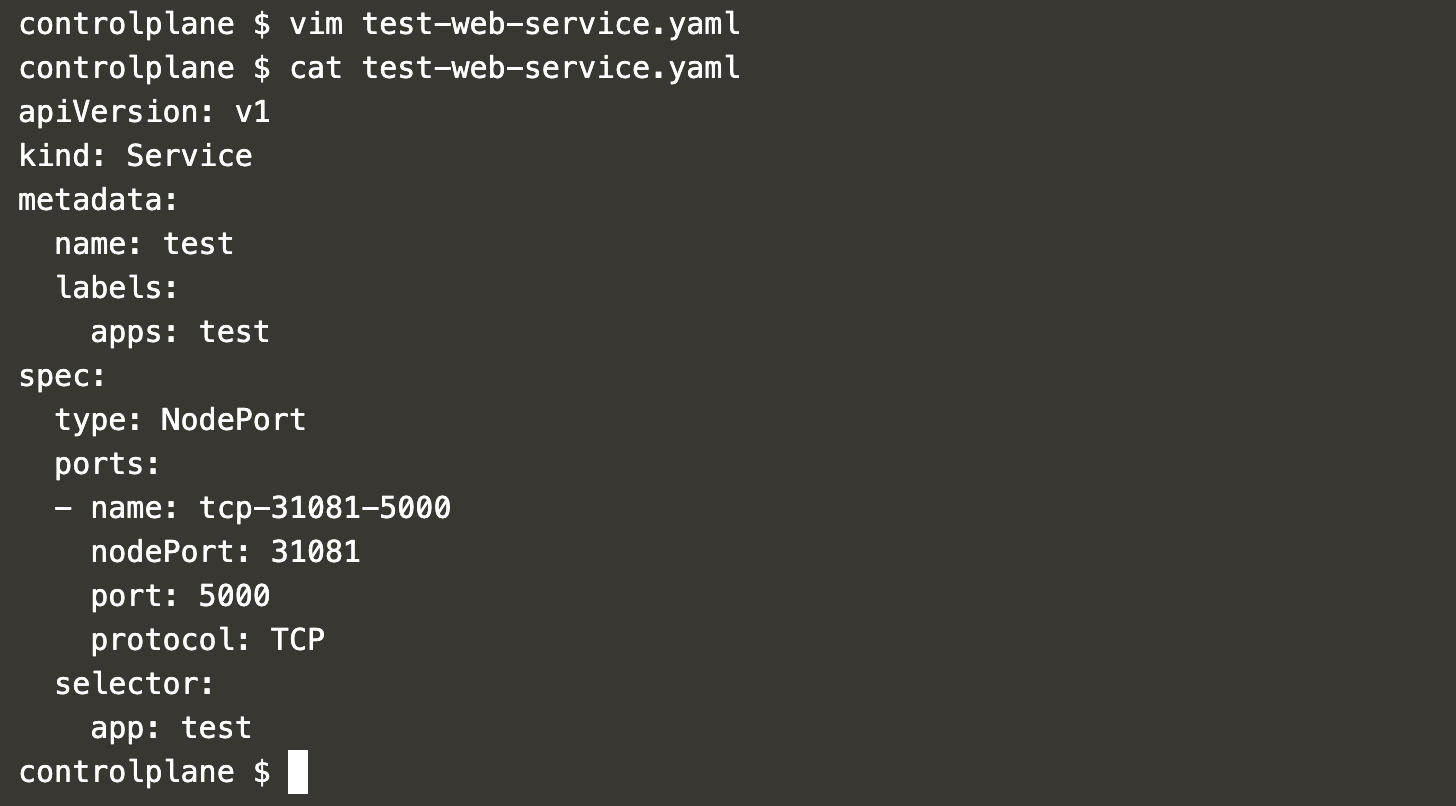
To access the frontend, we will create a service of type NodePort listening on Port 31081. This means the Python Flask Webserver can be accessed on IP=IP-Of-Any-Node and Port=31081. Create a new with the following service definition.
vim test-web-service.yaml
apiVersion: v1
kind: Service
metadata:
  name: test
  labels:
    apps: test
spec:
  type: NodePort
  ports:
  - name: tcp-31081-5000
    nodePort: 31081
    port: 5000
    protocol: TCP
  selector:
    app: test
Now, we are all set to create a 2 tier sample application. Before we proceed, let's check if the cluster has any objects.
Execute the following commands to check pods, deployments and services running in the cluster.
kubectl get pods
kubectl get deployments
kubectl get service
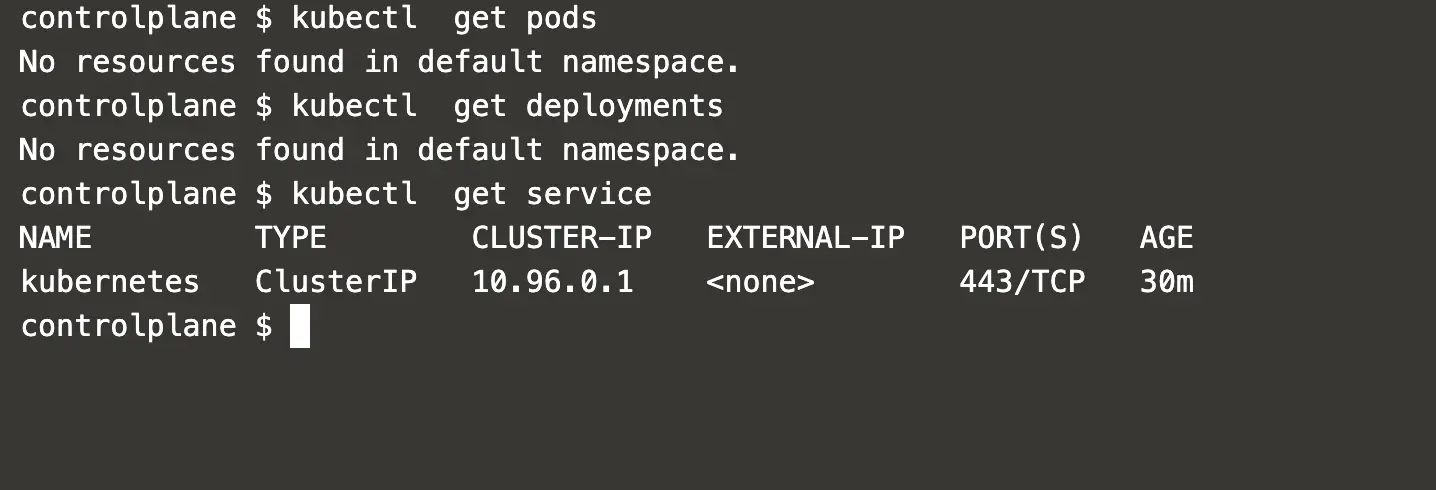
In the above screenshot, it can be seen that there is only 1 kubernetes default service in the cluster.
Now, execute the following command one by one from the directory where you have created 4 files to create MongoDB deployment, MongoDB service, Python Flask Webserver deployment and Python Flask Webserver service.
kubectl create -f test-db-deployment.yaml
kubectl create -f test-db-service.yaml
kubectl create -f test-web-deployment.yaml
kubectl create -f test-web-service.yaml

In the above screenshot, you can see that the MongoDB deployment, MongoDB service, Python Flask Webserver deployment and Python Flask Webserver service have been created successfully.
To verify the same, execute the following commands.
kubectl get pods
kubectl get deployments
kubectl get service
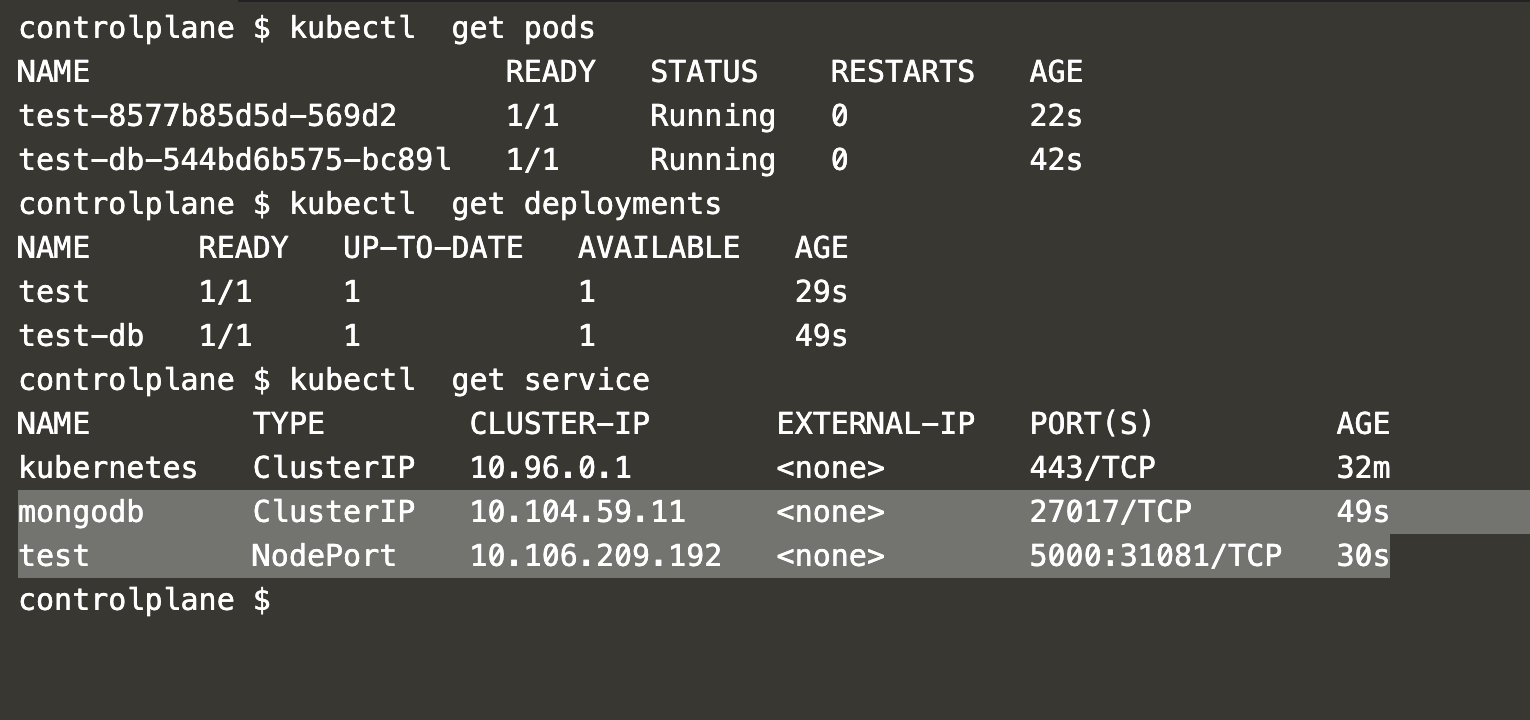
In the following screenshot, you can see that 2 pods and 2 services have been created. The pods which been created are controlled by the deployment we created.
Now, we are all set to access the application on IP-of-any-Node:NodePort i.e. IP-of-any-Node:31081.
Once you hit the URL in the browser, you will see the application as follows. This is a sample application that uses the publicly available docker image and belongs to CloudYuga. Here you can see that the RSVP count is 0, this means MongoDB does not have any data in it.

Now, we can add a few demo entries.
Upon adding a few entries, we can see that the count has changed. This means the data has been stored in MongoDB.

Now, when you no longer need these applications, you can delete all the objects by executing the following command from the directory where you have all your Kubernetes object files.
kubectl delete -f .

The above command will delete MongoDB deployment, MongoDB service, Python Flask Webserver deployment and Python Flask Webserver service that we created.
To check if all the objects we created have been deleted successfully, execute the following command.
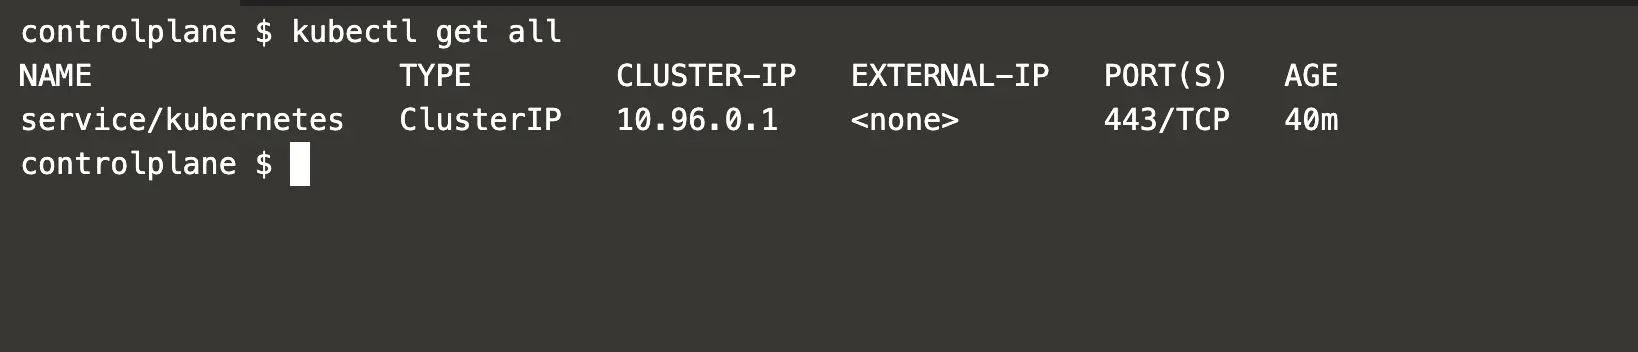
kubectl get all
In the following screenshot, you can see that there is only one default kubernetes service and the objects we had created no longer exist.
Conclusion
In this article, we created a deployment of the MongoDB backend database and service to access the database and for the frontend, we created Python Flask-based application deployment and service to access this frontend. We also saw the data getting stored in the backend database. This is a sample 2 tier application that uses publicly available docker images.

