
Wiring Libraries with Cleanse
Gain control of your dependency graph with Wiring Libraries
Cleanse is a Swift dependency injection framework we introduced in 2016. Since then, we’ve added several new features and it continues to be a tool that our developers enjoy using to reduce boilerplate and configure their dependency graphs.
Even with these benefits, we’re always looking for better ways to leverage the power that comes with Cleanse. Today, we’ll discuss how extracting our bindings, modules and components into what we call "wiring libraries" has given us greater control over configuring the dependencies we want to include (or exclude) between our App Store applications, UI testing targets, and development apps.
What do Wiring Libraries Look Like?
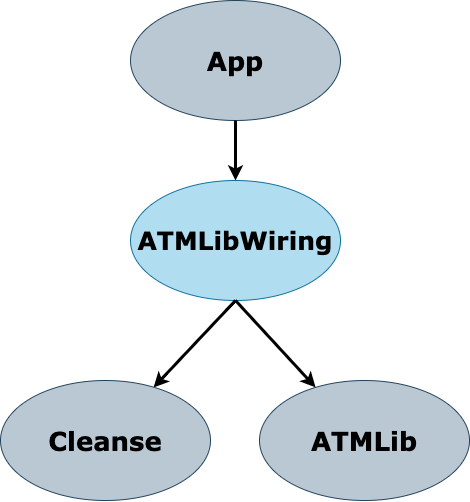
Wiring libraries, simply put, are where we perform dependency injection via Cleanse by creating bindings, modules, and components for the objects that are injected into our applications. Each wiring library has a one-to-one mapping with our core libraries. Consider, for example, an ATM library (ATMLib_)_ that allows you to deposit cash.
ATMLib.swift
// <library> ATMLib
public struct Bill {
    public let amount: Double
}

public struct BillScanner {
    public func scan(bills: [Bill]) -> Double {
        return bills.reduce(into: 0.0) { (total, bill) in
            total += bill.amount
        }
    }
}

public struct ATMDepositer {
    let scanner: BillScanner

    public func deposit(bills: [Bill]) {
        let amount = scanner.scan(bills: bills)
        print("Deposited \(amount)!")
    }
}
Our ATMLib has two primary objects that live in the application’s dependency graph: BillScanner and ATMDepositer. Normally, we would add a source file to ATMLib that holds our Cleanse bindings and module for these two objects.
ATMLibModule.swift
// <library> ATMLib
import Cleanse

public struct ATMLibModule: Cleanse.Module {
    static func configure(binder: Binder<Unscoped>) {
        binder
            .bind(BillScanner.self)
            .to(factory: BillScanner.init)

        binder
            .bind(ATMDepositer.self)
            .to(factory: ATMDepositer.init)
    }
}
However, by compiling ATMLibModule.swift into ATMLib, we must add Cleanse as a dependency.

Instead of compiling our Cleanse configuration into ATMLib, let’s extract this file into a separate wiring library. Wiring libraries have 2 rules:
- The wiring library should only be responsible for creating Cleanse bindings, modules, and components. No business logic.
- The wiring library should only create bindings for the objects defined in our sibling library (i.e ATMLib). We shouldn’t create any bindings or include modules from other libraries. This rule is what gives us tremendous power to configure dependencies in just a few lines. More on this later.
By extracting our Cleanse bindings from ATMLibModule.swift into a new wiring library, ATMLibWiring, our core ATMLib no longer requires a dependency on Cleanse.
Pretty simple! Now let’s dive into why this decoupling is important and how it improves configuring the different layers of our object graphs.
Why We Create Wiring Libraries
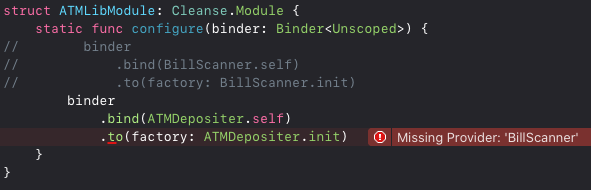
The first reason we create wiring libraries is because they help optimize a new open source tool we’ve added to Cleanse called cleansec, which parses your code and runs validations over your object graph (i.e missing dependencies, cyclical dependencies) during compilation. We’re excited about this tool because surfacing errors at compile-time is much faster than waiting until runtime, and it gives us peace of mind that when a build succeeds, all dependencies and objects will exist at launch. For example, if we forgot to create a binding for BillScanner inside ATMLibModule.swift, we would receive the following compile-time error in Xcode.
Wiring libraries prevent us from dramatically increasing overall build times by only allowing cleansec to parse the minimum subset of code needed to perform its validations.
Secondly, not every app at Square configures its object graph using Cleanse. Applications using manual dependency injection can reuse ATMLib without having to link Cleanse into their binary. Decoupling Cleanse from our core libraries also allows these apps to incrementally migrate towards Cleanse without having to convert all of their code at once.
Using Wiring Libraries
Now that we’ve created our ATMLibWiring library, let’s walk through an example for how wiring libraries allow us to swap different layers of the object graph with just a few lines of code.
Consider another library, Network, that contains a NetworkExecutor.
// <library> Network
public protocol NetworkExecutor {
    func updateAmount(_ amount: Double, _ callback: @escaping (Result<Double, Error>) -> Void)
}

public struct BankNetworkExecutor: NetworkExecutor {
    // note: Implementation is for demonstration and not fully complete.
    public func updateAmount(_ amount: Double, _ callback: @escaping (Result<Double, Error>) -> Void) {
        let session = URLSession.shared
        let url = URL(string: "https://myendpoint.co")!
        let task = session.dataTask(with: url, completionHandler: { data, response, error in
            if let e = error {
                callback(.failure(e))
            } else {
                // Maps response to an amount updated on the server.
                let amount = computeAmount(from: data)
                callback(.success(amount))
            }
        })
        task.resume()
    }
}
Let’s add our new NetworkExecutor as a dependency in ATMDepositer to update the user’s balance.
// <library> ATMLib
import Network

public struct ATMDepositer {
    let scanner: BillScanner
    let network: NetworkExecutor

    public func deposit(bills: [Bill]) {
        let amount = scanner.scan(bills: bills)
        network.updateAmount(amount) { result in
            switch result {
            case .success(let depositedAmount):
                print("Successfully deposited \(depositedAmount)!")
            case .failure(let error):
                print("Failed to deposit amount: \(error)")
            }
        }
    }
}
Let’s say we didn’t follow the rule that wiring libraries should only create bindings for objects in their sibling library and (incorrectly) create a binding for our NetworkExecutor within ATMLibModule.
// <library> ATMLibWiring
import ATMLib
import Cleanse
import Network

public struct ATMLibModule: Cleanse.Module {
    public static func configure(binder: Binder<Unscoped>) {
        binder
            .bind(BillScanner.self)
            .to(factory: BillScanner.init)
        binder
            .bind(ATMDepositer.self)
            .to(factory: ATMDepositer.init)

        // From 'Network' library
        binder
            .bind(NetworkExecutor.self)
            .to(factory: BankNetworkExecutor.init)
    }
}
Now when we create our object graph’s root component, we resolve all of our ATMLib and NetworkExecutor bindings by only including the ATMLibModule.
import ATMLibWiring
import Cleanse

struct ApplicationRootComponent: Cleanse.RootComponent {
    static func configure(binder: Binder<Unscoped>) {
        binder.include(module: ATMLibModule.self)
    }
    /*
     ...
     */
}
This presents difficulty when we want to include our ATMLibModule (BillScanner & ATMDepositer), but need to swap from a BankNetworkExecutor to a FakeNetworkExecutor for our UI tests. Tying our NetworkExecutor to the ATMLibModule makes it difficult to change implementations while reusing the bindings for BillScanner and ATMDepositer. To fix this, let’s move our NetworkExecutor binding into a separate NetworkWiring library.
// <library> NetworkWiring
import Cleanse
import Network

public struct BankNetworkModule: Cleanse.Module {
    public static func configure(binder: Binder<Unscoped>) {
        binder
            .bind(NetworkExecutor.self)
            .to(factory: BankNetworkExecutor.init)
    }
}
Now in our application’s root component, we can include the BankNetworkModule and ATMLibModule in our object graph. This approach makes it explicit which implementation (Real or Fake) we choose to include in our app.
import ATMLibWiring
import Cleanse
import NetworkWiring

struct ApplicationRootComponent: Cleanse.RootComponent {
    static func configure(binder: Binder<Unscoped>) {
        binder.include(module: ATMLibModule.self)
        binder.include(module: BankNetworkExecutor.self)
    }

    /*
     ...
     */
}
When we want to swap out the NetworkExecutor used by ATMDepositer, we can create new implementation and wiring libraries: FakeNetwork and FakeNetworkWiring.
FakeNetwork.swift
// <library> FakeNetwork
import Network

public struct FakeNetworkExecutor: NetworkExecutor {
    public func updateAmount(_ amount: Double, _ callback: @escaping (Result<Double, Error>) -> Void) {
        callback(.success(amount))
    }
}
FakeNetworkingWiring.swift
// <library> FakeNetworkWiring
import Cleanse
import FakeNetwork

public struct FakeBankNetworkModule: Cleanse.Module {
    public static func configure(binder: Binder<Unscoped>) {
        binder
            .bind(NetworkExecutor.self)
            .to(factory: FakeNetworkExecutor.init)
    }
}
Now, swapping implementations in our application is just a 2 line diff by changing imports and modules to include in our object graph.
 import ATMLibWiring
 import Cleanse
-import NetworkWiring
+import FakeNetworkWiring

 struct ApplicationRootComponent: Cleanse.RootComponent {
     static func configure(binder: Binder<Unscoped>) {
         binder.include(module: ATMLibModule.self)
-        binder.include(module: BankNetworkModule.self)
+        binder.include(module: FakeBankNetworkModule.self)
     }
 }
Wiring Libraries at Scale
For large applications that include thousands of dependencies, this design results in object graphs that configure hundreds of modules and components. In fact, some of our largest root components have over 600 included modules.
import Cleanse

struct SquareRootComponent: Cleanse.RootComponent {
    static func configure(binder: Binder<Singleton>) {
        binder.include(module: ATMLibModule.self)
        binder.include(module: BankNetworkExecutor.self)
        binder.include(module: RPCModule.self)
        binder.include(module: DepositUIModule.self)
        binder.include(module: FeatureFlagModule.self)
        binder.include(module: SettingsUIModule.self)
         /*
          ...
         */
     }
}
However, the wiring library structure has made it easier to discover which dependencies are included in your object graph, and subsequently swap them with different or fake implementations. This has been a huge win for enabling us to create development applications that can use fake wiring libraries with very shallow dependency graphs. Instead of compiling a library with hundreds of dependencies to develop a new independent screen, we can swap it out with a fake wiring library with only a couple dependencies to improve build times and Xcode IDE responsiveness.
Thinking beyond the benefits we’re seeing today, this structure lends itself to some future second-order optimizations as well. Once all of our libraries follow a similar wiring library format, we could potentially generate our applications’ root components based on the set of wiring libraries the application links. This is an interesting problem we’re beginning to explore in order to further optimize and improve our usage of Cleanse. You can stay up to date with the latest features and improvements at the Cleanse open source repo.
Authored By


