Here I am going to show you how to build REST web services in PHP based Codeigniter 4 framework. CodeIgniter 4 is the upcoming version of the framework and it is still under development, intended for use with PHP 7.2 or higher version. REST is an acronym that stands for Representational State Transfer (RESTful), which is an architectural style for distributed applications.
PHP based CodeIgniter framework enables developers to develop the projects much faster, it provides the core part that can easily be extended or replaced completely to make the system work smoothly. CodeIgniter makes it easy to create RESTful APIs for your resources, with its resource routes and ResourceController.
Recommended Reading:
Prerequisites
Make sure your CodeIgniter framework 4 has been setup before you proceed further down. The version of the CodeIgniter framework is 4.0.4 – 4.1.4 and the version of MySQL is 8.0.17 and version of PHP is 7.4.3 is used for this example.
Let’s move on to implementation of the basic CRUD (Create, Read, Update, Delete) application using CodeIgniter framework and MySQL database server.
Project Directory
It’s assumed that you have setup Apache, PHP and Codeigniter in Windows system.
Now I will create a project root directory called codeigniter-4-rest-api the Apache server’s htdocs folder.
Now move all the directories and files from CodeIgniter framework into codeigniter-4-rest-api directory.
I may not mention the project root directory in subsequent sections and I will assume that I am talking with respect to the project root directory.
MySQL Table
For this example I am going to create and insert some sample data into the table product.
CREATE TABLE `product` (
	`id` int unsigned COLLATE utf8mb4_unicode_ci NOT NULL AUTO_INCREMENT,
	`name` varchar(100) COLLATE utf8mb4_unicode_ci NOT NULL,
	`price` double COLLATE utf8mb4_unicode_ci NOT NULL,
	`sale_price` double COLLATE utf8mb4_unicode_ci NOT NULL,
	`sales_count` int unsigned COLLATE utf8mb4_unicode_ci NOT NULL,
	`sale_date` VARCHAR(20) NOT NULL,
	PRIMARY KEY (`id`)
) ENGINE=InnoDB AUTO_INCREMENT=1 DEFAULT CHARSET=utf8mb4 COLLATE=utf8mb4_unicode_ci;

insert into product(id,name,price,sale_price,sales_count,sale_date) values(1, 'Desktop','30000','35000','55','02-04-2018');
insert into product(id,name,price,sale_price,sales_count,sale_date) values(2, 'Desktop','30300','37030','43','03-04-2018');
insert into product(id,name,price,sale_price,sales_count,sale_date) values(3, 'Tablet','39010','48700','145','04-04-2018');
insert into product(id,name,price,sale_price,sales_count,sale_date) values(4, 'Phone','15000','17505','251','05-04-2018');
insert into product(id,name,price,sale_price,sales_count,sale_date) values(5, 'Phone','18000','22080','178','05-04-2018');
insert into product(id,name,price,sale_price,sales_count,sale_date) values(6, 'Tablet','30500','34040','58','05-04-2018');
insert into product(id,name,price,sale_price,sales_count,sale_date) values(7, 'Adapter','2000','2500','68','06-04-2018');
insert into product(id,name,price,sale_price,sales_count,sale_date) values(8, 'TV','45871','55894','165','07-04-2018');
Database Configuration
You need to setup database connection in order to fetch or write data to the table. The following configuration is done in the file app/Config/Database.php under the default group of database setting. Make sure you change or update the configuration according to yours.
public $default = [
	'DSN'      => '',
	'hostname' => 'localhost',
	'username' => 'root',
	'password' => 'root',
	'database' => 'roytuts',
	'DBDriver' => 'MySQLi',
	'DBPrefix' => '',
	'pConnect' => false,
	'DBDebug'  => (ENVIRONMENT !== 'production'),
	'cacheOn'  => false,
	'cacheDir' => '',
	'charset'  => 'utf8mb4',
	'DBCollat' => 'utf8mb4_unicode_ci',
	'swapPre'  => '',
	'encrypt'  => false,
	'compress' => false,
	'strictOn' => false,
	'failover' => [],
	'port'     => 3306,
];
Route Configuration
You also need to configure route to point to your own controller file instead of the default controller that comes with the framework. Search for the line $routes->get('/', 'Home::index'); and replace it by your resource controller name, for this example, $routes->resource('product');. The following route configuration is done on the file app/Config/Routes.php.
//$routes->get('/', 'Home::index');
$routes->resource('product');
Model
You need a model class to perform database activities, for example, for implementing CRUD operations. The below model class is written into app/Models/ProductModel.php file.
In CodeIgniter you can choose two ways of modeling your data – using CodeIgniter’s model and using entity class. I am using CodeIgniter’s model to create my own model that extends CodeIgniter’s model class. They come out of the box with helper methods for much of the standard ways you would need to interact with a database table, including finding records, updating records, deleting records, and more.
<?php
namespace App\Models;
use CodeIgniter\Model;

class ProductModel extends Model {

	protected $table      = 'product';
    protected $primaryKey = 'id';

	protected $returnType     = 'array';

    protected $allowedFields = ['name', 'price', 'sale_price', 'sales_count', 'sale_date'];

    protected $validationRules    = [];
    protected $validationMessages = [];
    protected $skipValidation     = false;

}
The model class has a few configuration options that can be set to allow the class’ methods to work seamlessly for you.
$table – specifies the database table that this model primarily works with. This only applies to the built-in CRUD methods. You are not restricted to using only this table in your own queries.
$primaryKey – this is the name of the column that uniquely identifies the records in this table. This does not necessarily have to match the primary key that is specified in the database, but is used with methods like find() to know what column to match the specified value to.
$returnType – the Model’s CRUD methods will take a step of work away from you and automatically return the resulting data, instead of the Result object. This setting allows you to define the type of data that is returned. Valid values are ‘array’, ‘object’, or the fully qualified name of a class that can be used with the Result object’s getCustomResultObject() method.
$allowedFields – this array should be updated with the field names that can be set during save, insert, or update methods. Any field names other than these will be discarded. This helps to protect against just taking input from a form and throwing it all at the model, resulting in potential mass assignment vulnerabilities.
$validationRules – contains either an array of validation rules as described in How to save your rules or a string containing the name of a validation group, as described in the same section. Described in more detail below.
$validationMessages – contains an array of custom error messages that should be used during validation.
$skipValidation – whether validation should be skipped during all inserts and updates. The default value is false, meaning that data will always attempt to be validated. This is primarily used by the skipValidation() method, but may be changed to true so this model will never validate.
Controller
The following resource controller (app/Controllers/Product.php) defines endpoints for REST APIs and interact with database table to perform the required activities.
You load your model class by overriding the $modelName property and response format from your REST APIs using $format property.
In the above you saw I created RESTful routes for a single resource with resources() method while configuring the route for this example. This creates the five most common routes needed for full CRUD of a resource: create a new resource, update an existing one, list all of that resource, show a single resource, and delete a single resource. The first parameter is the resource name. Therefore, $routes->resource('product'); is equivalent to the following:
$routes->get('product/new',             'Product::new');
$routes->post('product',                'Product::create');
$routes->get('product',                 'Product::index');
$routes->get('product/(:segment)',      'Product::show/$1');
$routes->get('product/(:segment)/edit', 'Product::edit/$1');
$routes->put('product/(:segment)',      'Product::update/$1');
$routes->patch('product/(:segment)',    'Product::update/$1');
$routes->delete('product/(:segment)',   'Product::delete/$1');
Let’s implement RESTful endpoints in the following resource controller class:
<?php
namespace App\Controllers;

use CodeIgniter\RESTful\ResourceController;
use CodeIgniter\HTTP\RequestInterface;

class Product extends ResourceController {

    protected $modelName = 'App\Models\ProductModel';
    protected $format    = 'json';

	// fetch all products
    public function index() {
        return $this->respond($this->model->findAll());
    }

    // save new product info
    public function create() {
		// get posted JSON
		//$json = json_decode(file_get_contents("php://input", true));
		$json = $this->request->getJSON();

		$name = $json->name;
		$price = $json->price;
		$sale_price = $json->sale_price;
		$sales_count = $json->sales_count;
		$sale_date = $json->sale_date;

		$data = array(
			'name' => $name,
			'price' => $price,
			'sale_price' => $sale_price,
			'sales_count' => $sales_count,
			'sale_date' => $sale_date
		);

        $this->model->insert($data);

        $response = array(
			'status'   => 201,
			'messages' => array(
				'success' => 'Product created successfully'
			)
		);

		return $this->respondCreated($response);
    }

    // fetch single product
    public function show($id = null) {
        $data = $this->model->where('id', $id)->first();

        if($data){
            return $this->respond($data);
        }else{
            return $this->failNotFound('No product found');
        }
    }

    // update product by id
    public function update($id = NULL){
		//$json = json_decode(file_get_contents("php://input", true));
		$json = $this->request->getJSON();

		$price = $json->price;
		$sale_price = $json->sale_price;

		$data = array(
			'id' => $id,
			'price' => $price,
			'sale_price' => $sale_price
		);

        $this->model->update($id, $data);

		$response = array(
			'status'   => 200,
			'messages' => array(
				'success' => 'Product updated successfully'
			)
		);

		return $this->respond($response);
    }

    // delete product by id
    public function delete($id = NULL){
        $data = $this->model->find($id);

        if($data) {
            $this->model->delete($id);

            $response = array(
                'status'   => 200,
                'messages' => array(
                    'success' => 'Product successfully deleted'
                )
            );

            return $this->respondDeleted($response);
        } else {
            return $this->failNotFound('No product found');
        }
    }
}
So you are done with the code implementation for your RESTful CRUD application. Now move on to test the application.
Testing the Application
I am not going to use any external server but CLI command to run the application. Make sure you start the MySQL database server before you start your application. If you want to use external server to run your application you can use. Execute the following command on your project root directory to run your application.
php spark serveYour application will be running on localhost and port 8080.
To test this application I am going to use Postman tool. You can use any REST client as per your convenience.
REST Endpoints
| HTTP Method | Endpoint | Description |
| GET | /product | List of products details |
| GET | /product/{id} | Single product details |
| POST | /product | Create or save a new product |
| PUT | /product/{id} | Update an existing product |
| DELETE | /product/{id} | Delete an existing product |
Fetch All Products
To fetch all products use the following request to send to the server and get all products details.
URL: http://localhost:8080/product
HTTP Method: GET
Response:
[
{
"id": "1",
"name": "Desktop",
"price": "30000",
"sale_price": "35000",
"sales_count": "55",
"sale_date": "02-04-2018"
},
{
"id": "2",
"name": "Desktop",
"price": "30300",
"sale_price": "37030",
"sales_count": "43",
"sale_date": "03-04-2018"
},
{
"id": "3",
"name": "Tablet",
"price": "39010",
"sale_price": "48700",
"sales_count": "145",
"sale_date": "04-04-2018"
},
{
"id": "4",
"name": "Phone",
"price": "15000",
"sale_price": "17505",
"sales_count": "251",
"sale_date": "05-04-2018"
},
{
"id": "5",
"name": "Phone",
"price": "18000",
"sale_price": "22080",
"sales_count": "178",
"sale_date": "05-04-2018"
},
{
"id": "6",
"name": "Tablet",
"price": "30500",
"sale_price": "34040",
"sales_count": "58",
"sale_date": "05-04-2018"
},
{
"id": "7",
"name": "Adapter",
"price": "2000",
"sale_price": "2500",
"sales_count": "68",
"sale_date": "06-04-2018"
},
{
"id": "8",
"name": "TV",
"price": "45871",
"sale_price": "55894",
"sales_count": "165",
"sale_date": "07-04-2018"
}
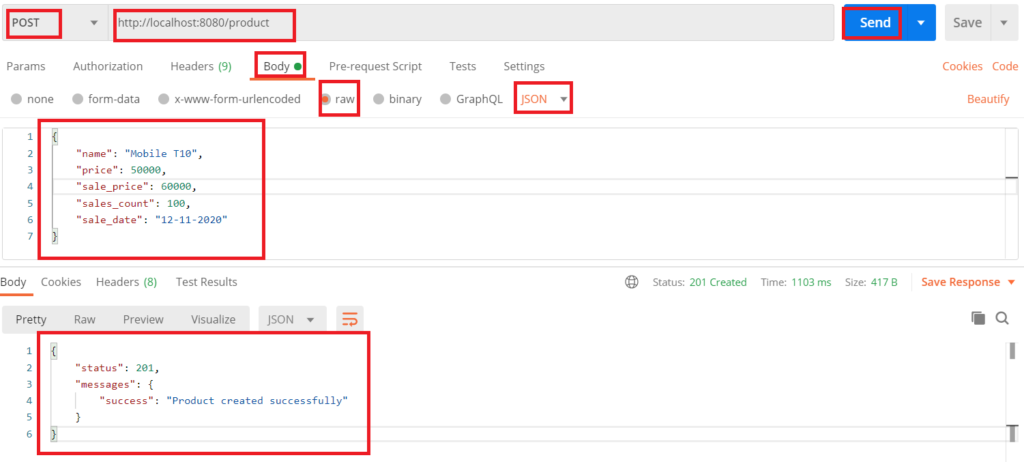
]Add New Product
To add a new product you need to use the following request.
URL: http://localhost:8080/product
HTTP Method: POST
Request Body:
{
    "name": "Mobile T10",
    "price": 50000,
    "sale_price": 60000,
    "sales_count": 100,
    "sale_date": "12-11-2020"
}
Response:
{
    "status": 201,
    "messages": {
        "success": "Product created successfully"
    }
}
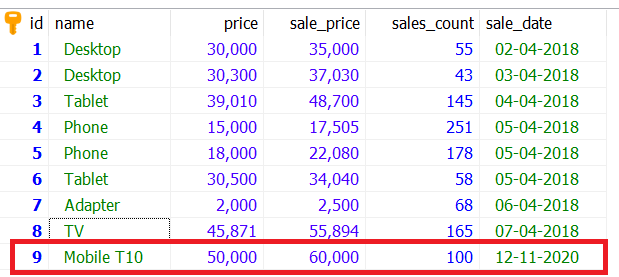
In the database you can check the new row:
Update Existing Product
To update existing product you can use the following in request.
URL: http://localhost:8080/product/9
HTTP Method: PUT
Request Body:
{
    "price": 55000,
    "sale_price": 65000
}
Response:
{
    "status": 200,
    "messages": {
        "success": "Product updated successfully"
    }
}
The row got updated in the database for product id 9:

Delete Existing Product
Delete an existing product using the following request.
URL: http://localhost:8080/product/9
HTTP Method: DELETE
Response:
{
    "status": 200,
    "messages": {
        "success": "Product successfully deleted"
    }
}
That’s all about REST API CRUD example in CodeIgniter framework 4.
how to fix probelm , when i post but the response from http://localhost/project-root/public/product is 500Internal Server Error
Check the browser console to get the error