

What You Will Build
In this tutorial, you will build a public feed app using Django. The app will allow users to post a message that is visible by everyone who comes to the app. You will also learn how to use Auth0 for authentication in your Django application.
For this tutorial, I'll assume you have experience with Django and its standard patterns. For this reason, I won't go in depth about things like setting up a Django app, for example.
In addition to the public-facing part of the app, you will add some moderation utilities to allow mods to both block users and hide posts from the feed. You will use Auth0 to handle the authentication, and you will add the authorization handling within the app to distinguish between the actions that non-users, users, and moderators can take. You will use the default Django admin to allow admin users to promote regular users to be a moderator by adding them to a particular group.
You can find the final code in this GitHub repository.
Requirements
This app will use:
But any Python version greater than 3.6 should work (because of f-strings), and any version over Django 2 should work. If you want to work with an older version of Python, anything over three should work as long you use something other than f-strings for string interpolation.
Build the App
To start, create a directory for the project and create a virtual environment. Once the virtual environment is ready, you can activate it and install Django.
mkdir django-auth0
cd django-auth0
python -m venv env
source env/bin/activate
pip install django
Now with Django installed, you need to create a project using django-admin and then you can create an app within that project that will have all the functionality you'll create in this tutorial.
django-admin startproject feed
cd feed/
python manage.py startapp feedapp
Open up feed/feed/settings.py, and add the feedapp to the list of installed apps.
INSTALLED_APPS = [
    'django.contrib.admin',
    'django.contrib.auth',
    'django.contrib.contenttypes',
    'django.contrib.sessions',
    'django.contrib.messages',
    'django.contrib.staticfiles',
    'feedapp',
]
Before doing anything else, it's a good idea to create a custom user model so you will have the most flexibility when changing the user model in the future. Even though there won't be any of those changes in this simple example, it's always a good idea to create the custom user model before running the first migration. You can place this user model in your feedapp model because the project will be simple. In a more complicated app, you could place the user model in an app that handles only authentication.
In feed/feedapp/models.py, add the following:
from django.db import models
# ...
from django.contrib.auth.models import AbstractUser

class User(AbstractUser):
    pass
Then you need to tell Django you want to use this as the user model. Add the following near the top of the settings.py file:
AUTH_USER_MODEL = 'feedapp.User'Now that you have the user model, you can migrate all the default tables. Then, create a super user so you can use the admin dashboard later.
python manage.py makemigrations
python manage.py migrate
python manage.py createsuperuser
Then you will need to register the user model you created on the admin dashboard. Inside of feedapp/admin.py, you can register the model.
from django.contrib.auth.admin import UserAdmin
from .models import User

admin.site.register(User, UserAdmin)
Now that the user model is set up, it's time to move on to the models you will need for the app: Post and Report. The Post model will contain the information needed for a post, and the Report model will handle reports of users that moderators can respond to.
The Post model will need the following data:
user— who created the posttext— the actual text content of the postdate_posted— tracks when it was created so you can order by postshidden— used only when a moderator decides to hide a postdate_hidden— used only when a moderator decides to hide a posthidden_by— used only when a moderator decides to hide a post
Regarding the last three, moderators won't be allowed to delete any data. Instead, they will only be allowed to hide users, so hidden posts can be tracked and potentially unhidden.
You can go ahead and create that model now in models.py:
class Post(models.Model):
    user = models.ForeignKey(settings.AUTH_USER_MODEL, on_delete=models.CASCADE)
    text = models.CharField(max_length=280)
    date_posted = models.DateTimeField(auto_now_add=True)
    hidden = models.BooleanField(default=False)
    date_hidden = models.DateTimeField(blank=True, null=True)
    hidden_by = models.ForeignKey(settings.AUTH_USER_MODEL,on_delete=models.CASCADE, blank=True, null=True, related_name='mod_who_hid')

    def __str__(self):
        return self.text
Everything here is normal. The only difference is for creating foreign keys to the user model, you need to use the settings.AUTH_USER_MODEL to reference the user model instead of importing the model directly. You need to import settings from django.conf at the top of the file.
from django.conf import settingsThe other model you need is for making reports. You only need two fields here: post and reported_by, where post refers to the post that got reported and reported_by is the user who created the report. Like the post model, you will use the settings.AUTH_USER_MODEL for the table in the foreign key for reported_by. The post's foreign key simply points to the Post model you just created.
class Report(models.Model):
    reported_by = models.ForeignKey(settings.AUTH_USER_MODEL, on_delete=models.CASCADE)
    post = models.ForeignKey(Post, on_delete=models.CASCADE)
With the code for the models added, go ahead and make the migrations again and migrate them.
python manage.py makemigrations
python manage.py migrate
Finally, add the models to the admin dashboard in feed/feedapp/admin.py so you can view them on the admin dashboard later.
from .models import User, Post, Report

admin.site.register(User, UserAdmin)
admin.site.register(Post)
admin.site.register(Report)
Now that you have the models done, you can start the scaffolding for the views and then add some templates. You will also create URLs that will connect to the views. Start with the two views that will return HTML, the index view and the reports view, which will allow moderators to see all the posts that have been reported.
First, in views.py, you need to add the functions for those views. You can return a render function that will have template names passed to it. The templates haven't been created yet, but you can add their names anyway.
from django.shortcuts import render

def index(request):
    return render(request, 'feedapp/index.html')

def reports(request):
    return render(request, 'feedapp/reports.html')
Now that you have the views, add the two templates that you need. Create a template directory with a feedapp directory inside of your feedapp package and then create the two files: feed/feedapp/templates/feedapp/index.html and feedapp/templates/feedapp/reports.html. Also, you can create a base.html template since both templates will have common elements.
Paste the following into base.html:
<!DOCTYPE html>
<html>
  <head>
    <meta charset="utf-8">
    <meta name="viewport" content="width=device-width, initial-scale=1">
    <title>{% block title %}{% endblock %}</title>
    <link rel="stylesheet" href="https://cdn.jsdelivr.net/npm/bulma@0.9.0/css/bulma.min.css">
  </head>
  <body>
  <section class="hero is-info">
      <div class="hero-head">
        <nav class="navbar" role="navigation" aria-label="main navigation">
          <div id="navbarBasicExample" class="navbar-menu">
            <div class="navbar-start pl-2">
              <a href="/" class="navbar-item">Home</a>
            </div>
            <div class="navbar-end pr-2">
              <div class="navbar-item">
              </div>
            </div>
          </div>
        </nav>
        <div class="hero-body">
          <div class="container has-text-centered">
            <p class="title">{% block main_title %}{% endblock %}</p>
            <p class="subtitle">{% block sub_title %}{% endblock %}</p>
          </div>
        </div>
      </div>
    </section>
    <section class="section">
      <div class="container">
        {% block content %}{% endblock %}
      </div>
    </section>
  </body>
</html>
Note that you have both title blocks and a content block inside of the base template.
Next, you need the template code for the index.html. For now, you will have just enough to display the titles. You will fill in the rest later as you add functionality.
{% extends 'feedapp/base.html' %}
{% block title %}Home{% endblock %}
{% block main_title %}Public Feed{% endblock %}
{% block sub_title %}Leave a message for everyone to see!{% endblock %}
{% block content %}
{% endblock %}
For the reports in feedapp/reports.py:
{% extends 'feedapp/base.html' %}
{% block main_title %}Reported Posts{% endblock %}
{% block content %}
{% endblock %}
With the views created and the templates for them, the last thing you need to do is add URLs for the views.
You need to create a urls.py in your feedapp directory. And in it you need to give paths and combine them with the views.
Paste the following into feed/feedapp/urls.py:
from django.urls import path
from . import views

urlpatterns = [
    path('', views.index, name='index'),
    path('reports/', views.reports, name='reports'),
]
Finally, you will need to modify the existing feed/feed/urls.py in the main project directory to include the urls from the file you just created.
from django.urls import path, include

urlpatterns = [
    path('admin/', admin.site.urls),
    path('', include('feedapp.urls')),
]
Now you have a chance to run the server and make sure you don't have any errors. Start the server and navigate to the two URLs you have to make sure you can see blank pages and see the titles in the title bar in the browser.
python manage.py runserverView your app in the browser at http://localhost:8000/. You'll find the reports page at http://localhost:8000/reports.
Adding Authentication
Now that everything is working, you want to start adding some functionality to the app. Since you need users to create posts and make reports, you need to allow the concept of a user first. This is where Auth0 comes in. To continue, you will need an Auth0 account. You can sign up for a free Auth0 account here if you don't have one already.
Once you are in your Auth0 account, go to 'Accounts' from the dashboard. There, click on 'Create Application.' Give your app a name, and select "Regular Web Applications". With the app created, you can go to the "Settings" tab to see the information you will need soon to connect the Django app with Auth0. Also, this is the place where you can create some callback URLs so Auth0 can communicate with the app.
For the callback URLs, you can add http://127.0.0.1:8000/complete/auth0 and http://localhost:8000/complete/auth0 to cover both forms of localhost on your machine. For the logout URL, you can just add the base URL: http://127.0.0.1:8000 or http://localhost:8000.
Save the changes once you are done.
With the URLs added, you can go back to the Django app and integrate Auth0. First, you need to install a couple of libraries that will handle the connection: python-jose and [social-auth-django](Social Django). You can install those now after stopping the app.
pip install python-jose social-auth-app-djangoSocial Django will have some URLs, so you need to include them in the project's feed/url.py file.
path('', include('social_django.urls')),Since social Django creates some new migration files, you need to migrate the app.
python manage.py migrateAfter installing, you need to change some parts of the settings.py
INSTALLED_APPS = [
    'django.contrib.admin',
    'django.contrib.auth',
    'django.contrib.contenttypes',
    'django.contrib.sessions',
    'django.contrib.messages',
    'django.contrib.staticfiles',
    'feedapp',
    'social_django',
]

# .....

AUTH_USER_MODEL = 'feedapp.User'

# Auth0 settings
SOCIAL_AUTH_TRAILING_SLASH = False  # Remove trailing slash from routes
SOCIAL_AUTH_AUTH0_DOMAIN = '<YOUR-AUTH0-DOMAIN>'
SOCIAL_AUTH_AUTH0_KEY = '<YOUR-AUTH0-CLIENT-ID>'
SOCIAL_AUTH_AUTH0_SECRET = '<YOUR-AUTH0-CLIENT-SECRET>'
SOCIAL_AUTH_AUTH0_SCOPE = [
    'openid',
    'profile',
    'email'
]

AUTHENTICATION_BACKENDS = {
    'social_core.backends.auth0.Auth0OAuth2',
    'django.contrib.auth.backends.ModelBackend'
}

LOGIN_URL = '/login/auth0'
LOGIN_REDIRECT_URL = '/'
LOGOUT_REDIRECT_URL = '/'
You will have to replace the Auth0 domain, key, and secret settings with the values from your Auth0 account. Because your Auth0 client secret should remain confidential, make sure you add this file to your .gitignore if you plan to push your code to GitHub.
Once you have those settings, you are done with the Auth0 integration. Social Django will handle everything for you. When a user logs in through Auth0, a new record will be created in the user table. That user will then forever be associated with the person who logs in with Auth0 with the same credentials.
So to get the login working, you just need to add a link. You can add it to your homepage. First, you will have to check if the user is authenticated. If they are, you will show a logout link. If they aren't, then you will show the login link, which is the same one in your settings. Add the following to feedapp/base.html inside the navbar-end div:
<div class="navbar-end pr-2">
  <div class="navbar-item">
    <div class="buttons">
    <AmpContent>
      <a class="button is-primary" href="/logout/">Logout</a>

</AmpContent>

<NonAmpContent>

      <a class="button is-primary" href="/login/auth0">Login</a>

</NonAmpContent>
    </div>
  </div>
</div>
When you start the server and go to the home page, you should see a single link. Since you are not authenticated yet, you should see the Login link. Click the link and it will take your to the Auth0 universal sign-in. From there, you can sign in with either a Google account by default or your Auth0 account.
If you want to change the methods of authentication, you can do it on the Auth0 dashboard and easily support things like Facebook login, GitHub login, passwordless login, and more without changing anything inside of your app. Auth0 will handle everything related to identity for you. After you sign in, you should be redirected to the index, and you should see the logout link instead of the login link because you are now authenticated.
Now take a look at what happened in the database. Go to the admin dashboard, sign in with your superuser account you created at the beginning, and check out the models. Look at the User model first.
You should see two users: your admin user and a user for the method you just authenticated as. Because you have the email scope, you will already have an email associated with the account. You should notice there is no password available, so this user can never login through the admin dashboard, for example, but that's OK because you want all of the users to authenticate through Auth0.
Now, go back and check out the "User social auths". There, you should see the user you created. This will have a relationship to the user in the User table you just looked at, and it will also list Auth0 as the provider and give you a UID and extra data associated with the service the user authenticated through. As you can see here, Auth0 and Social Django handled everything for you. And as you saw on the index, you have an authenticated user because the logout link is visible instead of the login link. From here, you can treat the user object the same as you would had you created a native Django authentication system.
For the user to log out, you need to create another view that handles logging out. It's more than you had to do to get the user to log in, but as you will see, it's still only a few lines of code. You need to both log out the user in Django itself, and then you need to tell Auth0 you want to log the user out by redirecting to a URL you will craft with some of the settings.
Add the following to feedapp/views.py:
@login_required
def logout(request):
    django_logout(request)
    domain = settings.SOCIAL_AUTH_AUTH0_DOMAIN
    client_id = settings.SOCIAL_AUTH_AUTH0_KEY
    return_to = 'http://127.0.0.1:8000' # this can be current domain
    return redirect(f'https://{domain}/v2/logout?client_id={client_id}&returnTo={return_to}')
You need to import settings and the logout function to do this. Since the view is called logout, create an alias called django_logout for this.
from django.contrib.auth import logout as django_logout
from django.conf import settings
from django.contrib.auth.decorators import login_required
Finally, create a URL for the logout function in the app's urls.py file.
path('logout/', views.logout, name='logout'),You can test the logout link now. You will know it's working when you get redirected to the homepage and you see the login link again.
Now that you have an active user you can work with, start by allowing that user to add a post. In the index template, between the content block tags, add a form with a textbox to allow the user to add a post. Since you only want authenticated users to add a post, you want to guard the form with a check if the user is authenticated.
<AmpContent>
<form method="POST">
  <article class="media">
    <div class="media-content">
      <div class="field">
        <p class="control">
          {% csrf_token %}
          <div class="field has-addons">
            <div class="control is-expanded">
              {{ form.text }}
            </div>
            <div class="control">
              <button class="button is-info">Submit</button>
            </div>
          </div>
        </p>
      </div>
    </div>
  </article>
</form>

</NonAmpContent>
With the form created, you need to handle any data that the user submits. First, create a ModelForm for the Post model. Create a forms.py file in your feedapp directory, add the following:
from django.forms import ModelForm, Textarea

from .models import Post

class PostForm(ModelForm):
  class Meta:
    model = Post
    fields = ['text']
    widgets = {
      'text': TextInput(attrs={'class' : 'input', 'placeholder' : 'Say something...'}),
    }
Then in the views.py, in the index function, you need to add the code to handle a POST request. You can use the ModelForm to save the form to the database.
The only thing special you have to do here is associate the authenticated user with the post in the database. Don't commit the first save of the form. Instead, add the user first and then save it. After a successful save, you will redirect back to the index, which will use GET instead of POST.
So, in views.py, replace the index function with the following:
from django.shortcuts import render, redirect # update this
# ...
from .forms import PostForm # add this

def index(request):
  if request.method == 'POST':
    form = PostForm(request.POST)
    if form.is_valid():
      post = form.save(commit=False)
      post.user = request.user
      post.save()
      return redirect('index')
  else:
    form = PostForm()

  context = {'form' : form}

  return render(request, 'feedapp/index.html', context)
Be sure to import PostForm and redirect, as shown at the top.
Try submitting a few posts, and then go to the admin dashboard to make sure they made it into the database. You should see your user account associated with your Auth0 login associated with the post.
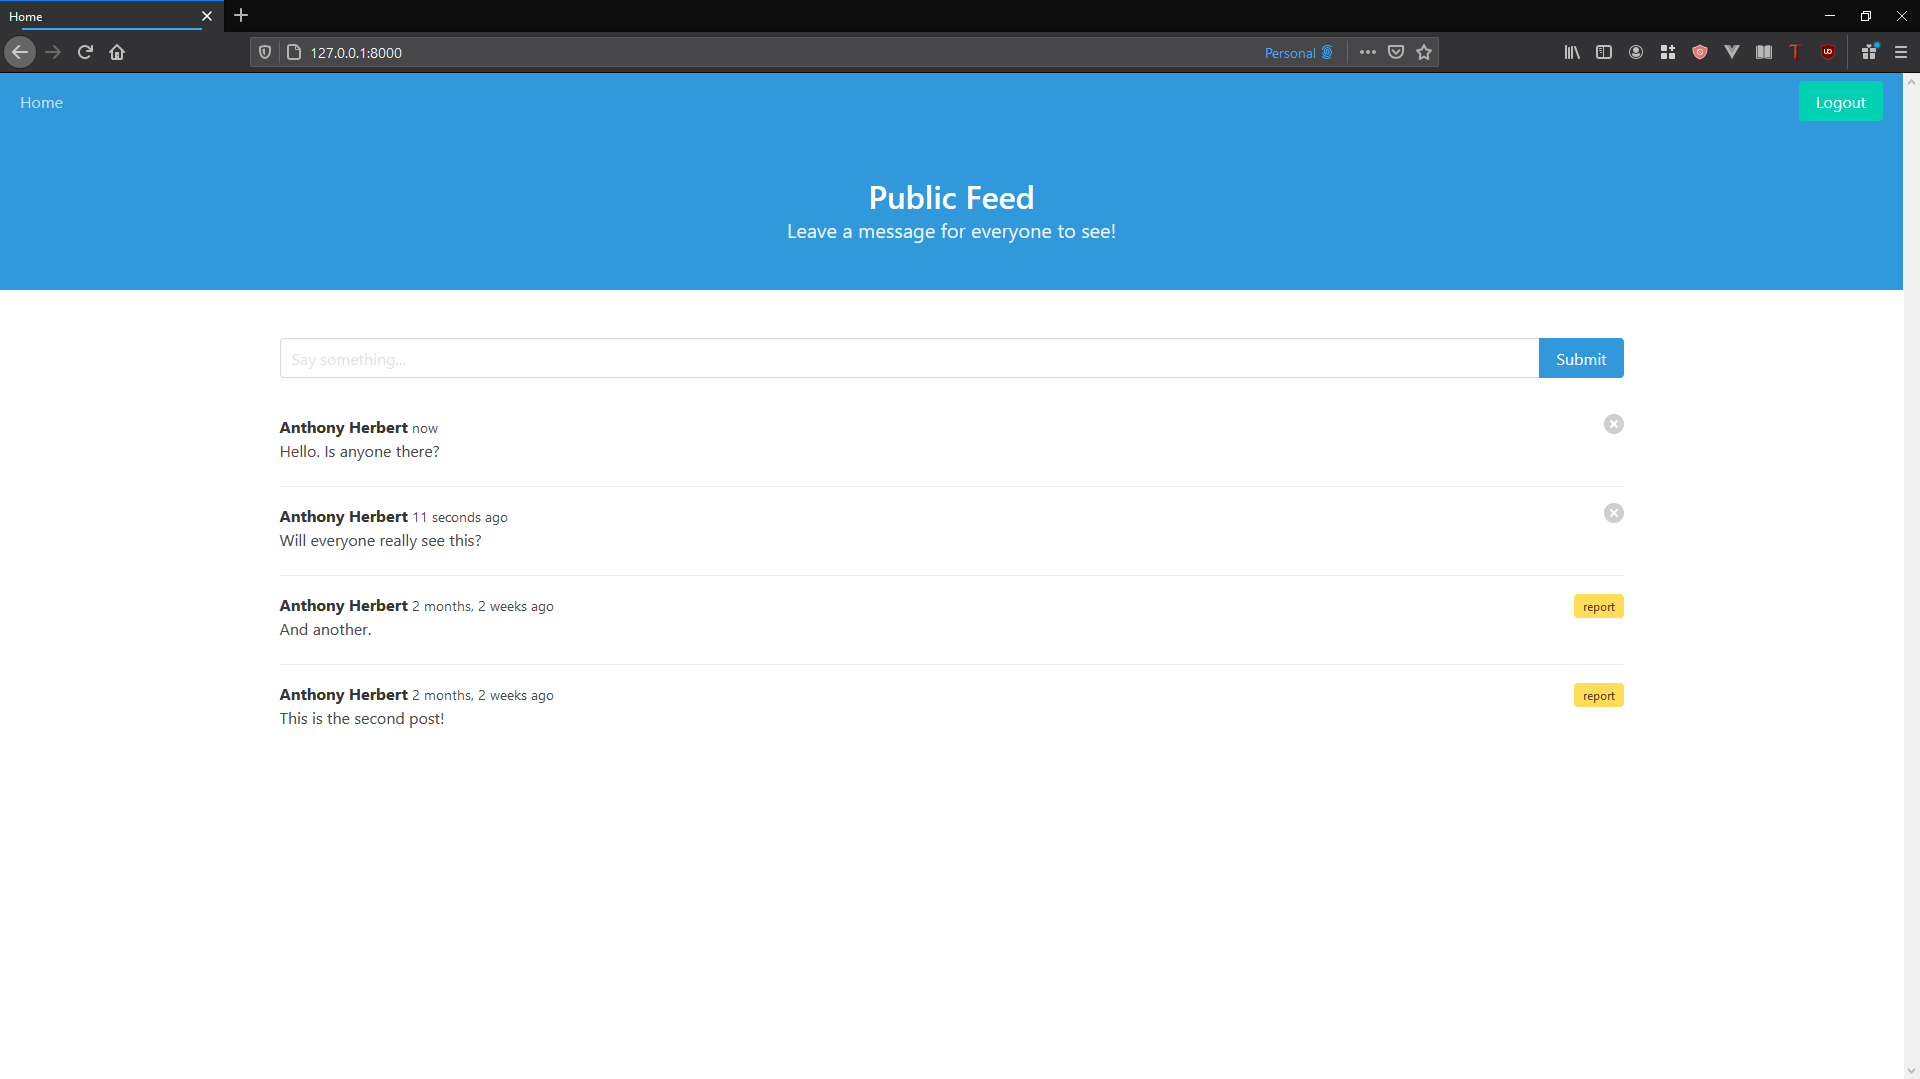
With the posts in the database, you can now add them to the homepage for the global feed. To do that, you need to modify the index function again. You need to query for all the posts in the database that aren't hidden and then pass that to the template. From there, you can display them.
Update views.py as follows:
from .models import Post

else:
  form = PostForm()
  posts = Post.objects.filter(hidden=False).order_by('-date_posted').all()

  context = {'form' : form, 'posts' : posts}
And in index.html, add the following:
{% load humanize %} <!-- at the top after extends -->

<!-- ... -->

<!-- form here -->

<!-- ... -->

<AmpContent>
  {% for post in posts %}
    <article class="media mt-5">
      <div class="media-content">
        <div class="content">
          <p>
            <strong>{{ post.user.first_name }} {{ post.user.last_name }}</strong>
            <small>{{ post.date_posted|naturaltime }}</small>
            <br>
            {{ post.text }}
          </p>
        </div>
      </div>
   </article>
  {% endfor %}

</AmpContent>

<NonAmpContent>

  <article class="media">
    <div class="media-content">
      <div class="content has-text-centered">
        <p>There are no posts.</p>
      </div>
    </div>
  </article>

</NonAmpContent>
Since you are using humanize to display the date, you need to both load it at the top of the template and add it to the installed apps in settings.py.
'django.contrib.humanize',Notice that you are using the first name and last name associate with the user that logged in through Auth0.
If you log out, you will still see the posts, but you will no longer have the option to add a new post.
Now you want to allow the user to delete their own posts as well. To do this, you need another view.
Add the following in views.py:
def delete_post(request, post_id):
  # check if post belongs to user
  post = Post.objects.get(id=post_id)
  if post.user == request.user:
      post.delete()
  # remove it from the database
  # redirect back to same page
  return redirect('index')
And then add a URL for it in urls.py:
path('delete/<post_id>/', views.delete_post, name='delete_post'),And then in the index template, check if the post belongs to the user. If so, add a delete link. Add the following in index.html right outside <div class="media-content">:
  <AmpContent>
    <div class="media-right">
      <a href="{% url 'delete_post' post.id %}" class="delete"></a>
    </div>

</NonAmpContent>
Try deleting one of your posts. If everything works, then it will redirect to the same page with the post you just deleted missing.
Now that you have posts on the site, you want the ability to moderate them. You will allow users to report posts made by other users, and you will then let moderators choose to block a user completely and/or hide their posts.
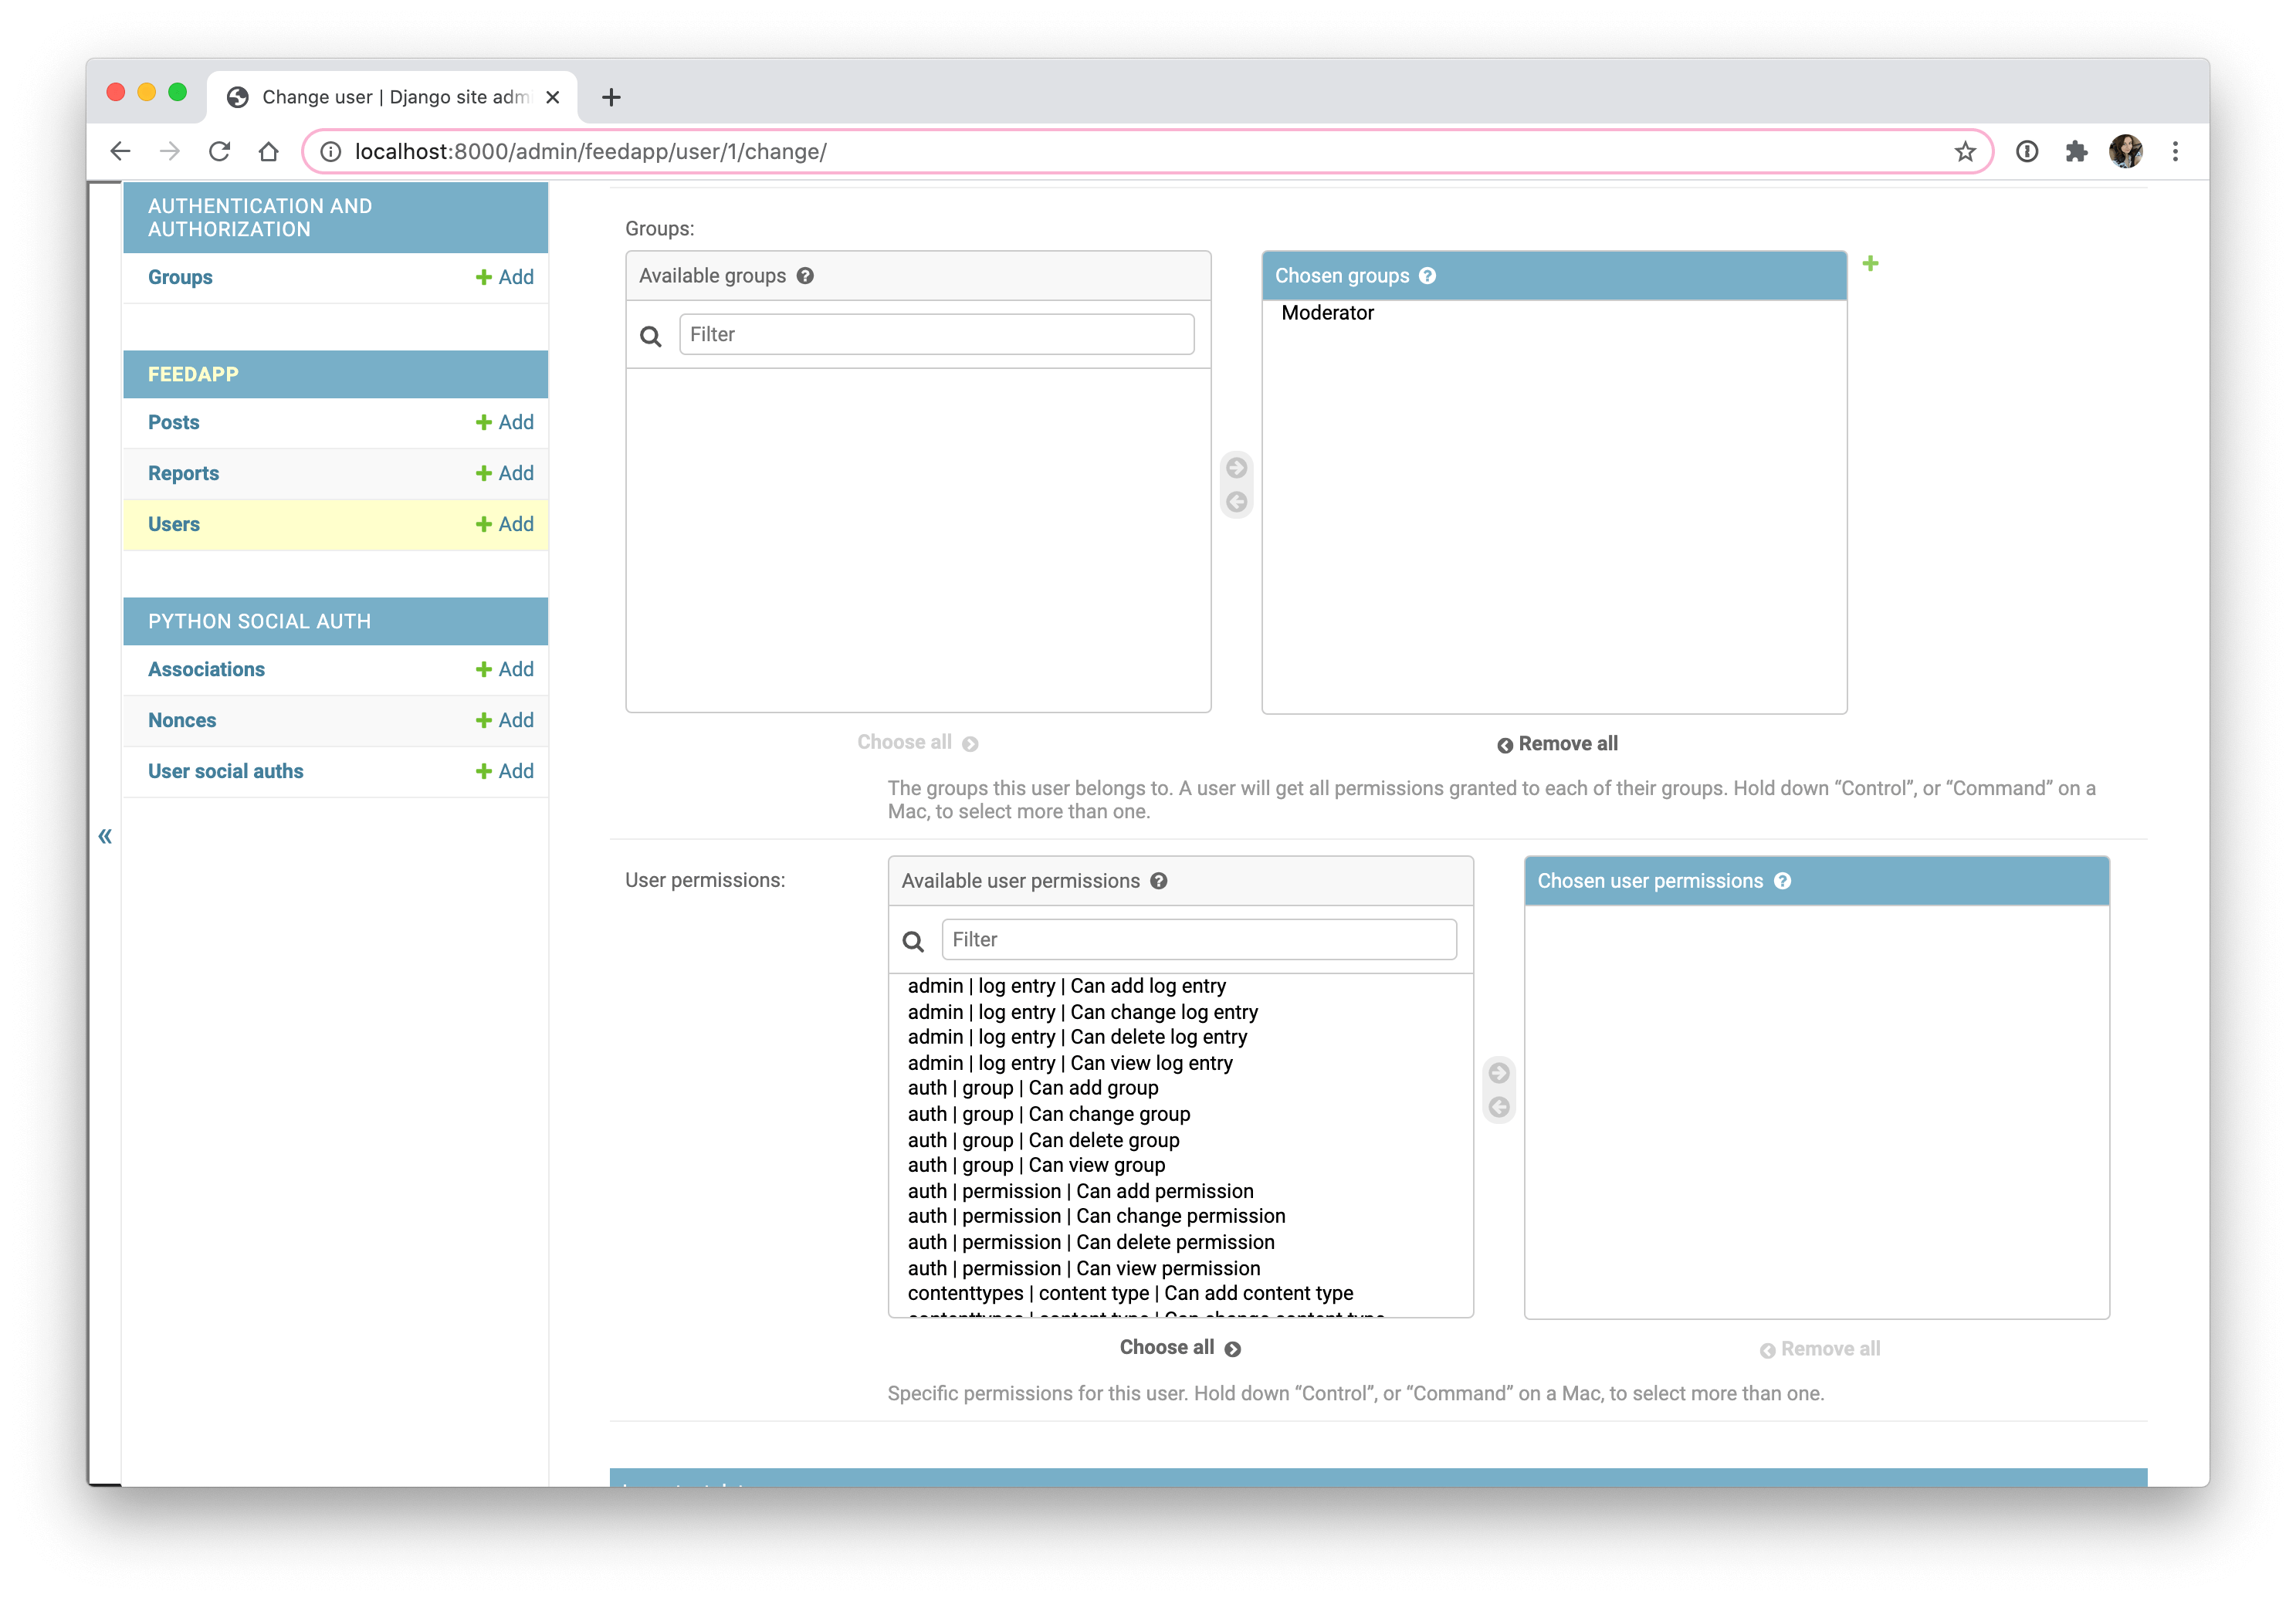
To get started with this, create a moderator group in the admin dashboard. The moderator group will be given access to change both posts and users and the ability to view reports.
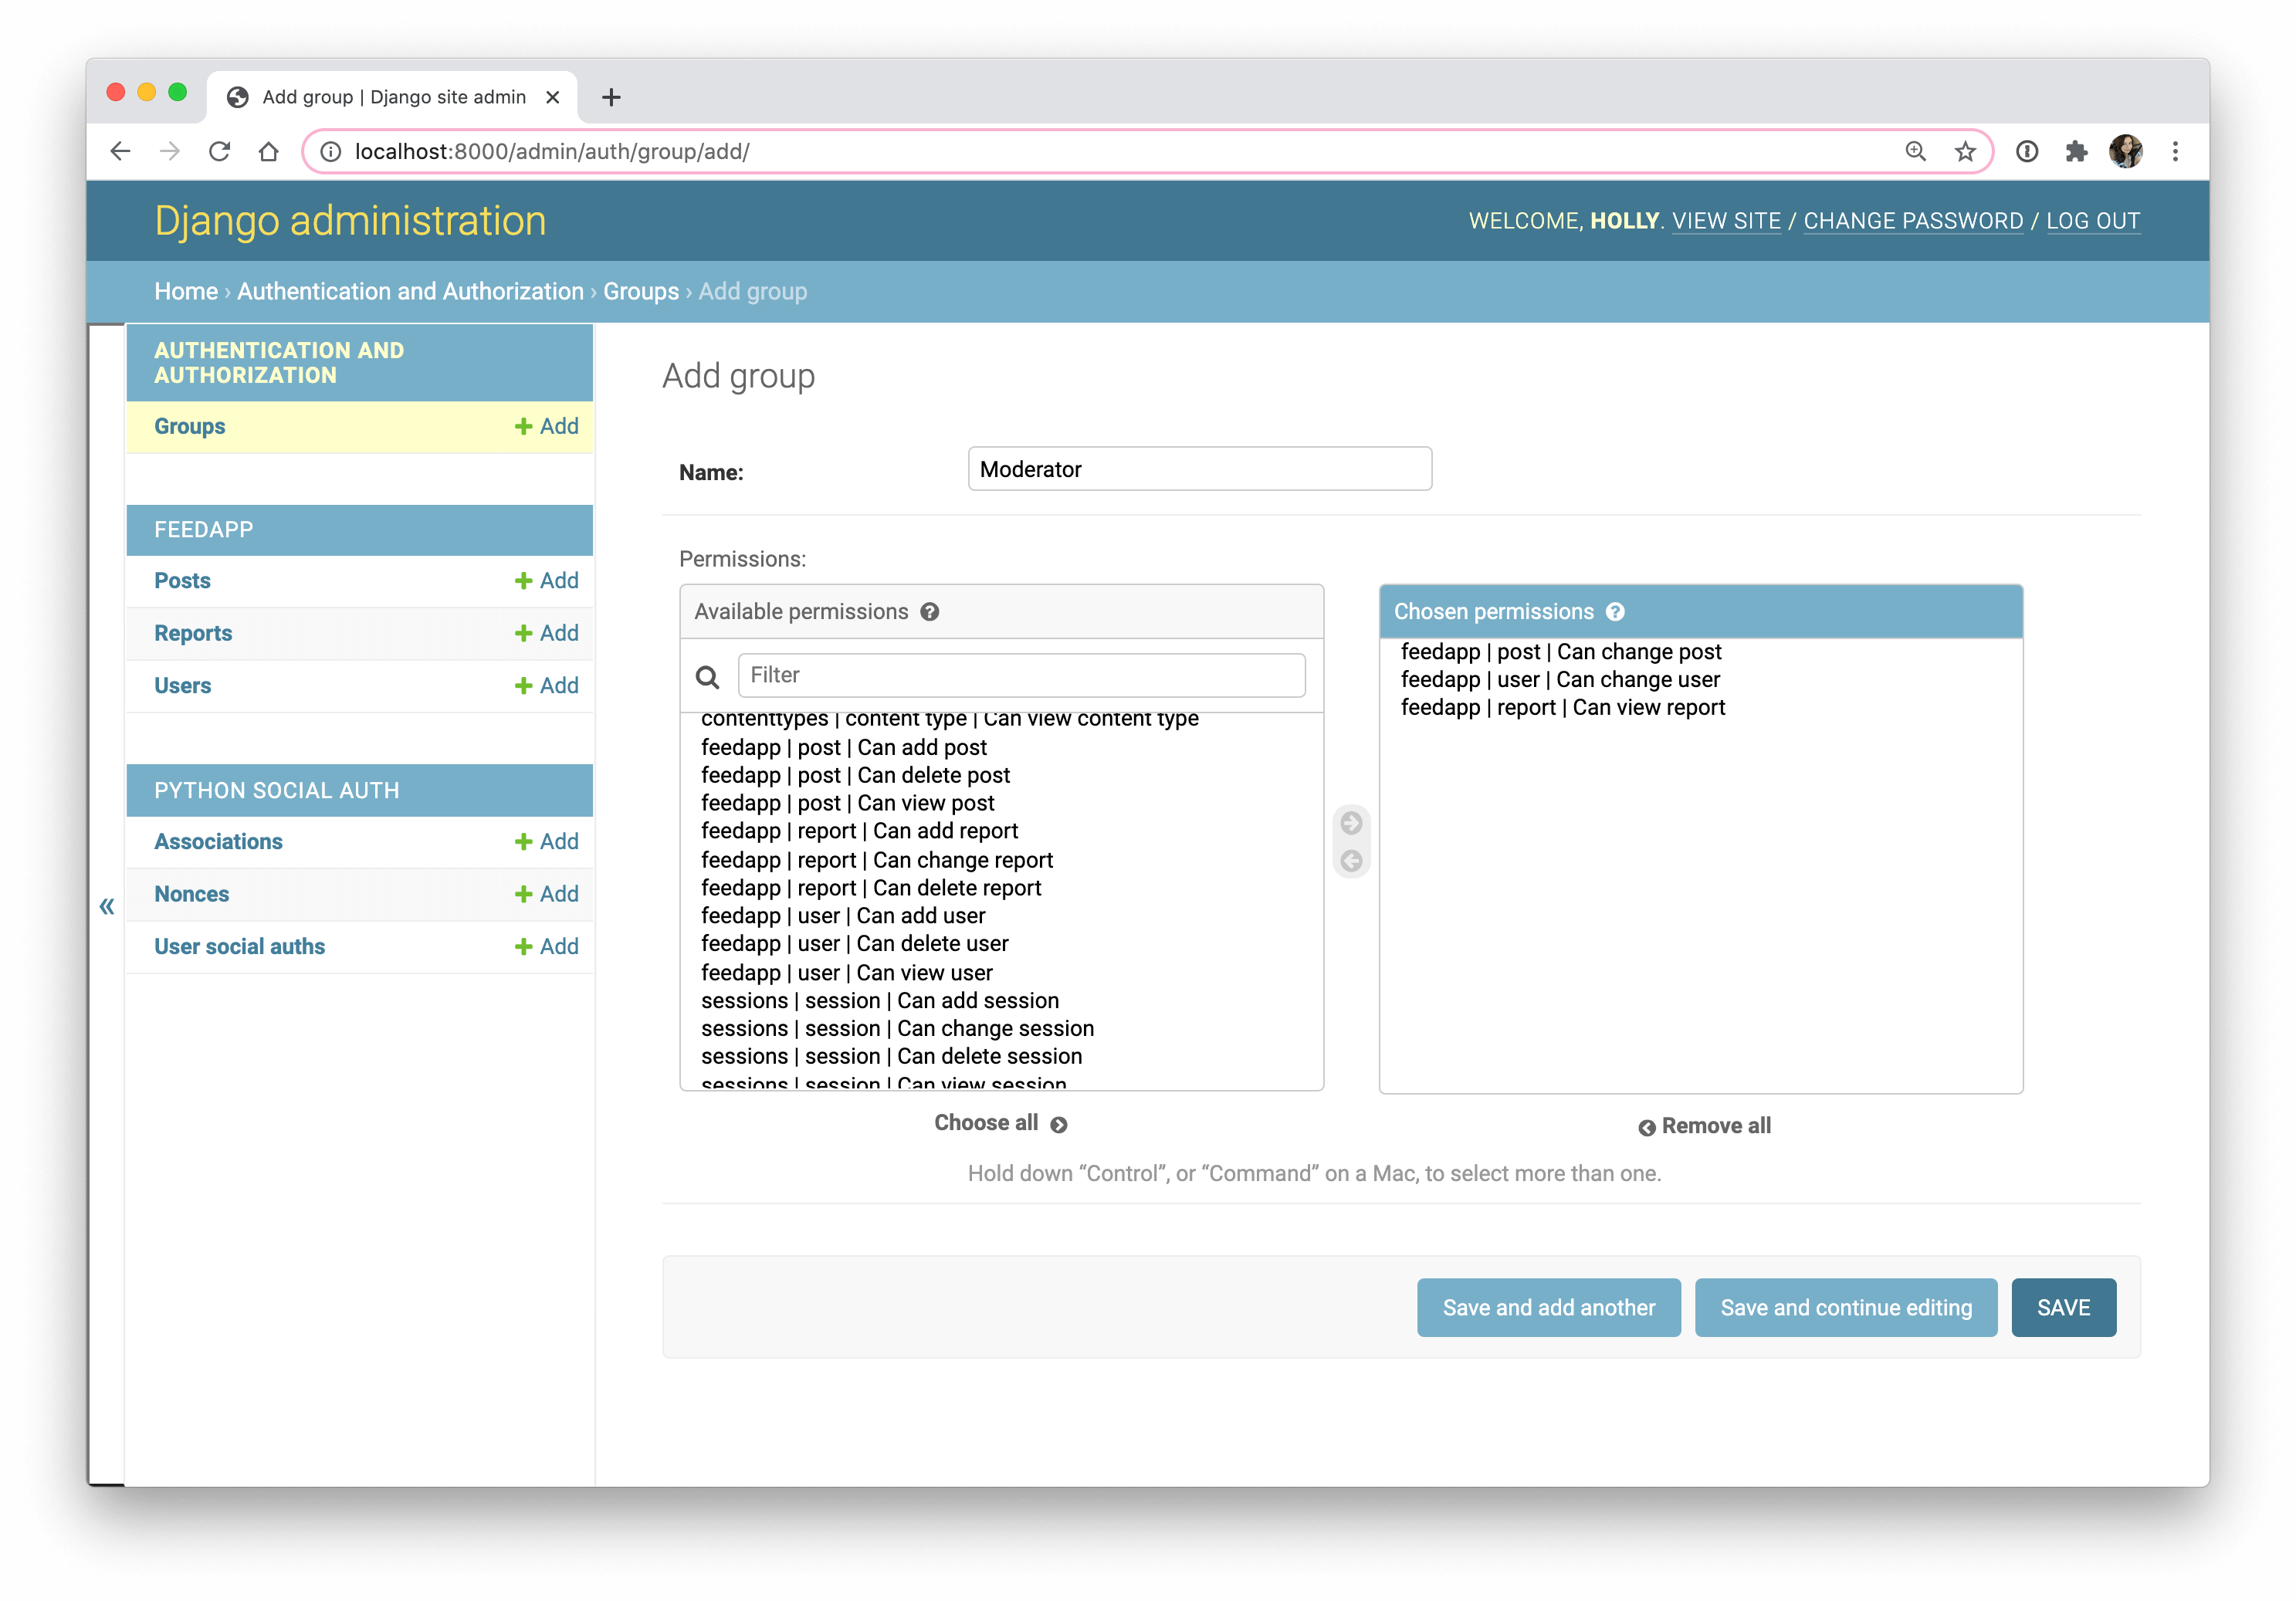
You will use these permissions later in the code to make sure only moderators can perform the action. You can then go into the users table and give one or more users the moderators group.
With that, add a permission required decorator on the reports view in views.py. Be sure to also import permission_required at the top.
from django.contrib.auth.decorators import login_required, permission_required

@permission_required('feedapp.view_report', raise_exception=True)
def reports(request):
  return render(request, 'feedapp/reports.html')
This will allow only members in the moderators group to see the reports.
Next, give the users the ability to report posts. You need to create a new view and an associated URL that will handle reporting a post. Then, put a link on each post by someone other than the logged-in user to let that user report post.
Start with the view in views.py:
from .models import Post, Report

def report_post(request, post_id):
  post = Post.objects.get(id=post_id)

  report, created = Report.objects.get_or_create(reported_by=request.user, post=post)

  if created:
      report.save()

  return redirect('index')
You don't want to allow a user to create multiple reports for the same post, so use getorcreate on the model.
Next, create a URL for this in urls.py.
path('report_post/<post_id>/', views.report_post, name='report_post'),And finally, add the links in the template in index.html. You can check if the post belongs to the user and if the post has already been reported. Since you already have the if block for checking a post belongs to a user, add an else if to check if user is authenticated.
  {% elif user.is_authenticated %}
  <div class="media-right">
    <a href="{% url 'report_post' post.id %}"><span class="tag is-warning">report</span></a>
  </div>

</NonAmpContent>
After you test reporting a post, you can check the report table in the admin dashboard to see if it appears. Under "Reports", you should see a Report object. If you click that, you'll see the post and who reported it.
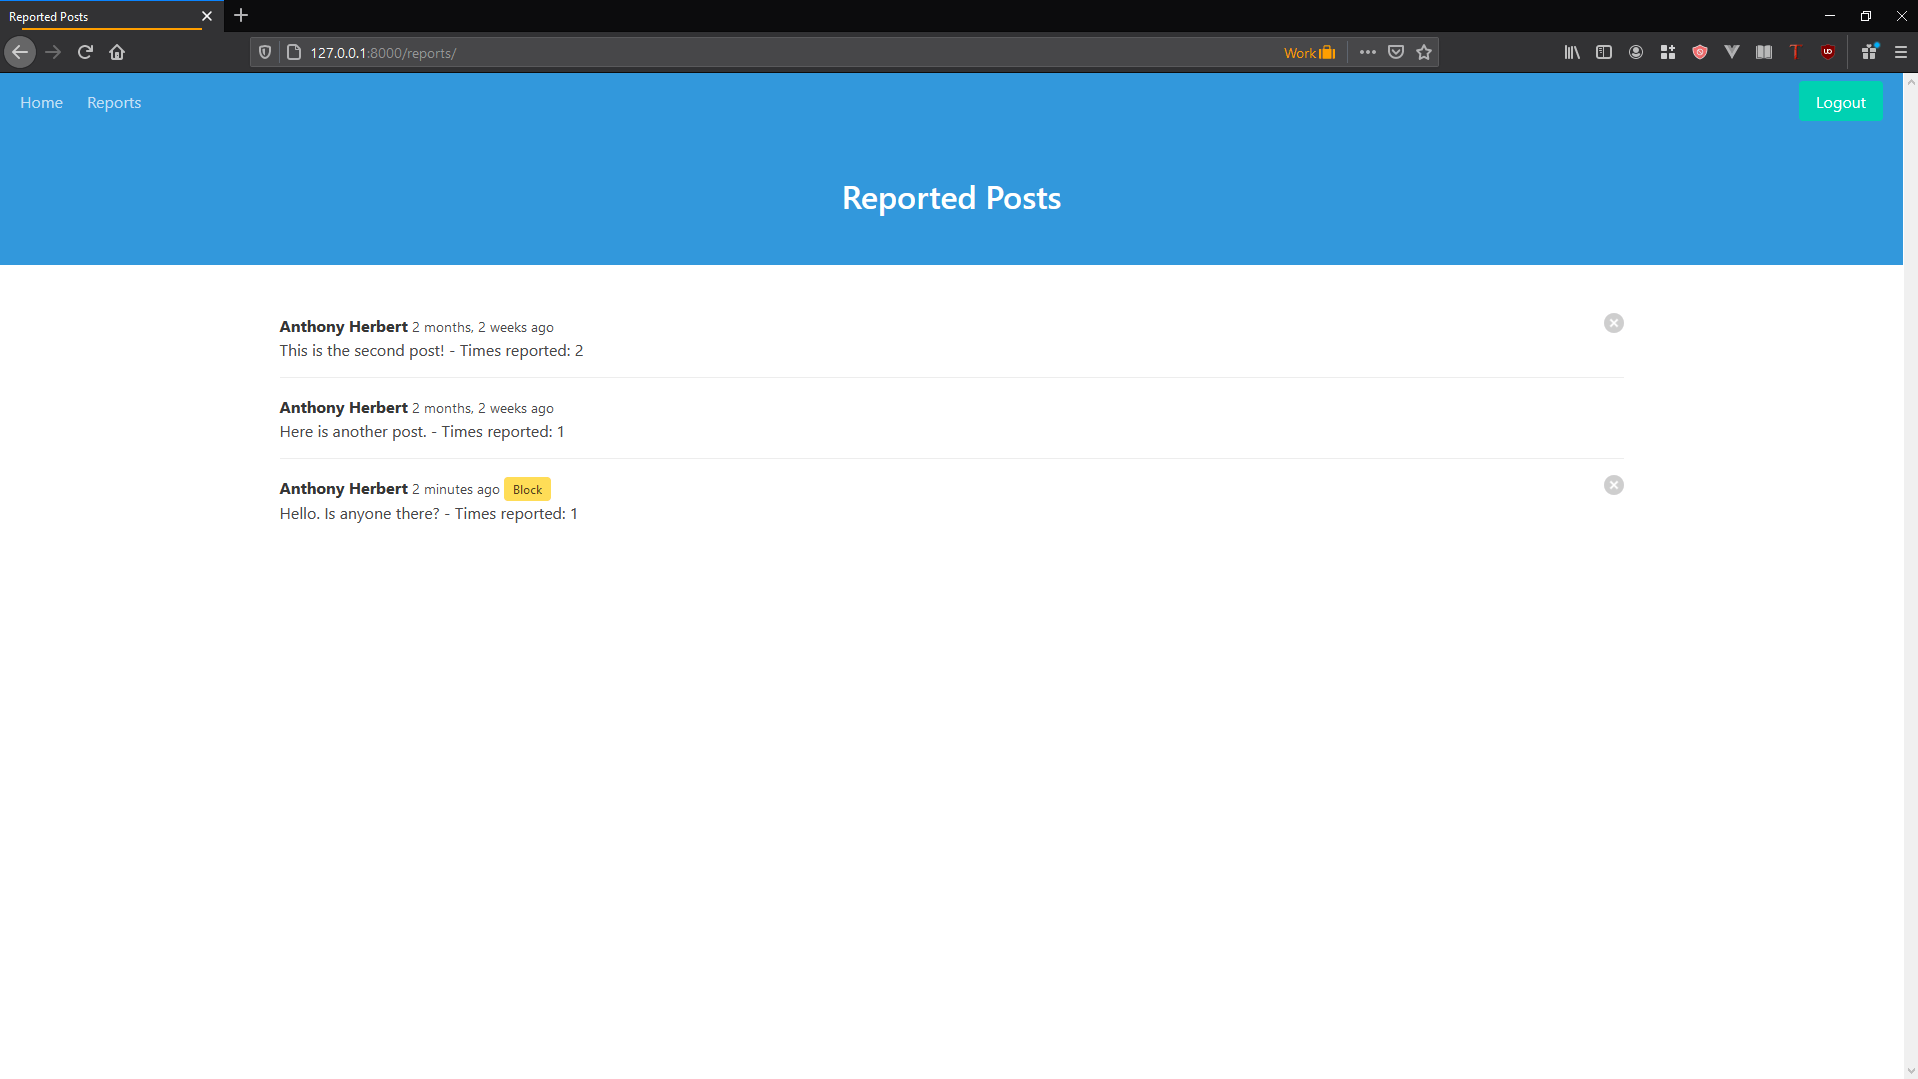
Now go back to the reports view. Here you can list all of the posts in the database that have been reported at least once.
from django.db.models import Count@permission_required('feedapp.view_report', raise_exception=True)
def reports(request):
reports = Post.objects.annotate(times_reported=Count('report')).filter(times_reported__gt=0).all()
context = {'reports' : reports}
return render(request, 'feedapp/reports.html', context)Since you're about to modify the reports template, now is a good time to update feedapp/base.html with a link to the page with the appropriate template. Add the following below the existing link for home:
<div class="navbar-start pl-2">
  <a href="/" class="navbar-item">Home</a>
  <AmpContent>
    <a href="{% url 'reports' %}" class="navbar-item">Reports</a>

</NonAmpContent>
</div>
And then in the reports template, you can display all the reported posts. It will be similar to how the posts are displayed on the home page. But you will also show the number of times the post has been reported.
Replace reports.html with the following:
{% extends 'feedapp/base.html' %}
{% load humanize %}

{% block title %}Reported Posts{% endblock %}
{% block main_title %}Reported Posts{% endblock %}

{% block content %}

{% for post in reports %}
  <article class="media">
    <div class="media-content">
      <div class="content">
        <p>
          <strong>{{ post.user.first_name }} {{ post.user.last_name }}</strong>
          <small>{{ post.date_posted|naturaltime }}</small>
          <AmpContent>
            <a href="{% url 'block_user' post.user.id %}"><span class="tag is-warning">Block</span></a>

</NonAmpContent>
          <br>
          {{ post.text }} - Times reported: {{ post.times_reported }}
        </p>
      </div>
    </div>
    <AmpContent>
      <div class="media-right">
        <a class="delete"></a>
      </div>

</NonAmpContent>
  </article>
{% endfor %}

{% endblock %}
Now that the moderators can see reported posts, you want to allow the moderator to block users and hide posts. Start with hiding posts. You can create a view that requires a change post permission. From there, you will get the post and hide it by updating the hidden, date_hidden, and hidden_by fields on the post. You will need the datetime object to get the current date.
Add the following to views.py:
@permission_required('feedapp.change_post', raise_exception=True)
def hide_post(request, post_id):
  post = Post.objects.get(id=post_id)
  post.hidden = True
  post.date_hidden = datetime.now()
  post.hidden_by = request.user
  post.save()
  return redirect('reports')
Then you need a URL for this view in urls.py.
path('hide_post/<post_id>/', views.hide_post, name='hide_post'),Finally, add the link in the template at the bottom of reports.html. Check if it has been hidden already so you don't hide it more than once.
<AmpContent>
<div class="media-right">
  <a href="{% url 'hide_post' post.id %}" class="delete"></a>
</div>

</NonAmpContent>
After hiding a post, you can verify by checking the homepage and seeing the post is no longer there because of the query you wrote earlier to check for hidden=False.
The other thing you want a moderator to do is block a user. When you block a user, you want to both set a user to be inactive, and you want to hide all of their posts. Create the view for this in views.py:
from .models import Post, Report, User  # import User
from django.contrib.auth import get_user_model  # add to the imports

@permission_required('feedapp.change_user')
def block_user(request, user_id):
  User = get_user_model()

  user = User.objects.get(id=user_id)
  for post in user.post_set.all():
      if not post.hidden:
          post.hidden = True
          post.hidden_by = request.user
          post.date_hidden = datetime.now()
          post.save()

  user.is_active = False
  user.save()

  return redirect('reports')
Then add a URL for this view:
path('block_user/<user_id>/', views.block_user, name='block_user'),And finally you can add the link on the reports template. Make sure the user hasn't been deactivated before.
<AmpContent>
<a href="{% url 'block_user' post.user.id %}"><span class="tag is-warning">Block</span></a>

</NonAmpContent>
Then you can test blocking a user. You can verify all their posts are gone.
Django Authentication vs. Auth0
How does the default authentication for Django compare with Auth0? For one, the default authentication focuses on hashing passwords locally and only allowing a user to login with a username and password. For all the apps that use this type of authentication, it works fine, but Auth0 gives you some advantages over the default Django authentication.
Acts as the authorization server
Even though Auth0 handles the actual credentials for your users, the user data is still stored in your app's database. So your user table will still have a user for each person who signs up with Auth0. But in addition to the user table, you will have three extra tables from Python social auth: associations, nonces, and user social auths. Only one table is primarily used: user social auths. This stores both the provider information (Auth0) and the access token for the user.
Handles different social providers
So Auth0 will stand between your users and whatever social auth they choose to use. Then they will be redirected to sign in with the social platform of choice (so you don't have to support their choices), and then the auth token for that user will be passed back to the app. This allows you to ignore integrating access to every social provider because Auth0 has already handled it for you. Otherwise, you'd have to do things like get an Oauth token for each individual social platform you want to support for auth.
Handles login page
If you use the default process for Django authentication, you will need to customize the login. Even though Django gives you the tables in the database, a way to hash passwords, and a way to associate data with a user, you will have to write this yourself. You will need to create the views and templates for the login-associated pages. Also, if you want to implement alternative forms of authentication, like social login and passwordless login, you will need to add the code yourself.
With Auth0, you simply connect your account, and Auth0 will handle all of the authentication stuff for you. You just rely on Auth0 to identify your users through authentication. This obviously saves a ton of time because you don't need to write the same code over and over again. Login code is both common to every app yet easy to mess up, so by using Auth0, you will save a ton of time authenticating with your app. Also, you can change how your app handles authentication at any time through the Auth0 dashboard. For example, if you want to add a new social provider, you can do it within minutes on the dashboard instead of writing any code in your app to handle a new social login.
Easily integrates with Django
Even though Auth0 will handle the identity part of your app, you can still work with a user once they're identified, just as if they signed up and logged in with your Django app directly. Since each user becomes a regular user, you can do things like add that particular user to a group on the admin dashboard to authorize them to use more features within your app.
Even though you can use Auth0 to allow your users to authenticate in any way they wish, you can also continue the use the default Django authentication alongside. The end result is the same with both processes: a user is created in the database, and a cookie is created to represent that user. Though in this tutorial, you will use Auth0 exclusively for the app's users and keep the default authentication for the admin users.
Conclusion
That's everything we wanted for the app. You have the feed app that allows users to create posts and moderators to make sure things don't get out of hand. Here is what you covered:
- Set up Auth0 to handle Django authentication
- Use Python social apps to store your users' tokens and account information
- Create an authorization system for different user types through roles
Let me know if you have any questions in the comments below.


