Are you looking for something that helps you write mobile applications in React Native that behave consistently, run in different environments, and test easily? There is a solution, and you just found it! You have certainly come across the fact that when your application gets bigger and more complex, it’s hard to manage states and pass data from one component to another component (or child components). There's exactly where redux can help you: it gives global access to state or data, which can be used in any component without depending on other components.
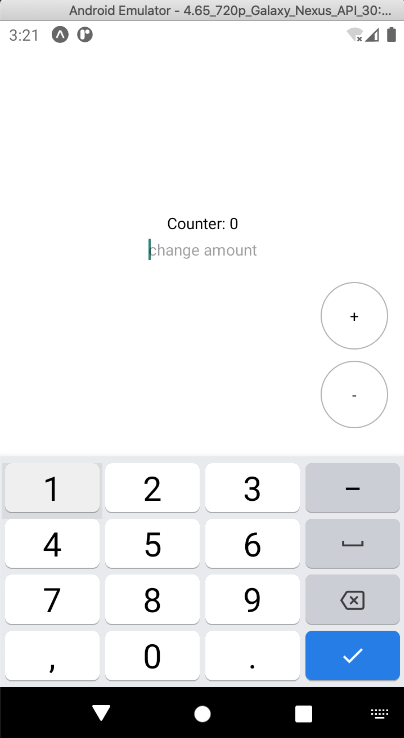
The article is a beginner's comprehensive on how to use redux and redux toolkit in a React Native application. This guide assumes that you know the basics of React Native but, if this is new to you as well, we've got you covered with our React Native tutorial. We are also using an Android emulator in this tutorial, something that allows you to simulate an Android device on your computer so you can test your application on a variety of devices and Android API levels without needing to have each physical device. Notice that this emulator provides almost all of the capabilities of a real Android device. Finally, to help you learn the basics of redux, we provide, along the way, code examples of a simple counter application. It will look something like this:
Here is the code of our SimpleCounter component:
const SimpleCounter = () => {

  return (
      <View style={styles.container}>
         <Text>Counter: 0</Text>
         <View style = {styles.floatingView}>
           <TouchableOpacity style ={styles.floatingButton}>
             <Text>+</Text>
           </TouchableOpacity>
           <TouchableOpacity style ={styles.floatingButton}>
             <Text>-</Text>
           </TouchableOpacity>
         </View>
         <TextInput keyboardType = 'numeric' placeholder= "change                    amount"/>
      </View>)

}
Right now, this code is static, and we have not declared any state inside the component. Feel free to follow along with the code examples as we integrate redux in our react native app. Our React Native tutorial (link above) will show you how to set up a React Native enviorment, after that, make sure you install the redux and react-redux libraries. To do that simply use the command:
npm install --save redux react-redux
If you are using npm 5.0.0 or superior type this instead:
npm install redux react-redux
What is redux and why use it ?
Redux is a javascript library made to help you manage the state of your application. It does that by providing the developer with a centralized place called the store, where the state is saved and modified through actions and reducers. This centralized place enables you to share the state between multiple screens and to know exactly where and how the state is being modified. This is particularly useful in growing applications that are too large for the developers to have full knowledge of the data flows and, consequently, become bug prome.
How to use redux
As said above, redux uses a combination of actions, reducers and the store to manage the application state. To understand and learn redux, you need to know how these abstractions works. Let's start!
-
The State
Very lightly, the application state is all the information that the application uses and/or modifies. Having a centralized state and a predictable way of modifying it can enable applications to be coherent with the information that they show to the users. This is particularly useful for large single page applications.
-
Actions and reducers
Actions and reducers together modify the state. Precisely, actions determine what is being modified and where. Reducers specify how it is being modified. By analyzing the layout at the beginning of the blog post, we will need three actions: INCREMENT, DECREMENT, and CHANGE_BY_AMOUNT. Actions are objects with a type and a payload attribute. The type is the action's identifier, and the payload is all the information that the reducer will need to modify the state. The first two actions will only decrement or increment the counter amount by 1, so we only need to define two objects with the attribute type, and the reducer will handle the rest. The third action must have a payload to specify how much we want to increment or decrement the counter. Declare your actions in a separate file called Actions:
const INCREMENT = "INCREMENT"

const DECREMENT = "DECREMENT"

const CHANGE_BY_AMOUNT = "CHANGE_BY_AMOUNT"

export const incrementAction = () => ({
    type: INCREMENT,
})

export const decrementAction = () => ({
    type: DECREMENT,
})

export const changeByAmount = (val) => ({
    type: CHANGE_BY_AMOUNT,
    payload: val,
})
As you can see, it is pretty simple. Next, we define the initial state. This is done in another file along side with the reducer:
const initialState = {
    counter: { amount: 0 },
}
We set the initial state to have an object named counter with the attribute amount, starting at 0. You can also see that the initial state is a constant and not a variable, which appears to make no sense, but we will explain it to you later. Next, we build the reducer, which is a function that receives the current state and the action - as arguments - to produce the new state of the application. Here it is:
export default (state = initialState, action) => {
    switch (action.type) {
        case INCREMENT:
            return {
                …state, counter: { amount: state.counter.amount + 1 }
            };
        case DECREMENT:
            return {
                …state, counter: { amount: state.counter.amount - 1 }
            };
        case CHANGE_BY_AMOUNT:
            return {
                …state,
                counter: { amount: state.counter.amount + action.payload }
            };
        default:
            return state;
    }
}
We must not mutate the state in the reducer. Why? In fact, the reducer should not modify the state object directly. Instead, it should create a new object, which will be the new state. React’s rendering engine compares the previous state object with the latest state object.
If you modify the state directly, React does not know what has changed, and it will have a flawed notion of the application state. You can start reading about this here. This is why, in the beginning, we declared the initial state as a constant and not as a variable, as we pretend the initial state object never to be altered.
-
The Store
The next step is to create the store. The store is the object where the state is saved. It is common practice to create the store and export it in a separate file. Check it below:
import { createStore } from "redux"

import simpleCounterReducer from "./CounterReducer"

export default createStore(simpleCounterReducer)
We create the store using the createStore() method from redux, which receives as argument the reducer function defined earlier. With the store, we can invoke actions with the dispatch method (will be shown later in this guide) to modify the state.
Now we make the store available by passing it to the Provider component that engulfs our SimpleCounter component. What the Provider component does is provide access to the store in the SimpleCounter component and all the components inside it.
The Provider component is imported from the react-redux library, which is the official binding library for react/react native and redux.See below how to do it:
const App = () => {
    return(
      <Provider store={store}>
        <SimpleCounter />
      </Provider>)
}

export default App
Connect your react components
Next, we want to connect our components to the redux store. We can do this by using the connect method from react-redux library in our SimpleCounter component file, like so:
const mapStateToProps = (state, props) => {
    return { amount: state.counter.amount };
  }
export default connect(mapStateToProps)(SimpleCounter);
We need to pass two arguments to the connect method: the component we want to connect (SimpleCounter) and a function that maps the application state to our component props.
Note that we only have access to the state object in the mapStateToProps function because we engulfed the SimpleCounter component with the Provider component.
The connect method is merging the object returned from mapStateToProps with the props of the SimpleCounter component to access the state.counter.amount value via this.props.amount.
The dispatch method also becomes available through props, and we can now import our actions and dispatch them inside the SimpleCounter component. Here’s the SimpleCounter component updated code:
const SimpleCounter = (props) =>{

    const increment = () => {
      props.dispatch(incrementAction());
    };

    const decrement = () => {
      props.dispatch(decrementAction());
    };

    const handleInputChange = (event) => {
      props.dispatch(changeByAmount(event.nativeEvent.text));
    };


    return (
      <View style={styles.container}>
        <Text>Counter: {props.amount}</Text>
        <View style = {styles.floatingView}>
          <TouchableOpacity style ={styles.floatingButton}
            onPress={increment}>
            <Text>+</Text>
          </TouchableOpacity>
          <TouchableOpacity style ={styles.floatingButton}
          onPress={decrement}>
            <Text>-</Text>
          </TouchableOpacity>
        </View>
        <TextInput onSubmitEditing = {handleInputChange} keyboardType = 'numeric' placeholder= "change amount"/>
      </View>)
    }
React Native state persistance
So now we have a centerlized store were the state is saved and modified in a predictable way through actions and reducers, but you might have noticed that the counter value returns to zero every time you refresh or exit the app, this is because right now the state is not being persisted and every time you open the application the reducer is defining the counter value to be zero (the initial state).
State persistance is important if you need to maintain certain information even when the user closes the application, like login tokens or some configuration settings. You can achieve state persistance in a React Native app by using the redux-persist library.
Redux persist saves the redux store into a local persistent storage and retrieves it every time the app is re-openned or refreshed. We are using an Android emulator, but redux-persist also works with IOS. Let's start by installing redux persist:
npm install redux-persist
After that, modify the Store.js file, like so:
import { createStore } from "redux"
import simpleCounterReducer from "./CounterReducer"
import AsyncStorage from '@react-native-community/async-storage'
import { persistStore, persistReducer } from 'redux-persist'

const persistConfig = {

    key: 'persistedReducer',

    storage: AsyncStorage
}

const persistedReducer = persistReducer(persistConfig, simpleCounterReducer)

const store = createStore(persistedReducer)

let persistor = persistStore(store)

export {store, persistor}
First import both persistStore and persistReducer methods from redux-persist library. Pass the reducer to the persistReducer method along side the persistConfig object to create a persistedReducer.
In the persistConfig object declare that you are going to use the AsyncStorage to persist the redux store which is an uncrypted key-value storage from React Native.

Finally, call the persistStore method to ensure that our store is persisted. If you have a bigger project, you might not need to persist the entire state, in that case, you can use a 'Whitelist' and 'Blacklist' methodology in the persistConfig object to choose which reducers you want to persist, click here if you want to know more.
Last, in the App.js file import the persistedStore from Store.js and engulf the SimpleCounter with the PersistGate component to make sure that the app's UI is not rendered until the persisted state is retrieved and saved into the redux store.
import {store, persistedStore} from "./Store"

import { PersistGate } from 'redux-persist/integration/react'

const App = () => {
    return(
      <Provider store={store}>
        <PersistGate loading={null} persistor={persistedStore}>
          <SimpleCounter />
        </PersistGate>
      </Provider>
  )
}

export default App
Redux toolkit
We have to mention the Redux toolkit, a library written by the redux developers to help create more efficient redux logic. Utilizing this library's functions will result in your code being more compact and simpler to read. Here is an introduction to some of those functions:
-
createAction()
Redux toolkit introduced us with a new way of creating an action. It works like this:
import { createAction } from '@reduxjs/toolkit'

export const incrementAction = createAction('INCREMENT')
export const decrementAction = createAction('DECREMENT')
export const changeByAmount = createAction('CHANGE_BY_AMOUNT')
The createAction method receives the action type as an argument and returns an action creator function. We can then call this function and pass the payload as an argument to create the action object. You can also access the action type with the toString() method, like so, incrementAction.toString(). This method makes it so that we no longer need to declare the action types as constants reducing the boilerplate code significantly.
-
createReducer()
This is another method of the redux toolkit that aims to simplify our code. The method allows us to write reducers with the lookup table notation, enabling us to write a much cleaner code. The objects returned from the createAction() method can be used directly as the table keys. Following with the previous reducer logic, we have:
const simpleCounterReducer = createReducer(initialState, {
    [incrementAction]: state => {
        return {…state, counter: { amount: state.counter.amount + 1 }}
    },
    [decrementAction]: state => {
        return {…state, counter: { amount: state.counter.amount - 1 }}
    },
    [changeByAmount]: (state, action) => {
        return {…state, counter: {
            amount: state.counter.amount + parseInt(action.payload)
        }}
    },
})

export default simpleCounterReducer
In addition to this, createReducer() also uses Immer to write reducers with simpler mutating logic. Immer translates all mutating operations into equivalent copy operations. So now, we can write our reducer like this:
const simpleCounterReducer = createReducer(initialState, {
    [incrementAction]: state => { state.counter.amount += 1 },
    [decrementAction]: state => { state.counter.amount -= 1 },
    [changeByAmount]: (state, action) => {
        state.counter.amount += parseInt(action.payload)
    }
})

export default simpleCounterReducer
Much simpler don't you think ?
-
configureStore()
The configureStore() function wraps around the createStore() method and creates the store setting up some standard configurations. Also, the method receives a configuration object instead of a group of functions so, when using it, you must pass the reducer inside an object associated to the reducer attribute. Like this:
import { configureStore } from '@reduxjs/toolkit'

import simpleCounterReducer from "./CounterReducer"

export default configureStore({reducer: simpleCounterReducer})
Store configuration is a matter that we did not include in this blog post, but we felt that it was still important to mention so, if you want, feel free to explore it yourself. One more thing, if you want to integrate redux-persist and redux-toolkit in the same project you might have came across the error 'A non-serializable value was detected in an action' this is because redux-toolkit's configureStore() incorporates a serializable check on actions and redux-persist needs to pass a function inside them. One way you can solve this is importing getDefaultMiddleware from redux-toolkit and disabling the serializable check on redux-persist actions types. Like so:
import { persistStore, persistReducer,
    FLUSH,
    REHYDRATE,
    PAUSE,
    PERSIST,
    PURGE,
    REGISTER} from 'redux-persist'
import { configureStore, getDefaultMiddleware} from '@reduxjs/toolkit'

const persistConfig = {
 // Root
 key: 'root',
 // Storage Method (React Native)
 storage: AsyncStorage
 }

const persistedReducer = persistReducer(persistConfig, simpleCounterReducer);

const store = configureStore({reducer: persistedReducer,
    middleware: getDefaultMiddleware({
    serializableCheck: {
          ignoredActions: [FLUSH, REHYDRATE, PAUSE, PERSIST, PURGE, REGISTER]}
})
})
You can find the discussion and the solution for this problem in this forum.
In short
There it is. The result should be a simple but functional counter app. We hope you learned how redux's abstractions work together and familiarized yourself with the dataflows that they create, so it becomes easier for you to start applying redux to your app. Additionally, redux is an independent library, so the logic you learned here would be the same if you wanted to integrate redux in a web application that uses react. Wish you the best of luck programming!
Want to read more about React and Redux?
More than 500.000 people read our blog every year and we are ranked at the top of Google for topics such as React and Redux. If you liked this blog post and would love to read all our blog posts on React and Redux, 
Get the best content in your inbox
Besides our Blog, we also develop a monthly newsletter that provides great content for IT Professionals such as news, trends and tools. You can know more about it, see past editions and subscribe here.