Polly Politician is looking to get voted into office. She has teamed up with Selly Celebrity, and together they are running an SMS voter campaign.
This article will explain how to integrate Contentful and the Twilio Programmable SMS API with the Flask microframework for Python. The article will also highlight how to set up webhooks in Contentful, and how to deploy it all to AWS Lambda to make the app genuinely serverless — all in the name of getting Polly Politician as many votes as possible.
Note: This article assumes that you have user accounts for Contentful, Twilio and Amazon AWS — using their respective free tiers will do just fine.
What we’ll be building
We’re putting together a Python Flask app that will send campaign messages like "Vote for Polly — she’s the best" to potential voters via SMS.
This will work by grabbing content from Contentful using the Contentful content delivery API, and then connect to Twilio’s Programmable SMS API to get the messages delivered.
We’ll also configure webhooks to make sure that whenever the campaign manager publishes a new campaign message, that message will be sent to Twilio’s Programmable SMS API and subsequently delivered to voters.
By reading this article you will learn how to:
- Get started with Contentful
- Use the Contentful Python SDK
- Integrate Contentful and Twilio
- Set up webhooks in Contentful
- Deploy to Amazon AWS using Zappa
Install dependencies and set up a minimal Flask app
We start by installing the packages for Flask, Contentful and Twilio like so:
pip install flask contentful twilio
And to make sure that we have debugging in place, and to point out our soon-to-be-created Flask app, we’ll run:
export FLASK_DEBUG=ON
export FLASK_APP=app.py
The flask app will have a single function called runVoterCampaign(). So the initial version of our Flask app will look like so:
from contentful import Client as contentfulClient
from twilio.rest import Client as twilioClient
from flask import Flask
app = Flask(__name__)
@app.route("/")
def runVoterCampaign():
    return "Hello World!"
Getting started with Contentful
In short - Contentful is content infrastructure. So if you have text, images or any other kind of digital assets that you want to serve to your users, you can use Contentful to edit, manage and deliver content via Contentful’s WebApp and through API-calls.
Contentful stores your data in so-called spaces. You can think of spaces like a project-specific bucket that you fill up with all sorts of assets belonging to your project.
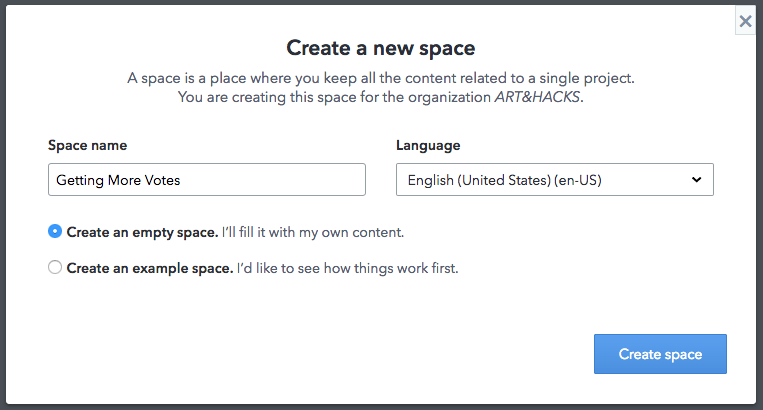
Creating a space
When you create your free Contentful account you will be asked to create a space. While there are examples to get you started, we’re going to create an empty space called Getting More Votes.
Creating content types
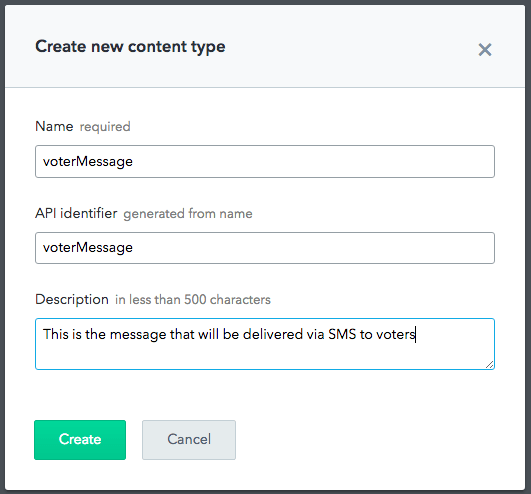
With our Contentful space in place, the next step is to create content types that go into that space.
For this implementation to work we need to create two content types: voterMessage and voterNumbers.
Let’s start with creating a voterMessage content type:
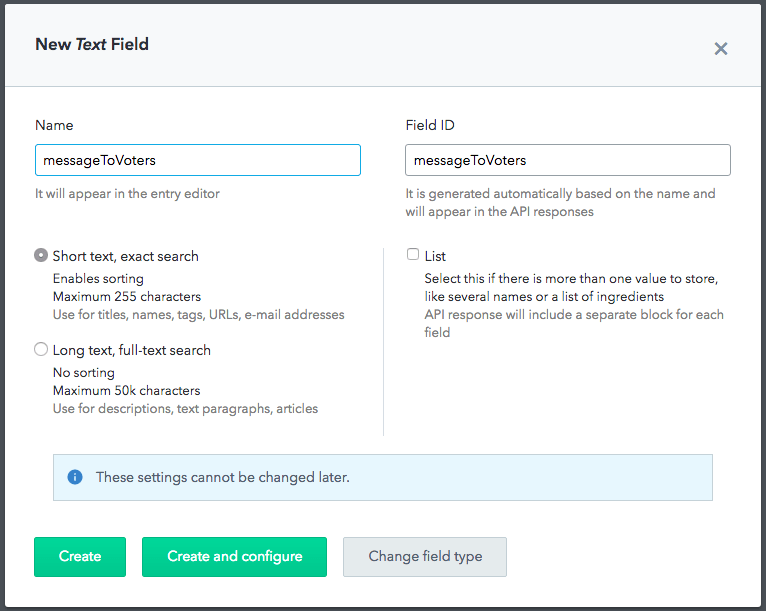
Once the content type has been created, we will need to add a field to hold our information:

We’ll go with a single text field:

And name it messageToVoters like so:
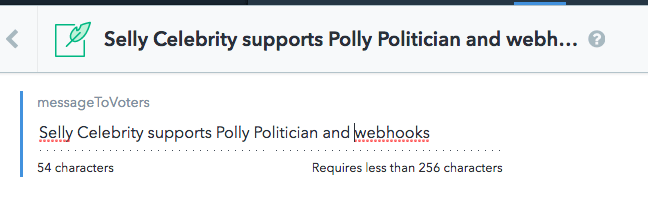
With the content type in place, let’s add the message that will be sent out to potential voters by selecting Content/Add entry/voterMessage.
The message that Polly Politician wants to send out is — "Selly Celebrity supports Polly Politician — you should too", so let’s add just that:

Once we hit the green publish button, Polly’s voter message will get a unique entry ID. We’ll use this entry ID when retrieving the entry via Contentful’s Content Delivery API, or CDA.
To view the entry ID, click the info button:

Our entry is Ykt2v3ixYQwwAekwSKg0A.
Connecting our app to Contentful
To authenticate against the CDA, we’ll need to create an API key — do this by navigating to Space settings and API Keys:

Then click Add API key and give your key a suitable name:

Now that we have our API key, let’s create a function called getVoterMessage() that utilizes this API key to grab content from Contentful.
def getVoterMessage():
    SPACE_ID = '1476xanqlrah'
    CONTENT_DELIVERY_API_KEY = 'dae35c068382427841441c61a6370d57101ba94a0f6e6e7cb22ca655c16b7f67'
    ENTRY_ID = 'Ykt2v3ixYQwwAekwSKg0A'
    client = contentfulClient(SPACE_ID, CONTENT_DELIVERY_API_KEY)
    entry = client.entry(ENTRY_ID)
    return entry.message_to_voters
Note that Contentful’s Python SDK will convert field names to snake case. That’s why our messageToVoters field is addressed as entry.message_to_voters in the snippet above. All in the name of PEP 8 compliance.
And if we temporarily change our Flask route to echo the content, we would get from Contentful like this:
@app.route("/")
def runVoterCampaign():
    voterMessage = getVoterMessage()
    return voterMessage
We would get:

The next step is to connect our app to Twilio’s Programmable SMS API.
Connecting to Twilio’s Programmable SMS API
So we’ve written the function getVoterMessage() to get our voter message from Contentful. Let’s write another function that takes this message and sends it out as an SMS:
def sendMessageToVoter(voterMessage):
    ACCOUNT_SID = 'AC046db3e3b2dd0……..'
    AUTH_TOKEN = '88572d13934ee1a5……….'
    client = twilioClient(ACCOUNT_SID, AUTH_TOKEN)
    client.api.account.messages.create(
        to="+15552395",
        from_="+4915375998263",
        body=voterMessage)
To get the function to execute, we’ll change the Flask route to the following:
@app.route("/")
def runVoterCampaign():
    voterMessage = getVoterMessage()
    sendMessageToVoter(voterMessage)
    return 'Message sent to voter'
Seconds after the function executes, the receiver will see the following SMS:

With the app’s core functionality in place, let’s make our app serverless by deploying it to AWS lambda.
Deploying our local app to AWS Lambda using Zappa
AWS Lambda lets you run code without provisioning or managing servers.
So far we’ve only been running our Flask app locally.
To deploy the app to AWS, we’ll be using Zappa.
Install Zappa like so:
pip install zappa
We’ll then run zappa init to generate a configuration file:
Welcome to Zappa!

Zappa is a system for running server-less Python web applications on AWS Lambda and AWS API Gateway.
This {% raw %}`init`{% endraw %} command will help you create and configure your new Zappa deployment.

Let's get started!
Your Zappa configuration can support multiple production stages, like 'dev', 'staging', and 'production'.

What do you want to call this environment (default 'dev'):

AWS Lambda and API Gateway are only available in certain regions. Let's check to make sure you have a profile set up in one that will work.

Okay, using profile default!

Your Zappa deployments will need to be uploaded to a private S3 bucket.
If you don't have a bucket yet, we'll create one for you too.
What do you want to call your bucket? (default 'zappa-w57kc2zrw'):
It looks like this is a Flask application.
What's the modular path to your app's function?
This will likely be something like 'your_module.app'.
We discovered: app.app
Where is your app's function? (default 'app.app'):
You can optionally deploy to all available regions in order to provide fast global service.
If you are using Zappa for the first time, you probably don't want to do this!

Would you like to deploy this application globally? (default 'n') [y/n/(p)rimary]:

Okay, here's your zappa_settings.json:

{
    "dev": {
        "app_function": "app.app",
        "aws_region": "us-east-1",
        "profile_name": "default",
        "project_name": "twiliocontentfu",
        "runtime": "python3.6",
        "s3_bucket": "zappa-w57kc2zrw"
    }
}

Does this look okay? (default 'y') [y/n]:
Now run zappa deploy dev to deploy the app to AWS Lambda:
Calling **deploy** for stage **dev**..
Creating twiliocontentfu-dev-ZappaLambdaExecutionRole IAM Role..
Creating zappa-permissions policy on twiliocontentfu-dev-ZappaLambdaExecutionRole IAM Role.

Warning! Your project and virtualenv have the same name! You may want to re-create your venv with a new name, or explicitly define a 'project_name', as this may cause errors.

Downloading and installing dependencies..

 - sqlite==python36: Using precompiled lambda package

Packaging project as zip.

Uploading twiliocontentfu-dev-1523880262.zip (16.2MiB)..

100%|███████████████████████████████████████| 17.0M/17.0M [00:32<00:00, 362KB/s]

Scheduling..

Scheduled twiliocontentfu-dev-zappa-keep-warm-handler.keep_warm_callback with expression rate(4 minutes)!

Uploading twiliocontentfu-dev-template-1523880329.json (1.6KiB)..

100%|██████████████████████████████████████| 1.64K/1.64K [00:01<00:00, 1.30KB/s]

Waiting for stack twiliocontentfu-dev to create (this can take a bit)..

100%|████████████████████████████████████████████| 4/4 [00:10<00:00,  2.61s/res]

Deploying API Gateway..

**Deployment complete**!: https://bz9zie872.execute-api.us-east-1.amazonaws.com/dev
The deploy was successful and our Flask app now runs serverless at hxxps://bz9zie872.execute-api.us-east-1.amazonaws.com/dev.
The next step is to configure webhooks in Contentful so that whenever a new campaign message gets published.
Setting up webhooks in Contentful
We want to set up a webhook so that every time the campaign message changes and the campaign manager pushes the publish button, an HTTP POST requests gets sent to our serverless AWS Lambda app — which in turn will send out a text message.
To configure a webhook we’ll navigate to Space settings and webhooks:

And then click Add webhook.
We’ll configure the target of our webhook to be our AWS lambda function at hxxps://bz9zie872.execute-api.us-east-1.amazonaws.com/dev.
Also, we’ll set up the webhook to trigger we hit the publish button:

The idea is now that when we change our campaign message and hit publish. The updated message will be delivered to voters via SMS with the push of a button. But before that can happen, we’ll need to return to our runVoterCampaign function.
Contentful’s webhooks are sent as HTTP POST. This means that we’ll have to add POST method support:
@app.route("/", methods=['GET', 'POST'])
def runVoterCampaign():
    voterMessage = getVoterMessage()
    sendMessageToVoter(voterMessage)
    return 'Message sent to voter'
Now let’s update our serverless app using Zappa
zappa update dev
To test our new webhook we’ll update the campaign message like so:
Hit the big green publish button, and no time later we’ll have the following message on our phone:

Yes!!! It works. Pretty easy right :)
Summary
Without too much effort, we’ve built a solution that grabs data from Contentful and sends it to users via Twilio’s programmable SMS API — all while running serverless.
We’ve also seen how webhooks can be configured to trigger on changes made to content stored with Contentful. Webhooks that in turn call AWS Lambda functions.
In this article, we built a Flask app. Now, Getting code deployed to AWS Lambda can be surprisingly complex — but using Zappa makes sending Flask apps to the cloud easier than ever.
A logic flow of what we’ve created looks like so:

What lies ahead?
Serverless is the way to go. No more having to worry about keeping servers patched — not to mention the burden of keeping perhaps thousands of servers up and running. Going serverless means that you can focus on code, and not on maintenance.


Top comments (4)
This is a great post. And you brought together two APIs and a serverless platform in a lot less time than I thought you'd need! Zappa seems really cool for deploying and making serverless easy for you.
Thank you so much Phil!
Awesome!
Thanks!