


Using MLOps with MLflow and Azure
The blog contains code examples in Azure Databricks, Azure DevOps and plain Python. Please note that much of the code depends on being...
The blog contains code examples in Azure Databricks, Azure DevOps and plain Python. Please note that much of the code depends on being inside an Azure environment and will not work in the Databricks Community Edition or in AWS-based Databricks.
Most organizations today have a defined process to promote code (e.g. Java or Python) from development to QA/Test and production. Many are using Continuous Integration and/or Continuous Delivery (CI/CD) processes and oftentimes are using tools such as Azure DevOps or Jenkins to help with that process. Databricks has provided many resources to detail how the Databricks Unified Analytics Platform can be integrated with these tools (see Azure DevOps Integration, Jenkins Integration). In addition, there is a Databricks Labs project - CI/CD Templates - as well as a related blog post that provides automated templates for GitHub Actions and Azure DevOps, which makes the integration much easier and faster.
When it comes to machine learning, though, most organizations do not have the same kind of disciplined process in place. There are a number of different reasons for that:
To address these and other issues, Databricks is spearheading MLflow, an open-source platform for the machine learning lifecycle. While MLflow has many different components, we will focus on the MLflow Model Registry in this Blog.
The MLflow Model Registry component is a centralized model store, set of APIs, and a UI, to collaboratively manage the full lifecycle of a machine learning model. It provides model lineage (which MLflow experiment and run produced the model), model versioning, stage transitions (for example from staging to production), and annotations.
The Azure Databricks Unified Data and Analytics platform includes managed MLflow and makes it very easy to leverage advanced MLflow capabilities such as the MLflow Model Registry. Moreover, Azure Databricks is tightly integrated with other Azure services, such as Azure DevOps and Azure ML.
Azure DevOps is a cloud-based CI/CD environment integrated with many Azure Services. Azure ML is a Machine Learning platform which in this example will serve the resulting model. This blog provides an end-to-end example of how all these pieces can be connected effectively.
To illustrate why an MLOps pipeline is useful, let’s consider the following business scenario: Billy is a Data Scientist working at Wine Inc. Wine Inc. is a global wholesaler of wines that prides itself on being able to find and promote high-quality wines that are a lot less expensive than comparable quality wines. The key success factor of Wine Inc. is a machine learning model for wine that can predict the quality of the wine (for example purposes we are using a public wine qualities dataset (published by Cortez et al.). Key features of the dataset include chemical ones such as fixed acidity, citric acid, residual sugar, chlorides, density, pH and alcohol. It also includes a sensory based quality score between 0 and 10. Billy is constantly rolling out improvements to the model to make it as accurate as possible. The main consumers of the model are the field wine testers. The field wine testers are testing wines across the globe and can quickly analyze the key features of the wine. Wine testers promptly enter the wine features in a mobile app which immediately returns a predictive quality score to the tasters. If a score is high enough, the tasters can acquire the wine for wholesale distribution on the spot.
Billy has started to use the MLFlow Model Registry to store and manage the different versions of his wine quality model. The MLflow Model Registry builds on MLflow’s existing capabilities to provide organizations with one central place to share ML models, collaborate on moving them from experimentation to testing and production, and implement approval and governance workflows.
The registry is a huge help in managing the different versions of the models and their lifecycle.
Once a machine learning model is properly trained and tested, it needs to be put into production. This is also known as the model serving or scoring environment. There are multiple types of architectures for ML model serving. The right type of ML production architecture is dependent on the answer to two key questions:
If the frequency is a few times a day and the inference request response time required is minutes to hours, a batch scoring model will be ideal. If the data is provided continuously, a streaming architecture should be considered, especially if the answers are needed quickly. If the data is provided ad hoc and the answer is needed within seconds or milliseconds, a REST API-based scoring model would be ideal.
In the case of Wine Inc., we assume that the latter is the case, i.e. the field testers request the results ad hoc and expect an immediate response. There are multiple options to provide REST based model serving, e.g. using Databricks REST Model serving or a simple Python based model server which is supported by MLFlow. Another popular option for model serving inside of the Azure ecosystem is using AzureML. Azure ML provides a container-based backend that allows for the deployment of REST-based model scoring. MLflow directly supports Azure ML as a serving endpoint. The remainder of this blog will focus on how to best utilize this built-in MLflow functionality.
The diagram above illustrates which end-to-end steps are required. I will use the diagram as the guide to walk through the different steps of the pipeline. Please note that this pipeline is still somewhat simplified for demo purposes.
The main steps are:
Please look at the following Notebook for guidance:
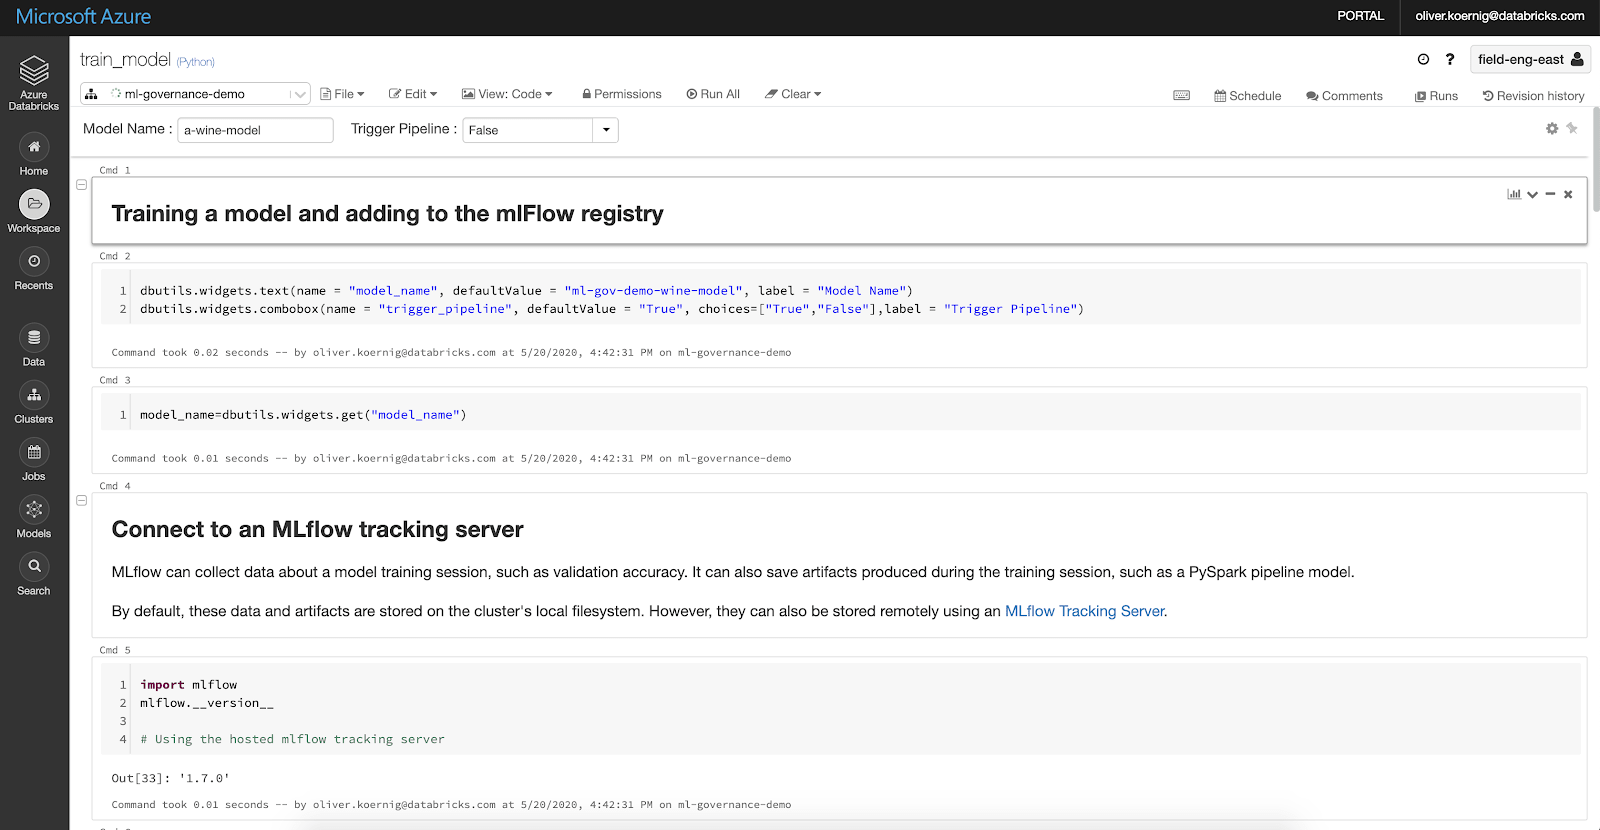
Billy continuously develops his wine model using the Azure Databricks Unified Data and Analytics Platform. He uses Databricks managed MLflow to train his models and run many model variations using MLFlow’s Tracking server to find the best model possible. Once Billy has found a better model, he stores the resulting model in the MLflow Model Registry, using the Python code below.
result = mlflow.register_model(
    model_uri,
    model_name
)
time.sleep(10)
version = result.version
(The sleep step is needed to make sure that the registry has enough time to register the model).
Once Billy has identified his best model, he registers it in the Model Registry as a “staging” model.
client = mlflow.tracking.MlflowClient()
client.transition_model_version_stage(
    name=model_name,
    version=version,
    stage="staging")
Azure DevOps provides a way to automate the end-to-end process of promoting, testing and deploying the model in the Azure ecosystem. It requires the creation of an Azure DevOps pipeline. The remainder of this blog will dive into how best define the Azure DevOps pipeline and integrate it with Azure Databricks and Azure.
Once Billy defines the Azure DevOps pipeline, he can then trigger the pipeline programmatically, which will test and promote the model into the production environment used by the mobile app.
The Azure Pipeline is the core component of Azure DevOps. It contains all the necessary steps to access and run code that will allow the testing, promotion and deployment of a ML pipeline. More info on Azure pipelines can be found here.
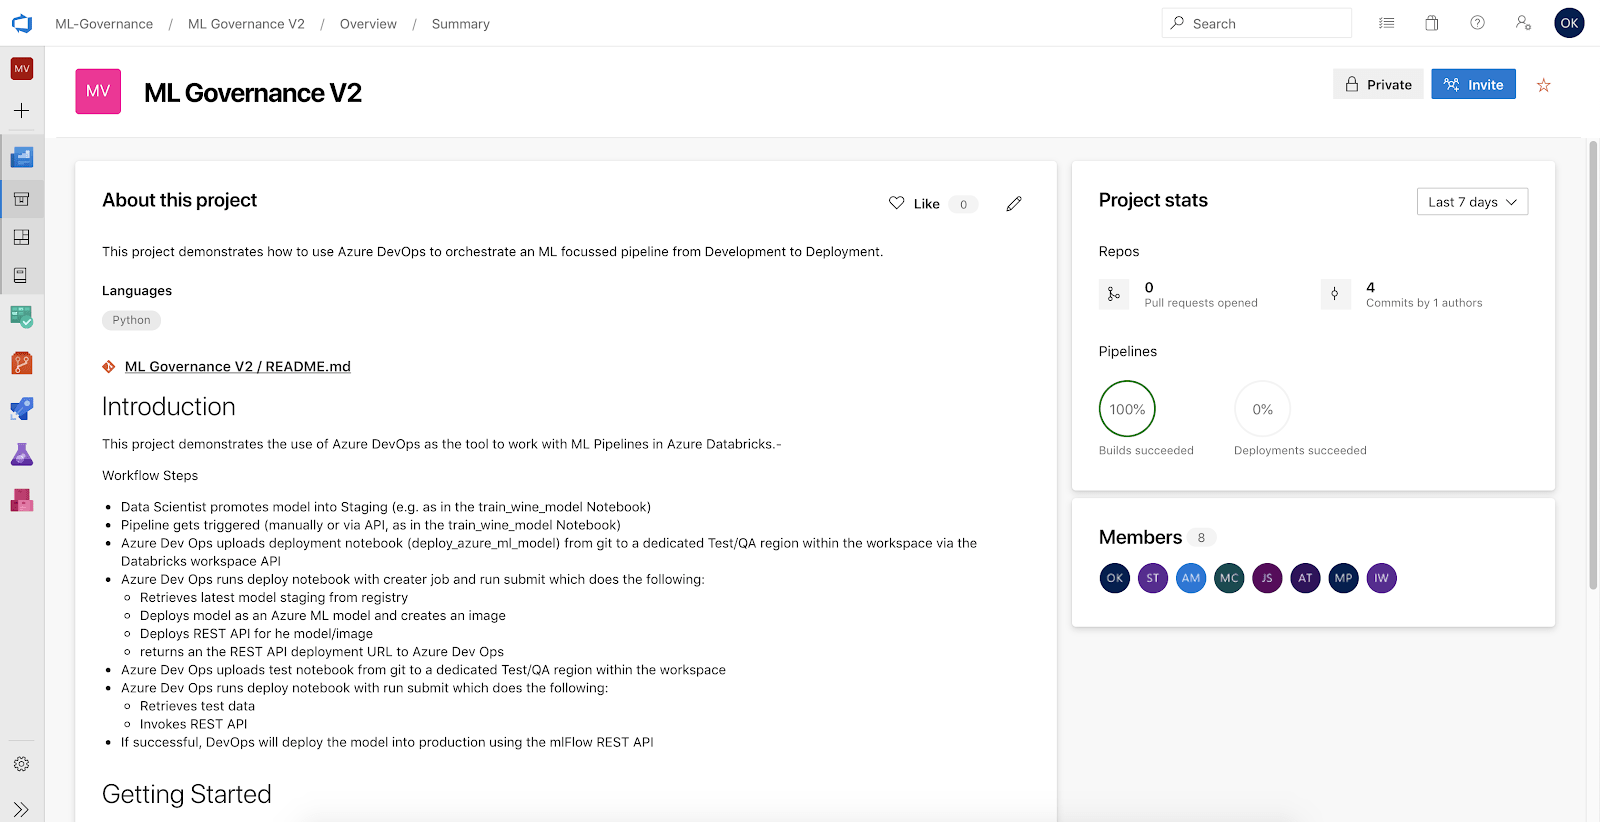
Another core component of Azure DevOps is the repo. The repo contains all the code that is relevant for a build and deploy pipeline. The repo stores all the artifacts that are required, including:
The image below shows the DevOps project and repo for the Wine Inc. pipeline:
The DevOps pipeline is defined in YAML. This is an example YAML file for the pipeline in this blog post,
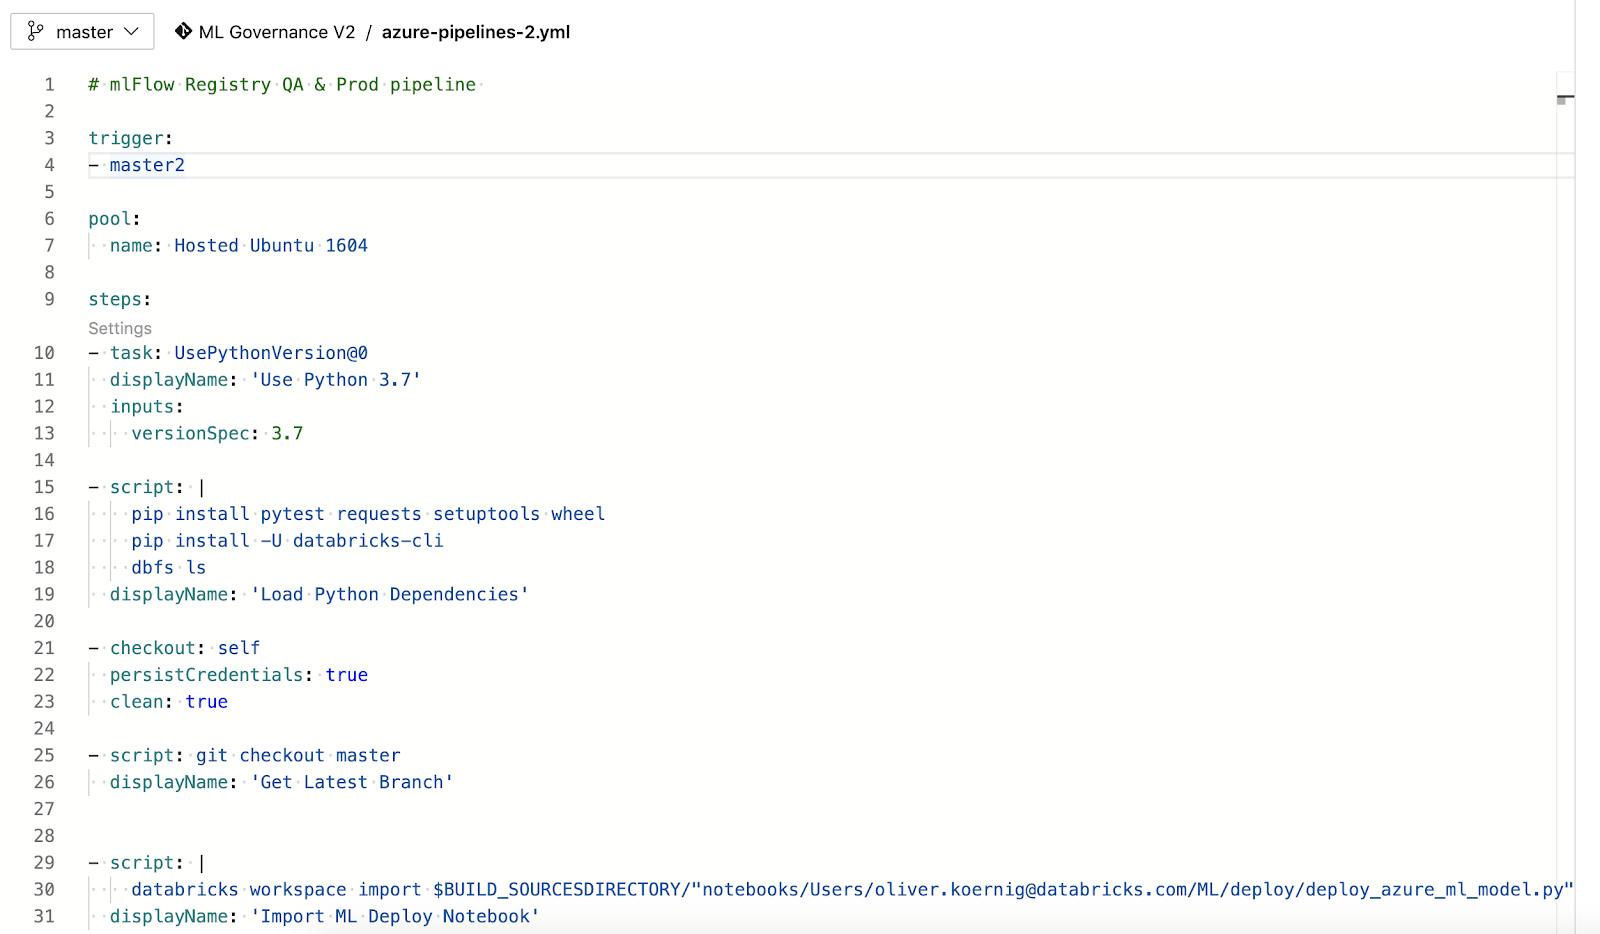
Line 3: Trigger: Oftentimes, pipelines will be triggered automatically by code changes. Since promoting a model in the Model Registry is not a code change, the Azure DevOps REST API can be used to trigger the pipeline programmatically. The pipeline can also be triggered manually via the UI.
This is the code in the training notebook that uses the DevOps REST API to trigger the pipeline:
from azure.devops.connection import Connection
from msrest.authentication import BasicAuthentication
from azure.devops.v6_0.pipelines.models import RunPipelineParameters,Variable

# Fill in with your personal access token and org URL
personal_access_token = dbutils.secrets.get('ml-gov','ado-token')
organization_url = 'https://dev.azure.com/ML-Governance'
    # Create a connection to the org
credentials = BasicAuthentication('', personal_access_token)
connection = Connection(base_url=organization_url, creds=credentials)

# Get a client (the "core" client provides access to projects, teams, etc)
pipeline_client=connection.clients_v6_0.get_pipelines_client()

#Set the variables for the pipeline
variable=Variable(value=model_name)
variables={'model_name':variable}
run_parameters=RunPipelineParameters(variables=variables)
print(run_parameters)

# Run pipeline in MKL Governance Project V2 with id 6 (ML Governance V3))
runPipeline = pipeline_client.run_pipeline(run_parameters=run_parameters,project='ML Governance V2',pipeline_id=6)The Azure pipeline is a YAML file. It will first setup the environment (all Python based) and then deploy the model into an Azure QA environment where it can be tested.

Line 15 to 19: Prerequisites: the pipeline installs a set of libraries that it needs to run the scripts. We are using Python to run the scripts. There are a variety of different options to run code in Python when using Azure Databricks. We will use a few of them in this blog.
Using the Databricks Command Line Interface: The Databricks CLI provides a simple way to interact with the REST API. It can create and run jobs, upload code etc. The CLI is most useful when no complex interactions are required. In the example the pipeline is used to upload the deploy code for Azure ML into an isolated part of the Azure Databricks workspace where it can be executed. The execution is a little more complicated, so it will be done using the REST API in a Python script further below.
Lines 32 to 37: This step executes the Python script executenotebook.py. It takes a number of values as parameters, e.g. the Databricks Host name, etc. It will also allow the passing of parameters into the notebook, such as the name of the Model that should be deployed and tested.
The code is stored inside the Azure DevOps repository along with the Databricks notebooks and the pipeline itself. Therefore it is always possible to reproduce the exact configuration that was used when executing the pipeline.
- task: PythonScript@0
inputs:
    scriptSource: 'filePath'
    scriptPath: '$(Build.Repository.LocalPath)/cicd-scripts/executenotebook.py'
    arguments: '--shard $(DATABRICKS_HOST) --token $(DATABRICKS_TOKEN) --cluster $(EXISTING_CLUSTER_ID) --localpath $(Build.Repository.LocalPath)/notebooks/Users/[email protected]/ML/deploy --workspacepath /Demo/Test --outfilepath /home/vsts/work/1/s/notebooks/Users/[email protected] --params model_name=$(model_name)'
displayName: 'Deploy MLflow Model from Registry to Azure ML for Testing'
This Notebook “deploy_azure_ml_model” performs one of the key tasks in the scenario, mainly deploying an MLflow model into an Azure ML environment using the built in MLflow deployment capabilities. The notebook is parameterized, so it can be reused for different models, stages etc.
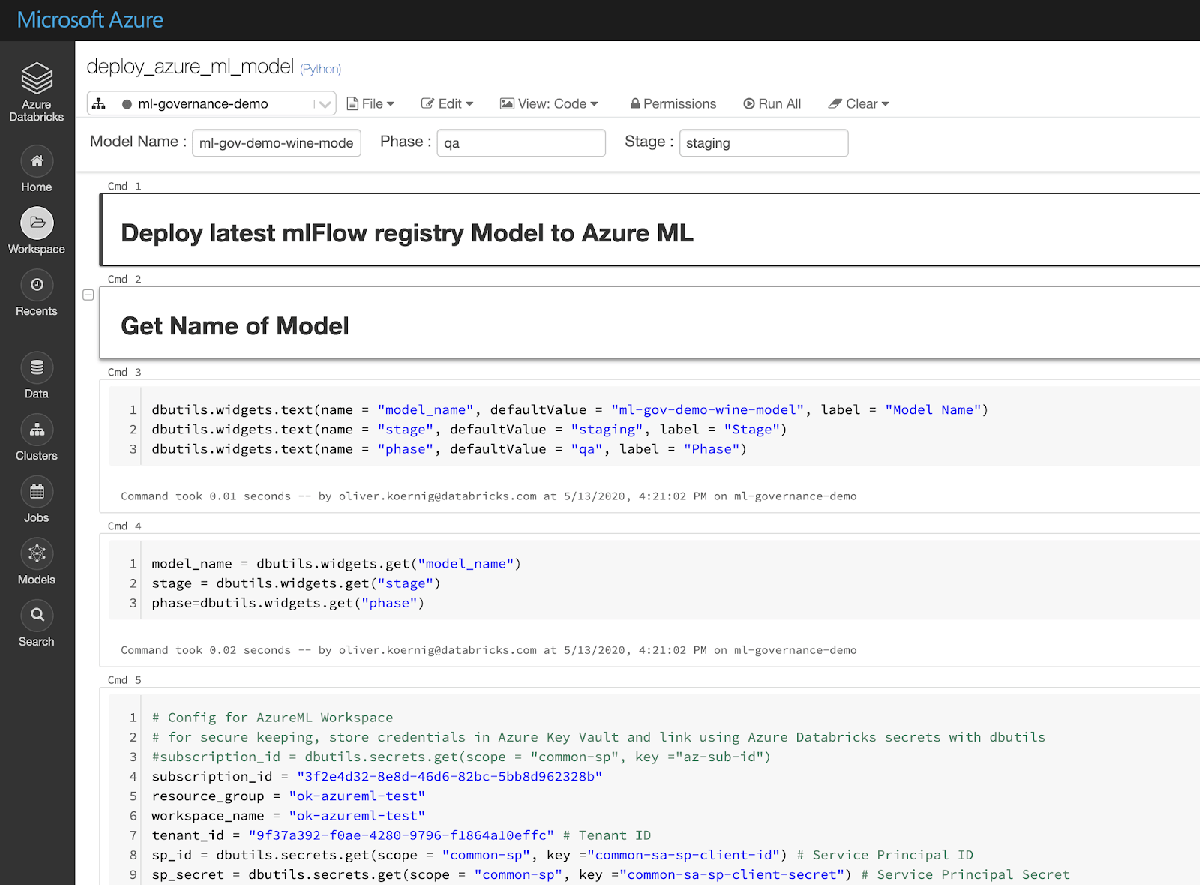
The following code snippet from the Notebook is the key piece that deploys the model in Azure ML using the MLflow libraries:
import mlflow.azureml
model_image, azure_model = mlflow.azureml.build_image(model_uri=model_uri,
workspace=workspace,
model_name=model_name+"-"+stage,
image_name=model_name+"-"+phase+"-image",
description=model_name,
tags={
"alpha": str(latest_sk_model.alpha),
"l1_ratio": str(latest_sk_model.l1_ratio),
},
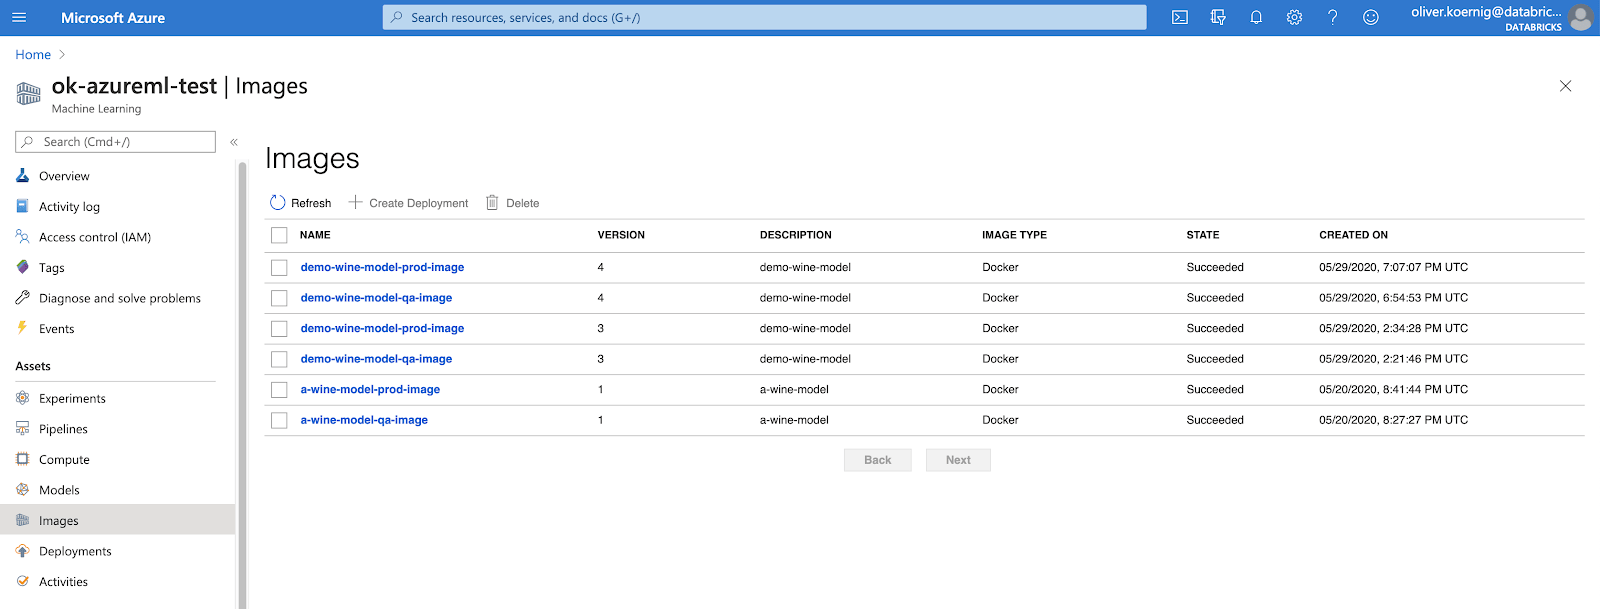
synchronous=True)This will create a container image in the Azure ML workspace. The following is the resulting view within the Azure ML workspace:
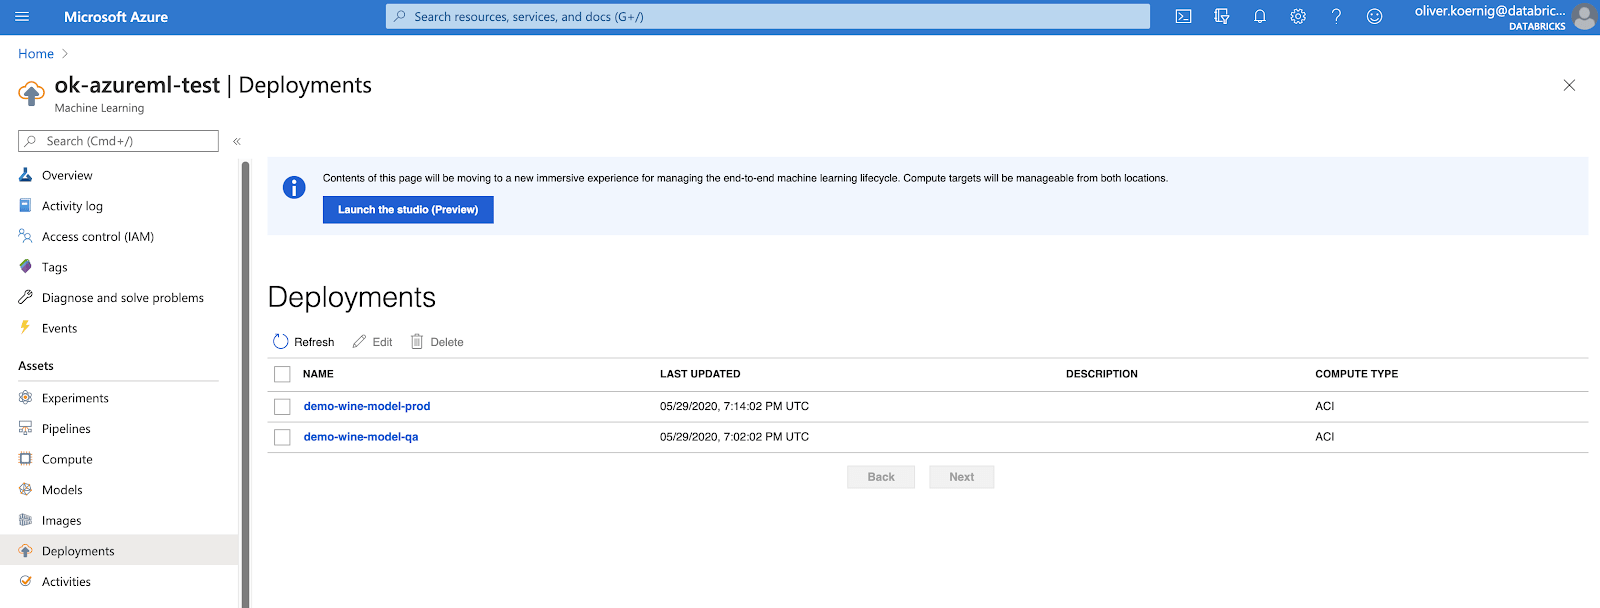
The next step is to create a deployment that will provide a REST API:
The Execution of this Notebook takes around 10-12 min. The executenotebook.py provides all the code that allows the Azure DevOps environment to wait until the Azure ML deployment task has been completed. It will check every 10 seconds if the job is still running and go back to sleep if indeed it is. When the model is successfully deployed on Azure ML, the Notebook will return the URL for the resulting model REST API. This REST API will be used further down to test if the model is properly scoring values.
When the pipeline is running, users can monitor the progress. The screen shot reveals the API calls and then 10 sec wait between calls.

The next step is executing the test of the Notebook. Like the previous step it triggers the executenotebook.py code and passes the name of the test notebook (“test_api”) as well as the REST API from the previous step.
task: PythonScript@0
inputs:
    scriptSource: 'filePath'
    scriptPath: '$(Build.Repository.LocalPath)/cicd-scripts/executenotebook.py'
    arguments: '--shard $(DATABRICKS_HOST) --token $(DATABRICKS_TOKEN) --cluster $(EXISTING_CLUSTER_ID) --localpath $(Build.Repository.LocalPath)/notebooks/Users/[email protected]/ML/test --workspacepath /Demo/Test --outfilepath /home/vsts/work/1/s/notebooks/Users/[email protected] --params model_name=$(model_name),scoring_uri=$(response)'
displayName: 'Test MLflow Model from Registry against REST API'
The testing code can be as simple or complicated as necessary. The “test_api” notebook simply uses a record from the initial training data and submits it via the model REST API from the Azure ML. If it returns a meaningful value the test is considered a success. A better way to test would be to define a set of expected results using the API and using a much larger set of records.
Given a successful test, two things need to subsequently happen:
The next step will take care of the first step. It uses the managed MLflow REST API on Azure Databricks. Using the API, the model can be promoted (using the mlflow.py script within Dev Ops) w/o executing any code on Azure Databricks itself. It will only take a few seconds.
This script promotes the latest model with the given name out of staging into production
This script promotes the latest model with the given name out of staging into production
import importlib,pprint,json,os
from mlflow_http_client import MlflowHttpClient, get_host,get_token
import pprint
client = MlflowHttpClient(host=get_host(),token=get_token())
pp = pprint.PrettyPrinter(indent=4)
model_name=os.environ.get('MODEL_NAME')
print("Mode Name is: "+model_name)
rsp = client.get("registered-models/get-latest-versions?name="+model_name+"&stages=staging")
if len(rsp) >= 1:
version = rsp['model_versions'][0]['version']
else:
raise BaseException('There is no staging model for the model named: '+model_name)
result=rsp['model_versions'][0]['version']
data = {"name": model_name,"version":version,"stage":"production","archive_existing_versions":False}
rsp = client.post("model-versions/transition-stage", data)
pp.pprint(rsp)
response=rsp['model_version']['version']
print ("Return value is:"+response)
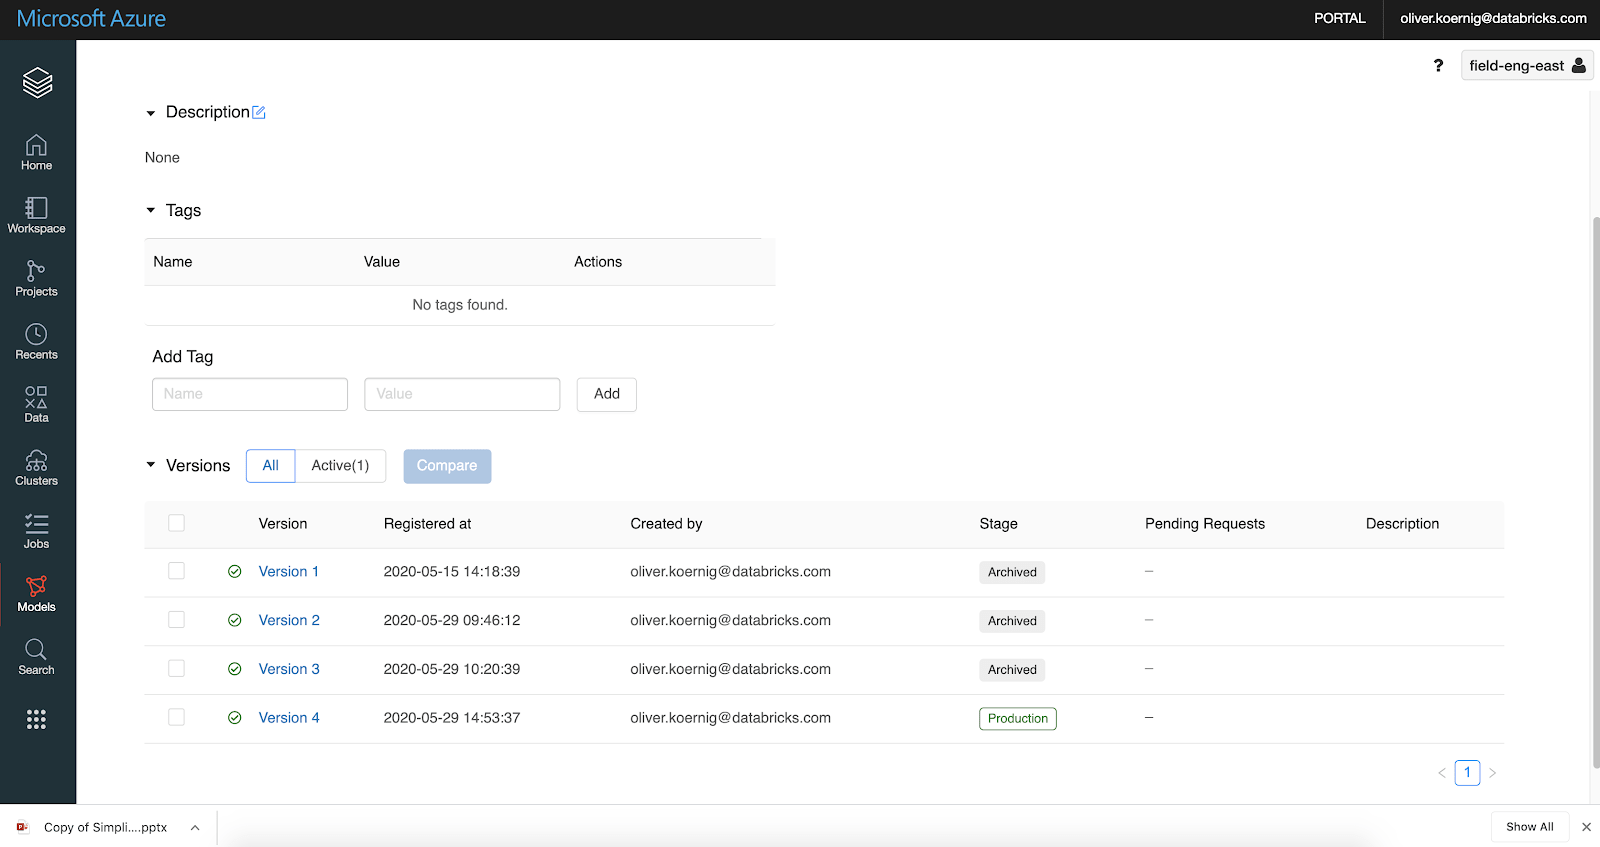
print('##vso[task.setvariable variable=response;]%s' % (response)) We can verify with the Azure Databricks Model UI that this has indeed happened: We can see that there is a new production level model (version 4). As a side note, while it is possible to have multiple models in production, we don’t consider that good practice, so all other production versions should be archived (MLflow provides a feature to automatically enable this by setting archive_existing_versions=true).
The next step is simply a repeat of steps 4 through 11. We will re-deploy the model in Azure ML and indicate that this is the production environment. Please note that Azure DevOps has a separate set of deploy pipelines which we are not utilizing in this blog in order to keep things a little simpler.
This blog post has demonstrated how an MLLC can be automated by using Azure Databricks , Azure DevOps and Azure ML. It demonstrated the different ways Databricks can integrate with different services in Azure using the Databricks REST API, Notebooks and the Databricks CLI. See below for links to the three notebooks referenced in this blog
For questions or comments, please contact [email protected].