How to install MySQL 8 on Debian 10
On this page
- Step 1 - Add MySQL Repository
- Step 2 - Install MySQL Server
- Step 3 - Secure MySQL Deployment using mysql_secure_password
- Step 4 - Secure MySQL Server Using Additional Configuration
- Step 5 - Secure and Enable MySQL Remote Connection using SSL
- Step 6 - Install and Configure phpMyAdmin
- Step 7 - Create MySQL User and Database
- Step 8 - Additional: Create Incremental Backup MySQL Database
- References
MySQL is an open-source relational database system that works on many Operating Systems, including Windows, Linux, macOS, and FreeBSD. It is probably the most popular OpenSource RDBMS and a central component of the LAMP and LEMP Stacks. Many applications depend on MySQL like WordPress, Joomla, TYPO3, phpBB, and many more.
Several new features have been added to the MySQL 8 including, JSON support, Transactional Data Dictionary, Persistent runtime configuration, Document Store, Optimizer Hints, SQL roles, CTEs, window functions, Invisible indexes, and many more.
What you will learn?
In this tutorial, you will learn some stuff related to the MySQL server, and below are details about:
- Install MySQL Server 8 on Debian Buster 10
- Set Up MySQL Root Password
- Secure MySQL Server Deployment (Change Bind Address, Port, etc.)
- Setup SSL and Enable Remote Connection for MySQL Server
- Install and Configure phpMyAdmin
- Basic MySQL Query for Creating User, Database, etc
- Set up automatic backup MySQL databases
Prerequisites
We will install the MySQL Server 8.04 on the latest Debian Buster 10 with 2GB of RAM and 4 CPUs for this guide. Also, we need the root privilege for installing packages and editing system configurations.
Step 1 - Add MySQL Repository
For this tutorial, we will install the MySQL Server 8 from the official MySQL repository. To do that, we need to add the official MySQL repository to our Debian Server.
Before adding the MySQL repository, install the 'GnuPG' package using the apt command below.
sudo apt install gnupg -y
Once all installation is completed, download the MySQL APT repository and add it to your system.
wget -q http://repo.mysql.com/mysql-apt-config_0.8.15-1_all.deb
sudo dpkg -i mysql-apt-config_0.8.15-1_all.deb
Leave the repository as default and select 'OK'.

And the official MySQL repository has been added.
Next, update all available repositories on the Debian system using the following command.
sudo apt update
And you will get the official MySQL repository on the list below.
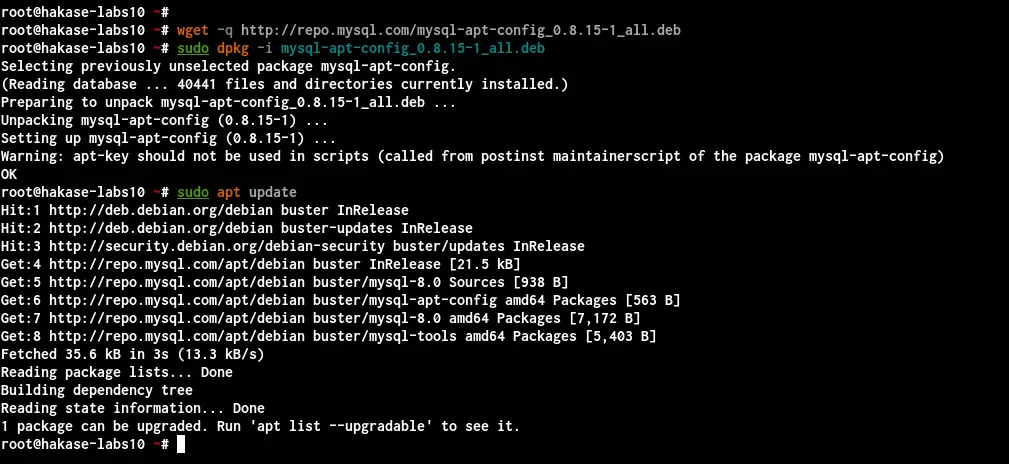
As can be seen, the official MySQL repository has been added, and we're ready to install the MySQL Server 8.0 to the Debian Buster 10.
Step 2 - Install MySQL Server
To install the MySQL Server 8.0 to the Debian system, run the apt command below.
sudo apt install mysql-server
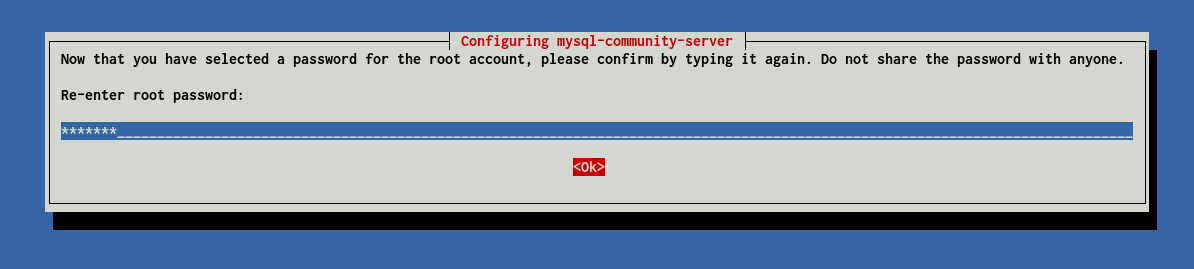
Now type the root password for your MySQL installation and choose 'OK'.

Repeat the password for your MySQL root user.
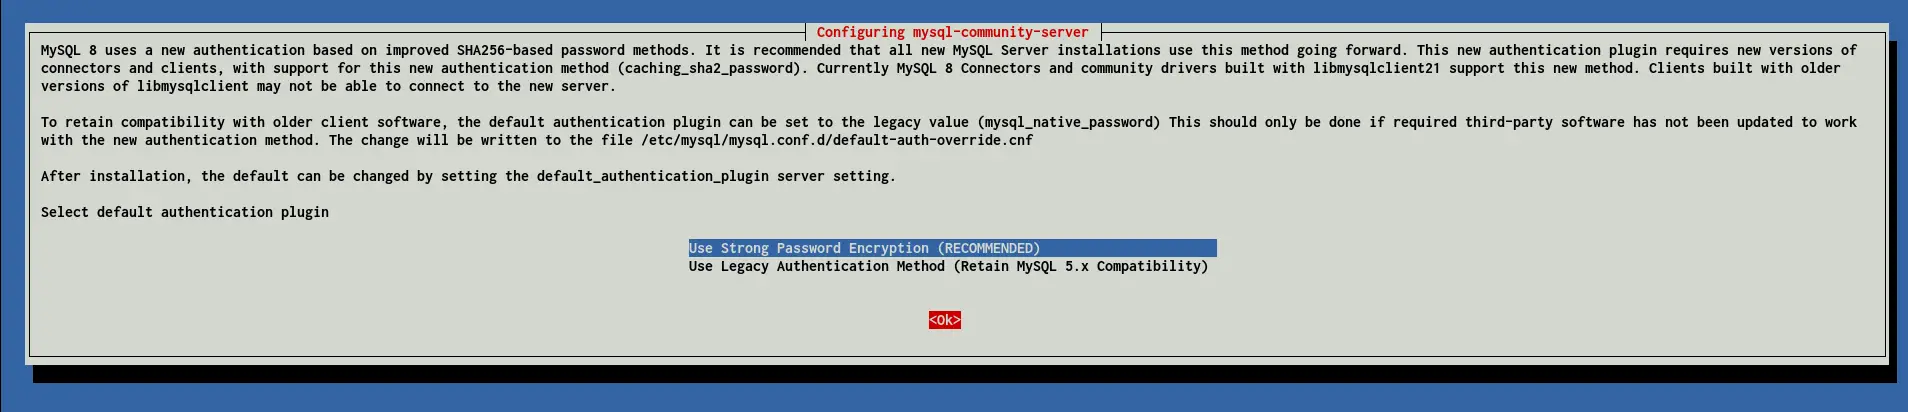
After that, you will be asked to configure the MySQL default authentication plugin. Select the 'Strong Password Encryption' as recommended and choose 'OK'.
And the MySQL Server 8.0 installation is finished.
Now check the MySQL service using the following command.
systemctl is-enabled mysql
systemctl status mysql
Below is the result you will get.
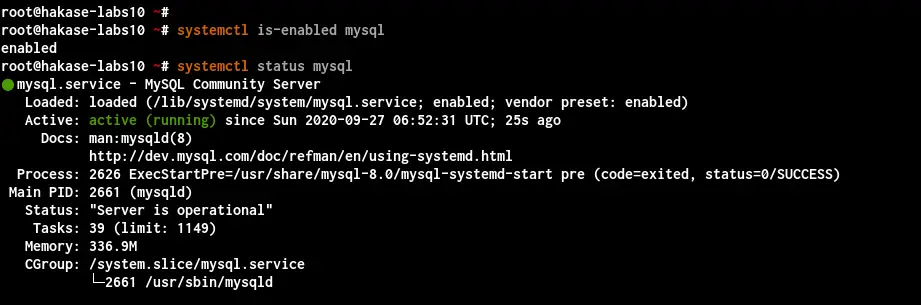
As a result, the MySQL service is up and running on the Debian Server. The service will be running automatically at every system boot.
Step 3 - Secure MySQL Deployment using mysql_secure_password
In this step, we will improve the MySQL server installation's security using the 'mysql_secure_installation' command-line tool.
The 'mysql_secure_installation' tool will help you improve your MySQL deployment from different aspects such as setup the password strength, disable remote access, and removing default anonymous user and test databases.
Now run the 'mysql_secure_installation' command on your shell.
mysql_secure_installation
At the beginning of the MySQL installation, you've already configured the root password for MySQL. Now type the password to continue to the process.
Enter the password for user root: TYPE YOUR MYSQL ROOT PASSWORD
After that, type 'Y' to configure the 'VALIDATE PASSWORD' component.
VALIDATE PASSWORD COMPONENT can be used to test passwords
and improve security. It checks the strength of the password
and allows the users to set only those passwords which are
secure enough. Would you like to setup VALIDATE PASSWORD component?

Press y|Y for Yes, any other key for No: Y
Now choose the password validation policy level for all users. Type '2' to set up the 'STRONG' password level policy.
There are three levels of password validation policy:

LOW    Length >= 8
MEDIUM Length >= 8, numeric, mixed case, and special characters
STRONG Length >= 8, numeric, mixed case, special characters, and dictionary                  file

Please enter 0 = LOW, 1 = MEDIUM and 2 = STRONG: 2
Using existing password for root.
Now 'mysql_secure_installation' command will check your current password strength. As can be seen, the strength of our current password is '50'. Now type 'Y' to change the current password with a new stronger password.
Estimated strength of the password: 50
Change the password for root? ((Press y|Y for Yes, any other key for No) : Y
Now type your strong password and make sure to have the score 100, then type 'Y' to continue with the new password.
New password:

Re-enter new password:

Estimated strength of the password: 100
Do you wish to continue with the password provided? (Press y|Y for Yes, any other key for No) : Y
As a result, the MySQL component 'VALIDATE PASSWORD' has been configured with a strong password policy, and the new MySQL password has been created.
Next, you will be asked to remove the default Anonymous user. Type 'Y' to remove the default anonymous user for your installation.
By default, a MySQL installation has an anonymous user,
allowing anyone to log into MySQL without creating a user account. This is intended only for testing, and to make the installation go a bit smoother.
You should remove them before moving into a production
environment.

Remove anonymous users? (Press y|Y for Yes, any other key for No) : Y
Next, type 'Y' again to disable MySQL remote login and if you want the MySQL server accessible only locally.
Normally, root should only be allowed to connect from
'localhost'. This ensures that someone cannot guess at
the root password from the network.

Disallow root login remotely? (Press y|Y for Yes, any other key for No) : Y
After that, remove the default database 'test' from your MySQL Server. Type 'Y' and press Enter to continue.
By default, MySQL comes with a database named 'test' that
anyone can access. This is also intended only for testing,
and should be removed before moving into a production
environment.

Remove test database and access to it? (Press y|Y for Yes, any other key for No) : Y
Next, type 'Y' again to reload the privilege tables. In effect, and new MySQL configuration changes have been applied.
Reloading the privilege tables will ensure that all changes
made so far will take effect immediately.

Reload privilege tables now? (Press y|Y for Yes, any other key for No) : Y
As a result, the Secure MySQL Server Deployment using te 'mysql_secure_installation' script has been completed. And at this stage, you've enabled the 'VALIDATE PASSWORD' component with the level '2' strong password policy, also the new strong root password for MySQL has been configured.
Step 4 - Secure MySQL Server Using Additional Configuration
For this tutorial, we will add additional configuration to improve the deployment of the MySQL Server. We will specify the MySQL Server's bind-address, change the default port, disable load data file, and set up a password expiration policy for all MySQL users.
Now go to the '/etc/mysql/conf.d/' directory and create a new configuration 'mysqld.cnf' using vim editor.
cd /etc/mysql/conf.d/
vim mysqld.cnf
Paste the following configuration into it.
[mysqld]

# MySQL running on 127.0.0.1 with port 8320
bind-address=127.0.0.1
port=8320

# Disable LOAD DATA LOCA
local-infile=0

# Password Expiration to 60 Days
default_password_lifetime=60

# MySQLX Plugin running on 127.0.0.1 with port 8321
mysqlx_bind_address=127.0.0.1
mysqlx_port=8321
Save and close.
Next, restart the MySQL service and check open ports on the system using the following command.
systemctl restart mysql
ss -plnt
Below is the result you will get.

As can be seen, the MySQL Server is up and running on the local IP address '127.0.0.1' on the non-default TCP port '8320'.
Next, to log in to the MySQL shell with the custom port, you can use the 'mysql' command with '-P port' option as below.
mysql -u root -P 8320 -p
Type the root password for the MySQL Server.
Once you've logged in, run the following query to check the MySQL Server's port configuration.
show variables like 'port';
And you will get the MySQL Server is running on the custom port '8320' as below.
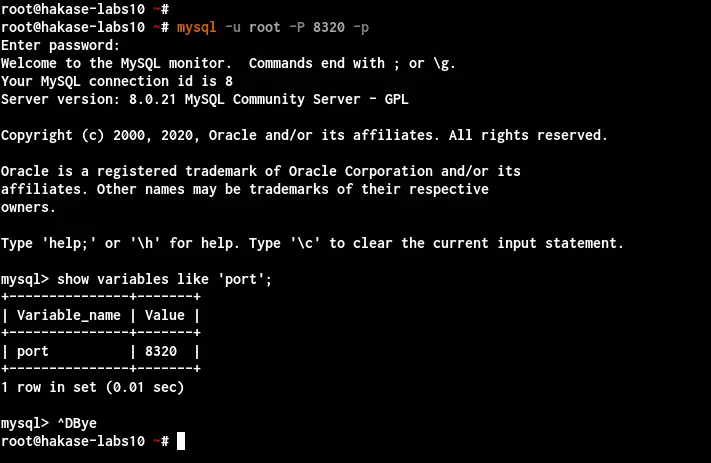
As a result, you've configured the MySQL Server to be running on the local IP address '127.0.0.1' with the custom TCP port '8320'.
Step 5 - Secure and Enable MySQL Remote Connection using SSL
Suppose you want to deploy the MySQL Server on the internal network and allow other hosts on the same network to access databases on the MySQL Server. In that case, it's recommended to enable SSL for your MySQL Server deployment.
In this step, you will learn how to set up and enable SSL and remote access on the MySQL Server.
Generate SSL Certificates
By default, the MySQL Server 8.0 is generated SSL certificates automatically during the installation. All default SSL certificates are available at the '/var/lib/mysql' directory.
For this step, we will generate a new SSL certificate for the MySQL Server using the 'mysql_ssl_rsa_setup' command-line tool.
Now create a new SSL directory '/etc/mysql/certs' and change that directory's ownership to the user 'mysql'.
mkdir -p /etc/mysql/certs/
sudo chown -R mysql:mysql /etc/mysql/certs
Next, generate new SSL certificates for the MySQL Server using the following command. And make sure to change the '--suffix=STRING' with your Common Name.
sudo mysql_ssl_rsa_setup --suffix=HakasMySQLSrv --uid=mysql --datadir=/etc/mysql/certs/
Once it's completed, new SSL certificates for the MySQL Server has been generated at the '/etc/mysql/certs' directory.

Check your SSL certificates using the following command.
ls -lah /etc/mysql/certs/
openssl verify -CAfile /etc/mysql/certs/ca.pem /etc/mysql/certs/server-cert.pem /etc/mysql/certs/client-cert.pem
Below is the result you will get.
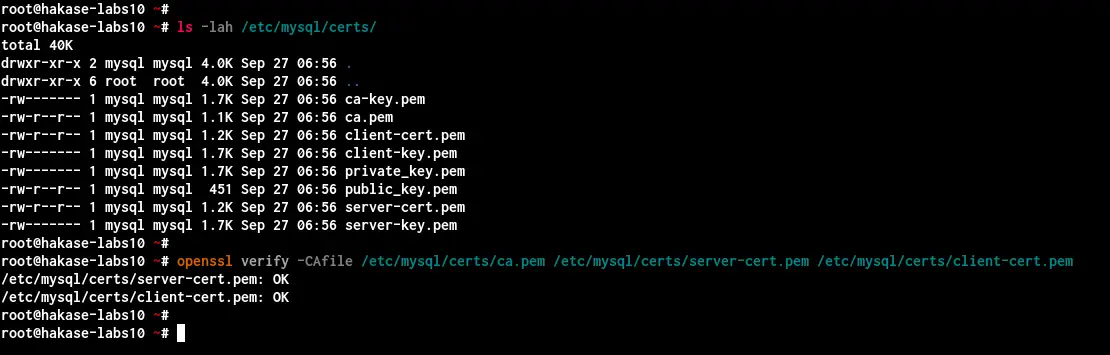
The new SSL certificates for MySQL Server has been generated to the '/etc/mysql/certs/' directory.
Enable SSL and Remote Access MySQL Server
To enable the SSL and remote access on the MySQL Server, you will need to change the 'bind-address' option with your internal network's IP address and add the SSL configuration for MySQL.
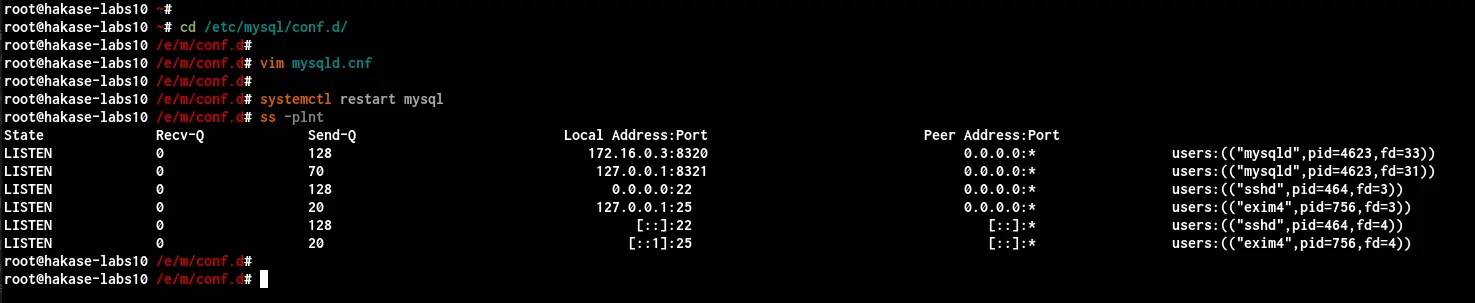
Now go to the '/etc/mysql/conf.d/' directory and edit the configuration that we've created on top 'mysqld.cnf' using vim editor.
cd /etc/mysql/conf.d/
vim mysqld.cnf
Change the 'bind-address' with your internal IP address as below.
bind-address=172.16.0.3
Next, add the SSL configuration for the MySQL Server below and change the SSL path with your own.
ssl-ca=/etc/mysql/certs/ca.pem
ssl-cert=/etc/mysql/certs/server-cert.pem
ssl-key=/etc/mysql/certs/server-key.pem
Additionally, you can specify the TLS version of al your clients and force them to use only the secure SSL connection using the following configuration.
#require_secure_transport=ON
tls_version=TLSv1.1,TLSv1.2
Save and close.
Next, restart the MySQL service to apply the new configuration and check the MySQL server's IP address using the following command.
systemctl restart mysql
ss -plnt
And you will get the MySQL Server is up and running on the internal network IP address with SSL enabled on it.
Setup Client and Test SSL Connection
To connect to the MySQL Server from another host/client, you must create a new MySQL user, copy the client certificates, and add the MySQL configuration for the client.
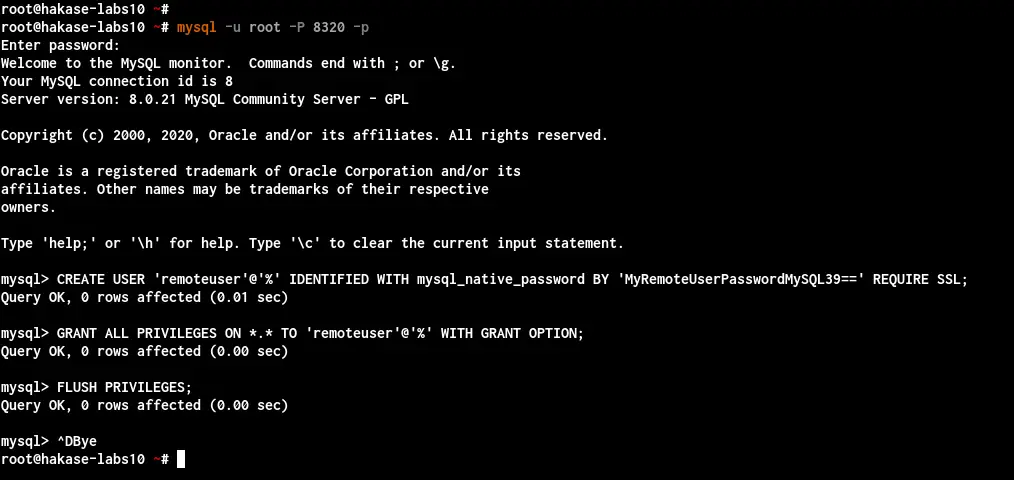
Log in to the MySQL shell using the following command.
mysql -u root -P 8320 -p
Now create a new MySQL user for remote connection using the following query.
CREATE USER 'remoteuser'@'%' IDENTIFIED WITH mysql_native_password BY 'MyRemoteUserPasswordMySQL39==' REQUIRE SSL;
GRANT ALL PRIVILEGES ON *.* TO 'remoteuser'@'%' WITH GRANT OPTION;
FLUSH PRIVILEGES;
Type 'exit' to log out from the MySQL shell.
Next, you need to copy the CA and client certificate and key to the client machine using the SCP command as below.
scp /etc/mysql/certs/ca.pem root@clientIP:/certificates/directory/
scp /etc/mysql/certs/client-cert.pem root@clientIP:/certificates/directory/
scp /etc/mysql/certs/client-key.pem root@clientIP:/certificates/directory/
After that, connect to your client machine and create a new configuration using the vim editor.
vim ~/.my.cnf
Paste the MySQL client configuration as below and change the client SSL certificate path with your own.
[client]
ssl-ca=/home/gpk/certs/ca.pem
ssl-cert=/home/gpk/certs/client-cert.pem
ssl-key=/home/gpk/certs/client-key.pem
Save and close.
To connect to the remote MySQL Server with a custom port, run the 'mysql' command below.
mysql -u remoteuser -h 172.16.0.3 -P 8320 -p
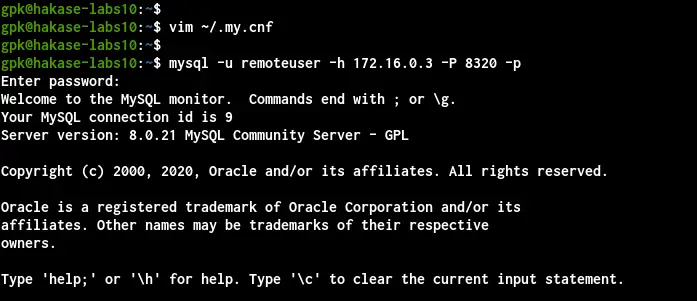
Once you've logged in, check your connection status using the following query.
STATUS
SELECT * FROM performance_schema.session_status
       WHERE VARIABLE_NAME IN ('Ssl_version','Ssl_cipher');
Below is the result you will get.
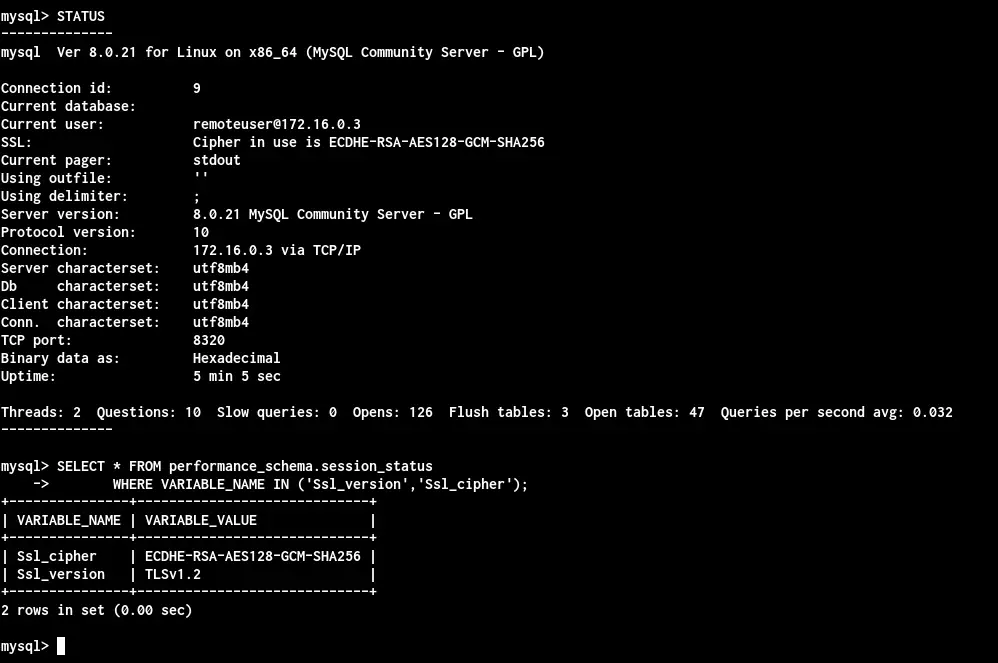
As can be seen, you've logged in with SSL secure connection TLSv1.2 to the MySQL Server.
As a result, the remote access with a secure SSL connection for MySQL Server has been enabled.
Step 6 - Install and Configure phpMyAdmin
In this step, you will learn how to install the latest phpMyAdmin with the Apache webserver. You will also learn how to connect to the MySQL Server on the remote host with a custom port and alose securely through SSL from the phpMyAdmin.
Before going any further, install some packages dependencies using the apt command below.
sudo apt install apache2 libapache2-mod-php php-imagick php-phpseclib php-php-gettext php-common php-mysql php-gd php-imap php-json php-curl php-zip php-xml php-mbstring php-bz2 php-intl php-gmp unzip
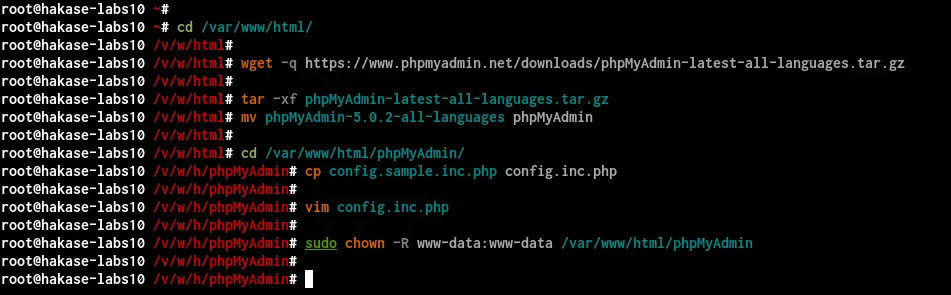
Next, go to the '/var/www/html' directory and download the latest phpMyAdmin source code.
cd /var/www/html/
wget -q https://www.phpmyadmin.net/downloads/phpMyAdmin-latest-all-languages.tar.gz
Now extract the phpMyAdmin source code and rename to the new directory named 'phpMyAdmin'.
tar -xf phpMyAdmin-latest-all-languages.tar.gz
mv phpMyAdmin-5.0.2-all-languages phpMyAdmin
Next, go to the '/var/www/phpMyAdmin' drectory and copy the default configuration file to 'config.inc.php'.
cd /var/www/html/phpMyAdmin/
cp config.sample.inc.php config.inc.php
Edit the 'config.inc.php' configuration file using vim editor.
vim config.inc.php
Generate the blowfish secret code using this link and paste the code to the 'blowfish_secret' line as below.
$cfg['blowfish_secret'] = '6}2]RFleN-JT=/vXD}L/0j0v.YALV/e3'; /* YOU MUST FILL IN THIS FOR COOKIE AUTH! */
Next, type your MySQL Server details under the 'Server Configuration' line as below.
/**
 * Servers configuration
 */
$i = 0;

.....
/* Custom MySQL Server Configuration */
$cfg['Servers'][$i]['host'] = '172.16.0.3';
$cfg['Servers'][$i]['port'] = '8320';
.....
After that, paste the following configuration to enable the SSL communication from the phpMyAdmin to MySQL Server. And make sure to change the client and CA certificates' path with your own and make sure the user 'www-data' can access CA and client certificates.
/* SSL Configuration */
$cfg['Servers'][$i]['ssl'] = true;
$cfg['Servers'][$i]['ssl_key'] = '/opt/mysql/certs/client-key.pem';
$cfg['Servers'][$i]['ssl_cert'] = '/opt/mysql/certs/client-cert.pem';
$cfg['Servers'][$i]['ssl_ca'] = '/opt/mysql/certs/ca.pem';

/* Disable SSL Verification for Self-signed certificates */
/* The Good: Connection between phpMyAdmin and MySQL Server are Encrypted */
/* But you're still vulnerable with the MiTM */
$cfg['Servers'][$i]['ssl_verify'] = false;

/* Hide Some Databases */
$cfg['Servers'][$i]['hide_db'] = '(information_schema|performance_schema|sys|mysql)';
Save and close.
Now change ownership of the 'phpMyAdmin' directory to the user 'www-data'.
sudo chown -R www-data:www-data /var/www/html/phpMyAdmin
And the phpMyAdmin installation and configuration of phpMyAdmin has been completed.
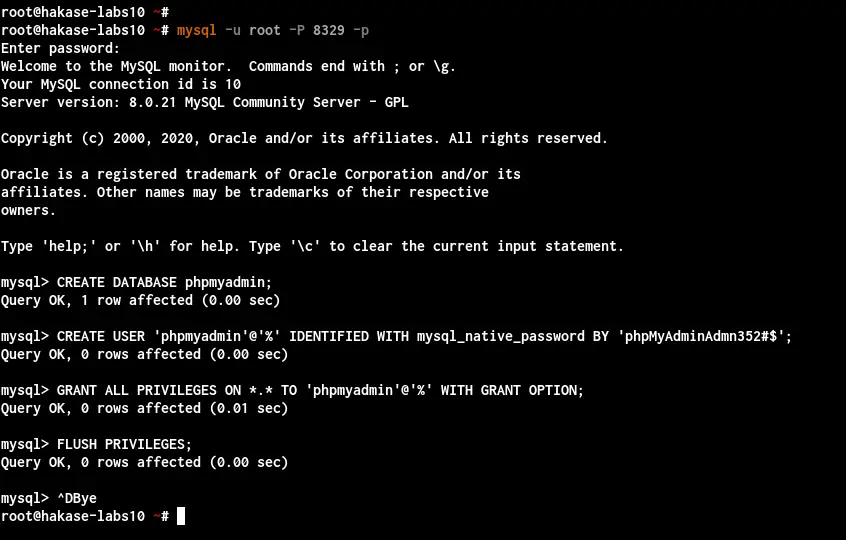
Now log in to the MySQL Server, check the MySQL SSL status, create a new database and user for phpMyAdmin.
Log in to the MySQL Server using the following command.
mysql -u root -P 8329 -p
Now check the SSL status using the following queries.
SHOW VARIABLES LIKE '%ssl%';
STATUS
Below is the result you will get.
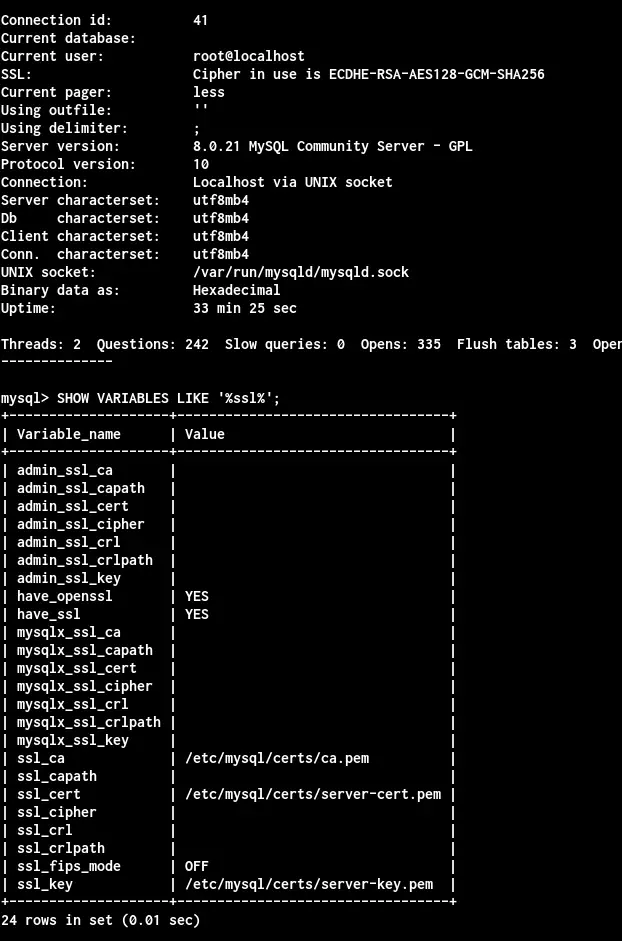
As can be seen, the MySQL server is up and running with SSL enabled on it, and it's using SSL certificates that we've generated. We're also connected to the MySQL Server through the SSL secure connection using the '~/.my.cnf' configuration file.
Next, create a new database and user named 'phpmyadmin' using the following query.
CREATE DATABASE phpmyadmin;
CREATE USER 'phpmyadmin'@'%' IDENTIFIED WITH mysql_native_password BY 'phpMyAdminAdmn352#$';
GRANT ALL PRIVILEGES ON *.* TO 'phpmyadmin'@'%' WITH GRANT OPTION;
FLUSH PRIVILEGES;
Type 'exit' to log out from the MySQL Shell.
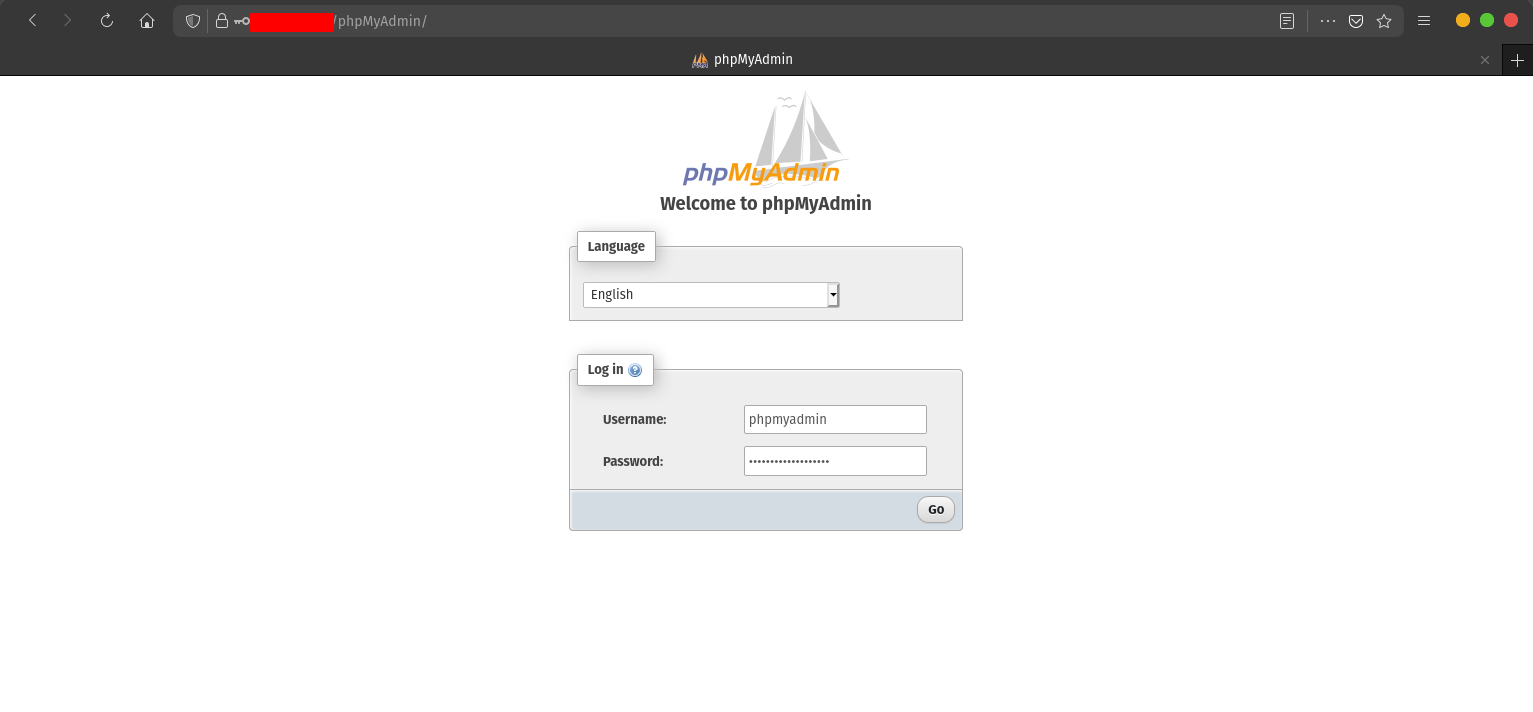
Now open your web browser and type the server IP address with the path of 'phpMyAdmin' on the address bar.
http://server-ip/phpMyAdmin/
On the phpMyAdmin Login page, type the user 'phpmyadmin' with the password that we've created on top and click the 'GO' button.
And you will get the phpMyAdmin Dashboard as below.
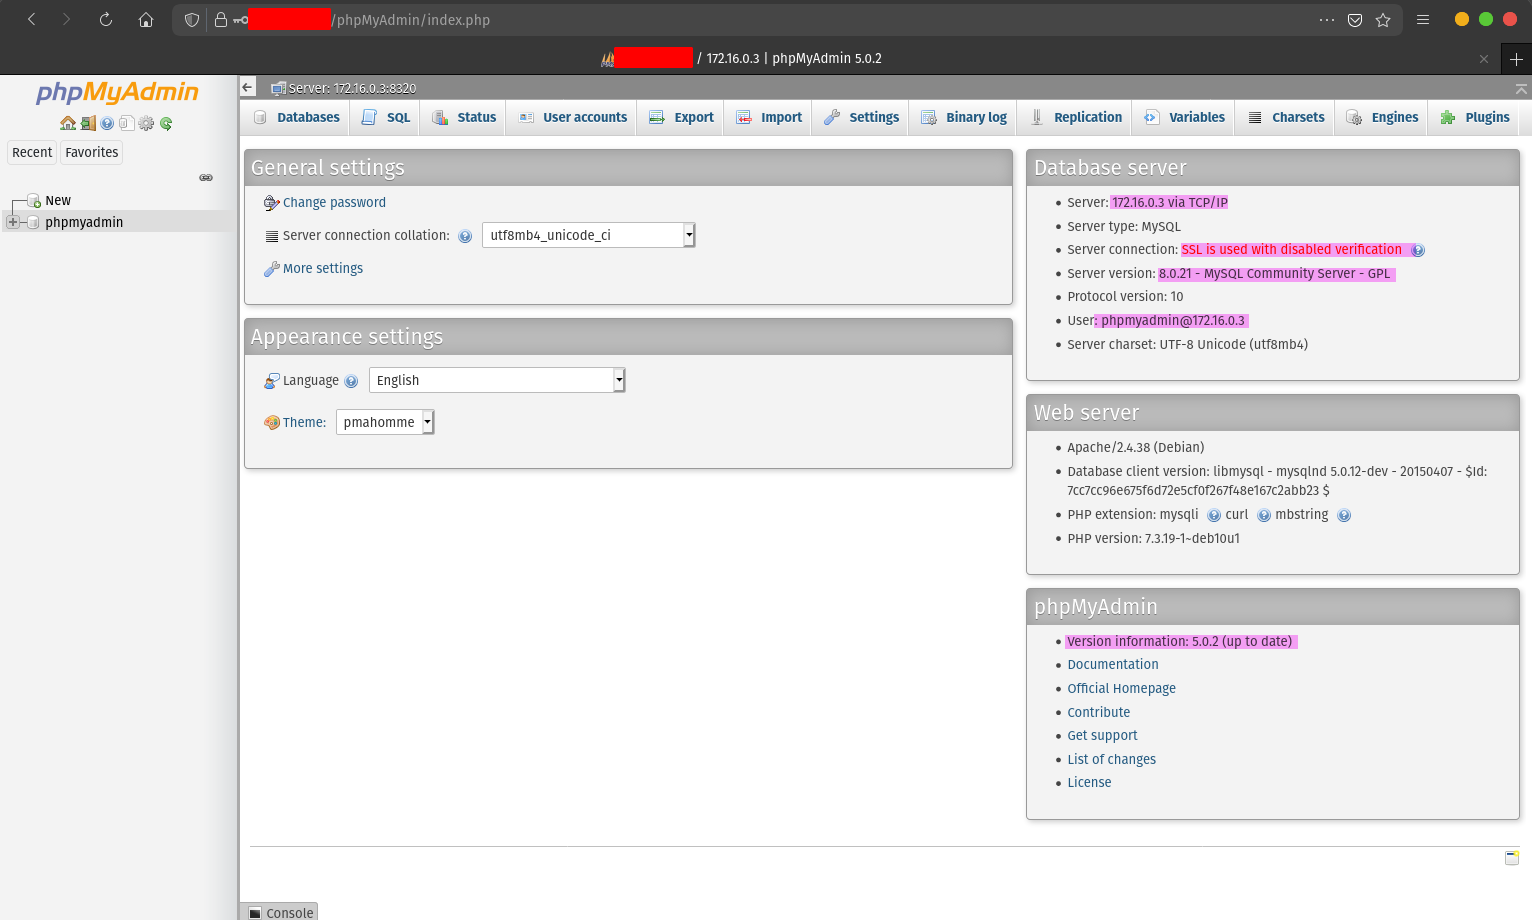
As a result, the installation and configuration of phpMyAdmin have been completed.
Step 7 - Create MySQL User and Database
For this step, you will learn the primary usage of MySQL queries for managing user, database, and the basic mysqldump command for database backup.
Connect to MySQL Server and Check Connection Status
To connect to the MySQL server, you can use the 'mysql' command line. And by default, all connections from the local MySQL Server will be using the Unix socket, which the SSL connection does not make connections any more secure.
Connect to the MySQL Server with default configuration using the following command.
mysql -u username -p
If your MySQL Server is running on the custom port, use the '-P port' option below.
mysql -u root -P 8320 -p
If your MySQL server runs on the local network with the custom port, use the 'h host/IP Address' and the '-P port' options below.
mysql -u root -h 172.16.0.3 -P 8320 -p
Once you've connected to your MySQL Server, run the following query to check the connection status.
STATUS
And you will get the following result.

And you're successfully connected to the MySQL Server.
Create and Show Database
After connecting to the MySQL shell, you will learn how to create the MySQL database, select the database, create tables, and insert data.
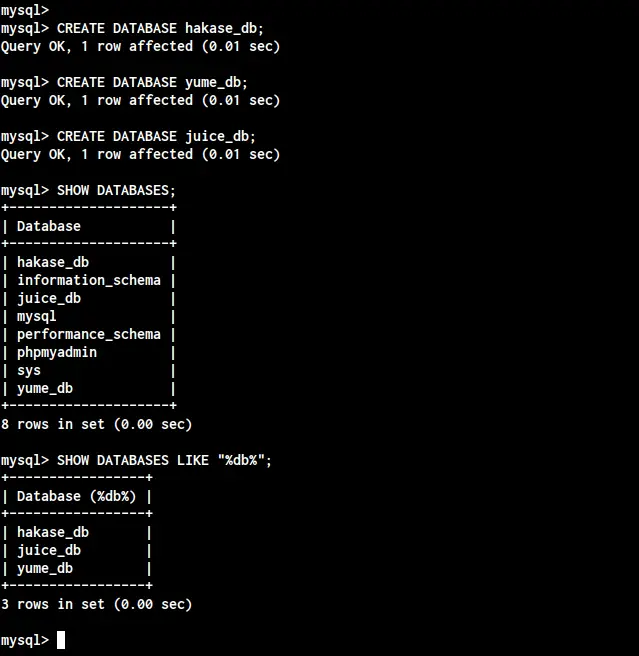
To create a new MySQL database, use the following query.
CREATE DATABASE hakase_db;
CREATE DATABASE yume_db;
CREATE DATABASE juice_db;
Now check all list databases on your MySQL server using the following query.
SHOW DATABASES;
SHOW DATABASES LIKE "%db%";
Next, you can switch and select the database using the following query.
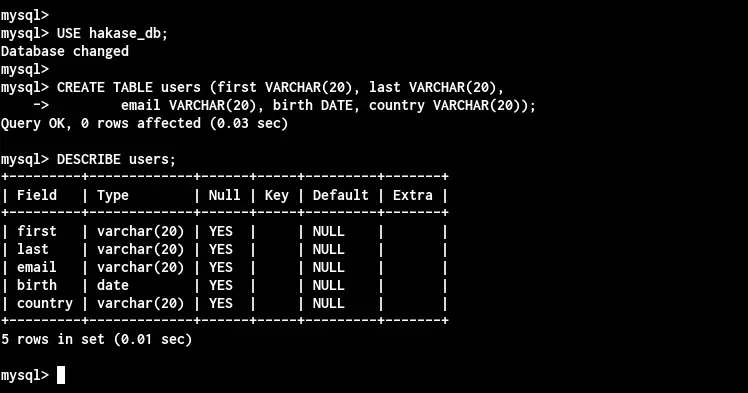
USE hakase_db;
Next, you can create a new table on your database using the 'CREATE TABLE' query as bellow.
CREATE TABLE users (first VARCHAR(20), last VARCHAR(20),
        email VARCHAR(20), birth DATE, country VARCHAR(20));
Now you can use 'DESCRIBE table-name' to check all fields on your database.
DESCRIBE users;
And you will get all details fields on the table 'users'.
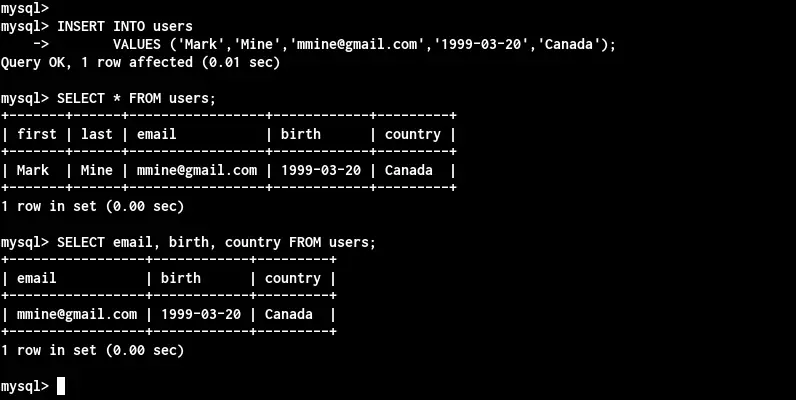
Next, you can insert data manually to your table using the 'INSERT' query as below.
INSERT INTO users
       VALUES ('Mark','Mine','[email protected]','1999-03-20','Canada');
Now you've successfully inserted data to the MySQL database. Next, check all data on the table using the 'SELECT' query as below.
SELECT * FROM users;
SELECT email, birth, country FROM users;
And you will get all data from your table.
Create MySQL User
After creating the database, you will learn how to create a user on the MySQL Server and grant the user privileges to databases.
The basic MySQL query for creating a user is by using the 'CREATE USER' query. Then you can grant privileges of the database to your user using the command 'GRANT' following by its options. And the last you must reload the grant tables to apply the new changes.
- The Basic
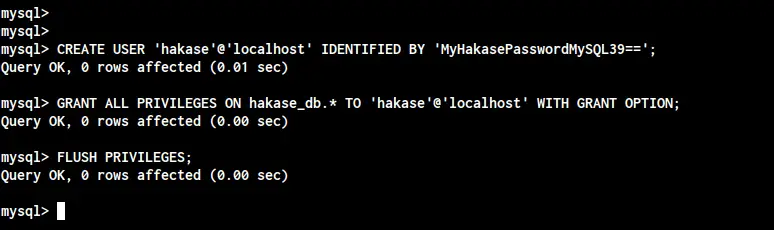
Create a new user named 'hakase@localhost' with the password 'MyHakasePasswordMySQL39==' and allow all privileges of the 'hakase_db' to the user using the following query.
CREATE USER 'hakase'@'localhost' IDENTIFIED BY 'MyHakasePasswordMySQL39==';
GRANT ALL PRIVILEGES ON hakase_db.* TO 'hakase'@'localhost' WITH GRANT OPTION;
FLUSH PRIVILEGES;
Additional information, the hostname 'user@localhost' is a part of the account name. The '@localhost' only allows the user to connect from the local server. If not given, the default is '%' which allowing users from everywhere.
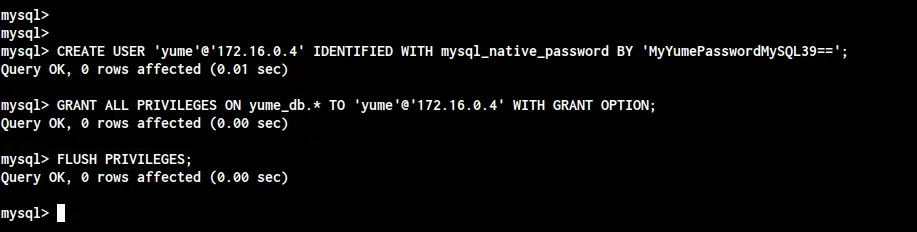
- Create User for Remote Access with Specific Authentication Plugin
We will create a new user that can only log in from the specific host IP address and use the particular authentication plugin.
We will create a new user named 'yume' connecting through the client IP '172.16.0.4' with the 'mysql_native_password' authentication plugin, and the user will be allowed to access the database 'yume_db' only.
CREATE USER 'yume'@'172.16.0.4' IDENTIFIED WITH mysql_native_password BY 'MyYumePasswordMySQL39==';
GRANT ALL PRIVILEGES ON yume_db.* TO 'yume'@'172.16.0.4' WITH GRANT OPTION;
FLUSH PRIVILEGES;
As a result, the user 'yume' will only connect to the MySQL server with IP address '172.16.0.4'. Otherwise, the authentication of the user will be denied by the MySQL Server.
- Create User and Force to Use Encrypted SSL Connection
To force the user to use the SSL secure connection, you can use the 'REQUIRE SSL' option. If the secure connection fails, you can't connect to the MySQL Server (cannot establish the connections).
For a more secure scenario, you can use the 'REQUIRE X509' query, which means the connection to the MySQL Server only established when the user/client machine provided the client and CA certificates.
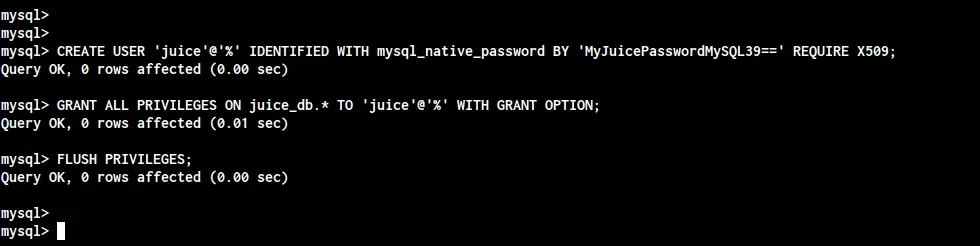
Create a new user named 'juice' with the hostname '%'. This hostname option '%' allows the user 'juice' to connect from any IP address, but the connection will be established when the client machine provided client and CA certificates.
CREATE USER 'juice'@'%' IDENTIFIED WITH mysql_native_password BY 'MyJuicePasswordMySQL39==' REQUIRE X509;
GRANT ALL PRIVILEGES ON juice_db.* TO 'juice'@'%' WITH GRANT OPTION;
FLUSH PRIVILEGES;
As a result, the 'juice' user can connect to the MySQL Server when the machine provided client and CA certificates.
Show All Available user and Grants
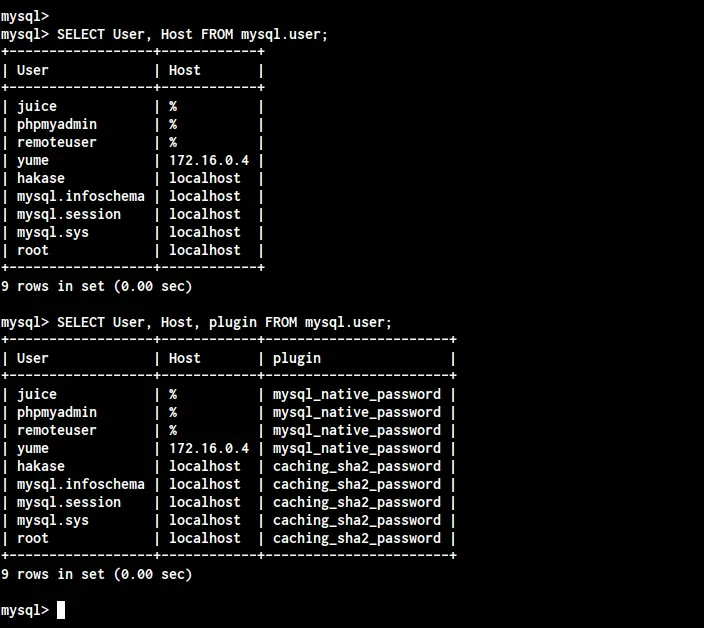
After creating all users, check all users using the following queries.
SELECT User, Host FROM mysql.user;
SELECT User, Host, plugin FROM mysql.user;
Now you will get details user, host, and the authentication plugins that are used by users.
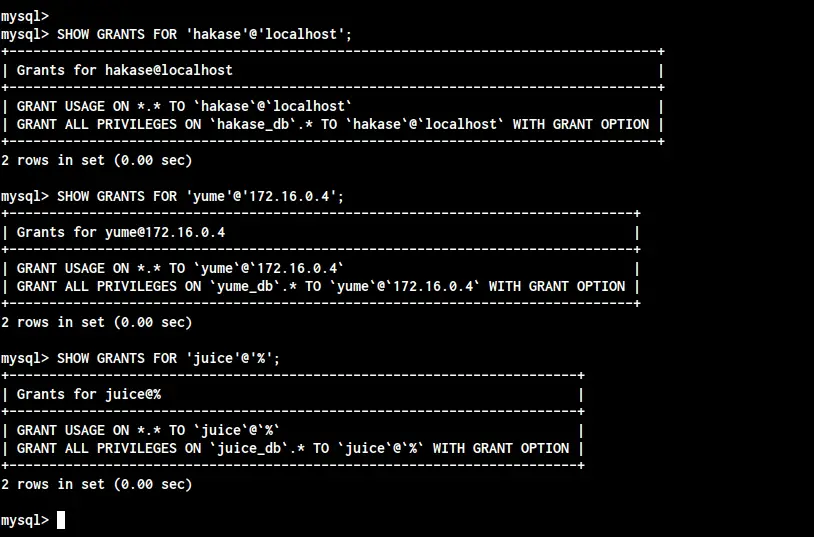
Next, check all privileges of users using the 'SHOW GRANTS' query as below.
SHOW GRANTS FOR 'hakase'@'localhost';
SHOW GRANTS FOR 'yume'@'172.16.0.3';
SHOW GRANTS FOR 'juice'@'%';
Now you will get detailed privileges of your users.
As a result, you've learned the primary usage of MySQL Server, including create a database, create a table, insert data to the table, create and show users, and show details privileges of each user.
Step 8 - Additional: Create Incremental Backup MySQL Database
For this step, you will learn the primary usage of the 'mysqldump' command for backup all MySQL databases. The 'mysqldump' command-line allows you to backup all databases, specific or multiple databases, and backup tables.
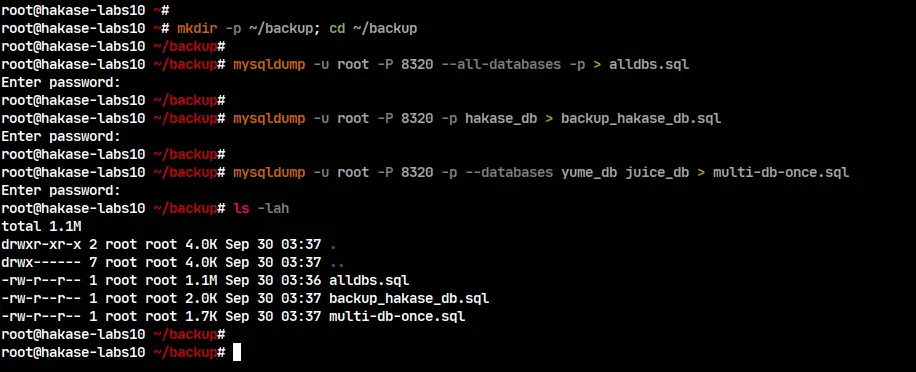
Before going any further, create the backup directory and go into it.
mkdir -p ~/backup; cd ~/backup
And you're ready to create MySQL databases backup using the 'mysqldump' utility.
Backup All Databases
To back up all databases on the MySQL Server, use mysqldump command with the '--add-databases' option below.
mysqldump -u root -P 8320 --all-databases -p > alldbs.sql
Now you will get all backup of your databases to the single SQL file named 'alldbs.sql'.
Backup Specific Database
To back up the specific MySQL database, include your database name on the mysqldump command below.
mysqldump -u root -P 8320 -p hakase_db > backup_hakase_db.sql
As a result, you will get the SQL backup file from the database 'hakase_db' named as 'backup_hakase_db.sql' on the backup directory.
Backup Multiple Databases
If you want to create a backup of multiple databases (not all databases on the MySQL Server), use the '--databases' option below.
mysqldump -u root -P 8320 -p --databases yume_db juice_db > multi-db-once.sql
As a result, the backup file for your two databases 'yume_db' and 'juice_db' has been created, named as 'multi-db-once.sql' file.
Automatic Backup MySQL Database
To set up an automatic backup for MySQL, we will be using the Linux 'cron'. We will create a new bash script for MySQL databases and run it automatically at a specific time using the Linux Cron.
Before going any further, log in to the MySQL shell using the following command.
mysql -u root -P 8320 -p
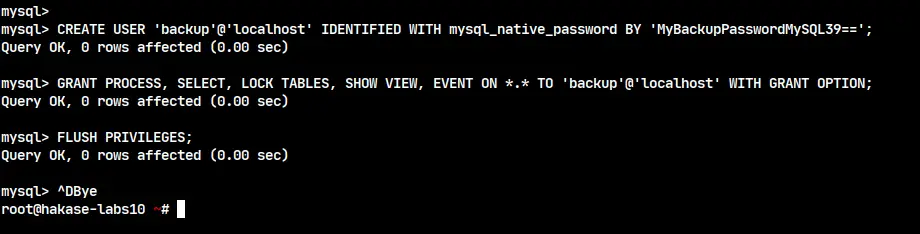
Create a new backup user with some privileges using the following query.
CREATE USER 'backup'@'localhost' IDENTIFIED WITH mysql_native_password BY 'MyBackupPasswordMySQL39==';
GRANT PROCESS, SELECT, LOCK TABLES, SHOW VIEW, EVENT ON *.* TO 'backup'@'localhost' WITH GRANT OPTION;
FLUSH PRIVILEGES;
Now type 'exit' to log out from the MySQL shell.
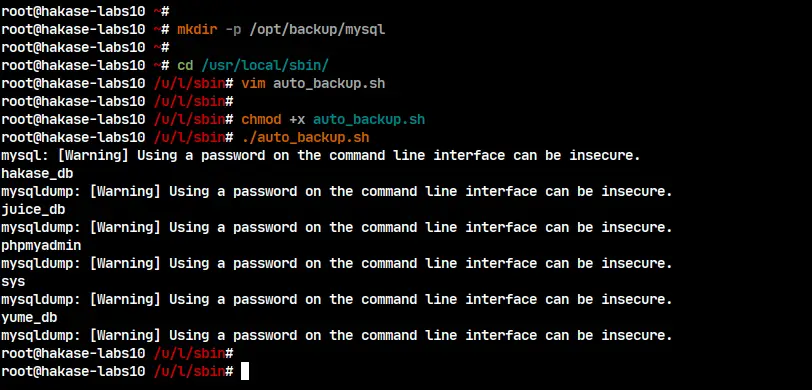
Next, create a new backup directory '/opt/backup/mysql' for storing all your database backup files.
mkdir -p /opt/backup/mysql
After that, go to the '/usr/local/sbin' directory and create a new bash file 'auto_backup.sh' using vim editor.
cd /usr/local/sbin/
vim auto_backup.sh
Change the details user, password, and port with your own and paste the configuration into it.
#!/bin/bash

# Basic configuration: datestamp e.g., YYYYMMDD
DATE=$(date +"%Y%m%d")

# Location of your backups (create the directory first!)
BACKUP_DIR="/opt/backup/mysql"

# MySQL login details
MYSQL_USER="backup"
MYSQL_PASSWORD="MyBackupPasswordMySQL39=="

# MySQL executable locations (no need to change this)
MYSQL=/usr/bin/mysql
MYSQLDUMP=/usr/bin/mysqldump

# MySQL databases you wish to skip
SKIPDATABASES="Database|information_schema|performance_schema|mysql"

# Number of days to keep the directories (older than X days will be removed)
RETENTION=14

# ---- DO NOT CHANGE BELOW THIS LINE ------------------------------------------
#
# Create a new directory into the backup directory location for this date
mkdir -p $BACKUP_DIR/$DATE

# Retrieve a list of all databases
databases=`$MYSQL -u$MYSQL_USER -p$MYSQL_PASSWORD -e "SHOW DATABASES;" | grep -Ev "($SKIPDATABASES)"`

# Dumb the databases in seperate names and gzip the .sql file
for db in $databases; do
echo $db
$MYSQLDUMP --opt --user=$MYSQL_USER -p$MYSQL_PASSWORD --skip-lock-tables --events --databases $db | gzip > "$BACKUP_DIR/$DATE/$db.sql.gz"
done

# Remove files older than X days
find $BACKUP_DIR/* -mtime +$RETENTION -delete
Save and close.
Now make the 'auto_backup.sh' script executable and run the script for testing purposes.
chmod +x auto_backup.sh
./auto_backup.sh
As a result, you will get your database backup files on the '/opt/mysql/backup-current-date' directory. Check using the following command.
ls -lah /opt/backup/mysql/
ls -lah /opt/backup/mysql/datedir/
Below is the result you will get.
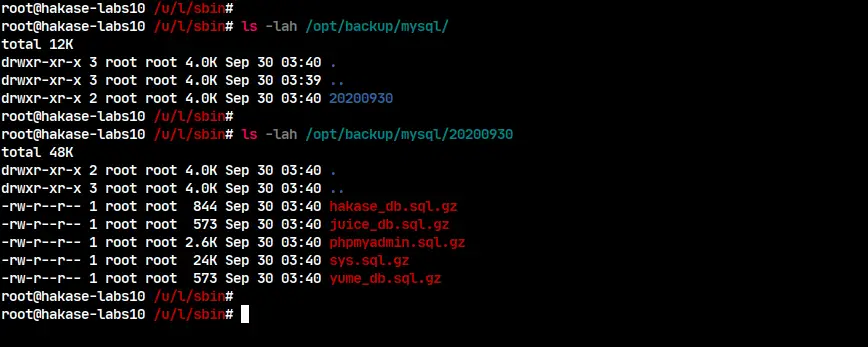
As a result, you will get compressed files of your database backup, which means the script is working.
Next, create a new cronjob that will be running the MySQL auto backup script 'auto_backup.sh' every day at the time '00:00'.
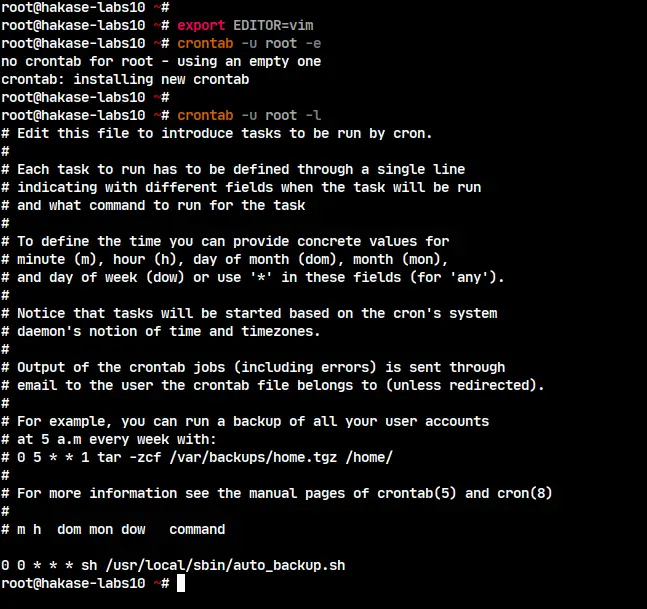
Set the default editor to 'vim' and create a new cronjob as user root using the following command.
export EDITOR=vim
crontab -u root -e
Now paste the following configuration into it.
0 0 * * * sh /usr/local/sbin/auto_backup.sh
Save and close.
The new cronjob for user root has been created. Check all cronjob list for the root user using the following command.
crontab -u root -l
And you will get details cron configuration for the user root.
As a result, you've successfully set up the automatic MySQL database backup using the bash script and Linux Cron.
Finally, you've learned how to install and secure the MySQL Database Server on the Debian Buster 10 with phpMyAdmin web-based database management. Also, you've learned the basic MySQL query for managing users, create database and tables, and using the mysqldump utility for backup databases.

