

In this article, we are going to learn how to use Blazor WebAssembly and SignalR with ASP.NET Core Web API application to create real-time charts.
Since we already have an article on a similar topic – How to Use Signalr with .NET Core and Angular – we won’t dive deep into the SignalR explanations. Everything is explained in the mentioned article in great detail. Of course, in this article, we are going to show you all the steps to get to the final solution.
Let’s get down to business.

CORS and SignalR Configuration – Web API
Let’s start by opening the Start folder from our source code repository. There, we can find two projects and we are going to open both of them.
In the server project, we have already configured the CORS, but for this article, we are going to slightly modify it:
services.AddCors(policy =>
{
    policy.AddPolicy("CorsPolicy", opt => opt
        .WithOrigins("https://localhost:5001")
        .AllowAnyHeader()
        .AllowAnyMethod()
        .AllowCredentials());
 });
So, we just set a more specific rule about the origin we grant access to our resources and also we allow credentials for the CORS policy.
Now, in the Entities/Models folder, we are going to create a new ChartDto class:
public class ChartDto
{
    public string Label { get; set; }
    public int Value { get; set; }
}
We are going to use this DTO class to send the data to the client application. Also, these properties are going to be required by the chart library we are going to install later on.
After this, we have to create a hub class for the SignalR to work properly. Again, if you are not familiar with SignalR, please read our article on this topic because it will help you a lot with SignalR and Hub class understanding.
That said, in the Blazor.Products.Server project, we are going to create a new HubConfig folder with a new ChartHub class:
public class ChartHub : Hub
{
}
This class must inherit from the SignalR’s Hub class, which resides in the Microsoft.AspNetCore.SignalR namespace.
Finally, to complete the SignalR configuration, we have to modify the ConfigureServices method:
public void ConfigureServices(IServiceCollection services)
{
    services.AddCors(policy =>
    {
        policy.AddPolicy("CorsPolicy", opt => opt
            .WithOrigins("https://localhost:5001")
            .AllowAnyHeader()
            .AllowAnyMethod()
            .AllowCredentials());
    });

    services.AddDbContext<ProductContext>(opt => opt.UseSqlServer(Configuration.GetConnectionString("sqlConnection")));

    services.AddScoped<IProductRepository, ProductRepository>();

    services.AddSignalR();

    services.AddControllers();
}
Also, we have to modify the Configure method:
public void Configure(IApplicationBuilder app, IWebHostEnvironment env)
{
    ...

    app.UseEndpoints(endpoints =>
    {
        endpoints.MapControllers();
        endpoints.MapHub<ChartHub>("/chart");
    });
}
With this code, we are adding SignalR to the request pipeline by pointing to our ChartHub with the provided /chart path.
Simulating a Data Storage to Provide the Data for the Blazor WebAssembly and SignalR App
In this section, we are going to implement a fake data storage to provide the data for our Blazor WebAssembly and SignalR application. Also, we are going to implement a Timer class that is going to help us with sending that data every few seconds.
That said, let’s start with a new ChartDataProvider folder and a new TimerManager class inside:
public class TimerManager
{
    private Timer _timer;
    private AutoResetEvent _autoResetEvent;
    private Action _action;

    public DateTime TimerStarted { get; set; }

    public bool IsTimerStarted { get; set; }

    public void PrepareTimer(Action action)
    {
        _action = action;
        _autoResetEvent = new AutoResetEvent(false);
        _timer = new Timer(Execute, _autoResetEvent, 1000, 2000);
        TimerStarted = DateTime.Now;
        IsTimerStarted = true;
    }

    public void Execute(object stateInfo)
    {
        _action();

        if ((DateTime.Now - TimerStarted).TotalSeconds > 120)
        {
            IsTimerStarted = false;
            _timer.Dispose();
        }
    }
}
In this class, we have two methods. In the first method, we accept an Action Delegate to execute the logic from our controller. Then, we create a new Timer instance with four parameters – which method to execute, the auto-reset event, the pause before the first execution, and the interval between invocations. Also, we populate the TimerStarted property to the current date and time and IsTimerStarted to true.
In the Execute method, we execute the action and just set the IsTimerStarted property to false and dispose of the timer after two minutes.
Also, in the same folder, we are going to create a new DataManager class:
public static class DataManager
{
    public static List<ChartDto> GetData()
    {
        var r = new Random();
        return new List<ChartDto>()
        {
            new ChartDto { Value = r.Next(1, 40), Label = "Wall Clock" },
            new ChartDto { Value = r.Next(1, 40), Label = "Fitted T-Shirt" },
            new ChartDto { Value = r.Next(1, 40), Label = "Tall Mug" },
            new ChartDto { Value = r.Next(1, 40), Label = "Pullover Hoodie" }
        };
    }
}
Now, we have to register the TimerManager class in the ConfigureServices method:
services.AddSingleton<TimerManager>();
Finally, let’s create a new ChartControllerunder the Controllers folder, and modify it:
[Route("api/[controller]")]
[ApiController]
public class ChartController : ControllerBase
{
    private readonly IHubContext<ChartHub> _hub;
    private readonly TimerManager _timer;

    public ChartController(IHubContext<ChartHub> hub, TimerManager timer)
    {
        _hub = hub;
        _timer = timer;
    }

    [HttpGet]
    public IActionResult Get()
    {
        if (!_timer.IsTimerStarted)
            _timer.PrepareTimer(() => _hub.Clients.All.SendAsync("TransferChartData", DataManager.GetData()));

        return Ok(new { Message = "Request Completed" });
    }
}
We use the IHubContext interface to inject the Hub context that we are going to use to send the data to the client-side subscribers. In the Get action, we check if the timer is started, and if it is, we prepare the timer and provide the action that we want to execute. With the Client.All.SendAsync method, we send the data to all the clients subscribed to the transferchartdata topic.
Basically, we are going to send an HTTP request from the Blazor WebAssembly application that is going to start the timer and emit the data every two seconds.
Blazor WebAssembly and SignalR Setup
Let’s start by opening the BlazorProducts.Client application from the Start folder from our source code.
So, the first thing we are going to do is to install the Microsoft.AspNetCore.SingalR.Client library:
Install-Package Microsoft.AspNetCore.SignalR.Client -Version 3.1.7
After the installation, we are going to create two files in the main project in the Pages folder: SignalRCharts.razor and SignalRCharts.razor.cs. We are using the partial class here to divide the HTML and C# logic for the Blazor component.
Before we start modifying these files, we are going to prepare an HTTP request for the ChartController’s Get action. To do that, let’s first modify the IProductHttpRepository class:
public interface IProductHttpRepository
{
    Task<List<Product>> GetProducts();
    Task CallChartEndpoint();
}
And then, let’s implement the missing member in the ProductHttpRepository class:
public async Task CallChartEndpoint()
{
    var result = await _client.GetAsync("chart");
    if (!result.IsSuccessStatusCode)
        Console.WriteLine("Something went wrong with the response");
}
We don’t need to do anything special here. Just to send the request and if for some reason it failed, to handle that.
Now, let’s modify the Program.cs file to slightly modify our HTTP configuration:
public static async Task Main(string[] args)
{
    var builder = WebAssemblyHostBuilder.CreateDefault(args);
    builder.RootComponents.Add<App>("app");

    builder.Services.AddTransient(sp => new HttpClient { BaseAddress = new Uri("https://localhost:5011/api/") });
    builder.Services.AddScoped<IProductHttpRepository, ProductHttpRepository>();

    await builder.Build().RunAsync();
}
Now, we can modify the SignalRCharts.razor.cs file:
public partial class SignalRCharts
{
    private HubConnection _hubConnection;

    [Inject]
    public IProductHttpRepository Repo { get; set; }

    protected async override Task OnInitializedAsync()
    {
        await StartHubConnection();

        await Repo.CallChartEndpoint();

        AddTransferChartDataListener();
    }

    private async Task StartHubConnection()
    {
        _hubConnection = new HubConnectionBuilder()
            .WithUrl("https://localhost:5011/chart")
            .Build();

        await _hubConnection.StartAsync();
        if (_hubConnection.State == HubConnectionState.Connected)
            Console.WriteLine("connection started");
    }

    private void AddTransferChartDataListener()
    {
        _hubConnection.On<List<ChartDto>>("TransferChartData", (data) =>
        {
            foreach (var item in data)
            {
                Console.WriteLine($"Label: {item.Label}, Value: {item.Value}");
            }
        });
    }
}
Before we test this, let’s just add two more modifications.
With the first one, we are going to add the route to the SignalRCharts.razor page:
@page "/signalRcharts"
<h3>SignalRCharts</h3>
The second change is to create a menu item to be able to navigate to this page:
<div class="@NavMenuCssClass" @onclick="ToggleNavMenu">
    <ul class="nav flex-column">
        ...
        <li class="nav-item px-3">
            <NavLink class="nav-link" href="signalRcharts">
                <span class="oi oi-list-rich" aria-hidden="true"></span> SignalR Charts
            </NavLink>
        </li>
    </ul>
</div>
Excellent.
Now, we can start both applications and navigate to the SignalR Charts page:
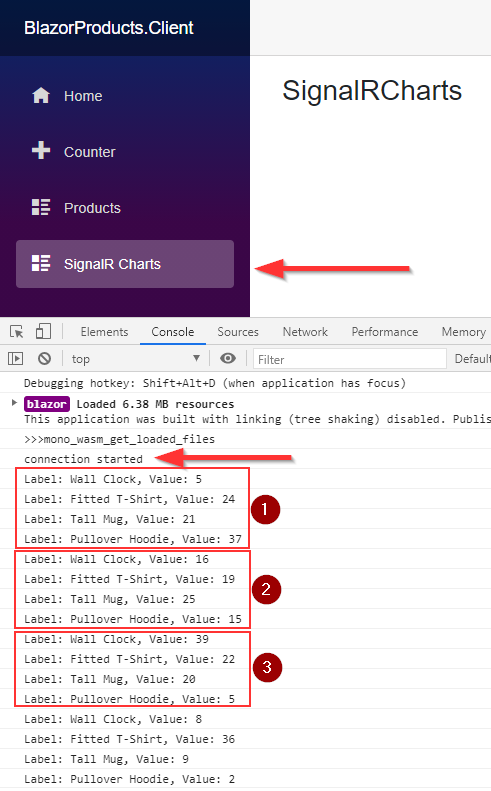
We can see our connection started, and also the streams of data we receive every two seconds. So, this works perfectly, and we can move on.
Adding Charts to the Blazor WebAssembly and SignalR Project
To add the charts to our client application, we are first going to install the Radzen.Blazor library:

Then, in the Imports.razor file, we have to add two more using directives:
@using Radzen
@using Radzen.Blazor
After that, let’s open the wwwroot/index.html file and add .css and .js files:
<!DOCTYPE html>
<html>

<head>
    ...
    <link href="css/products.client.css" rel="stylesheet" />
    <link rel="stylesheet" href="_content/Radzen.Blazor/css/default-base.css">
</head>

<body>
    <app>Loading...</app>

    ...

    <script src="_framework/blazor.webassembly.js"></script>
    <script src="_content/Radzen.Blazor/Radzen.Blazor.js"></script>
</body>

</html>
Now, we can implement the chart in our SignalRCharts.razor file:
<div class="row">
    <div class="col-md-8 p-4">
        <RadzenChart>
            <RadzenColumnSeries Data="@Data" CategoryProperty="Label" Title="Product Views"
                LineType="LineType.Dashed" ValueProperty="Value" Fill="green" />
            <RadzenColumnOptions Radius="5" />
            <RadzenValueAxis>
                <RadzenGridLines Visible="true" />
                <RadzenAxisTitle Text="Product views" />
            </RadzenValueAxis>
        </RadzenChart>
    </div>
</div>
Here, we provide the data for the chart and what is going to be the label category and what the value category. We also configure different attributes related to line type, fill color, and axis. But as we can see, we don’t have the Data property yet, so let’s create it in the .cs file:
public partial class SignalRCharts : IDisposable
{
    private HubConnection _hubConnection;

    public List<ChartDto> Data = new List<ChartDto>();
    [Inject]
    public IProductHttpRepository Repo { get; set; }

    protected async override Task OnInitializedAsync()
    {
        await StartHubConnection();

        AddTransferChartDataListener();

        await Repo.CallChartEndpoint();
    }

    private async Task StartHubConnection()
    {
        ...
    }

    private void AddTransferChartDataListener()
    {
        _hubConnection.On<List<ChartDto>>("TransferChartData", (data) =>
        {
            foreach (var item in data)
            {
                Console.WriteLine($"Label: {item.Label}, Value: {item.Value}");
            }

            Data = data;
            StateHasChanged();
        });
    }

    public void Dispose()
    {
        _hubConnection.DisposeAsync();
    }
}
As you can see, we create a new Data property and in the AddTransferChartDataListener method, we assign the value to that property and call the StateHasChanged method to notify our component to rerender. Also, you can see that we implement the IDisposable interface. The Dispose method will trigger as soon as we navigate out of this component and at the same time, we are going to dispose of our hub connection.
Now, let’s inspect the result:
Click to enlarge.
Excellent job.
Our chart works as expected.
Sending Data with Blazor WebAssembly and SignalR to the API
Up until now, we have seen the communication from the API to the Blazor client application over SignalR. But it is possible to create a two-way communication where the client application sends the data to the server and then the server streams that data to all the subscribed clients. So, in this section, let’s learn how to do exactly that.
The first thing we have to do is to modify the ChartHub class in the Web API project:
public async Task AcceptChartData(List<ChartDto> data) =>
    await Clients.All.SendAsync("ExchangeChartData", data);
This time, when a client sends a message to the AcceptChartData method, our API is going to send that data to all the clients on the ExchangeChartData topic. As we said if you want, you can send the message to just a specific client.
Now, we have to prepare the Blazor WebAssembly and SignalR functionality to support this.
First, let’s modify the SignalRCharts.razor.cs file:
public partial class SignalRCharts : IDisposable
{
    private HubConnection _hubConnection;

    public List<ChartDto> Data = new List<ChartDto>();
    public List<ChartDto> ExchangedData = new List<ChartDto>();
    [Inject]
    public IProductHttpRepository Repo { get; set; }

    protected async override Task OnInitializedAsync()
    {
        await StartHubConnection();

        AddTransferChartDataListener();
        AddExchangeDataListener();

        await Repo.CallChartEndpoint();
    }

    private async Task StartHubConnection()
    {
        ...
    }

    private void AddTransferChartDataListener()
    {
        ...
    }

    public async Task SendToAcceptChartDataMethod() =>
        await _hubConnection.SendAsync("AcceptChartData", Data);

    private void AddExchangeDataListener()
    {
        _hubConnection.On<List<ChartDto>>("ExchangeChartData", (data) =>
        {
            ExchangedData = data;
            StateHasChanged();
        });
    }

    public void Dispose()
    {
        _hubConnection.DisposeAsync();
    }
}
In this class, we add another ExchangedData property to store the data sent from the server. Also, we create two more methods. AddExchangeDataListener is a method that subscribes to the ExchangeChartData topic and assigns the value to the ExchangedData property. Furthermore, with the SentToAcceptChartDataMethod method, we send our data to the server. This method will trigger as soon as we click our chart.
So, let’s implement that part:
@page "/signalRcharts"
<h3>SignalRCharts</h3>

<div class="row">
    <div class="col-md-8 p-4" @onclick="@SendToAcceptChartDataMethod">
        <RadzenChart>
            <RadzenColumnSeries Data="@Data" CategoryProperty="Label" Title="Product Views"
                LineType="LineType.Dashed" ValueProperty="Value" Fill="green" />
            <RadzenColumnOptions Radius="5" />
            <RadzenValueAxis>
                <RadzenGridLines Visible="true" />
                <RadzenAxisTitle Text="Product views" />
            </RadzenValueAxis>
        </RadzenChart>
    </div>
    <div class="col-md-4">
        @if (ExchangedData.Count > 0)
        {
            <table class="table">
                <thead>
                    <tr>
                        <th>Product</th>
                        <th>Quantity</th>
                    </tr>
                </thead>
                <tbody>
                    @foreach (var product in ExchangedData)
                    {
                        <tr>
                            <td>@product.Label</td>
                            <td>@product.Value</td>
                        </tr>
                    }
                </tbody>
            </table>
        }
    </div>
</div>
Here, we wrap our chart with a click event where we call the SendToAcceptChartDataMethod method. Also, we conditionally render the table with the currently selected data (at the moment we click the chart).
Of course, let’s see this in practice:

Click to enlarge
We can see, it works great.
Conclusion
So, we have learned a lot here about the SignalR and the communication between the server-side API and the Blazor WebAssembly client applications. Also, we know how to import charts in our Blazor WebAssembly application and how to set the data in a real-time manner.
Until the next article…
Hey guys, I’m currently looking into Blazor WebAssembly. This one is a great article. I found a mistake : “transferchartdata” has to be with the right caps, as in the backend WebAPI, otherwise the client will not display chart data.
Yep, you are right. For some reasong the code in the article was displayd all lower caps. The source code, on the other hand, is good.
Very good article. Will give a try.
I need your thoughts on this.
Was working on stock market analysis tool.
Initial thought
Fetch json from stock market api save it on db. Using api share processed json to plot chart on client. As web server is hitting stock Market api every min and client fetching data every min. Scaling is a pain.
Proposing: web assembly blazor
Is there a better way client will fetch data from public url , process json n store local data. Blazor will plot the chart so offline app shuld work without need of server api. Scaling will be mitigated.
Please share your thoughts. [email protected]