
Microsoft announced its new .NET web framework, Blazor, in 2018. Since then, Blazor has caused a lot of buzz, especially in the JavaScript community, for approaching features like the use of WebAssembly and its templating system as well as addressing performance.
Blazor stands for Browser + Razor, which gives you an idea of what’s behind the new framework. Razor is the ASP.NET programming syntax that Microsoft uses to create its C# (or VB.NET) dynamic pages. Now, you can create web applications using only C# and run them in a web browser.
No, you didn’t read it wrong, the modern browsers you’ve used now can run C# in native speed. Not only C# but all the other major back-end languages.
And it’s not just the language, but Blazor now has all the power of .NET available, including:
- .NET APIs and tools over all the platform, the IDE and the community. All of that mature enough because of the platform history;
- C#, as mentioned, but also F#, which allows you to include machine learning features into your web applications;
- The possibility to choose between Visual Studio IDE and VS Code, both mature and massively adopted by the community;
- All the well-known characteristics of the .NET platform like the performance, robustness, scalability and responsiveness.
Some may think that the ability to run C# in browsers is another attempt to recreate the old Java Applets, famous for their security breaches, and related complexities. That’s not it. This can happen thanks to the WebAssembly (also known as Wasm).
WebAssembly is a low-level assembly-like binary instruction format for a stack-based virtual machine. It enables the execution of applications made with some targeted programming languages in web clients and servers, through a process called portable compilation.
Blazor resembles other common web frameworks, like Angular, for example. You have a routing system, very similar layouts, forms, and interoperability between your language and JavaScript functions, etc.
In this tutorial, you’ll be guided through the creation of a simple web app, a CRUD. Blazor auto-generates some code examples when creating a new project, and one of them is going to be the base for this tutorial development. It will be enough for you to feel how the framework works, as well as get started.
Setting Up the Project
For the tutorial example, you need to have both Visual Studio Code and .NET SDK installed. The example you’ll develop here can also be done with Visual Studio IDE.
Select a folder via command line and run the command:
|
1 |
dotnet new blazorserver -o first-steps-blazor --no-https |
The --no-https is important because you don’t want to add extra complexities in this example by including HTTPS in the example. Keep it simple for now.
The following figure shows the result of its execution:
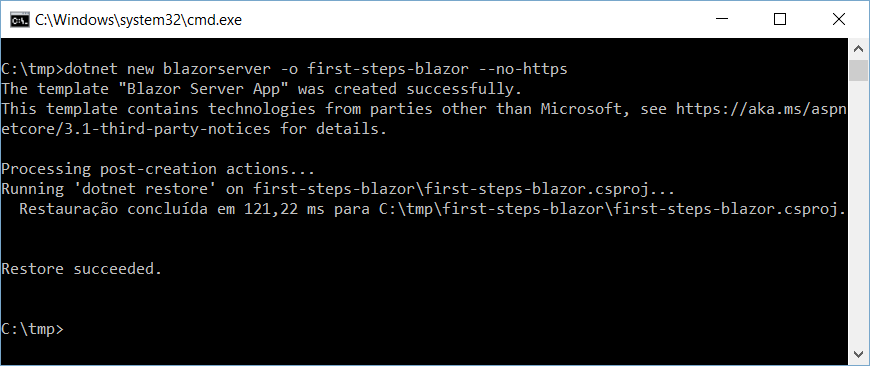
Figure 1. Creating a new Blazor-based project
After that, cd the created project root folder and run the command dotnet run. It will start the application up and make it available at http://localhost:5000.
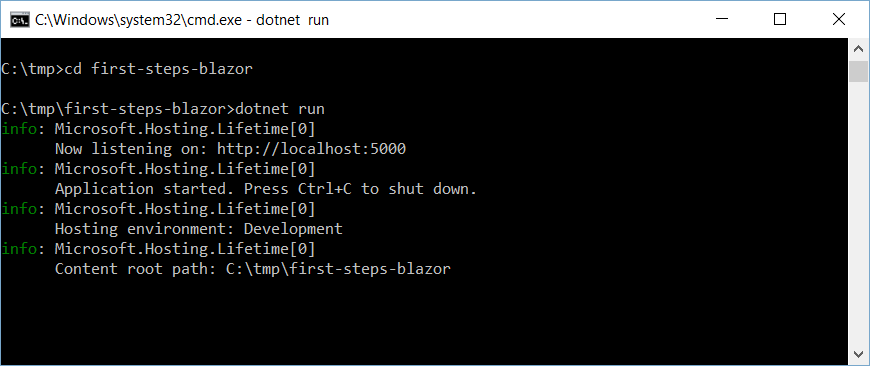
Figure 2. Starting up the app
If your browser doesn’t automatically open the page, do it yourself and check the results (Figure 3).
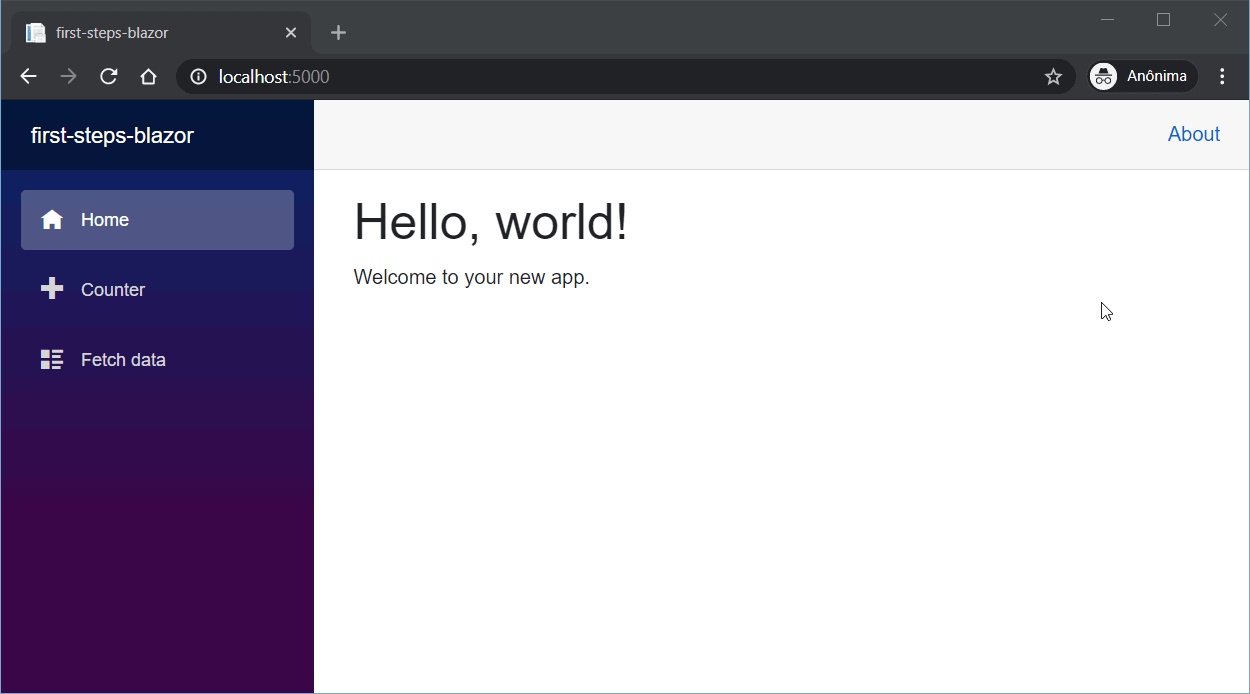
Figure 3. Hello World, Blazor.
Once you’re here, the app started up successfully. Take a look at the three samples shown here; they were auto-generated to give you some reference material when getting started.
In this article, the goal is to “redo” the third one, the Fetch data example. For now, it only displays a list of forecast data kept in memory in direct communication to a service class. When you finish the modifications, a full CRUD of weather forecasts will be available to feed the data table better.
It’s time to open your project in VS Code in order to start coding, but first, make sure to install the C# extension to the IDE (in case you don’t have it already). It is extremely important since it provides the features for developing with .NET, syntax highlighting, debugging, etc. In the Visual Studio IDE, that’s not necessary.
Figure 4 shows how the extension looks like for your reference.
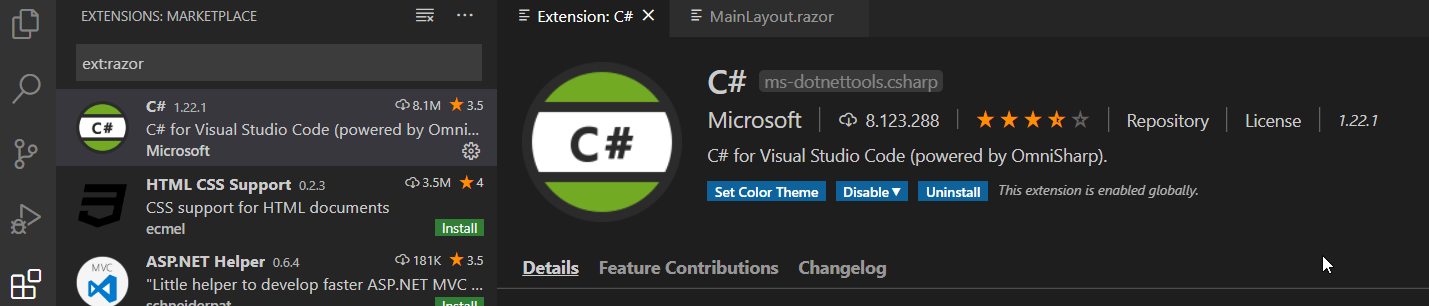
Figure 4. Installing C# for Visual Studio Code
Now, go to the File > Open Folder… menu option and select the first-steps-blazor folder. This will import all the project files into the workspace. You will also notice that the extension will colorize the C# code when you open any .cs or .razor file from the samples. Try it out!
Before proceeding to the example implementation, take some time to look at the files and folders that were auto-generated. Here’s a summary:
- /Data: this is the folder that keeps the models, services and repositories of your app. For now, there are only two classes:
- WeatherForecast represents the model itself by holding the attributes of a forecast object;
- WeatherForecastService is the service class and will keep the methods for forecast manipulation in the CRUD example.
- /Pages: if you’re familiar with ASP.NET projects, this won’t be that new. It’s where the project keeps the Blazor pages. It is equivalent to the Razor elements you’d have in a common ASP.NET Core app.
- /Shared: this is where the project keeps its Blazor templates. That’s an essential part of it, because it demonstrates the componentization power of the framework, just like you see in others (like Angular, for example). Blazor has a powerful templating system, which you should consider using at any time you feel there’s a piece of the view that could be reused throughout the project.
- _Imports.razor: a place you can use to centralize all the using statements of your Blazor pages.
- App.razor: where everything starts, the root of a Blazor app. Its job is basically about checking for the routing system. If everything’s ok, it mounts the app from top to bottom, making use of the established templates. Here, Blazor starts by importing the MainLayout template, which, in turn, calls the rest of the hierarchy.
The rest of the files belong to the usual .NET structural setup, so no more details on them.
The Forecast CRUD
Before going any further, you must take some time analyzing the forecast created example code. There are two C# files, as mentioned, and the Blazor page that keeps the overall logic of the table data displaying, the FetchData.razor.
Three points stand out at this moment:
- Every time you need to use something external, do as you did before: import the statements in the beginning via
@usingoperator. Since there’s no constructor in such pages, if you need to inject a service do it through the@injectoperator. - Whenever you need to create local objects, methods or operations within the page, do it under the
@code{ ... }section. - Once an object is imported correctly or defined in the bottom’s
@code, you can make use of it within the HTML by always prefixing it with a@. They’re also available when accessed into Blazor components or via programming expressions (like@ifor@foreach).
Now, you’re equipped with all you need, so jump right into the example implementation. By the end of it, the app should look like this:
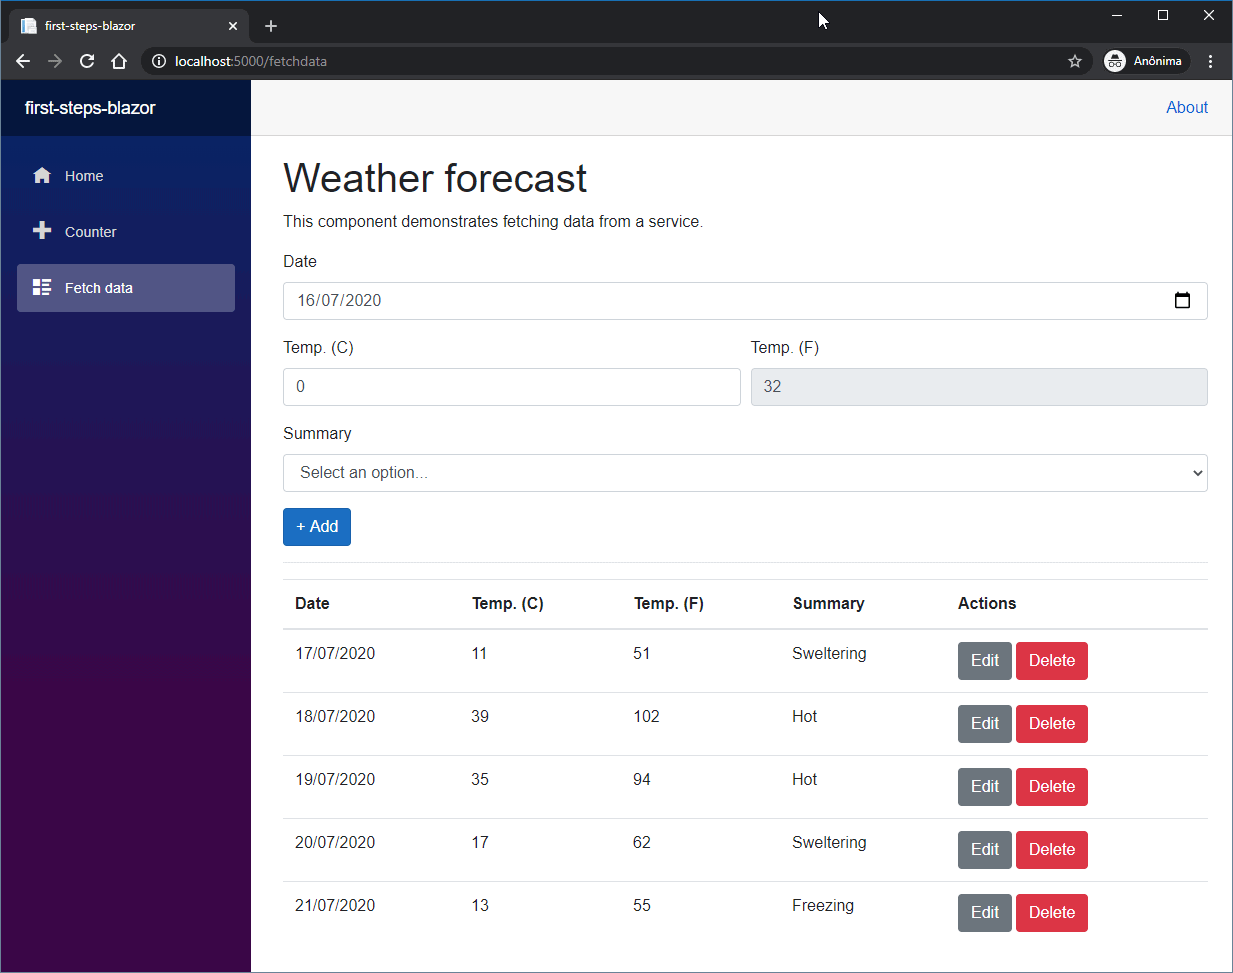
Figure 5. Weather forecast CRUD
First, you need to make sure your model is updated for all the different scenarios of the example. Take a look at its new contents:
Listing 1. New forecast model code
|
1 2 3 4 5 6 7 8 9 10 11 12 13 14 15 16 17 18 19 20 21 22 23 |
using System; using System.ComponentModel.DataAnnotations; namespace first_steps_blazor.Data { public class WeatherForecast : ICloneable { [Required] public int Id { get; set; } [Required] public DateTime Date { get; set; } = DateTime.Today; [Required] [Range(-60, 60, ErrorMessage = "Temp C. must be between -60 and 60.")] public int TemperatureC { get; set; } [Required] public int TemperatureF => 32 + (int)(TemperatureC / 0.5556); [Required] public string Summary { get; set; } public object Clone() { return this.MemberwiseClone(); } } } |
Note that all the previous fields were saved with just some small changes. The first change is the addition of an Id. The id of a model is important because it helps later to identify within the list each of the editing and deleting actions.
The Date field received a default value: today.
Notice how each one of the fields is annotated with the [Required] annotation. TemperatureC is getting another one: the [Range] annotation that validates if the Celsius temperature is between -60 and 60 degrees.
The use of the annotations, that belong to the ComponentModel.DataAnnotations, will help you to assimilate the validations under the form. Blazor forms can understand these annotations and display proper messages in the view.
Finally, the class is also an ICloneable, which means that you can clone an instance of it via Clone() method. That will be important later.
The next stop is the WeatherForecastService. Listing 2 shows what code you should put there now.
Listing 2. New code for the WeatherForecastService
|
1 2 3 4 5 6 7 8 9 10 11 12 13 14 15 16 17 18 19 20 21 22 23 24 25 26 27 28 29 30 31 32 33 34 35 36 37 38 39 40 41 42 43 44 45 46 47 48 49 50 51 52 53 54 55 56 57 58 59 60 61 62 63 64 65 66 67 68 69 70 71 72 73 74 75 |
using System; using System.Collections.Generic; using System.Linq; using System.Threading.Tasks; namespace first_steps_blazor.Data { public class WeatherForecastService { private List<WeatherForecast> Forecasts = new List<WeatherForecast>(); private static string[] Summaries = new[] { "Freezing", "Bracing", "Chilly", "Cool", "Mild", "Warm", "Balmy", "Hot", "Sweltering", "Scorching" }; public WeatherForecastService() { var rng = new Random(); Forecasts.AddRange(Enumerable.Range(1, 5).Select(index => new WeatherForecast { Id = index, Date = DateTime.Now.AddDays(index), TemperatureC = rng.Next(-20, 55), Summary = Summaries[rng.Next(Summaries.Length)] }).ToArray()); } public Task<string[]> GetSummaries() { return Task.FromResult(Summaries); } public Task<List<WeatherForecast>> GetAll() { return Task.FromResult(this.Forecasts); } public Task<WeatherForecast> GetById(int id) { return Task.FromResult((WeatherForecast)this.Forecasts.Where(note => note.Id == id).First().Clone()); } public Task Add(WeatherForecast forecast) { try { forecast.Id = this.Forecasts.Count + 1; this.Forecasts.Add(forecast); } catch (Exception e) { return Task.FromException(e); } return Task.CompletedTask; } public Task Update(int id, WeatherForecast forecast) { try { this.Forecasts[this.Forecasts.FindIndex(note => note.Id == id)] = forecast; } catch (Exception e) { return Task.FromException(e); } return Task.CompletedTask; } public Task Delete(int id) { try { this.Forecasts = this.Forecasts.Where(note => note.Id != id).ToList(); } catch (Exception e) { return Task.FromException(e); } return Task.CompletedTask; } } } |
The first important point here is the fact that the place where the list of forecasts is going to be held has changed. Before, the Blazor page kept it. Now, the service will do the job, as it would do in a real-world scenario.
The list of summaries also remained here, but with a different purpose. Now, instead of being used just to generate random values for the table data, it is available to the pages via GetSummaries() method. This is going to be useful for the summaries combo box of the page. In other words, every time the user needs to create a new forecast, it’s possible to choose it from a select element fed with this list (returned from the service).
The old method that initialized and returned a list of forecasts is now over, and this task was reassigned to the constructor.
The rest of the methods are just simple CRUD operations performed with the in-memory list of forecasts, and you can go over them for more details. Make sure to refer to each of the try/catch flows for async treatment. Plus, notice the calling to the Clone() method in the GetById(). This is because when getting a forecast by id, the form can use the same object to the editing process, which would alter the attribute values directly in the form (objects in C# work as references) so that behavior should be avoided.
And then it comes the FetchData.razor code. Since its code is too big, break it into two pieces. The first one, shown in Listing 3, displays the @code contents that are going to be necessary for the second part: the Blazor/HTML code.
Listing 3. Code contents for the @code section
|
1 2 3 4 5 6 7 8 9 10 11 12 13 14 15 16 17 18 19 20 21 22 23 24 25 26 27 28 29 30 31 32 33 34 35 36 37 38 39 40 41 42 43 44 45 46 47 48 49 50 51 52 53 |
@code { WeatherForecast Forecast = new WeatherForecast(); private string[] summaries; private List<WeatherForecast> forecasts; private int calculatedTemperatureF = 0; private string currentId = null; private async Task UpdateTemperature() { calculatedTemperatureF = 32 + (int)(Forecast.TemperatureC / 0.5556); } private async Task AddForecast() { if (currentId != null) { await ForecastService.Update(Int32.Parse(currentId), this.Forecast); await JSRuntime.InvokeVoidAsync("alert", "Updated!"); } else { await ForecastService.Add(this.Forecast); await JSRuntime.InvokeVoidAsync("alert", "Added!"); } await Reset(); } private async Task Reset() { this.Forecast = new WeatherForecast(); this.currentId = null; calculatedTemperatureF = 0; await UpdateTemperature(); } private async Task EditForecast(int id) { this.Forecast = await ForecastService.GetById(id); this.currentId = this.Forecast.Id.ToString(); } private async Task DeleteForecast(int id) { bool confirmed = await JSRuntime.InvokeAsync<bool>("confirm", "Are you sure?"); if (confirmed) { await ForecastService.Delete(id); await JSRuntime.InvokeVoidAsync("alert", "Done!"); forecasts = await ForecastService.GetAll(); } } protected override async Task OnInitializedAsync() { forecasts = await ForecastService.GetAll(); summaries = await ForecastService.GetSummaries(); await Reset(); } } |
Before that, this section of the page was short. The OnInitializedAsync method (at the end of the listing) works like the constructor of the page, more as you’d do with an onload event in JavaScript. After the page finishes the loading, Blazor triggers this method. This is why it is a protected method because it is inherited from Blazor superclass.
This method is used to initialize the forecast data to be displayed in the table. Now, it keeps doing the same by retrieving the full list of items from the service and storing into the forecasts local variable. This is the list that it’s going to be used to display the items in the table.
It also retrieves all the summaries, since the select element needs them to display the combo options. And finally, the method resets the local variables by calling the Reset() method. This method, in turn, takes the task of cleaning up all the local references the CRUD page uses. That’s important every time you finish an adding, updating or deleting action.
Back to the local variables, you have
- the
Forecastobject, which is going to be the model object to auto bind to each of the form’s fields; - the
summariesarray, which is going to store the list of summaries retrieved from the service; - the
calculatedTemperatureF, which is going to hold the value of the Fahrenheit temperature. In this example, the Fº value should not be inputted but automatically calculated based on the Cº value. It’s another excellent opportunity to explore how Blazor deals with the DOM events, like theonchangeandonblur; - and the
currentIdwill hold the currently selected id for the editing and deleting actions after each button is clicked.
And finally, you’ve got the methods. They deserve some special considerations:
- The
UpdateTemperature()explicitly duplicates the temperature calculation done in the model. It is going to be triggered after thetempCloses the focus, on theonblurevent. You could have called the getter ofTemperatureFfield directly; however, this was made on purpose for you to see how such event handling works within Blazor. - The
AddForecast()method works for both adding and updating actions. Whenever thecurrentIdholds any value, it means that an editing process is in progress, so the service updating method should be called; otherwise, the adding flow goes on.- Here, it’s also important to point out that it’s the first time the example makes use of the interop ability of Blazor. You can talk directly to JavaScript within Blazor pages through the JSRuntime class.
- It provides the
InvokeVoidAsyncandInvokeAsyncmethods (for both voided and returning functions) for implementing such integration. The first argument is the JavaScript function, and the second represents its arguments. Look how the code calls an explicit JavaScript alert. The deleting method makes use of theconfirmfunction.
- Make sure to refresh the forecasts list after deleting an item, for example.
Listing 4 shows the rest of the content, to be placed at the beginning of the page file:
Listing 4. Remaining code contents for the FetchData.razor page
|
1 2 3 4 5 6 7 8 9 10 11 12 13 14 15 16 17 18 19 20 21 22 23 24 25 26 27 28 29 30 31 32 33 34 35 36 37 38 39 40 41 42 43 44 45 46 47 48 49 50 51 52 53 54 55 56 57 58 59 60 61 62 63 64 65 66 67 68 69 70 71 72 73 74 75 76 |
@page "/fetchdata" @using first_steps_blazor.Data @using System.Collections.Generic @inject WeatherForecastService ForecastService @inject IJSRuntime JSRuntime <h1>Weather forecast</h1> <p>This component demonstrates fetching data from a service.</p> @if (forecasts == null) { <p><em>Loading...</em></p> } else { <EditForm Model=@Forecast OnValidSubmit=@AddForecast> <DataAnnotationsValidator/> <ValidationSummary/> <InputText @bind-Value=currentId type="hidden" /> <div class="form-group"> <label for="date">Date</label> <InputDate @bind-Value=Forecast.Date class="form-control" id="date" placeholder="Date" /> <ValidationMessage For="() => Forecast.Date"/> </div> <div class="form-row"> <div class="form-group col-md-6"> <label for="tempC">Temp. (C)</label> <InputNumber @bind-Value="Forecast.TemperatureC" @onblur="UpdateTemperature" class="form-control" id="tempC" placeholder="Temp. (C)" /> <ValidationMessage For="() => Forecast.TemperatureC"/> </div> <div class="form-group col-md-6"> <label for="tempF">Temp. (F)</label> <InputNumber @bind-Value=calculatedTemperatureF disabled class="form-control" id="tempF" placeholder="Temp. (F)" /> </div> </div> <div class="form-group"> <label for="summary">Summary</label> <InputSelect @bind-Value=Forecast.Summary class="form-control" id="summary"> <option>Select an option...</option> @foreach (var summary in summaries) { <option value="@summary">@summary</option> } </InputSelect> <ValidationMessage For="() => Forecast.Summary"/> </div> <input type="submit" class="btn btn-primary" value="+ Add" /> </EditForm> <hr /> <table class="table"> <thead> <tr> <th>Date</th> <th>Temp. (C)</th> <th>Temp. (F)</th> <th>Summary</th> <th>Actions</th> </tr> </thead> <tbody> @foreach (var forecast in forecasts) { <tr> <td>@forecast.Date.ToShortDateString()</td> <td>@forecast.TemperatureC</td> <td>@forecast.TemperatureF</td> <td>@forecast.Summary</td> <td colspan="2"> <button class="btn btn-secondary" @onclick="@(async() => await EditForecast(@forecast.Id))">Edit</button> <button class="btn btn-danger" @onclick="@(async() => await DeleteForecast(@forecast.Id))">Delete</button> </td> </tr> } </tbody> </table> } |
First, make sure to import/inject everything the page will need, just as if you’re doing it in a common C# class.
Start by analyzing the form composition. You can make use of plain HTML form tags here. The reason the example does not is due to the Blazor validations and data binding. For each of the main form elements, you have a corresponding Blazor component tag.
EditForm stands for an editable form that auto binds its data field values directly onto the attributes of a model object (in this case, the Forecast local object). Every time you type any text into a field, this value is automatically set to the provided @bind-Value property. This can only happen because you also informed the form’s Model property correctly.
The same is valid for the OnValidSubmit’s one. In this case, however, it is a method, the one Blazor will trigger when the form is submitted.
Right after, you can see the other two tags: DataAnnotationsValidator and ValidationSummary. The former explicitly says to Blazor that this form should be validated against the model annotations inserted before. Remember? If a field is marked as required (or within a range, like in tempC) it should respect this rule before submitting the form; otherwise, Blazor will display the proper messages in an HTML ul list at the top of the page, thanks to the latter tag (ValidationSummary).
Note, however, that below each of the input components of the form you can see a ValidationMessage tag as well. These work the same way as ValidationSummary; the only difference is that they’re assigned to a specific input field, rather than to the whole validation context. Figure 6 shows how both validation categories work.
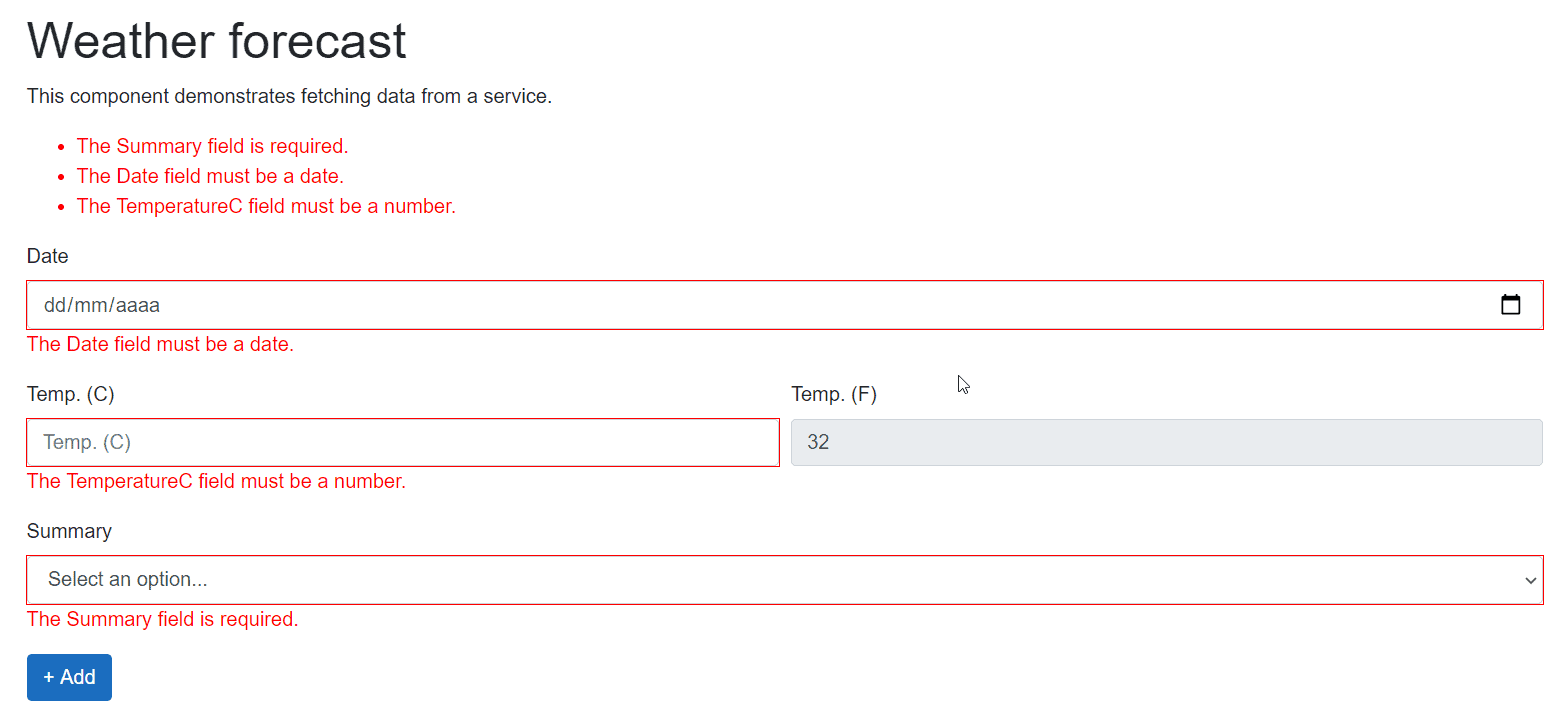
Figure 6. Displaying the two groups of validation messages
After you correctly fill in each of the fields, Blazor changes their the color states, as shown in Figure 7.
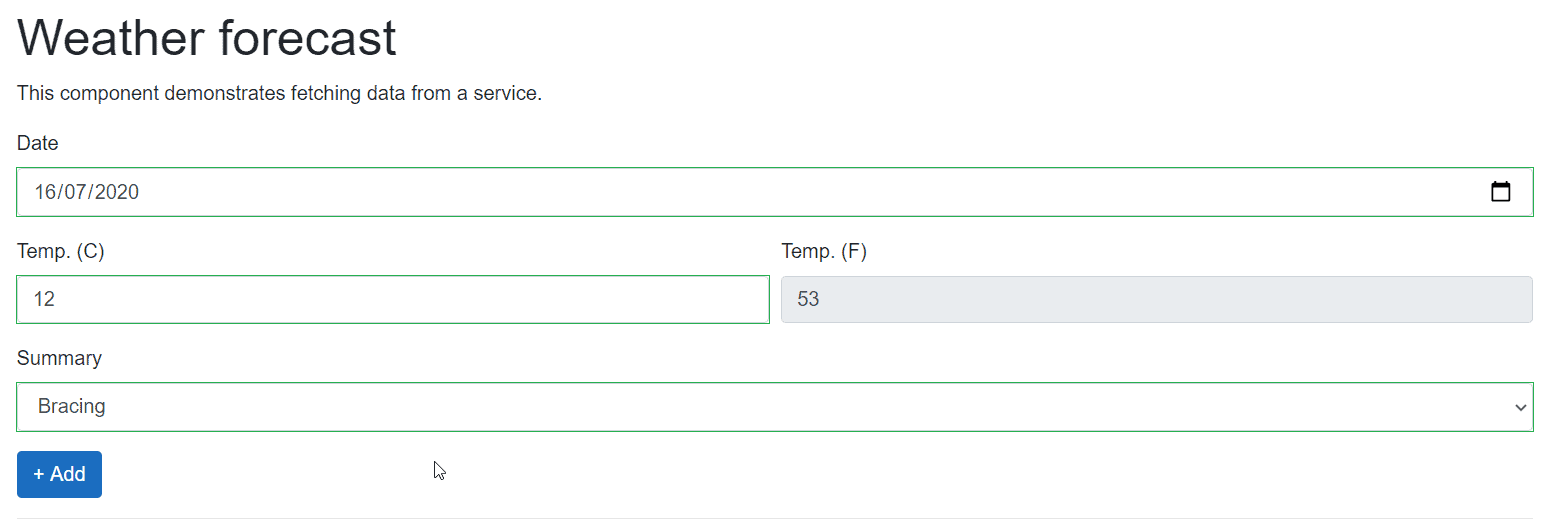
Figure 7. Look and feel of a correctly filled form
Take a look now at the tempC field. It has a different property called @onblur, which triggers the UpdateTemperature() method implemented before.
Another good example is the @onlick functions implemented in both editing and deleting action buttons. These, however, are passing on the forecast id as a parameter to their own methods. Since they’re async methods, make sure to call them into an async block.
Finally, you have two more foreach loops that iterate over the summaries and forecasts lists. The first works by feeding the select combo box and the second displays the table of forecasts data.
It’s time to test the example. Make sure to explore each one of the functionalities: the deleting, the adding and updating of forecasts, as well as the auto calculating of a Fahrenheit temperature based on the Celsius one.
Conclusion
You can find the source code for this project sample in my GitHub repo. Let me know if you had any trouble making the example work.
It’s always worth mentioning the importance of reading the official docs of Blazor (like any other new tech you’d be willing to learn). It is very complete with in-depth information of each of the many pieces of Blazor, as well as great samples. You can even play ahead with this tutorial example and increment it with more helpful features you learn from there. Keep on track and good studies!