
This article was originally published on Alibaba Cloud. Thank you for supporting the partners who make SitePoint possible.
High Availability (HA), Fault Tolerance (FT), and Horizontal Scale Friendly (HSF) are equally important to functionality for web applications to run and succeed today. Existing or new web applications should be designed and provisioned with such underlying architecture. Fortunately, you can easily and promptly deploy the aforementioned architecture in the Cloud era today (compared to the on-premises bare-metal machine era)!
However, this flexibility comes with a caveat – how do you choose the right cloud provider? We are spoiled for choice and it can be really challenging (and hectic!) when evaluating and choosing the right one.
This post is intended to discuss and provide a walkthrough on deploying web applications on Alibaba Cloud from the ground up, including HA, FT, and HSF. Throughout this post, I will briefly introduce several services and tools provided in Alibaba Cloud. Yes, briefly! If you wish to learn more about particular services or tools, please visit the Documentation Center. In addition, this post will highlight the concerns and considerations when deploying such services.
WordPress is used as the demo web application that would be deployed on Alibaba Cloud in this post. The same deploying principle shall apply to many other web applications. This post is not intended to discuss on WordPress configuration at all. It shall not (and not able to) serves as reference for WordPress configuration. There are tons and tons of good resources out there regarding best practices on WordPress administrative.
1. High-level Architecture
Like many other web applications, the demo web application consists of an application layer (WordPress) and a database layer (MySQL).
Goal: Ultimately, we want an always-on web application (WordPress)!
In order to achieve such a “simple” goal, the demo web application must be deployed with the following minimum requirements:
- A single main site.
- A minimum of two physically separate WordPress instances on each site for redundancy and load balancing purposes.
- Auto-spawning the other WordPress instance when the existing instance stops or experiences a failure.
- The database instance (MySQL) must also be running in redundancy mode. It should automatically failover to the active standby instance when necessary.
- Centralized dataspace. Shared resources must be accessible and available to all running WordPress instances. For example, a document uploaded by a user via WordPress should be synced across all running WordPress instances.
Fortunately, Alibaba Cloud provides a list of services and tools for us to fulfil these requirements. In this post specifically, we’ll utilize Cloud DNS (DNS), Auto Scaling Group (ASG), Server Load Balancer (SLB), Elastic Compute Service (ECS), Relational Database System (RDS), Object Storage Service (OSS), and Object Storage File System (OSSFS) tools to achieve our goal. The high-level architecture diagram for the deployed WordPress would be as following:

2. Deployment Procedures
We’ll briefly introduce the components shown in Figure 1.0 before diving into each individual configuration. As stated earlier, you would have to refer to other sources such as Alibaba Cloud online documentation for detailed explanation. The following table summarizes the description and usage of such components according to our deployment context:
Table 1: Cloud Components in Demo Deployments
| Site / Region | Geographical area of the data center | 1. Site for deployments |
| Zone | Physically isolated data center within a region | 2. Used for redundancy purpose for Database |
| Cloud DNS | Domain name resolution and management service | 3. Purchase new Domain Name4. Route traffic to WordPress instance |
| VPC (Virtual Private Cloud) | Virtual isolated network built for private usage | 5. To group and separate resources6. To setup security control7. Assign network IP range |
| VRouter | Virtual routing table | 8. To configure network route for provisioned resources |
| VSwitch | Segment virtual networks into subnets | 9. To separate resources into group within specify Zone via subnet |
| Server Load Balancer | Distribute traffic to instances according to configured profile | 10. To load balance (round robin) request among provisioned WordPress instances |
| Auto Scaling Group | Automatically adjust computing resources based on scaling configuration | 11. Serves as watchdog to maintain the defined healthy running WordPress instances |
| Elastics Computing Service (WordPress instance) | Compute and process unit provided by Alibaba Cloud | 12. To install and run WordPress. This is the application layer of demo deployment |
| Relational Database Service (MySQL) | On-demand managed database service | 13. The DB for WordPress application |
| Object Storage Service | High availability and fault tolerance object storage | 14. Centralized storage for files/objects uploaded by user via WordPress application |
The workflow below describes the general steps involved in deploying a web application on Alibaba Cloud.
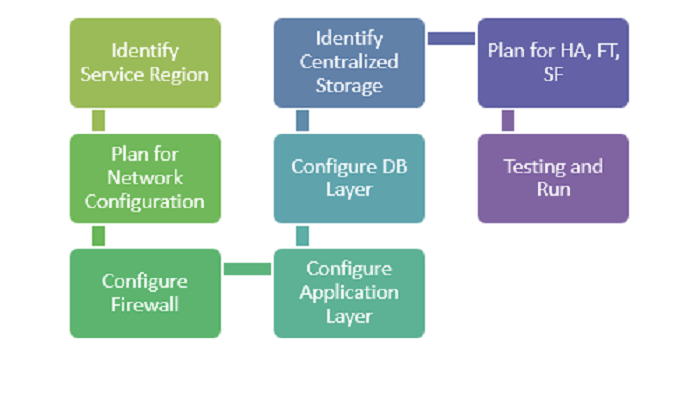
2.1. Identify Service Region
It’s important to decide on the region where an application should be deployed. The general considerations shall include the following:
- Cost: The mother of all considerations. Yes, the cost may vary according region.
- Service availability in the region? It’s not uncommon that some regions provide additional services that aren’t available in another region — you have to test to find out!
- Main target users’ geographical location. It’s definitely better for user experience if the application is physically closer to the customer, resulting in shorter latency.
- Rules & Regulations. Is it legally OK for the application to be hosted in the selected region?
- Number of Availability Zonez. Occasionally, we need to improve application availability by deploying redundant applications in a different zone. Since I’m based in Southeast Asia, I will be looking at the Singapore and Kuala Lumpur data centers. At the time of writing, “Asia Pacific SE 3 (Kuala Lumpur)” has only a single zone while “Asia Pacific SE 1 (Singapore)” has dual zones.
After consideration, we’ve decided “Asia Pacific SE 1 (Singapore)” will be the main region for our demo deployment.`
2.2. Plan for Network Configuration
I. VPC
We have to consider the number of nodes that might potentially be running in the deployment. Each running node is subject to one private IP, and we don’t want to end up running out of private IPs for nodes in the future!
There are three type of CIDR blocks allowed by Alibaba Cloud for a VPC: 10.0.0.0/8, 172.16.0.0/12, 192.168.0.0/16. According to Alibaba Cloud documentation, the first & last three IPs of CIDR block would be reserved by system usage, and hence the maximum number of private IPs for each CIDR block are:
- 10.0.0.0/8 = 16777212 (16777216 – 4)
- 172.16.0.0/12 1048572 (1048576 – 4)
- 192.168.0.0/16 = 65532 (65536 – 4)
You may also wonder, why don’t we just use the biggest CIDR block allowed to avoid potentially running out of private IP in future? The following might help you to reconsider that thought:
- Bigger CIDR block may increase the complexity when dealing with IP-related configuration, such as subnet creation, route configuration, security group configuration, and etc.
- If the above is not a valid show-stopper for you, then consider this: “VPC peering (interconnect)” with other VPCs doesn’t allow overlapping CIDR block. In other words, it’s not possible to peer with other VPC once you using 10.0.0.0/8 as CIDR block!
After consideration, we’ll use “192.168.0.0/16” for our demo deployment as there will only be a few running nodes within the VPC.
II. Subnet
In Alibaba Cloud, VSwitch could be used to further segment the VPC CIDR block into a subnet with a smaller CIDR block. The general consideration for segmenting subnets includes the following:
- Logical grouping of instances according to functionality. E.g. grouping the application in one group and RDS in another group for easier maintainability. For example, disabling a group of instances by deleting VSwitch attached to the group.
- Simplify security group profile configuration. Security rules based on the subnet CIDR block level rather than the individual instance’s IP are cleaner.
- Enable Auto-scaling and Server Load Balancer monitoring and actions on a specific subnet.
- Redundancy on resources. It’s possible to seamlessly failover to a different subnet that’s based in a different zone when the existing subnet’s zone encounters failure.
After consideration, we’re grouping WordPress in one subnet (192.168.1.0/24) and the RDS instance in another subnet (192.168.2.0/24).
2.3. Configure Firewall (Security Group)
Network access at the instance level could be limited via Security Group in Alibaba Cloud. The Security Group Rule configuration could be very granular, up to the per-protocol, per-port, per-client IP level. Hence, to avoid unauthorized access to the instance, we need to consider the following:
- Always comply with least privilege practice. Restrict access to the required client only.
- Intranet or/and internet connectivity. You can use Security Group to create a “private subnet” (no internet usage) by only allowing access for inbound intranet. In addition, a NAT gateway could be used to allow the instance in the private network to access outbound internet services.
Since we are running WordPress on Linux instances, we would at least allow an inbound rule for Port 80 (HTTP) and 22 (SSH) in Security Group. Besides that, all outbound traffic would be allowed since there’s no specific requirement on that.
2.4. Configure the Application Layer
This could be the trickiest and most uncertain decision we have to make when deploying web applications. As stated earlier, this post will not discuss an application’s capacity requirements and hence, choosing a proper instance type is out of scope of this post. Anyhow, the following considerations may assist in deciding on an instance type generally:
- Always start with the Pay-As-You-Go model if you have no idea on the instance type performance nor the actual capacity requirement. This pricing model allows you to experiment with different instance types freely without a lock-in period.
- You have to understand the nature of the to-be deployed application’s constraint. Is the application CPU-bound or IO-bound? You have to answer that in order to determine a proper instance type with the best cost efficiency.
- Deploy with one step down instance whenever possible. If an application’s capacity requirement could be satisfied with a ‘X’ instance of a instance family type Y, it might be better if we deploy the application with two one step down instances (e.g. X/2) from the same family type for the same amount of workload. This will increase the availability of the application. For example, we can still process 50% of the workload if any the X/2 instance goes down compared with 100% downtime if the X instance is down. Of course, this approach is subject to the design and usage of the application.
- Decide on other usage parameters e.g. network type, network bandwidth, operating system image, and etc. accordingly.
Since this is a demo deployment without any real production usage, we’ll go for the lowest (cheapest) ECS instance configuration. For example: General Type n1: 1-core, 1GB, Ubuntu 16.04 OS, Ultra Cloud Disk 40GB, and 1Mbps network bandwidth.
2.5. Configure the Database Layer
Generally, we have to decide between using self-managed DB instances (self-install DB at ECS instance) like what we usually do for on-premises solutions, or using fully managed RDS DB services like ApsaraDB. Again, it’s out of this post’s scope in comparing or benchmarking the two variants of database services. These guidelines may assist in choosing database variants generally:
- Do you have available resources for managing and operating database instances? The management and operational tasks may include backing up data files, OS/DB patching, access control on the host machine, etc. If the answer is no, then maybe a fully managed RDS DB is preferable.
- Do you need a dedicated database instance? If your database is small and the workload is minimal and able to co-exist with the application (e.g. in the development environment), perhaps the self-managed variant is preferable due to cost efficiency.
- Do you need access to the underlying host for the database instance? For example, if you need to perform specific OS/DB configuration for performance-tuning purposes, then the self-managed variant shall be employed.
- Does the fully-managed database service provide the DB type that you required? If no, then the answer is straightforward, go for a self-managed DB variant.
- If you are concerned about possible cloud vendor lock-in, then you might want to avoid the fully-managed variant as some RDS implementations could be cloud vendor specific.
Since there is neither manpower to maintain the demo database nor any specify DB configuration, we’ll deploy the demo DB with ApsaraDB RDS – MySQL. In addition, this variant allows us to make a redundancy (active standby) database easily (with just a click!).
2.6. Identify Centralized Storage
Eventually, there could be multiple concurrent WordPress applications running on physically separate ECS instances. Each instance might generate and store certain files/image/media resulting from users’ operations. Obviously, objects that are generated by any instance would have to be synchronized across all other running application instances. One of the approaches to achieve this mentioned synchronization is through centralized storage. Objects generated shall be synchronzied to centralized storage and followed by synchronization between centralized objects and other running instances. Additionally, the centralized storage must always be available and any failure of any instance shouldn’t impact the availability and durability of centralized storage.
Alibaba Cloud provides a couple of fully managed services which could serve as centralized storage:
- Object Storage Service for objects: It’s ideal as centralized object storage due to the guaranteed high availability (99.9%), scalability, and fully-managed nature. Specifically to this demo deployment, each running WordPress instance shall sync with a dedicated common Object Storage Service’s bucket. By employing such a syncing mechanism, all the running WordPress instances would have an identical set of created objects.
- ApsaraDB Redis for application state: Sharing state (e.g. shared value, parameter) among running instances is possible via fully-managed ApsaraDB Redis.
A dedicated bucket in Object Storage Service would be created and used to store objects created as a result of user operations. All running WordPress instances shall sync with the relevant bucket for the list of created objects.
2.7. Plan for HA, FT, and HSF
To achieve HA, FT, and HSF in Alibaba Cloud, a web application shall be fundamentally designed as stateless and horizontally scalable. Any dependent application’s state or data shall be decoupled from the web application and migrated to centralized storage as discussed in the earlier section.
Services listed below could be employed for deploying a HA, FT, and HSF web application:
- Cloud DNS: It’s possible to configure ‘A’ record types for instances hosted in different regions. It’s really useful during failover scenarios whereby an ‘A’ record of a standby instance could be enabled with one click, resulting in network traffic diversion to the standby instance.
- Auto Scaling: It can be used to auto-spawn instances in a desired Zone when running instances go down or become unhealthy.
- Server Load Balancer: This service would provide a health check on configured instances and report their status to the Auto Scaling service for further action. Besides that, this service would also load balance workload among running instances.
- ApsaraDB RDS: RDS MySQL provides the multi-zone availability feature with just a click. It will really ease the effort required to provide HA and FT for the database.
The demo deployment will utilize DNS to route traffic to WordPress instances, Auto Scaling to ensure a minimum of two running instances in each region, and Server Load Balancer to provide a health check as well as to load balance workload. Last but not least, the Multi-Zone availability feature on RDS MySQL is enabled to provide HA and FT for the database.
2.8. Testing and Run
To test the HA and FT behavior, we may stop a running ECS manually and observe the action triggers by the auto-scaling service. If the auto-scaling has been configured properly, a new instance would be spawned automatically. Besides that, we may also manually turn off the RDS DB instance to observe the Multi-Zone redundancy failover happening. The best thing is that these actions are automatically handled by the respective services without any manual intervention. Shown below is our deployed WordPress:

3. Possible Improvements
The following suggestions might be useful to further improve the resiliency, performance, and availability of a deployed web application:
- Auto scale out/in according to the instance’s workload. For example, spawn a new instance when CPU/memory exceeds a certain threshold over a defined period.
- Utilize the CDN to cache and distribute content to minimize geographical latency and reduce traffic to the application instance. In addition, the CDN also acts as defense layer for DDoS attacks on application instances.
- Offload the database’s ‘read’ workload by creating a read replica.
- Plan a Disaster Recovery Region and create failover strategy.
- Setup cloud monitoring, enable alert, and turn on detailed log at least for critical metrics and incidents such as instance failure, disk space full, auto scaling triggered, and etc.
4. Appendix (Sample Configuration)
The following sample configuration steps are based on the outcome discussed in the “Deployment Procedures” section. You would need an Alibaba Cloud account to run the following configuration. If you are yet to get one, you may register (with US$300 free credit at the time of this writing) with this link.
1. VPC & Network Configuration (Identify Service Region & Plan for Network Configuration)
- Login to Alibaba Cloud console
- Create “VPC”. Go to “Product” and click on “Virtual Private Cloud” under “Networking”. Select region as “Asia Pacific SE 1”. Once landed at VPC overview page, click at “VPC” on side tab follows by click on “Create VPC” button.
- Name: VPC-Main
- CIDR range: 192.168.0.0/16
- Create a “subnet”. One subnet for the WordPress instance and one subnet for RDS.
- First subnet (Continue with “Next Step” at Step 2 to “Create VSwitch”):
- VPC: Recently created VPC (e.g. VPC-Main)
- Name: Public-Subnet1
- Zone: Zone A
- CIDR: 192.168.1.0/24
- Second subnet (Click on ‘Create More’ to create second switch):
- VPC: Recently created VPC (e.g. VPC-Main)
- Name: Public-Subnet2
- Zone: Zone A
- CIDR: 192.168.2.0/24
- First subnet (Continue with “Next Step” at Step 2 to “Create VSwitch”):
2. Security Group Configuration (Configure Firewall)
- Create “Security Group”. Go to “Product” and click on “Elastic Computing Service”. Once landed at ECS overview page, click at “Security Group” on side tab follow by click on “Create Security Group” button.
- Name: Any name. E.g. SG-SSH-HTTP
- Network Type: VPC
- VPC: VPC-Main
- Click on “Set the Rule Immediately”
- Add rule. Click on “Add Security Group Rules”
- First Rule (SSH for any inbound client)
- Rule Direction: Inbound
- Authorization Policy: Allow
- Protocol Type: SSH
- Authorization Object: 0.0.0.0/0
- Second Rule (HTTP for any inbound client)
- Rule Direction: Inbound
- Authorization Policy: Allow
- Protocol Type: HTTP
- Authorization Object: 0.0.0.0/0
- Third Rule (All protocol for any outbound target)
- Rule Direction: outbound
- Authorization Policy: Allow
- Protocol Type: All
- Authorization Object: 0.0.0.0/0
- First Rule (SSH for any inbound client)
3. ECS Configuration (Configure Application Layer – Part 1)
- Create “Key Pair”. Go to “Product” and click on “Elastic Computing Service”. Once you’re on the ECS overview page, click “Key Pairs” on the side tab, then click “Create Key Pair”.
- Name: ECS-Lab
- Type: Automatically Create a Key Pair
- A key pair file named “ECS-Lab.pem” should be automatically downloaded. This file will be used as your authentication key when connecting to the ECS instance.
- Create an ECS instance for your WordPress installation. Go to “Product” and click on “Elastic Computing Service”. Once on the ECS overview page, click “Instances” on the side tab, then click the “Create Instance” button.
- Pricing Model: Pay-As-You-Go
- Region and Zone: Asia Pacific SE 1 (Singapore), Asia Pacific SE 1 Zone A
- Instance Type: General Type n1 – 1 core 1GB
- Network Type: Select the created ‘VPC’ (VPC-Main), VSwitch (Public-Subnet1), and Security Group (SG-SSH-HTTP) accordingly
- Operating System: Ubuntu 16.04
- Security Setting: Attach Key Pair, select the generated key-pair from Step 6 (ECS-Lab).
- Instance name: ECS-Lab-WP
- Click “Buy Now” and proceed accordingly
- SSH into the purchased ECS instance with the key pair generated at Step 3.1. Refer to this link on how to SSH into the ECS instance. Go to “Product” and click on “Elastic Computing Service”. Once landed on the ECS overview page, click “Instances” on the side tab. The internet IP address is in the “IP Address” column.
SSH into the ECS instance, and run the following commands to install the necessary software and packages for WordPress. Please ensure all commands are executed successfully.
apt-get update
apt-get install apache2 libapache2-mod-php php php-mcrypt php-mysql mysql-client-core-5.7 -y
cd /var/www/html
mv index.html index.html.bk
wget https://wordpress.org/latest.tar.gz
tar -xzf latest.tar.gz
cp -r wordpress/* /var/www/html/
rm -rf wordpress latest.tar.gz
chown -R www-data:www-data /var/www/html
chmod -R 755 /var/www/html/wp-content
service apache2 restart
4. ApsaraDB RDS Configuration (Configure Database Layer)
- Create ApsaraDB RDS – MySQL. Go to “Product” and click on “ApsaraDB for RDS”. Once landed on the RDS page, click “Create Instances”.
- Billing Method: Pay-As-You-Go
- Region and Zone: Singapore, Multiple Zone (Zone A + Zone B)
- Database Engine: MySQL
- Instance type: 1 Core 1GB (rds.mysql.t1.small)
- Network Type: “VPC”, and select VPC (VPC-Main) and VSwitch (Public-Subnet2) accordingly
- Click “Buy Now” and proceed accordingly
- Configure the RDS instance. Go to “Product” and click on “ApsaraDB for RDS” (it might take a while before the purchased “RDS” appears on the page). Once the purchased RDS is up and running, click “Manage” on the RDS.
- Create a whitelist. Click “Security” on the side tab. Under the “Whitelist Setting” tab, click on “+ Add a Whitelist Group”.
- Group Name: rds_ecs_whitelist
- Whitelist: 192.168.1.0/24
- Click “OK”
- Create the “wordpress” database. Click “Databases” on the side tab followed by “Create Database”.
- Database Name: wordpress
- Supported Characters: utf8
- Click OK
- Create a user account. Click “Accounts” on the side tab followed by “Create Account”.
- Database Account: wordpress_user
- Authorized Databases: select the created database (wordpress)
- Password & Re-enter Password: WordPress123 (insert your own more secure password here)
- Click “OK” to create the account.
5. WordPress Configuration (Configure Application Layer – Part 2)
- Browse to the ECS internet IP (created at Step 3.2) using your web browser.
- Fill in the MySQL connection details, such as “Database Name”, “Username”, “Password” as defined in Step 4.2. The “Database Host” is the “Intranet Address” of the created RDS instance at 4.1. You may get the intranet address by going to Alibaba Cloud’s console at “Product” and click on “ApsaraDB for RDS”. Once landed on the RDS page, click on the created RDS instance, and copy the “Intranet Address” value.
- Click “Run on Installation” and continue the WordPress configuration until completion. Hooray! By now, your first WordPress instance should be installed and running at Alibaba Cloud!
6. Sync Dependent Data Storage (Identify Centralized Storage)
- The folder used by WordPress to store user-uploaded files should be synchronized to centralized storage.
- Create an OSS bucket. Go to “Product” and click on “Object Storage Service” under “Storage & CDN”. Once you’ve landed on the Object Storage page, click on “Create Bucket” on the RDS.
- Bucket Name: lab-wp-XXX (using your own bucket name)
- Region: Asia Pacific SE 1 (Singapore)
- Storage Class: Standard
- ACL: Private
- Click OK
- Grant access to the bucket created at Step 14. Go to “Product” and click on “Resource Access Management” under “Monitor and Management”. Once you’ve landed on the RAM page, click on “User” followed by “Create User”.
- User Name: oss-user
- Click OK
- Authorize the created user with OSS access. Go to “Product” and click on “Resource Access Management” under “Monitor and Management”. Once you’ve landed on the RAM page, click on the “Authorize” button for the newly created user.
- Select and add the “AliyunOSSFullAccess”
- Click OK
- Generate “User Access Key”. Go to “Product” and click on “Resource Access Management” under “Monitor and Management”. Once you’ve landed on the RAM page, click on “Manage” for the newly created user.
- Go to the “User Access Key” section and click “Create Access Key”.
- Click on “Save Access Key Information” to save the generated Access Key and Access Key Secret.
- Install the “ossfs” tool. This tool is used to sync WordPress’ dependent folder with the OSS bucket created at Step 6.2.
- SSH into the launched WordPress ECS instance
- Install ‘ossfs’ according to the guidelines at this link
- Make the WordPress uploads directory:
- Setup credentials with the bucket name and key created at Step 6.2 and 6.5 accordingly.
- Mount the ‘lab-wp-XXX’ OSS bucket to WordPress’ dependent folder and enable auto-mounting during instance startup.
- Add the following command into
/etc/fstabto mountlab-wp-XXXduring system startup. Beware of using the correct zone. E.g. “http://oss-ap-southeast-1.aliyuncs.com” - Execute the mounting operation:
mount -a - To avoid the mounted OSS bucket being scanned by Linux (which incurs unnecessary costs), add the following details into “/etc/updatedb.conf”:
- Add “/var/www/html/wp-content/uploads” to PRUNEPATHS
- Add “fuse.ossfs” into PRUNEFS
cd
wget https://github.com/aliyun/ossfs/releases/download/v1.80.3/ossfs_1.80.3_ubuntu16.04_amd64.deb
sudo apt-get update
sudo apt-get install gdebi-core -y
sudo gdebi ossfs_1.80.3_ubuntu16.04_amd64.deb
mkdir -p /var/www/html/wp-content/uploads
chown -R www-data:www-data /var/www/html/wp-content/uploads
chmod 640 /etc/passwd-ossfs
echo "ossfs#lab-wp-XXX /var/www/html/wp-content/uploads fuse _netdev,url=http://oss-ap-southeast-1.aliyuncs.com,allow_other, 0 0" >> /etc/fstab
7. High Availability, Fault Tolerance, and Load Balance Configuration
- Create the Load Balancer. On the ECS overview page, click “Load Balancer” on the side tab. On the Load Balancer page, click “Create Server Load Balancer”.
- Region: Singapore
- Zone: Multi-zone
- Primary Zone: Zone A
- Backup Zone: Zone B
- Instance Type: Internet
- Quantity: 1
- Configure load balancer. On the ECS overview page, click “Load Balancer” on the side tab. Once the Load Balancer page is loaded, click “Manage” on the purchased load balancer at Step 7.1.
- Click “Listener” and then click the “Add Listener” button.
- Front-end Protocol: HTTP, port 80
- Back-end Protocol: HTTP, port 80
- Scheduling: Weighted Round
- Click “Show Advance” and enable persistence session
- Timeout Duration: 300
- Click “Next” to configure the health check.
- Domain Name: Leave Blank
- Health Check Port: 80
- Health Check Path: /index.php
- Normal Status Code: enable http_2xx and http_3xx
- Click “Confirm” to provision Load Balancer
- Update the Load Balancer internet IP address in WordPress. This is important as the running WordPress instance has been auto-configured with the running ECS IP. We need to change the IP to point to the Load Balancer’s IP, as WordPress might be running by any ECS instance behind the load balancer. If you have a domain name, you might want to update to the domain name instead.
- Browse to WordPress using the browser. Go to the “Settings” URL e.g. “http://
/wp-admin/options-general.php” and then change the “WordPress Address (URL)” & “Site Address (URL)” to the Load Balancer’s internet IP accordingly.
- Browse to WordPress using the browser. Go to the “Settings” URL e.g. “http://
- Stop the ECS instance. Go to “Product” and click on “Elastic Computing Service”. Once landed on the ECS overview page, click “Instances” on the side tab, followed by “More” and then “Stop”.
- Create a Custom Image. Once ECS has stopped, click on “More” then “Create Custom Image”.
- Image Name: IMG-WP
- Image Description: Image for WordPress
- Restart ECS once the ‘custom image’ creation at Step 22 has completed (you may check the creation status under the “Snapshot” section). Go to “Product” and click on “Elastic Computing Service”. Once landed on the ECS overview page, click “Instances” on the side tab, followed by “More” and then “Start”.
- Once ECS is up and running, create an Auto Scaling Group. Go to “Product” and click on “Auto Scaling” under “Elastic Computing”. Once landed on the “Auto Scaling” page, click on “Create Scaling Group”.
- Scaling Group Name: ASG-WS
- Maximum Number: 2
- Minimum Number: 2
- Default Cool-down Time: 300
- Network Type: VPC and select the VPC (VPC-Main) and VSwitch (Public-Subnet1)
- Server Load Balancer: Select the load balance created at step 7.1. You may need to click “Load more data” to show the load balancer.
- Configure the ECS source and ‘User Defined Image’ accordingly.
- Click the “Submit” button.
- Create a “Scaling Configuration”. Click on “Create Scaling Configuration”.
- Source ECS: Select the one that got restarted at Step 7.8.
- Configuration Name: ASG_ECS_WP
- Security Group: Select the one created at Step 2.1
- User Defined Image: Select the one created at Step 7.7.
- Click “Next”, followed by “OK” and “Enable” the Auto Scaling Group.
- Retrieve the Load Balancer Public IP. Go to “Product” and click on “Elastic Computing Service”. Once landed on the ECS overview page, click “Load Balancer” on the side tab. The Public IP is under the “IP Address” column.
- The health check carried out by the Load Balancer might take a while to complete. You may visit the WordPress application by using the Load Balancer’s public IP once the Load Balance status is shown as “normal”.
Congratulations! You’ve now successfully deployed a high availability, fault tolerant, and load balanced WordPress server in a single region!
If you would like to buy a domain name, go to “Domain” under “Domain & Websites” and proceed for purchasing.
If you would like to associate your domain name with the deployed WordPress, go to “Alibaba Cloud DNS” under “Domain & Websites” and add at least ‘A’ records for the ‘Server Load Balance’ public IP.
Frequently Asked Questions (FAQs) on Deploying Fault-Tolerant Load-Balanced Web Apps on Alibaba Cloud
What is the importance of deploying a fault-tolerant load-balanced web app on Alibaba Cloud?
Deploying a fault-tolerant load-balanced web app on Alibaba Cloud is crucial for maintaining high availability and reliability of your web applications. This setup ensures that your application remains accessible even if one or more servers fail. Load balancing distributes network traffic across multiple servers to prevent any single server from becoming a bottleneck, thus improving responsiveness and increasing availability of applications. Alibaba Cloud provides robust and scalable solutions for deploying such applications, making it a preferred choice for many businesses.
How does Alibaba Cloud ensure fault tolerance and load balancing?
Alibaba Cloud uses several services to ensure fault tolerance and load balancing. The Server Load Balancer (SLB) service distributes incoming traffic among multiple instances to balance their load. It also ensures high availability by automatically rerouting traffic to healthy instances in case of any instance failure. The Elastic Compute Service (ECS) provides resizable compute capacity in the cloud, which can be easily scaled up or down as per the application requirements.
Can I deploy a WordPress blog on Alibaba Cloud?
Yes, you can deploy a WordPress blog on Alibaba Cloud. Alibaba Cloud provides a Simple Application Server (SAS) that allows you to quickly build a WordPress blog. The SAS provides a one-stop solution for application deployment, server management, and more. It comes with pre-installed software like LAMP, making it easier to deploy WordPress.
How secure is Alibaba Cloud for deploying web applications?
Alibaba Cloud provides robust security measures to protect your web applications. It offers features like Anti-DDoS protection, Web Application Firewall (WAF), and Server Guard to ensure your applications are safe from common web threats. Additionally, it complies with several international and industry-specific compliance standards, ensuring your data is handled securely.
How does Alibaba Cloud compare to other cloud service providers?
Alibaba Cloud is one of the leading cloud service providers, offering a comprehensive suite of cloud services. It stands out for its robust infrastructure, high scalability, and cost-effectiveness. While other providers like AWS, Google Cloud, and Azure also offer similar services, Alibaba Cloud’s strong presence in the Asia-Pacific region and competitive pricing make it a preferred choice for many businesses.
What are the costs associated with deploying a web app on Alibaba Cloud?
The costs of deploying a web app on Alibaba Cloud can vary based on several factors, including the type and number of instances used, data transfer costs, and any additional services like load balancing or data storage. Alibaba Cloud offers a Pay-As-You-Go model, allowing you to pay only for the resources you use.
How can I monitor the performance of my web app on Alibaba Cloud?
Alibaba Cloud provides several tools for monitoring the performance of your web app. The CloudMonitor service allows you to track the usage and performance of your cloud resources in real-time. It provides comprehensive monitoring data and customizable alert rules to help you manage your applications effectively.
Can I scale my web app on Alibaba Cloud?
Yes, Alibaba Cloud provides easy scalability for your web apps. With services like Auto Scaling, you can automatically adjust your resource capacity based on the demand. This ensures that your application can handle traffic spikes without any performance degradation.
What support does Alibaba Cloud offer for deploying web apps?
Alibaba Cloud offers extensive documentation, tutorials, and community forums to help you deploy your web apps. It also provides 24/7 technical support for any issues you may encounter. Additionally, it offers professional services for application development, migration, and optimization.
How reliable is Alibaba Cloud for hosting web apps?
Alibaba Cloud is highly reliable for hosting web apps. It offers a Service Level Agreement (SLA) of 99.95% availability for its ECS instances. It also has a global network of data centers and multiple availability zones, ensuring your application remains accessible and performs optimally at all times.
 Ngoi Se Keng