As the adoption of cloud technologies increases day by day, companies are enhancing their web applications by using the varied services provided by different cloud providers. Security is an important step while developing any application. In this article, I am going to provide the details of one such Azure service that helps safely store your application configuration secrets – Azure Key Vault. I’ll go through what Azure Key Vault is and how you can use it to store application secrets securely.
While developing applications, you might have seen scenarios where you need to provide connection strings to resources such as databases or cache. As a developer, you might be quite aware that these values are being put into the configuration files (i.e., web.config) of the application. These values are further used by the application to establish connections and communicate with the resources. This may be seen as one of the security issues as the connection strings might be accidentally visible to unauthorized individuals. This is one of the security threats for the Production database information. Azure Key Vault can come to the rescue here so that the crucial information is saved on the Azure cloud with more secured role-based authorization and access control policies. The next section explains the Azure Key Vault in more detail.
Azure Key Vault
As the name suggests, Azure Key Vault is used to store and manage keys securely. Key Vault can be used to store the cryptographic secrets and keys such as authentication keys, storage account keys, data encryption keys, passwords and certificates.
Azure Key Vault enables developers to create the keys for development and testing in minutes, and they can further migrate this setup seamlessly onto the production environment.
The centralized key store/vault can be securely managed by the Key Vault owner who manages permissions to this key store and would be responsible for keeping the secrets secure.
Sensitive Date Categories
Keys: These are the cryptographic keys which are most often used by other Azure services. For example, say you want to write data to Azure Storage, and you want to encrypt it. Such highly sensitive encryption codes can be stored as the keys.
Secrets: These include sensitive information that application might need during the run time such as SQL database connection strings and other connections string such as Azure Storage, Redis Cache, etc. that the application is using.
Certificates: The certificates that are used for HTTP/SSL communication is a good example. These certificates consist of private and public keys, and such values should be stored securely.
Benefits of Azure Key Vault
- Reduces the need for deployments if there is a change in resource’s configuration. The main reason for this is that access keys/secrets are stored in Azure Key Vault and not in web.config, so there is no need for redeploying web.config. Just update the value in Azure Key Vault, and your application is ready to use it.
- Securely manage application key/secrets by enforcing role-based access policies.
- Reduce latency in accessing the keys by making use of the Azure Cloud Global redundancy feature. This makes sure your application keys are accessible at all times.
- Applications have no direct access to keys. This ensures the secrets are not passed on to a person who has no permissions to the respective resources.
- Helps to create and export keys in no time.
Take a look at how you can store application secrets in Azure Key Vault and use them to build applications.
Setup in Azure
The application demonstrated here is a simple console application that fetches an image from Azure blob storage and downloads it to the local folder specified in the application. Since the app must grab the image from the Azure storage blob, it must establish a secure connection. Typically, this connection string is stored in the config file of the application; however, this example makes use of Azure Key Vault to store this connection string value. The essential components needed for this application are
- Azure Blob Container Storage with a file to download.
- Azure Key Vault with a storage account connection string stored in a secret.
- Application registered on the Azure Active Directory that provides the ClientId and ClientSecret to access the key vault.
Setting up Azure Storage container
- The first step is to log in to the Azure Portal. For this, you would need an Azure Subscription.
- Create an Azure storage account for Blob Storage first if you don’t want to use an existing one. Navigate to Storage Accounts by typing in the search section. Click Add and fill in the necessary information such as Storage account name, subscription, and resource group. I have created an account with the name quickuploadappstorage. You may want to create it and the other services in a new Resource Group, so it’s easy to delete everything once you are done with the example.
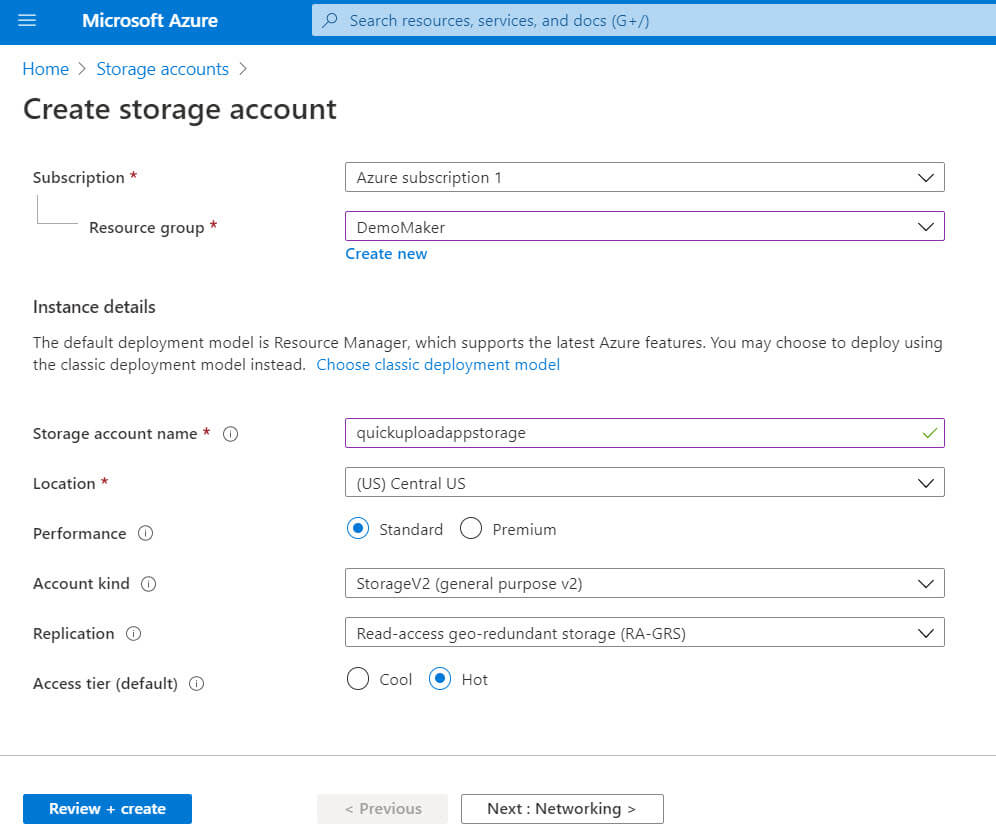
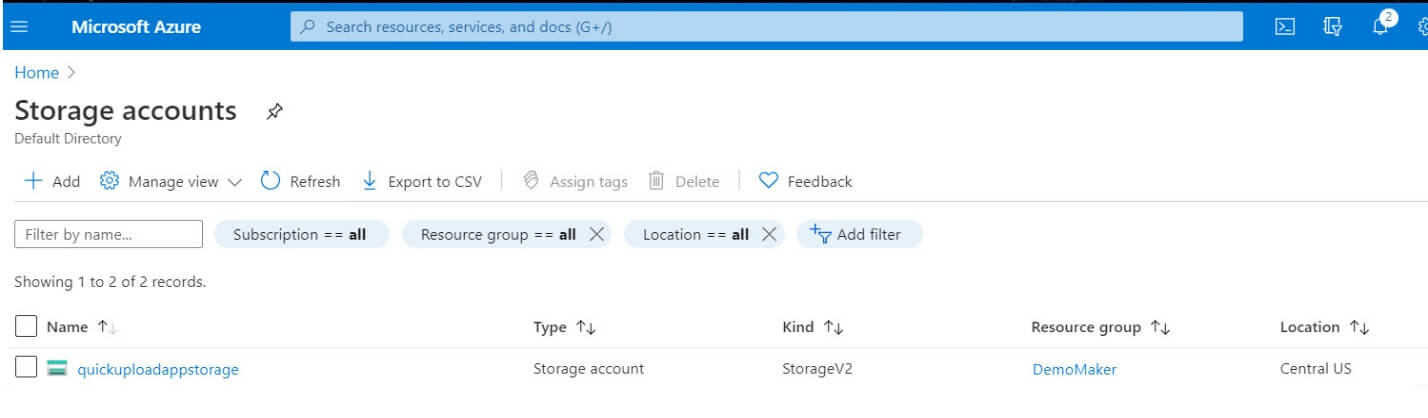
Click Review + Create. After you see that all the Validation Passed you can hit Create button. This takes you to the deployment page, which takes a couple of minutes. After it’s successful, you can go back to the Storage Accounts page where you can see newly added storage account.
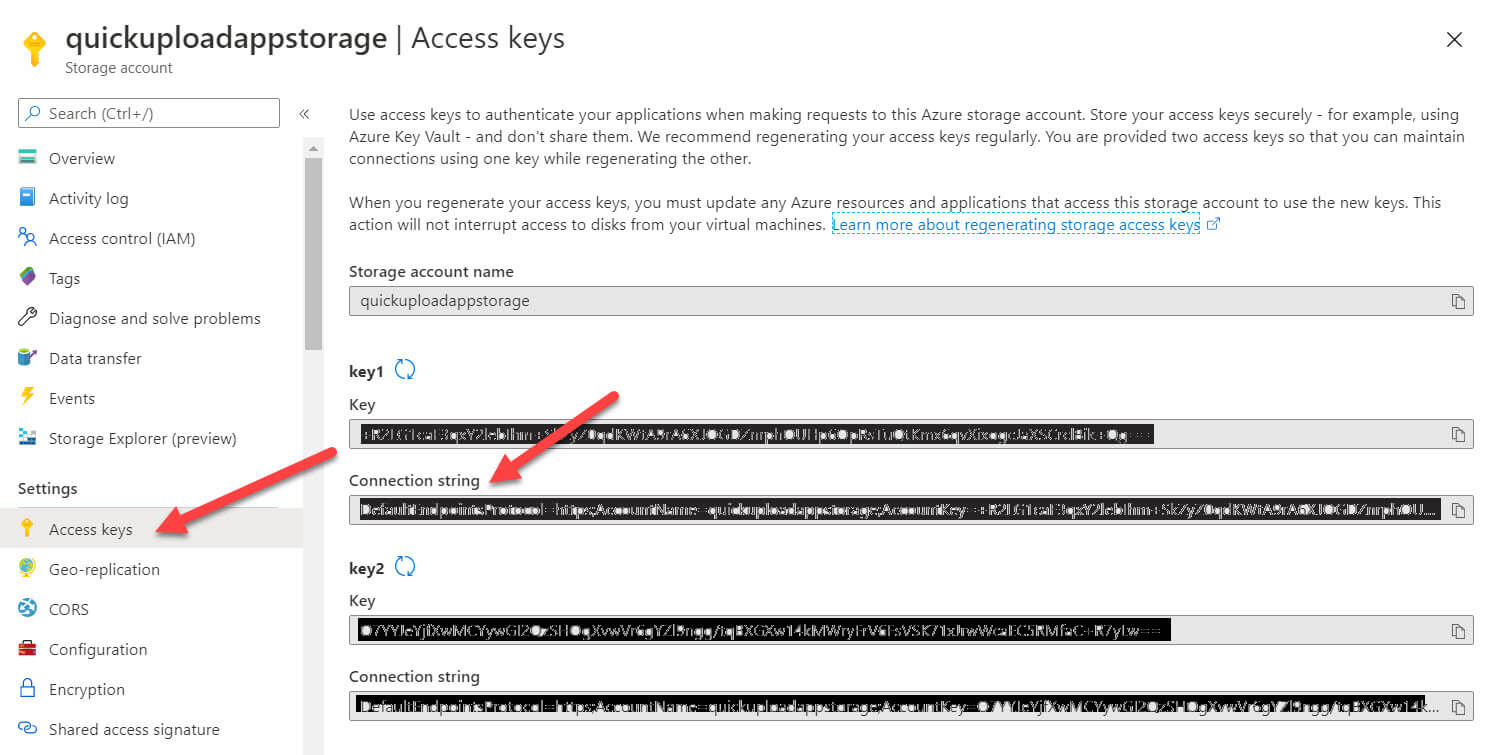
- The next step is to note down the connection string of the storage account that you just created. Click the quickuploadappstorage to see the details and click on Access Keys. Grab the Connection string from this page and make sure you keep a backup of the Connection string from the storage keys; you will need it later while creating the secret.
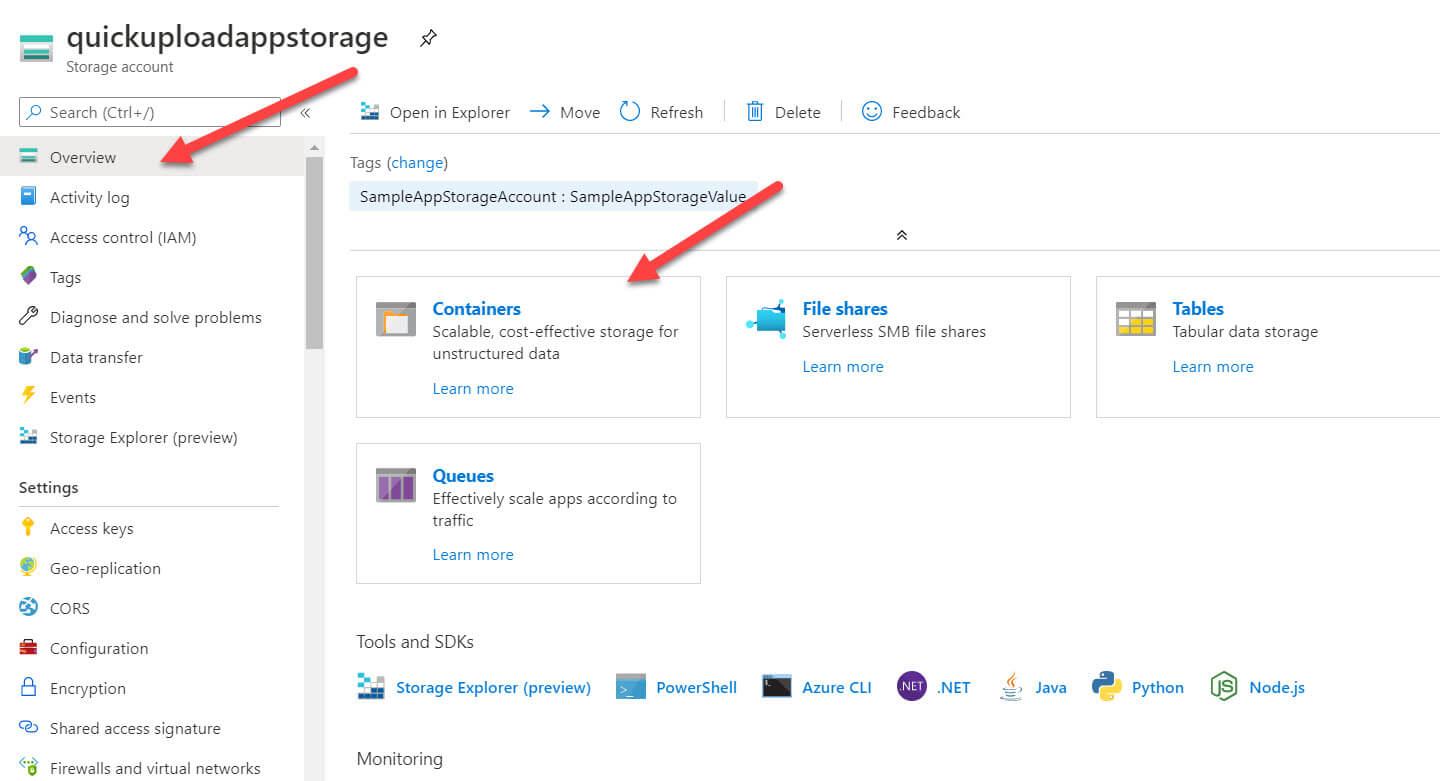
- Add a new container to upload the image. For this click on the Overview option and click the Containers.
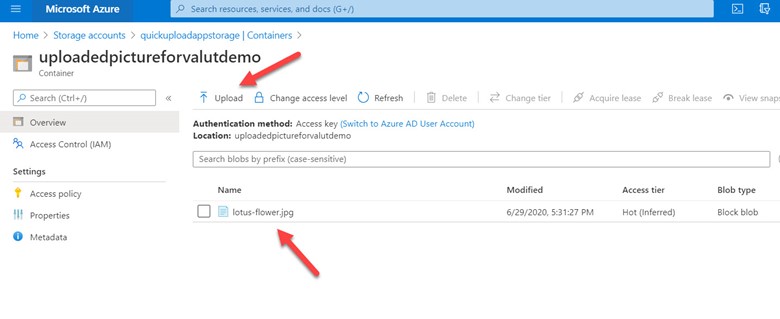
Once you are on the Containers page, click on the + Container option. Provide the Container Name and set the Public Access Level to “Blob (anonymous read access for blobs only) ”. To understand the different public level access you can refer this documentation. For demo purposes, I have created a container uploadedpictureforvalutdemo. After I created it, I navigated down
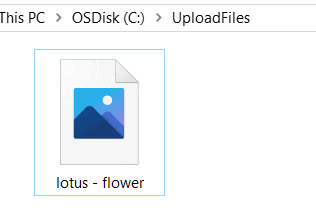
to the specific container and uploaded a file lotus-flower.jpg to this container using the upload blade. Be sure to upload a file in your own container.
Setting up a secret in Azure Key Vault
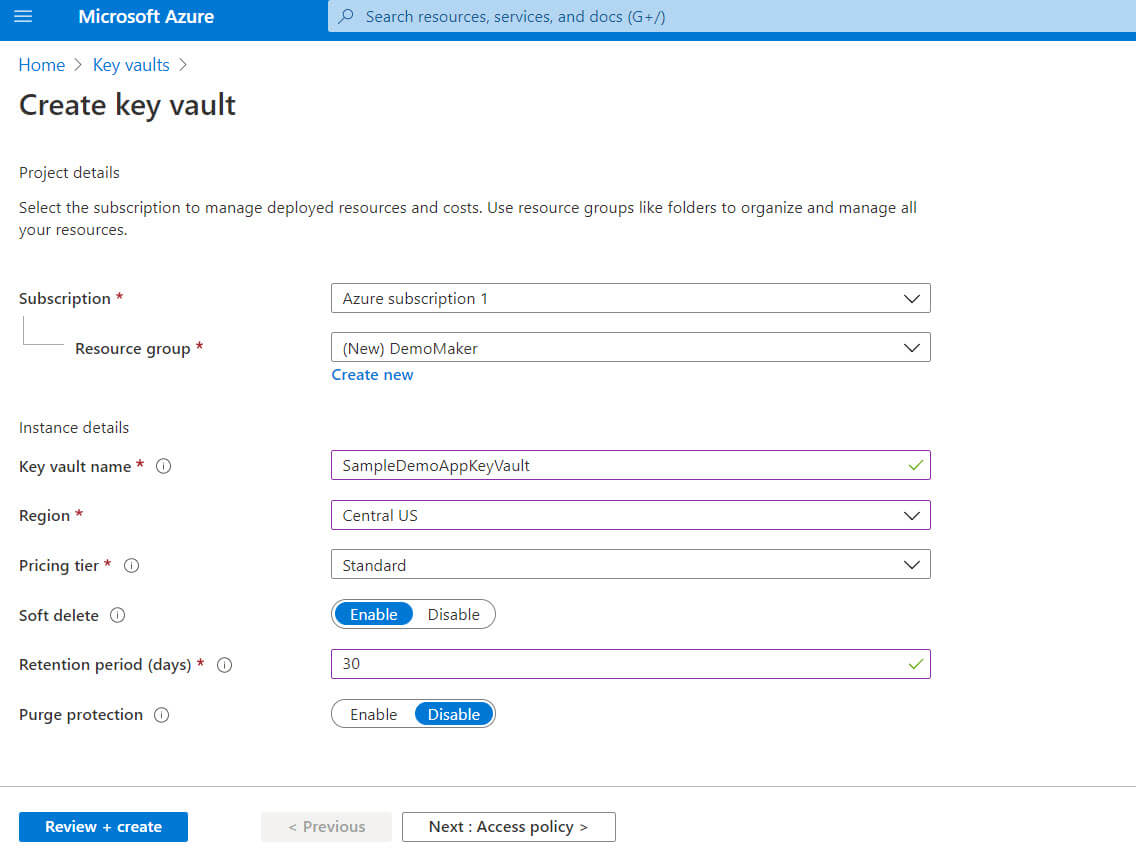
Back on the main page, search for key vaults and navigate to that page. Click + Add to create a new key vault for storing the secrets as below:
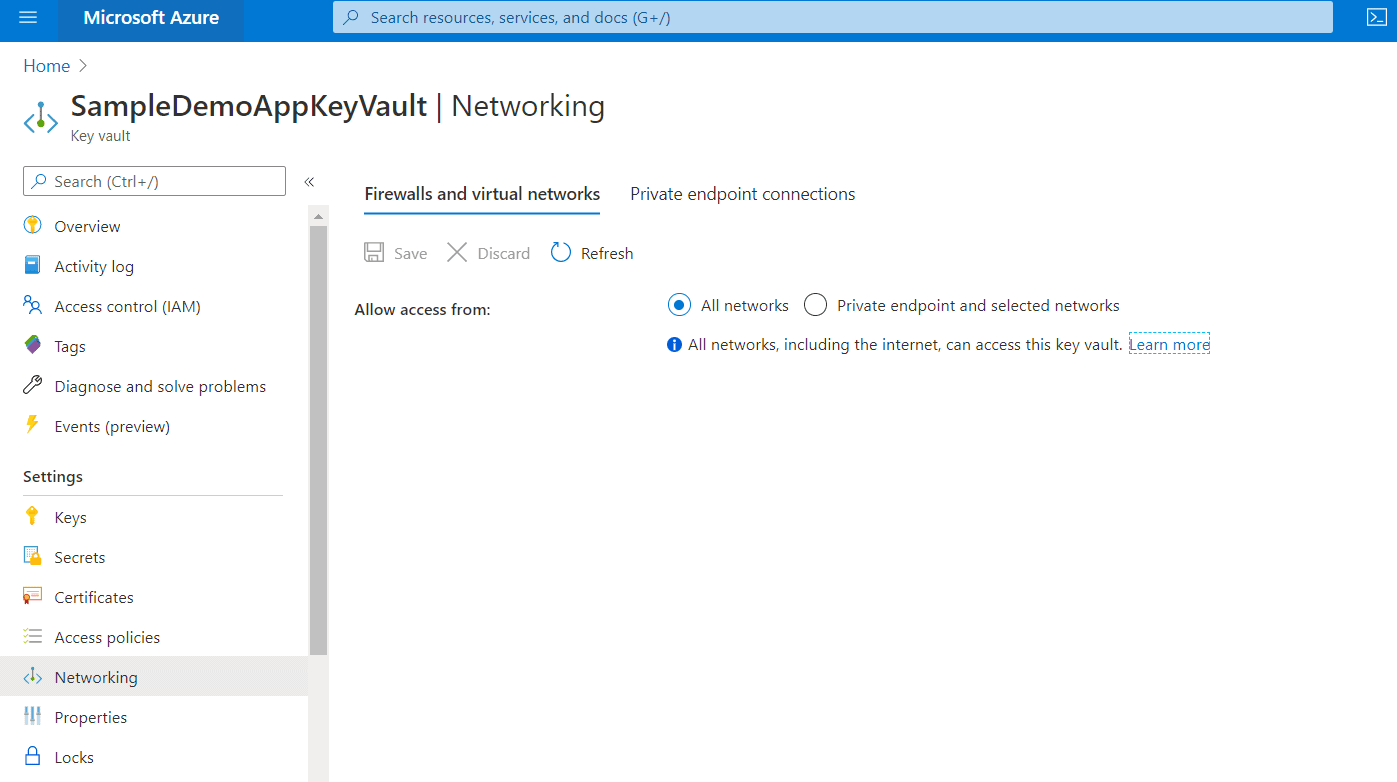
On the networking page, make sure that all networks are allowed.
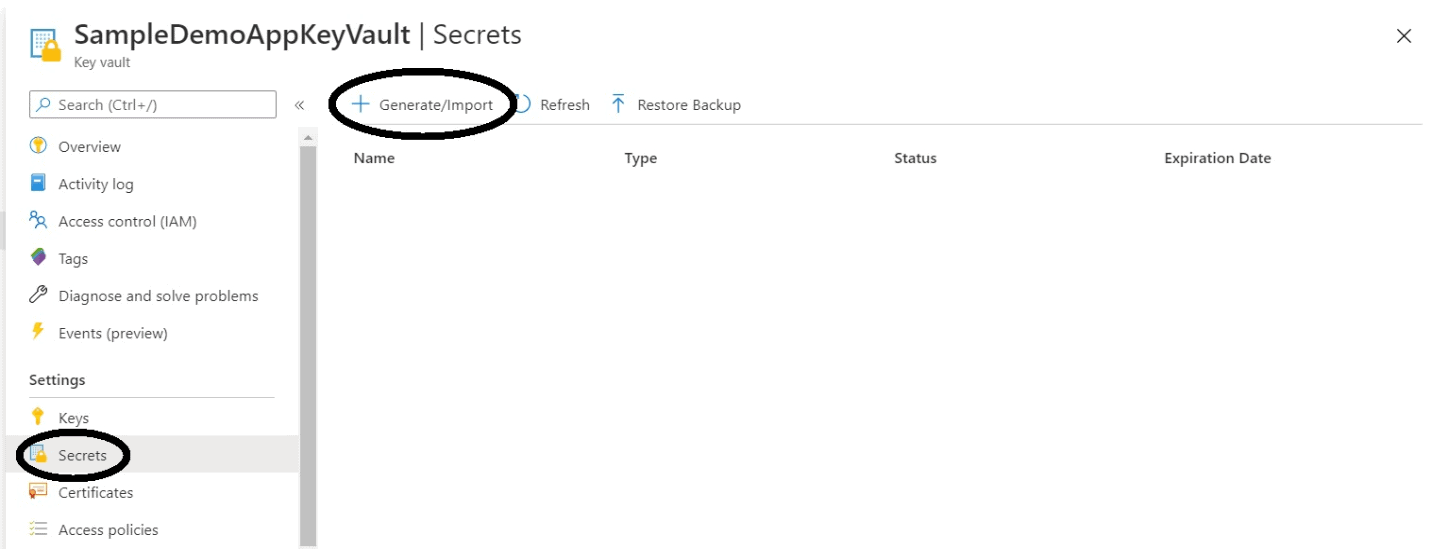
After you have created the key vault, navigate to it. You can add a new secret by selecting Secrets on the key vault page and by clicking the Generate/Import button.
Add the new secret Name and Value. You can think of Name and Value as a key-value pair that you provide in web.config or app.config of an application. For instance, the entry that you provide in app.config is something similar to this
<add key=”StorageConnection” value=”Sample connection string” />.
The Secret Name is the Key (StorageConnection), and the value is the Storage Connection string that you copied from the Azure Storage connection in the previous step.
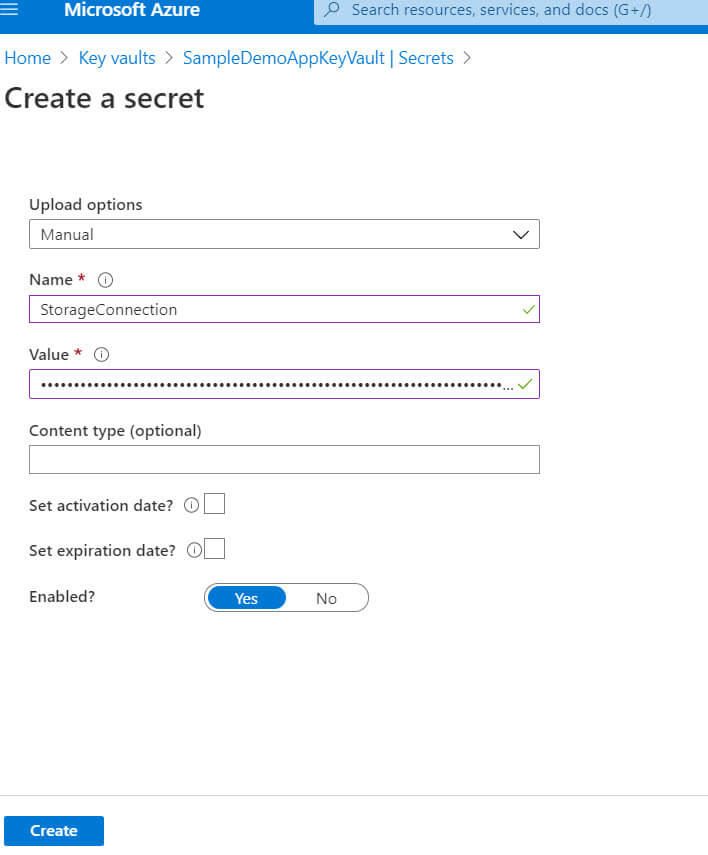
After all the details are entered hit “Create”. This creates a new secret in your vault that you will use shortly in the application.
Register Application on Azure Active Directory
After you have created the secret in your vault, the next important setup step is registering an app with the Azure Active Directory. After this app is registered, you will get the Client Id and Client secret that can be used to authenticate to Azure Active Directory and, consequently, to the key vault.
To register the app just search the “App registration” in the Azure portal search box or you can browse to Default Directory and search with the same keyword in the default directory.
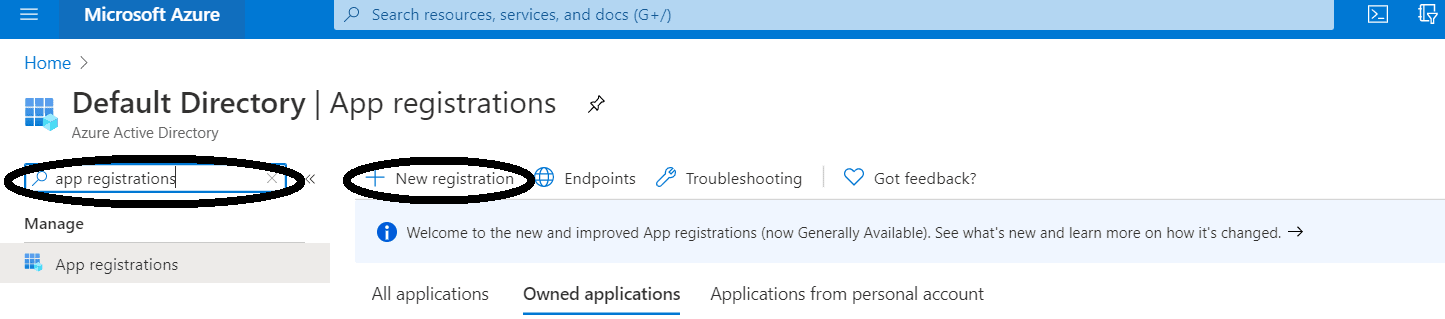
Then click “New registration” and provide the details such as display name and redirect url if required.
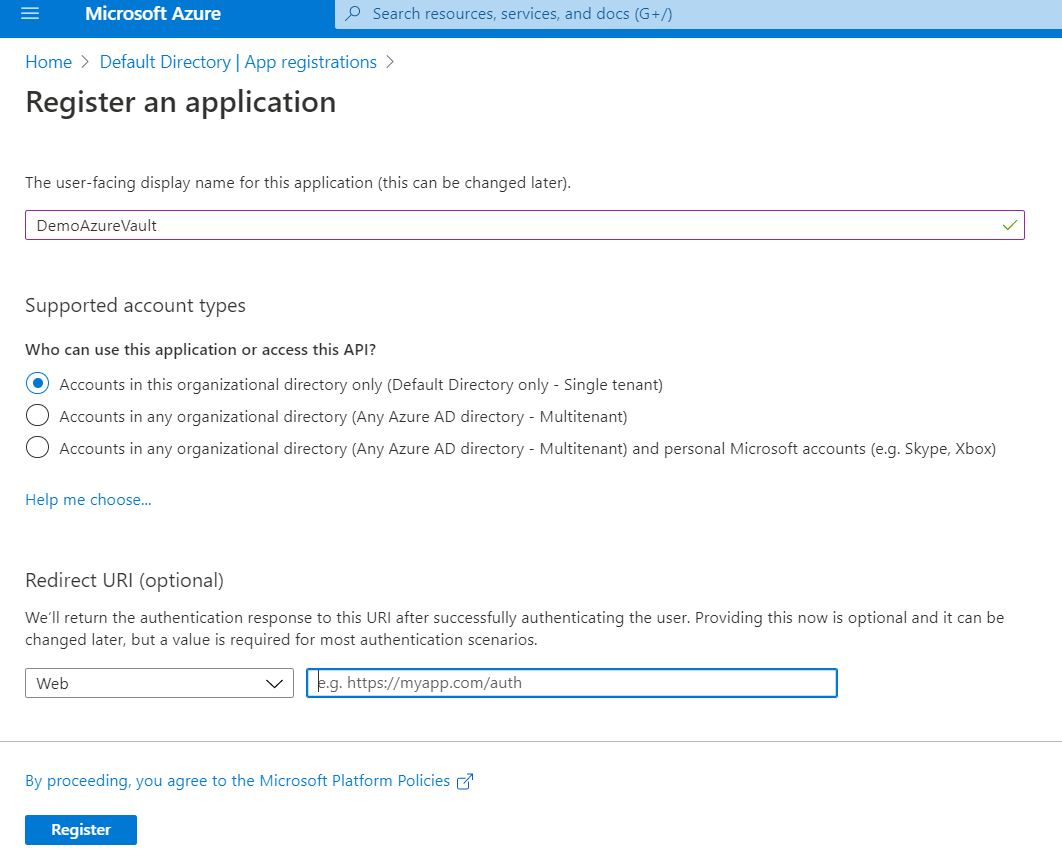
Also, save the Application (client) ID from the registered app confirmation page. Unlike client secret, this is accessible to you later.
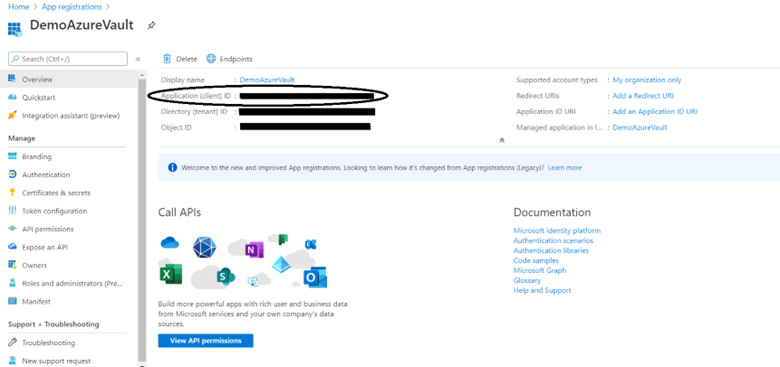
The next step is generating the Client Secret. For this go to registered app DemoAzureVault Select Certificates & Secrets blade -> Click New client secret.
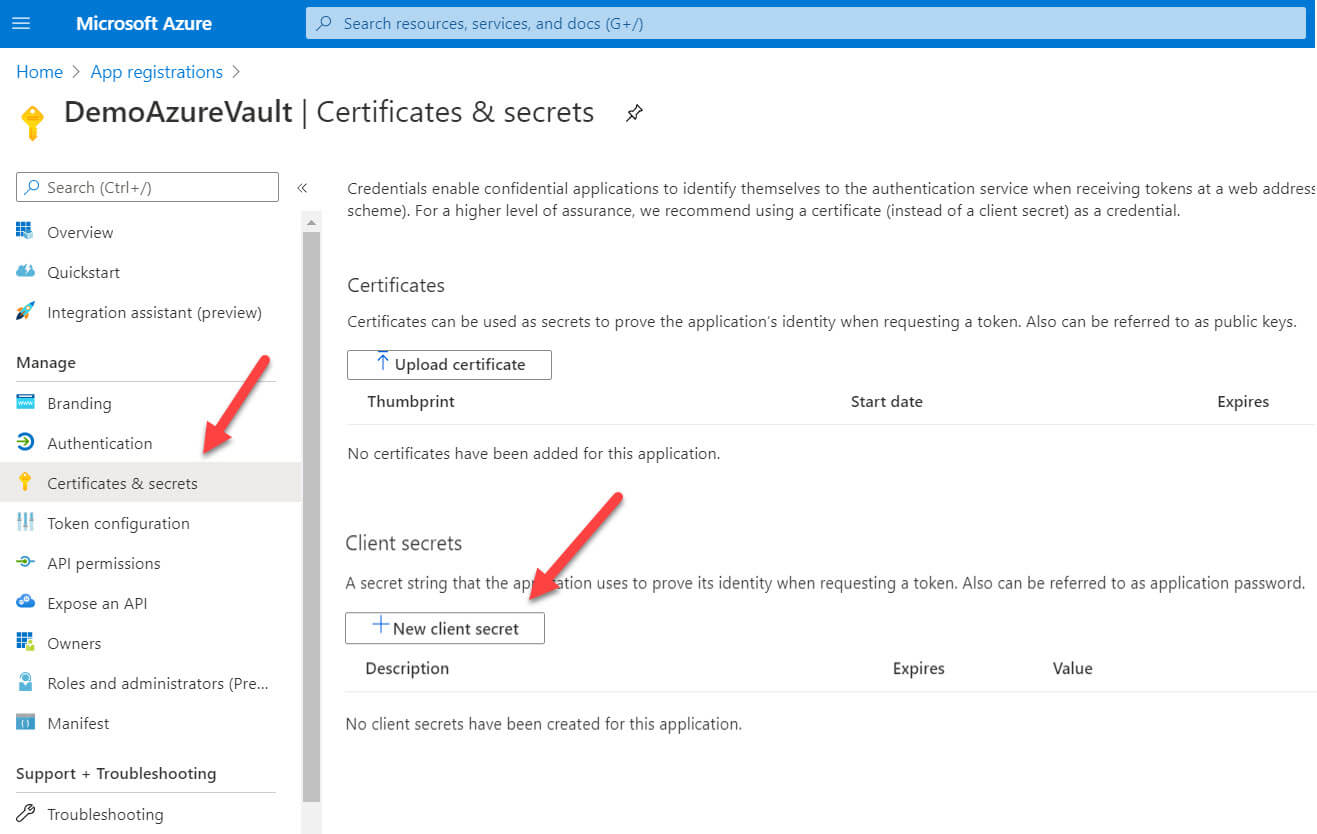
Provide the client secret description and the expiration information and click add.
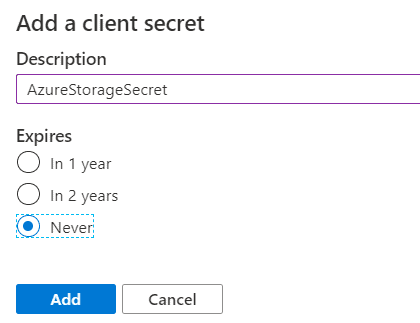
When you click register on the next screen, make sure you save the value of the key as this is the only time you will be able to see it. This is the Client Secret that you will use in the application.
The very first time you add a new secret, the value shows without asterisks *. Make sure you make a note of it that time.

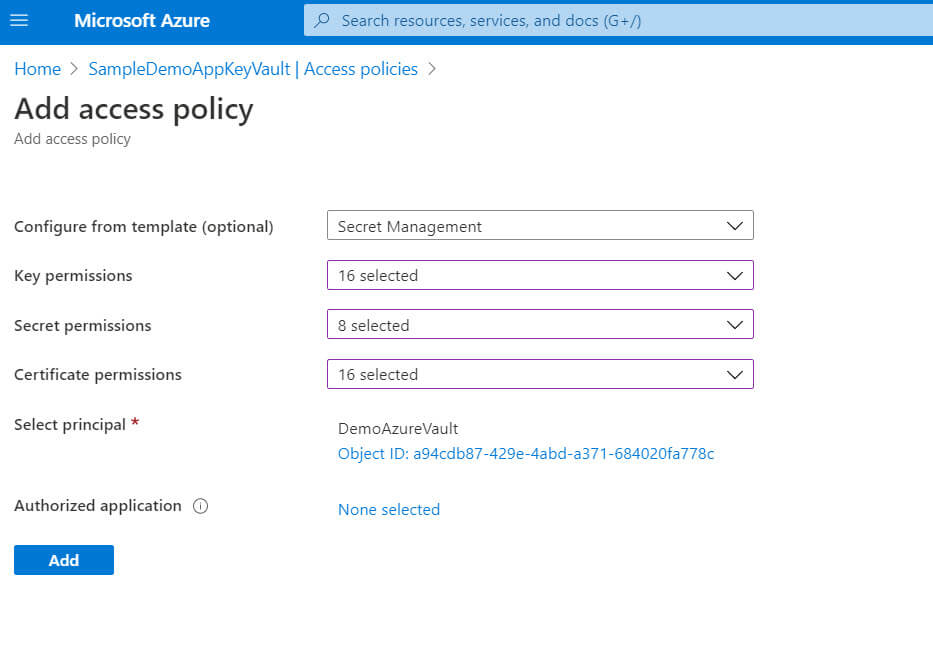
After the app is registered, the next step is to provide access to the app to the key vault. For this, navigate to the Key vault -> Click access policies -> Add access policy
In the access policy page, you can select the permissions to keys, secrets and certificates. For the demo application, I have provided full access at the moment. You can choose the access you want to grant from the drop-down values.
Make sure you select the app you just registered through app registration as the Principal. I have selected the DemoAzureVault app. This provides the necessary permissions to the app. According to Azure documentation “Principal is an object that represents a user, group, service principal, or managed identity that is requesting access to Azure resources.” Authorized application is another set of applications or users that you can provide access to Key Vault.
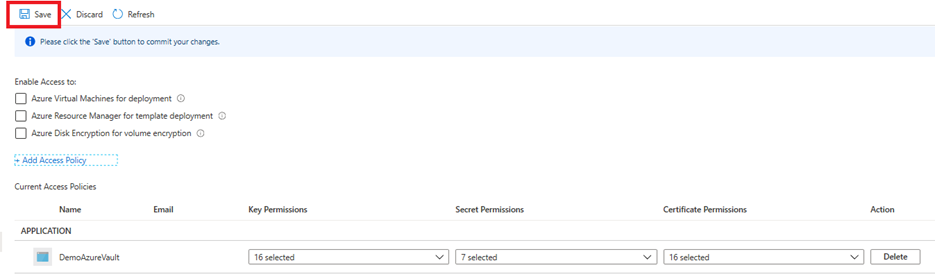
Once the Access Policy shows up in the list of Access policies, remember to click Save!
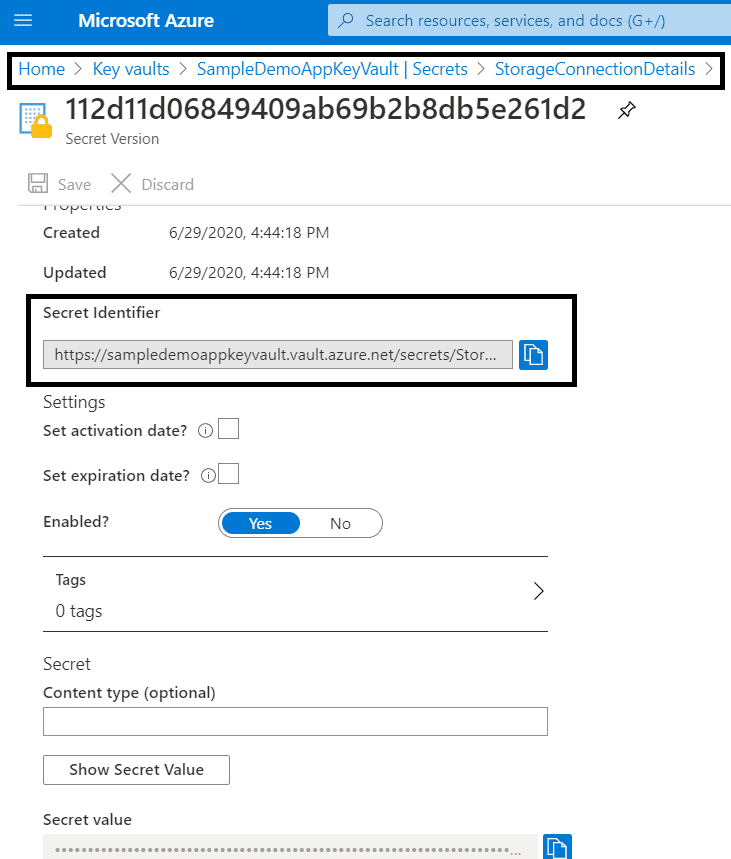
Another step is grabbing the base secret uri. You can get this by navigating down to the secret by clicking Secrets, and the StorageConnectionDetails see the highlighted details below.
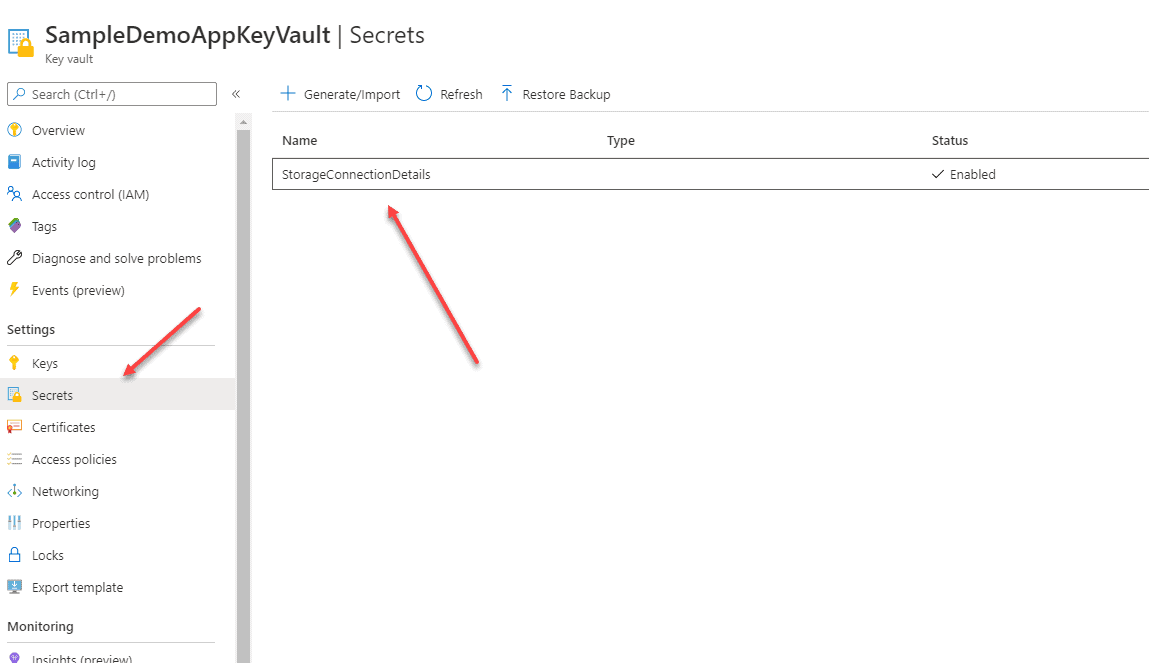
The Secret identifier is the uri that’s needed to copy for the application.
Setting up Key Vault Client
After you have these things ready, you can start writing code for the application.
In the traditional way of writing the connection strings in the app.config, you would have specified the Azure Storage Account connection string something like this.
|
1 2 3 |
<appSettings> <add key="StorageAccount" value="your Azure Storage Connection String here"/> </appSettings> |
However, this is how your app.config look like instead. It will have the ClientId, ClientSecret and the BaseSecretUri values that you captured in the previous steps
|
1 2 3 4 5 |
<appSettings> <add key="ClientSecret" value="your client secret value" /> <add key="ClientId" value="your client Id details" /> <add key="BaseSecretUri" value="your base secret uri value" /> </appSettings> |
Begin by creating a .NET Framework Console app. Before writing code, add the references below from the Nuget Package Browser.
- System.Configuration.ConfigurationManager
- Microsoft.WindowsAzure.Storage
- Microsoft.Azure.KeyVault
- Microsoft.IdentityModel.Clients.ActiveDirectory
Since you have to get the Image file from Azure Blob Storage, you need first get the access keys from Azure Key Vault. The very first step to establishing a connection to the key vault for this set up a key vault client by using ClientId and ClientSecret (Saved in app.config) from your registered app on Azure Directory. The GetToken() method helps generate the token and create a successful Key Vault Client.
|
1 |
var vaultClient = new KeyVaultClient(GetToken); |
Fetching the storage connection string from Secret is the next step. The vaultClient can further be used to fetch the secret details.
|
1 |
var storageAccountSecretValue = vaultClient.GetSecretAsync(BaseSecretUri).Result.Value; |
This connection string is what you use to establish a successful connection to the Azure Blob Storage container. Finally, you will use the DownloadImage() method to download the file to the specified location. I have mentioned the folder C:\UploadFiles\” and the name of the file image to download is “lotus – flower.jpg”. The code also has the container name, uploadedpictureforvalutdemo, that should be replaced if you named your container something else.
Here is the complete code that I wrote in Program.cs file.
|
1 2 3 4 5 6 7 8 9 10 11 12 13 14 15 16 17 18 19 20 21 22 23 24 25 26 27 28 29 30 31 32 33 34 35 36 37 38 39 40 41 42 43 44 45 46 47 48 49 50 51 52 53 54 55 56 57 58 59 |
using System; using System.Configuration; using System.IO; using System.Threading.Tasks; using Microsoft.Azure.KeyVault; using Microsoft.IdentityModel.Clients.ActiveDirectory; using Microsoft.WindowsAzure.Storage; using Microsoft.WindowsAzure.Storage.Blob; namespace DemoAzureVault { internal class Program { //get the connection details from app settings private static readonly string ClientSecret = ConfigurationManager.AppSettings["ClientSecret"]; private static readonly string ClientId = ConfigurationManager.AppSettings["ClientId"]; private static readonly string BaseSecretUri = ConfigurationManager.AppSettings["BaseSecretUri"]; private static void Main(string[] args) { //initialize key vault client var vaultClient = new KeyVaultClient(GetToken); //get the secret(storage account connection string) from key vault var storageAccountSecretValue = vaultClient.GetSecretAsync(BaseSecretUri).Result.Value; //connect to storage account using connection string var storageAccount = CloudStorageAccount.Parse(storageAccountSecretValue); var blobClient = storageAccount.CreateCloudBlobClient(); var blobContainer = blobClient.GetContainerReference("<a id="post-87740-_Hlk47452325"></a>uploadedpictureforvalutdemo"); //Download the file from blob storage to the destination folder if (blobContainer.Exists()) { var filetoDownload = "lotus - flower.jpg"; DownloadImage(filetoDownload, "uploadedpictureforvalutdemo", storageAccountSecretValue); Console.Write("Download Complete"); Console.WriteLine(); } Console.Write("Press any key to exit..."); Console.ReadKey(true); } public static void DownloadImage(string fileToDownload, string azure_ContainerName, string storageAccountSecretValue) { CloudStorageAccount storageAccount = CloudStorageAccount.Parse(storageAccountSecretValue); CloudBlobClient blobClient = storageAccount.CreateCloudBlobClient(); CloudBlobContainer blobContainer = blobClient.GetContainerReference(azure_ContainerName); CloudBlockBlob cloudBlob = blobContainer.GetBlockBlobReference(fileToDownload); // provide the file download location below Stream file = File.OpenWrite(@"C:\UploadFiles\" + fileToDownload); cloudBlob.DownloadToStream(file); } public static async Task<string> GetToken(string authority, string resource, string scope) { var authContext = new AuthenticationContext(authority); var clientCred = new ClientCredential(ClientId, ClientSecret); var result = await authContext.AcquireTokenAsync(resource, clientCred); if (result == null) throw new InvalidOperationException("Failed to obtain the token"); return result.AccessToken; } } } |
Results
After you successfully run the code and check the specified location, you will see that the image is downloaded successfully from Azure Blob Storage to the folder.
Conclusion
Azure Key Vault provides a secure, reliable and easy to manage capabilities for storing the application secrets in a quick and hassle-free setup. After reading this article, you will be able to learn how to securely store the critical information in the form of keys, secrets and certificates in the Azure Key Vault and use them to build varied applications.
References
https://docs.microsoft.com/en-us/azure/key-vault/general/basic-concepts
https://docs.microsoft.com/en-us/azure/key-vault/general/authentication
https://docs.microsoft.com/en-us/azure/key-vault/general/overview
https://docs.microsoft.com/en-us/azure/storage/blobs/storage-blobs-introduction
https://docs.microsoft.com/en-us/azure/storage/blobs/anonymous-read-access-configure?tabs=portal
Load comments