Many developers find unit testing confusing. This is made worse by the advanced techniques you need to test classes or asynchronous code, like the one for network requests.
In reality, at the base of unit testing, there are simple fundamental concepts. Once you grasp those, unit testing suddenly becomes more approachable.
Architecting SwiftUI apps with MVC and MVVM
GET THE FREE BOOK NOWContents
- Unit testing explained in simple, understandable terms
- Unit testing allows you to check hard to reach edge cases and prevent bugs
- Writing unit tests in Xcode
- A good architecture makes your code easier to test
- Treating value types as pure functions to simplify unit testing
- Verifying your code using the assertions functions from the XCTest framework
- Measuring the code coverage of a test in Xcode
- Why aiming for specific code coverage is meaningless and what you should do instead
Unit testing explained in simple, understandable terms
When you write an app, you go through a cycle of writing code, running it, and checking if it works as intended. But, as your code grows, it becomes harder to test your entire app manually.
Automated testing can perform those tests for you. So, practically speaking, unit testing is code to make sure your app code is correct.
The other reason why unit testing can be hard to understand is that many concepts surround it: testing in Xcode, app architecture, test doubles, dependency injection, and so forth.
But, at its core, the idea of unit testing is pretty straightforward. You can write simple unit tests in plain Swift. You don’t need any special Xcode feature or sophisticated technique, and you can even run them inside a Swift Playground.
Let’s look at an example. The function below calculates the factorial of an integer, which is the product of all positive integers less than or equal to the input.
func factorial(of number: Int) -> Int {
	var result = 1
	for factor in 1...number {
		result = result * factor
	}
	return result
}
To test this function manually, you would feed it a couple of numbers and check that the result is what you expect. So, for example, you would try it on four and check that the result is 24.
You can automate that, writing a Swift function that does the test for you. For example:
func testFactorial() {
	if factorial(of: 4) != 24 {
		print("The factorial of 3 is wrong")
	}
}
This is simple Swift code everyone can understand. All it does is check the function’s output and print a message if it’s not correct.
That’s unit testing in a nutshell. Everything else is bells and whistles added by Xcode to make testing simpler.
Or at least, that would be the case if the code in our apps was as simple as the factorial function we just wrote. That’s why you need Xcode’s support and advanced techniques like test doubles.
Nonetheless, this idea is helpful for both simple and complex tests.
Unit testing allows you to check hard to reach edge cases and prevent bugs
You can get several benefits from unit testing.
The most obvious is that you don’t have to continually test your code manually. It can be tedious to run your app and get to a specific location with the functionality you want to test.
But that’s not all. Unit tests also allow you to test edge cases that might be hard to create in a running app. And edge cases are where most bugs live.
For example, what happens if we feed zero or a negative number to our factorial(of:) function from above?
func testFactorialOfZero() {
	if factorial(of: 0) != 1 {
		print("The factorial of 0 is wrong")
	}
}
Our code breaks:

In a real app, this code would cause a crash. Zero is out of the range in the for loop.
But our code does not fail because of a limitation of Swift ranges. It fails because we forgot to consider non-positive integers in our code. By definition, the factorial of a negative integer does not exist, while the factorial of 0 is 1.
func factorial(of number: Int) -> Int? {
	if (number < 0) {
		return nil
	}
	if (number == 0) {
		return 1
	}
	var result = 1
	for factor in 1...number {
		result = result * factor
	}
	return result
}
We can now run our tests again and even add a check for negative numbers.
func testFactorialOfNegativeInteger() {
	if factorial(of: -1) != nil {
		print("The factorial of -1 is wrong")
	}
}
Here you see the last and, in my opinion, most important benefit of unit testing. The tests we wrote previously make sure that, as we update our factorial(of:) function, we don’t break its existing code.
This is crucial in complex apps, where you have to add, update, and delete code continually. Unit testing gives you the confidence that your changes didn’t break code that was working well.
Writing unit tests in Xcode
With an understanding of unit tests, we can now look at the testing features of Xcode.
When you create a new Xcode project, you get a chance to add unit testing straight away. I will use, as an example, an app to track calories. You can find the full Xcode project here.
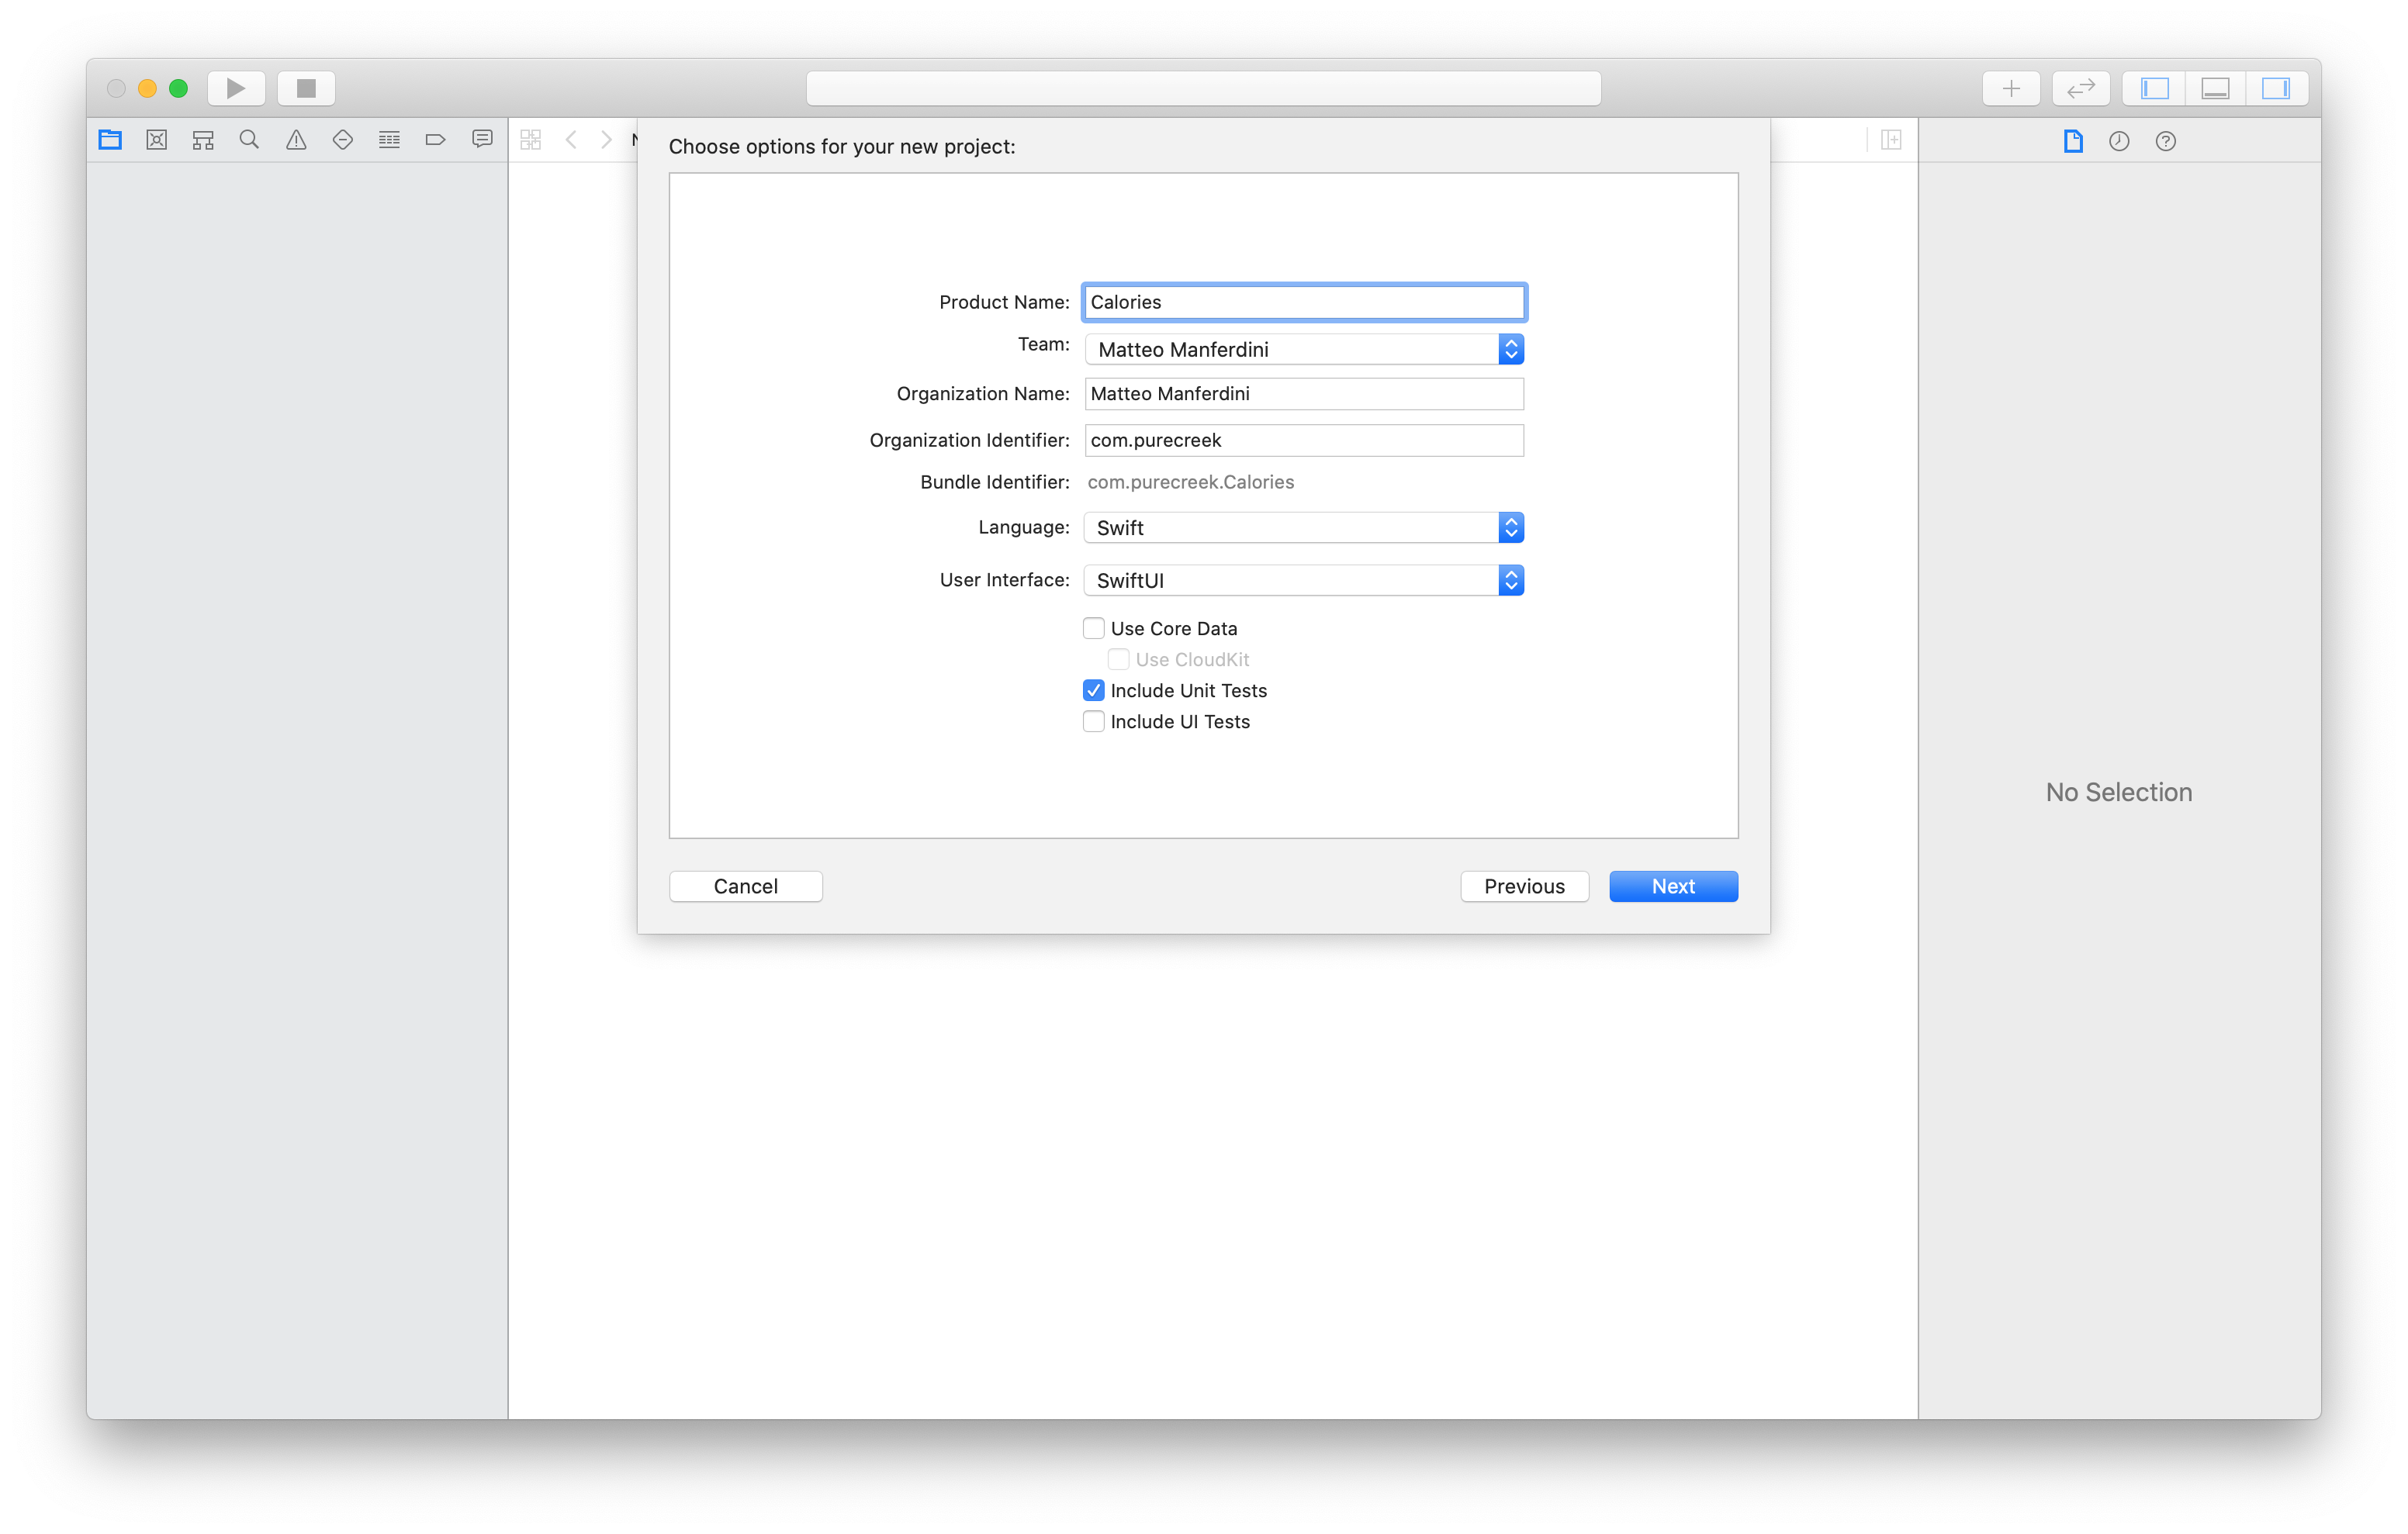
When you check that option, your template project will include a test target already configured. You can always add one later, but I usually check the option by default. Even if I am not going to write tests straight away, everything will be set up when I decide to.
The test target already starts with some template code for our tests.
import XCTest
@testable import Calories

class CaloriesTests: XCTestCase {

    override func setUpWithError() throws {
        // Put setup code here. This method is called before the invocation of each test method in the class.
    }

    override func tearDownWithError() throws {
        // Put teardown code here. This method is called after the invocation of each test method in the class.
    }

    func testExample() throws {
        // This is an example of a functional test case.
        // Use XCTAssert and related functions to verify your tests produce the correct results.
    }

    func testPerformanceExample() throws {
        // This is an example of a performance test case.
        self.measure {
            // Put the code you want to measure the time of here.
        }
    }

}- The
@testable import Caloriesline gives you access to all the types in your project’s main target. The code of a Swift module is not accessible from the outside unless all types and methods are explicitly declared to be public. The@testablekeyword allows you to go around this limitation and access even private code. - The
CaloriesTestsclass represents a test case, i.e., a grouping of related tests. A test case class needs to descent from theXCTestCase. - The
setUpWithError()method allows you to set up a standard environment for all the tests in a test case. If you need to do some cleaning after your tests, you usetearDownWithError(). These methods run before and after each test in a test case. We won’t need them, so you can delete them. - The
testExample()method is a test like the ones we wrote for our factorial example. You can name test methods as you please, but they need to start with thetestprefix for Xcode to recognize them. - And finally, the
testPerformanceExample()shows you how to measure your code’s performance. Performance tests are less standard than unit tests, and you use them only for crucial code than need to be fast. We won’t use this method either.
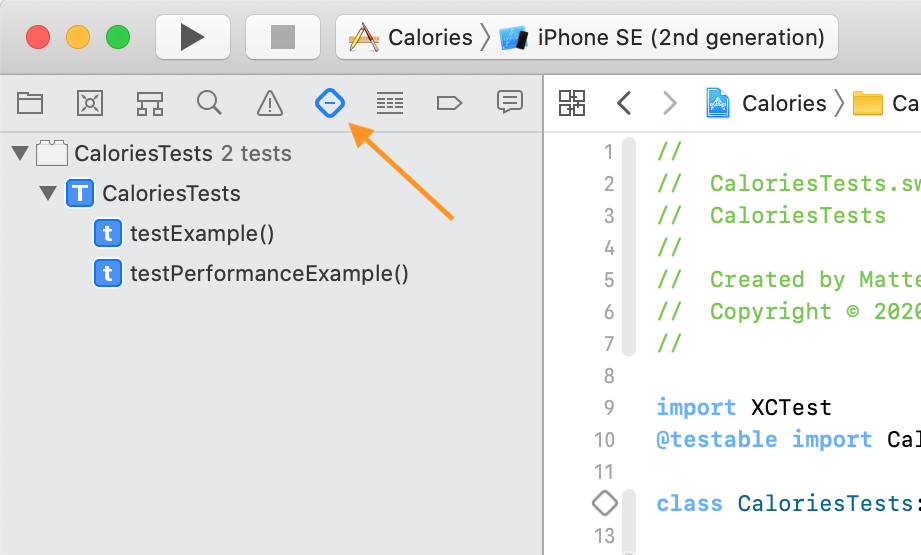
You can find all your test cases and relative tests listed in the Test navigator of Xcode.
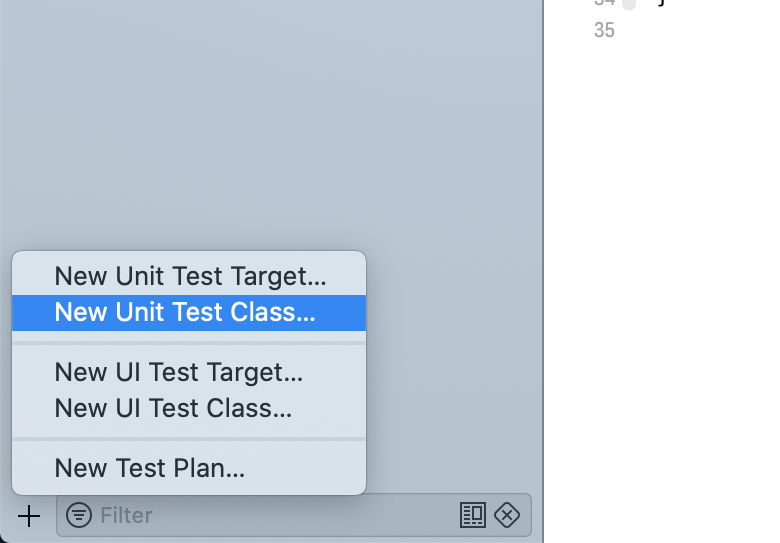
You can add new test cases to your project by simply creating new .swift files with code like the one above, but it’s easier to use the add menu at the bottom of the Test navigator.
A good architecture makes your code easier to test
In a real project, you don’t usually have loose functions like in our factorial example. Instead, you have structures, enumerations, and classes representing the various parts of your app.
It is crucial to organize your code according to a design pattern like MVC or MVVM. Having well-architected code does not only make your code well organized and easier to maintain. It also makes unit testing easier.
This also helps us answer a common question: which code should you test first?
The answer is: start from your model types.
There are several reasons for this:
- If you follow the MVC pattern or one of its derivatives, your model types will contain the domain business logic. Your entire app depends on such code’s correctness, so even a few tests have a significant impact.
- Model types are often structures, which are value types. These are far easier to test than reference types (we will see why in a moment).
- Reference types, i.e., classes, have dependencies and cause side effects. To write unit tests for these, you need test doubles (dummies, stubs, fakes, spies, and mocks) and use sophisticated techniques.
- Controllers (in MVC terms) or view models (in MVVM terms) are often connected to resources like disk storage, a database, the network, and device sensors. They also might run parallel code. These make unit testing harder.
- View code is the one that changes the most frequently, producing brittle tests that break easily. And nobody likes to fix broken tests.
Treating value types as pure functions to simplify unit testing
So, let’s add some model types to our app.
struct FoodItem {
	let name: String
	let caloriesFor100Grams: Int
	let grams: Int
}

struct Meal {
	private(set) var items: [FoodItem] = []

	var calories: Int {
		var calories = 0
		for item in items {
			calories += (item.caloriesFor100Grams / 100) * item.grams
		}
		return calories
	}

	mutating func add(_ item: FoodItem) {
		items.append(item)
	}
}
The Meal structure contains some simple logic to add food items and calculate the total calories of the food it contains.
Unit testing has such a name because you should test your code in separate units, removing all dependencies (testing dependencies together is instead called integration testing). Each unit is then treated as a black box. You feed it some input and test its output to check if it’s what you expect.
That was easy in the case of our factorial example because it was a pure function, i.e., a function where the output depends only on the input, and that does not create any side effect.
But that does not seem the case for our Meal type, which contains state.
The value returned by the calories computed property has no input. It depends only on the content of the items array. The add(_:) method, instead, does not return any value and only changes the internal state of a meal.
But structures are value types, and we can consider them to be pure functions. Since they don’t have dependencies, you can consider the initial state of a structure as the input of a method and its state after calling the method as the output.
(This is one of the reasons why you should refrain from putting reference types inside value types).
Verifying your code using the assertions functions from the XCTest framework
We now have some code to test, and a place in our Xcode project where to write the tests.
We are missing one last ingredient: a way to express if our code is correct or not.
In the example at the beginning of this article, I used simple print statements. That’s not practical for real unit testing. You don’t want to waste time sifting through logs to identify which tests failed. We need a way that points to failing tests directly.
In the XCTest framework, you find a series of assertion functions that make Xcode point to tests that don’t pass.
With those, we can write our first test.
As I mentioned above, unit tests are helpful to check edge cases, so let’s start making sure that an empty meal has no calories.
class CaloriesTests: XCTestCase {
	func testEmptyMeal() throws {
		let meal = Meal()
		XCTAssertEqual(meal.calories, 0, "An empty meal should have 0 calories")
	}
}
The XCTest offers a generic XCTAssert function that allows you to assert any condition. You could use that for any test you write, but it’s better to use more specialized assertion functions when possible, like XCTAssertEqual (above), XCTAssertNil, and others. These produce better errors in Xcode than XCTAssert.
You can run a single test by clicking on the diamond next to its name in the code editor’s gutter.
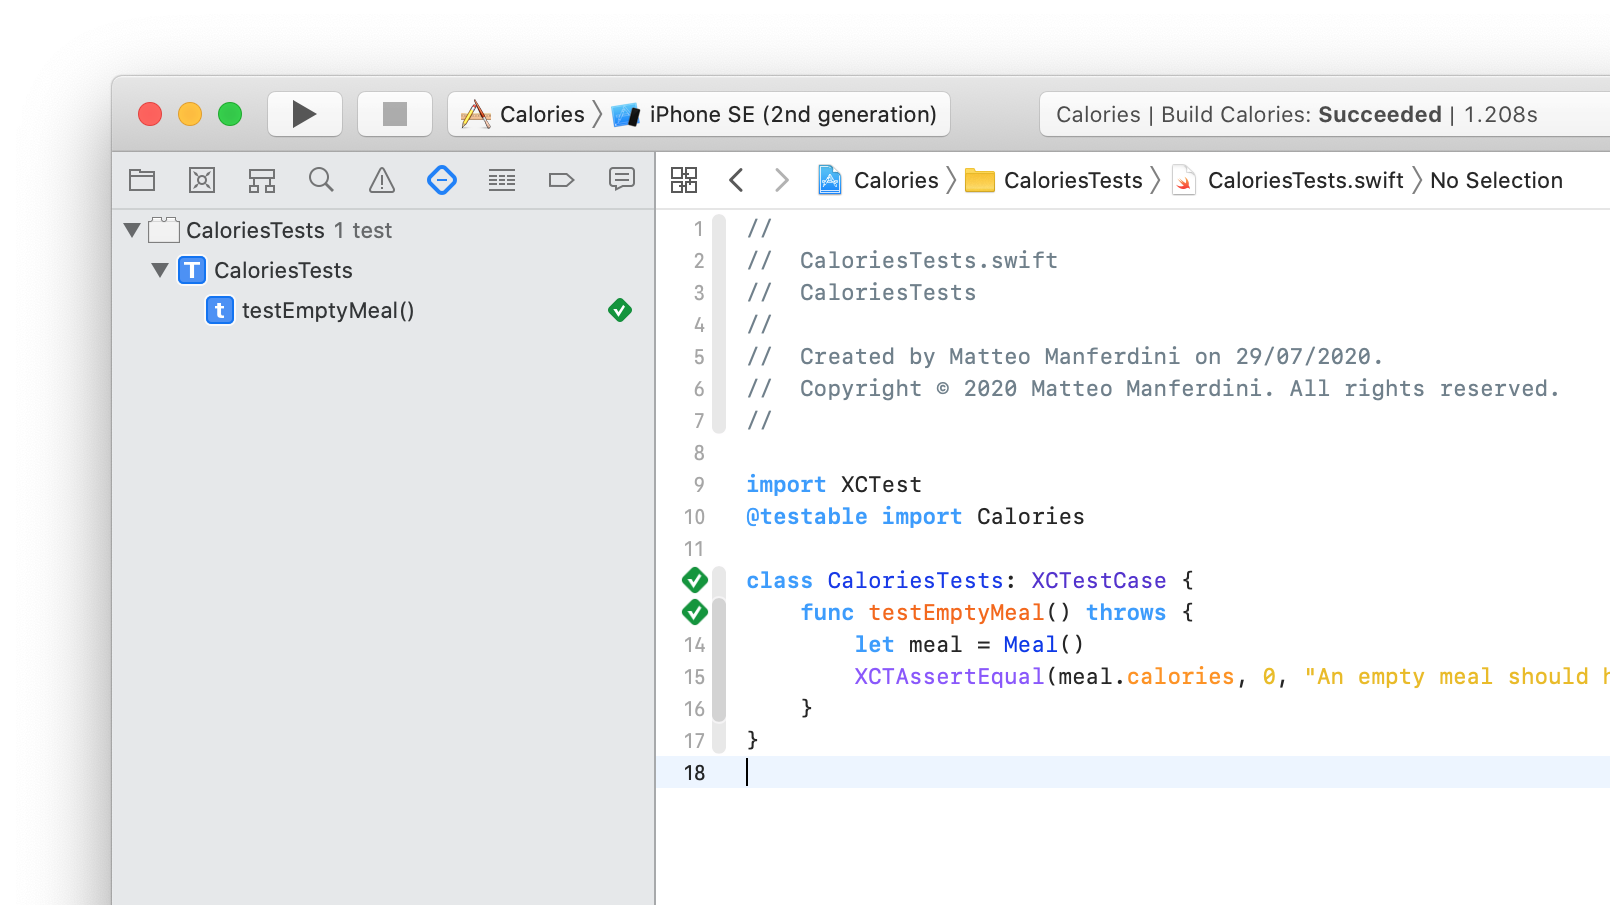
When a test passes, it becomes green, while failing tests are marked in red. You can change the 0 in the test to any other number to see how a failing test looks.
You can run all the tests in a test case by clicking on the diamond next to the class declaration. You can also use the Test navigator we saw above to run individual tests or test cases.
You often want to run all the tests in your project at once, which you can quickly do by hitting cmd+U on your keyboard or selecting the Test option in Xcode’s Product menu.
Measuring the code coverage of a test in Xcode
The next, most common question about unit testing is: how much of your code should you test?
This is usually measured by code coverage, i.e., the percentage of code covered by your tests. So, before we answer that question, let’s see how you can measure your tests’ code coverage in Xcode.
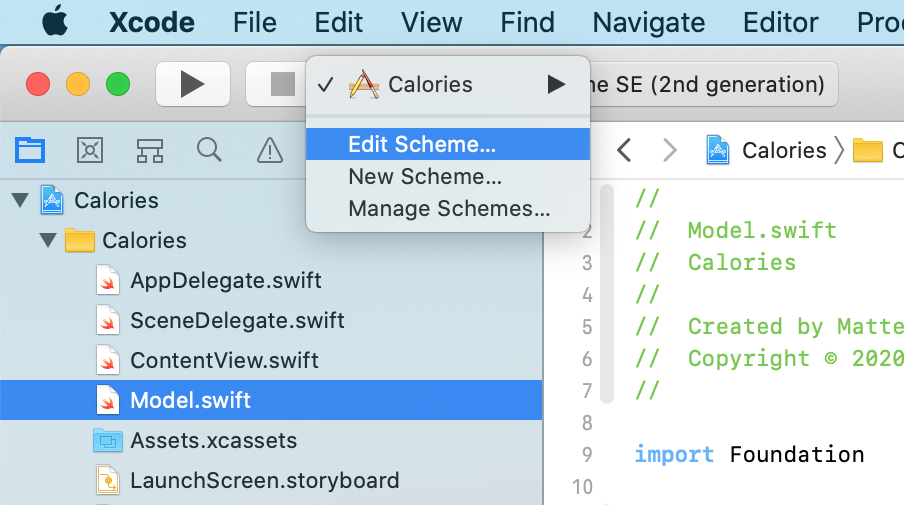
First of all, you need to let Xcode gather the coverage for your test target. Click on the button with the project name in the segmented control in the Xcode toolbar (next to the stop button). Then, select Edit scheme… in the pop-up menu.
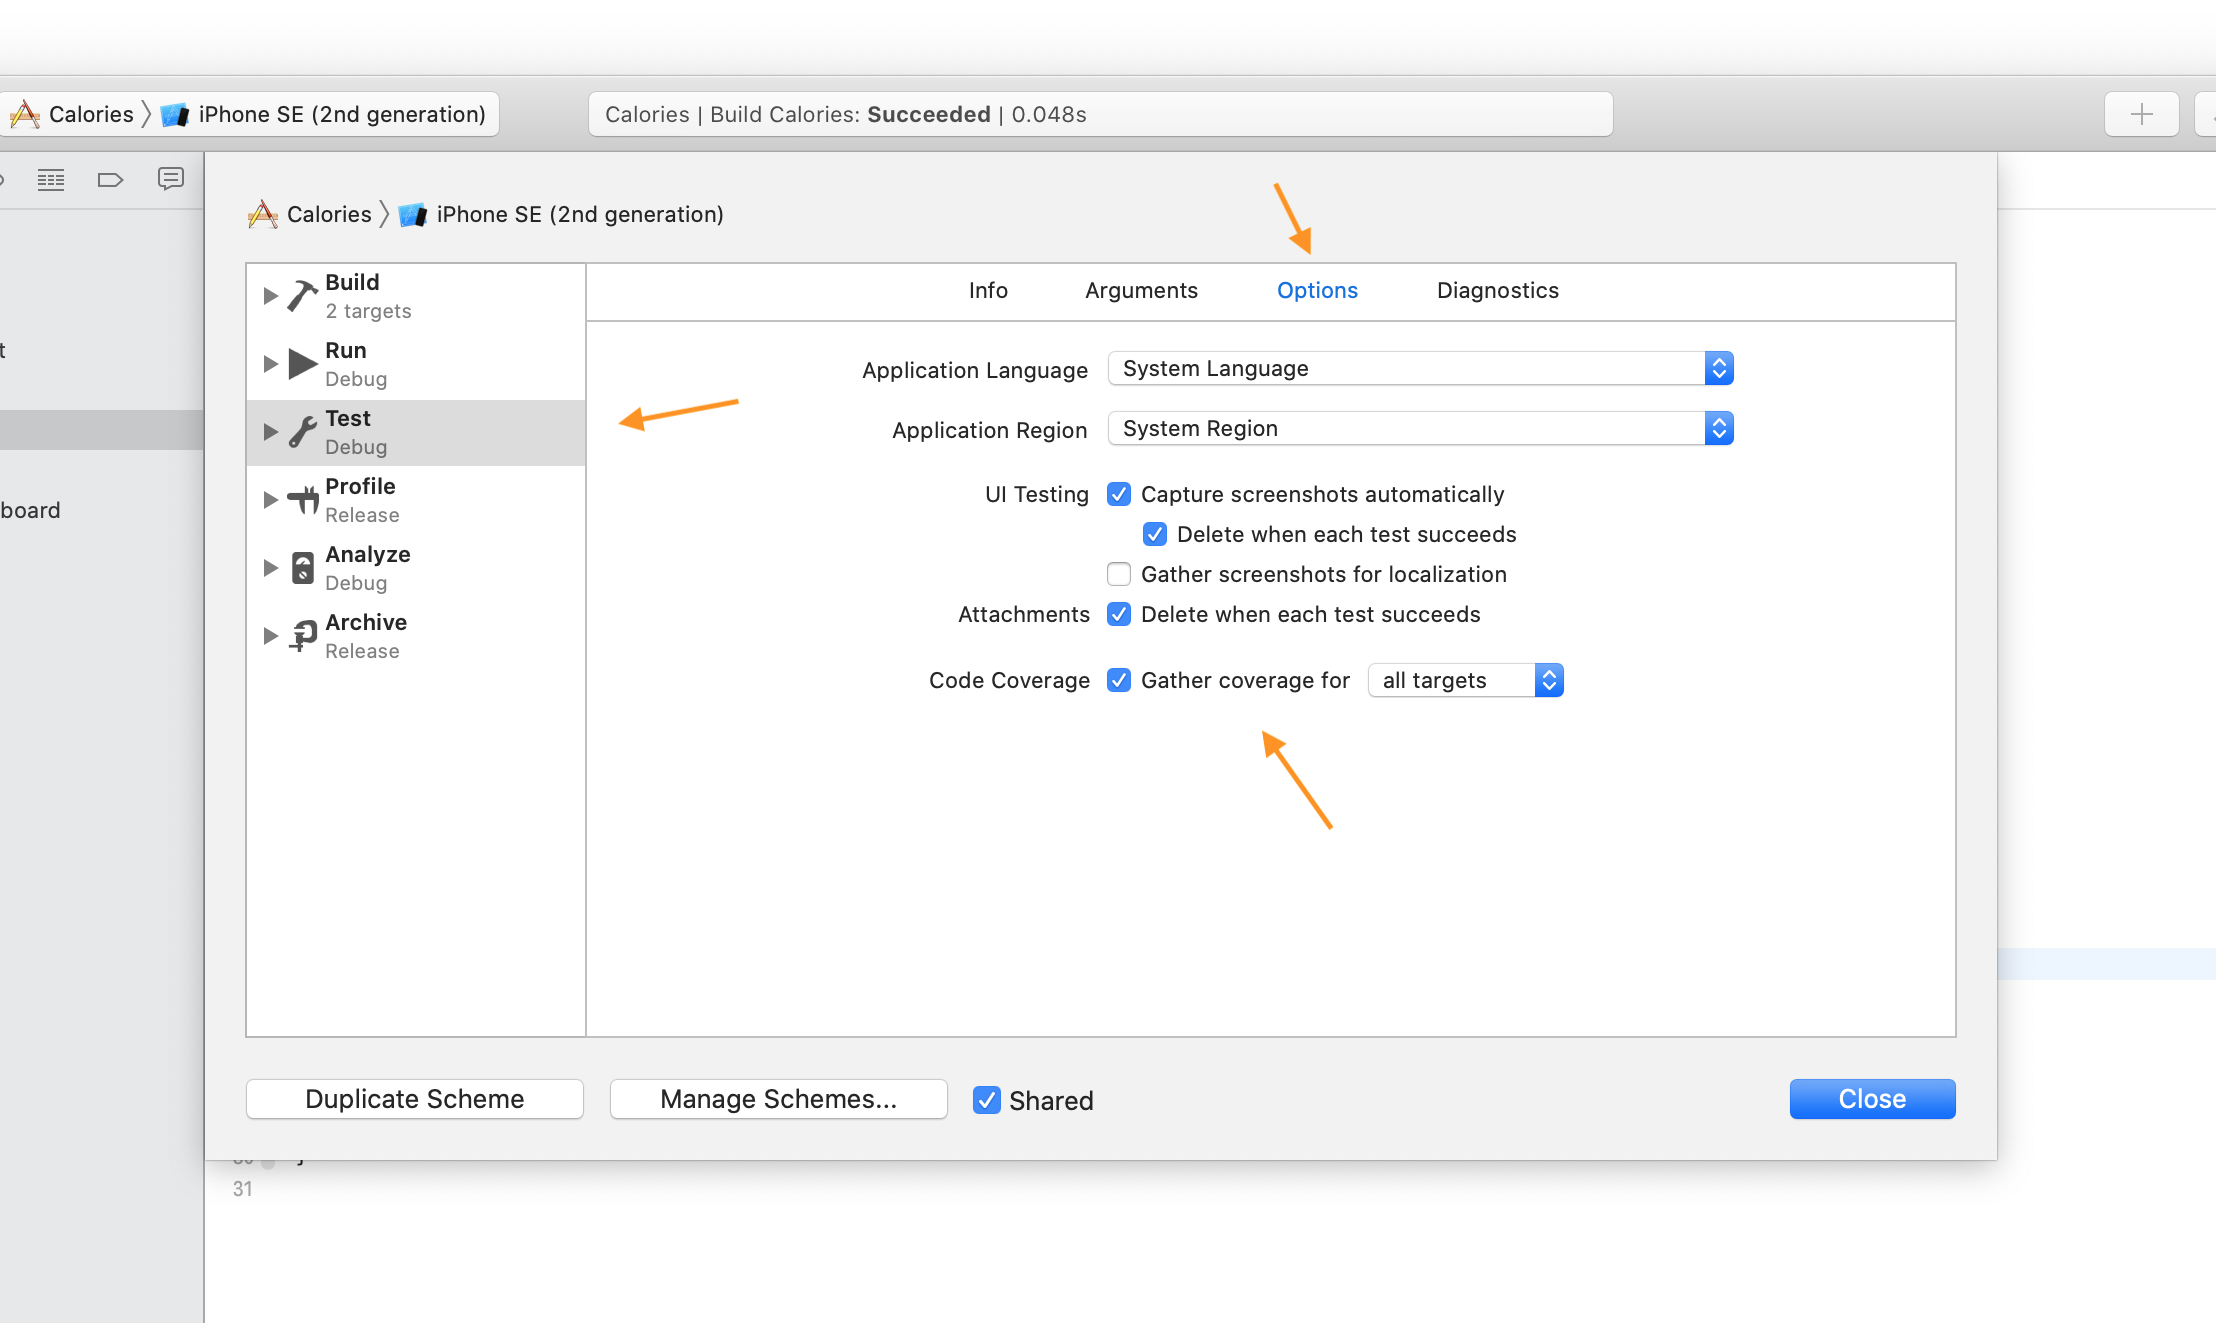
There, select Test in the outline, then go to the Options tab. And, finally, select Gather coverage for. You can leave its option to all targets.
You can now rerun your tests, which will allow Xcode to gather the coverage data. You will find the result in the Report navigator, by selecting the Code coverage item in the outline.
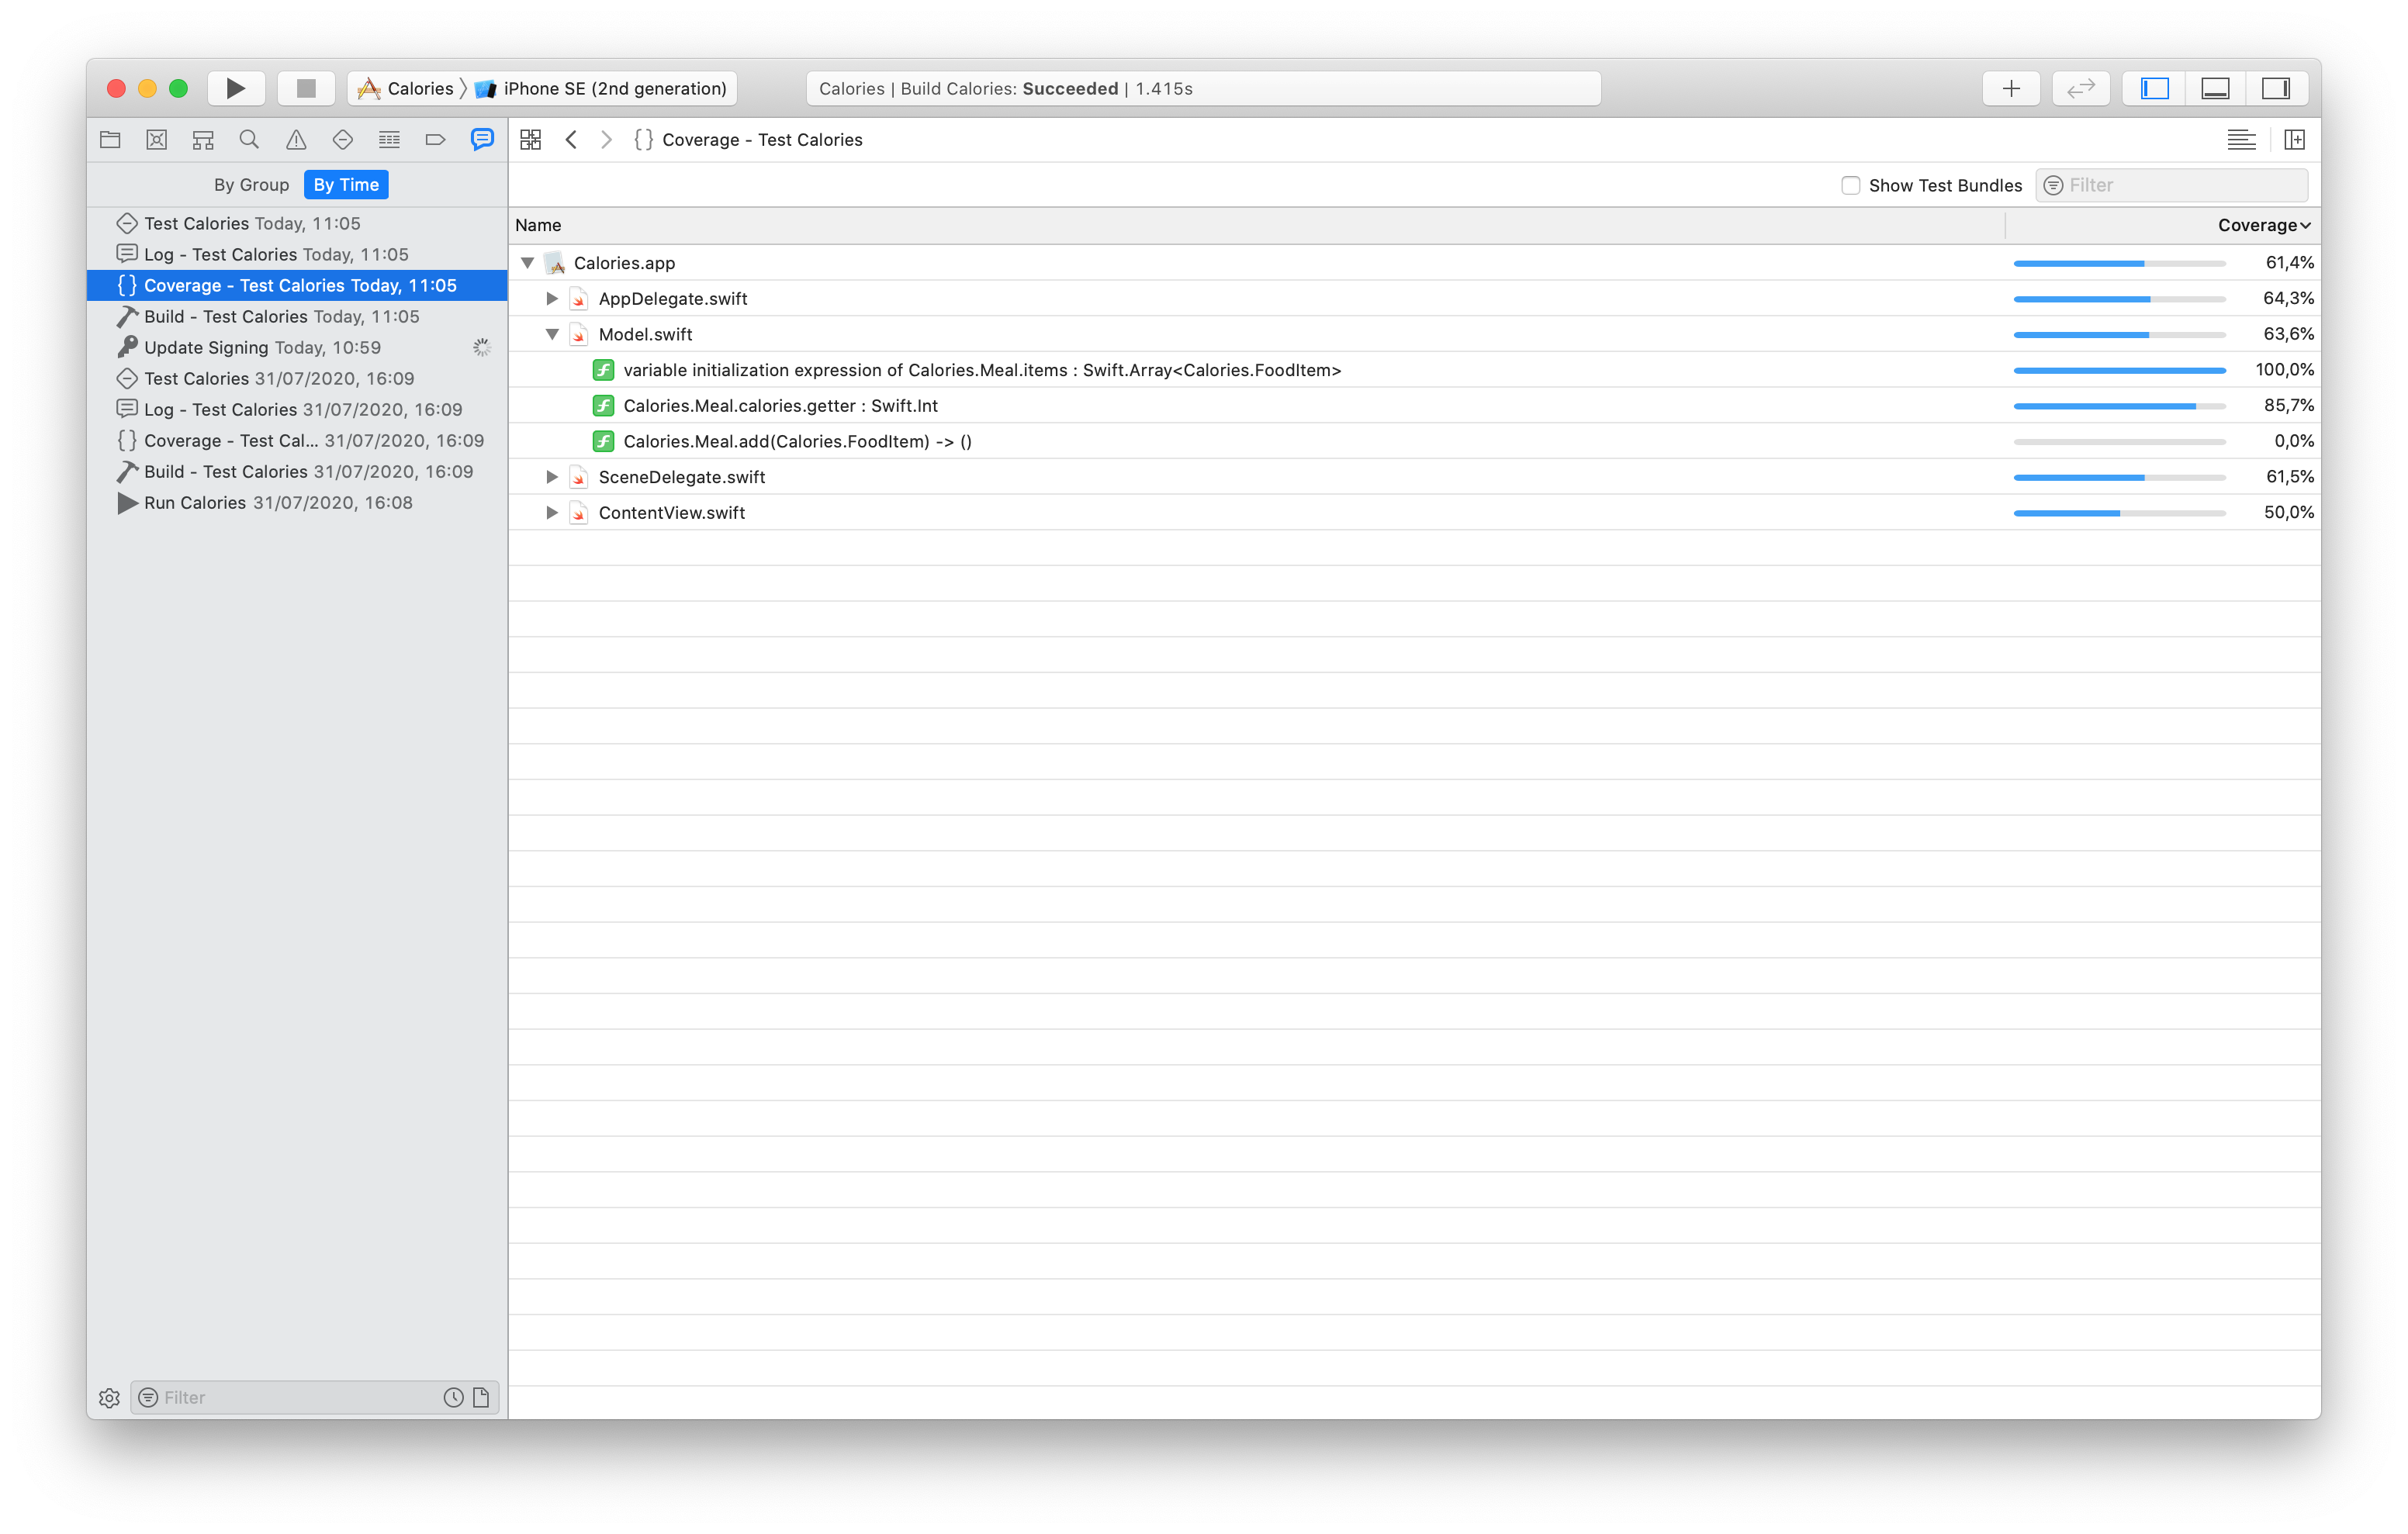
Here, you can check the percentages of code covered by your tests for the whole project and each file.
These numbers are not that significant for our example, since we hardly wrote any code. Still, we can see that the add(_:) method of the Meal type has a 0% coverage, which means we didn’t test it yet.
The calories computed property has, instead, an 85.7% coverage, which means that there are some execution paths in our code that our test didn’t trigger.
In our simple example, it’s easy to understand what path that is. We only tested the calories of an empty meal, so the code in the for loop didn’t run.
In more sophisticated methods, though, it might not be as straightforward.
For that, you can bring out the code coverage strip in the Xcode editor. You can find that in the Adjust Editor Options menu in the top-right corner.
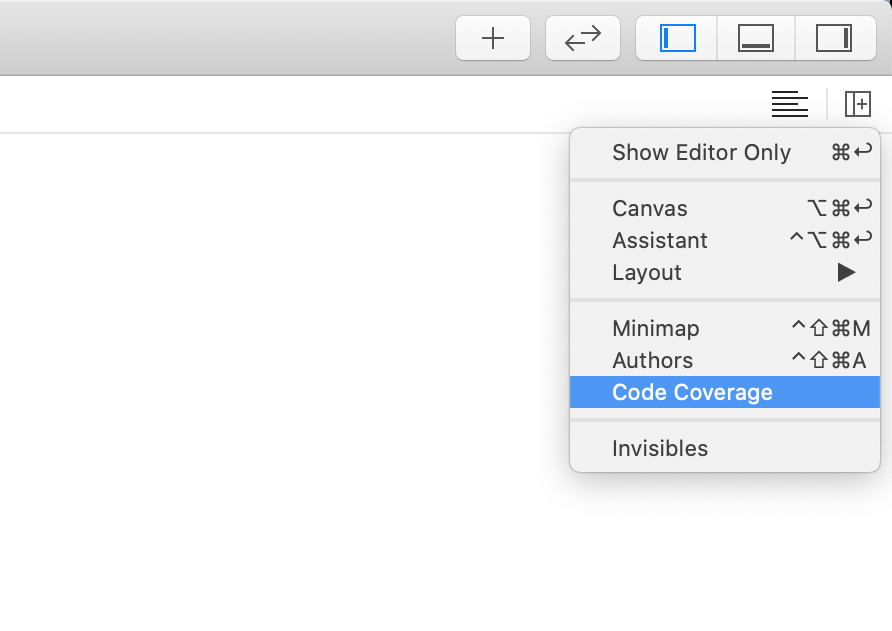
This will reveal a strip that shows you the coverage for each line of code.
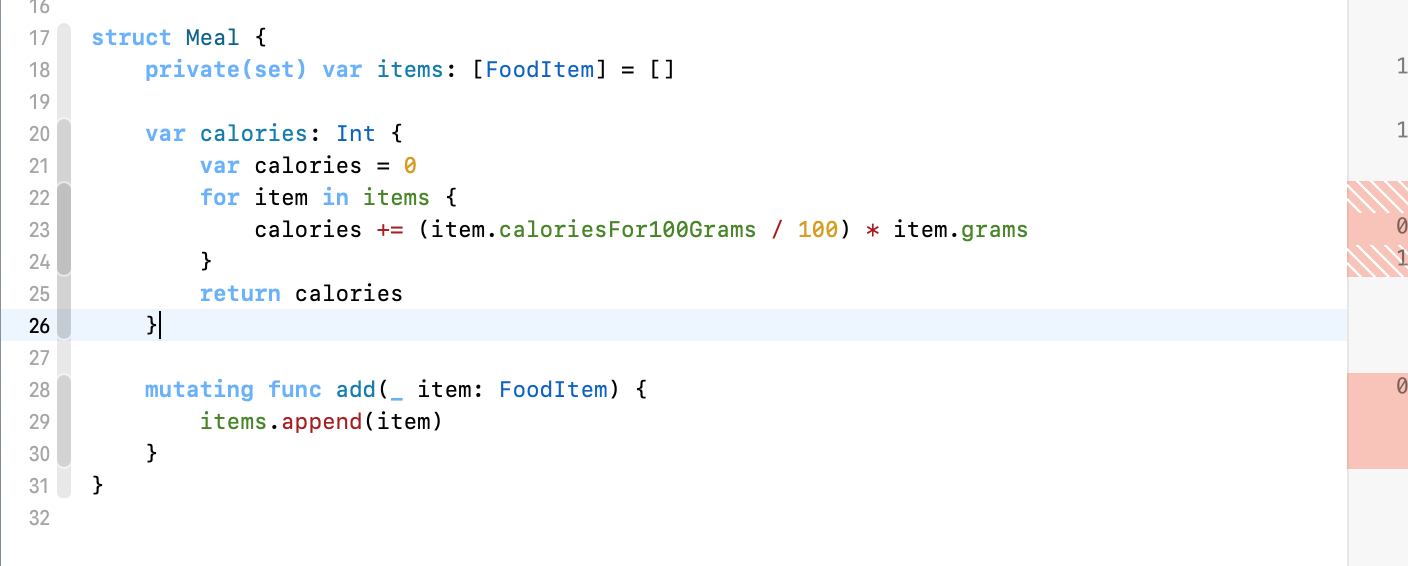
The numbers tell you how many times each line was executed during testing. In red, you can see which lines were not run at all (full) or executed only partially (striped).
Why aiming for specific code coverage is meaningless and what you should do instead
So, what percentage is a good code coverage percentage?
Opinions are vastly different. Some developers think that 20% is enough. Others go for higher numbers, like 70% or 80%. There are even developers that believe that only 100% is acceptable.
In my opinion, code coverage is a meaningless metric. You can use it to inform your decisions on testing, but you should not treat it as a goal you have to hit.
To see why let’s write another test to cover the code we didn’t test yet.
class CaloriesTests: XCTestCase {
	let banana = FoodItem(name: "Banana", caloriesFor100Grams: 89, grams: 118)
	let steak = FoodItem(name: "Steak", caloriesFor100Grams: 271, grams: 225)
	let goatCheese = FoodItem(name: "Goat Cheese", caloriesFor100Grams: 364, grams: 28)

	func testEmptyMeal() throws {
		let meal = Meal()
		XCTAssertEqual(meal.calories, 0, "An empty meal should have 0 calories")
	}

	func testCalories() {
		var meal = Meal()
		meal.add(banana)
		meal.add(steak)
		meal.add(goatCheese)
		XCTAssertEqual(meal.items.count, 3)
		XCTAssertEqual(meal.calories, 534)
	}
}
If you rerun all tests, you will get a 100% coverage for the Model.swift file. Looks good, right?
Now, go and remove the testEmptyMeal() method. If you run the remaining test alone, you will see that the coverage for our Meal types is still 100%.
This shows you already that the 100% number can give you a false sense of security. You know that now we are not testing all edge cases for the calories computed property. And yet, our test coverage does not reflect that.
I would add that 100% coverage is not only misleading but even detrimental. Some code in your project is prone to constant change, especially the newest code and especially in views.
Covering 100% of it means you will have only produce brittle tests that continuously break, and you have to fix. These tests don’t detect bugs. They break because the functionality of your code changes.
And here we get to the point that nobody talks about.
Writing tests is no fun, despite what some developers claim. Fixing tests is even less fun. Do it too much, and you’ll hate unit testing and push it aside altogether.
Psychology is as essential for software development as best practices. We are not machines.
So, what number should you aim for? That requires a more extended discussion, but here I’ll give you a summary of my opinion.
Write useful tests, starting with the oldest code in your project that is not going to change. Use code coverage only to identify what code is not yet tested, but don’t use it as a goal or to decide when to write more tests. 20% coverage is better than 80% if your tests are meaningful, and you are testing the right code.
As I mention above, model types contain the most critical code in your project, which also tends to change the least. So, start there.
I usually don’t bother testing every single execution path. For example, in a real project, I would not write the testEmptyMeal() method I showed you above. Yes, it’s crucial to test edge cases, but they are nor all important.
I would typically only write the testCalories() test. That tells me that my code works, and it will warn me if, later, I make a mistake when changing this method.
Sure, it does not cover every path, but this code is so simple that that’s just a waste of time. Spending your time writing real code for features that help your users is more important than testing every execution path.
I know I will get some flack from some developers for this opinion, but I don’t care. Test coverage is one of those debates that will never end.
The code you write is usually mostly right. There is no need to be paranoid. Having a plethora of tests that break every time you change anything is a liability, not an asset.
Your time and willpower are limited. Spend them on more important tasks.
Architecting SwiftUI apps with MVC and MVVM
It's easy to make an app by throwing some code together. But without best practices and robust architecture, you soon end up with unmanageable spaghetti code. In this guide I'll show you how to properly structure SwiftUI apps.
Matteo has been developing apps for iOS since 2008. He has been teaching iOS development best practices to hundreds of students since 2015 and he is the developer of Vulcan, a macOS app to generate SwiftUI code. Before that he was a freelance iOS developer for small and big clients, including TomTom, Squla, Siilo, and Layar. Matteo got a master’s degree in computer science and computational logic at the University of Turin. In his spare time he dances and teaches tango.
Hi Matteo. Excellent post, learned a lot.
An aspect of unit testing that is of great interest to me is testing error handling. I would seek the ability to configure a test that exercises the various error handling cases; especially in do-try-catch code with various catch blocks.
Here is sample code:
do {let result = try addContact(name: "Matteo Manferdini")
} catch addContactError.alreadyExists {
*/ ...do something... /*
} catch addContactError.badInput {
*/ ...do something... /*
} catch {
*/ ...do something... /*
}
Is this easily done–am I over-thinking the problem? Or is unit testing for error handling outside the scope of this article
There are different ways to read your question.
If you are talking about testing wether a function throws an error, you don’t need a do-catch clause in your tests. Use the error assertions in XCTest: https://developer.apple.com/documentation/xctest/error_assertions
If, instead, that do-catch clause is in your code and you want to test that your type responds to errors correctly, then you need test doubles, and those would require an entire article to explain.
>If…you want to test that your type responds to errors correctly.
Yes, it is this second option that I was addressing with my question; except, I don’t know what a test double is, which might explain my poorly worded question.
Thank you for your response; this gives me a start point to pursue an answer.