Introduction
Here in this tutorial I am going to show you how to setup Python based Django framework and MySQL database server to execute SQL statement in Windows environment. The MySQL server is used as a persistent system for storing data for the application.
I have already discussed in my another tutorial how to setup Django, so I won’t repeat the same thing here. As a prerequisite you need to go through the django setup tutorial before going down further.
Django officially supports database servers, such as, MySQL, MariaDB, PostgreSQL, Oracle and SQLite.
If you are planning to do some small PoC projects, then you can use SQLite as it does not require any separate database server.
As I am going to use MySQL database server throughout this tutorial, so I will discuss about MySQL database server.
To use MySQL or MariaDB with django you need MySQL DB API driver – either mysqlclient or MySQL Connector/Python. The mysqlclient is native driver and recommended to use with django. Django requires 1.3.13 or later version of mysqlclient driver. MySQL Connector/Python is a pure Python driver from Oracle. Both these drivers are thread safe and provide connection pooling.
Prerequisites
Python 3.8.5, Django 3.0.8, MySQL 8.0.17, Windows 10 64 bit, mysqlclient (pip install mysqlclient)
Setup Django in Windows Environment
Connect to MySQL Database
Database configuration is put into settings.py file. A dictionary containing the settings for all databases is used with django. It is a nested dictionary whose contents map a database alias to a dictionary containing the options for an individual database.
The DATABASES setting must configure a default database; any number of additional databases may also be specified.
Connection settings are used in the following order:
- OPTIONS
- NAME, USER, PASSWORD, HOST, PORT
- MySQL option file
If you set the name of the database in OPTIONS, this will take precedence over NAME, which will override anything in MySQL option file.
The option file is the my.ini or my.cnf file where your MySQL server settings are configured.
Make sure you have already created django project by following the tutorial how to setup django in windows environment.
To connect to MySQL database, edit settings.py file and edit the DATABASE section and remove the SQLite database settings and add the settings for MySQL database as shown below. Make sure to change the database name, user, password, host and port according to your settings.
DATABASES = {
    'default': {
		'ENGINE': 'django.db.backends.mysql',
        'NAME': 'roytuts',
		'USER': 'root',
		'PASSWORD': 'root',
		'HOST': 'localhost',
		'PORT': '3306'
    }
}
You may also opt for more complex inner configuration as given in the below options:
ATOMIC_REQUESTS: by default it is False. You can set this to True to wrap each view in transaction with this database.
AUTOCOMMIT: by default True. You can set this to False if you want to implement your own transaction instead of django’s transaction management.
CONN_MAX_AGE: default value is 0, meaning that close connection at the end of each request, which is the default behavior. You can specify other integer value. The unit of this value is second(s). You can also specify None for unlimited persistent connections.
There is a number of options which you can find more here.
Model Class
We have configured database settings to establish connection with MySQL server. The next step is to create a model class that represents the django mapping with table.
Let’s say we have the below user table with some sample data under roytuts database.
CREATE TABLE `user` (
  `id` int unsigned NOT NULL AUTO_INCREMENT,
  `name` varchar(50) NOT NULL,
  `email` varchar(100) NOT NULL,
  `phone` int unsigned NOT NULL,
  `address` varchar(250) NOT NULL,
  PRIMARY KEY (`id`)
) ENGINE=InnoDB AUTO_INCREMENT=6 DEFAULT CHARSET=utf8mb4 COLLATE=utf8mb4_unicode_ci;

insert  into `user`(`id`,`name`,`email`,`phone`,`address`) values
(1,'Soumitra Roy','sroy@gmail.com',2147483647,'Earth'),
(2,'Rahul Kumar','rahul@gmail.com',34256780,'Mars');
The equivalent model class would be as follows:
from django.db import models

class User(models.Model):
	id = models.IntegerField()
	name = models.CharField(max_length=50)
	email = models.CharField(max_length=100)
	phone = models.IntegerField(max_length=10)
	address = models.CharField(max_length=250)

	class Meta:
		db_table = "user"
		app_label = ''

	def __str__(self):
		return self
The above class is written into djangomysql/djangomysql/models.py file.
Each model is represented by a class that subclasses django.db.models.Model. Each model has a number of class variables, each of which represents a database field in the model.
Each field is represented by an instance of a Field class – e.g., CharField for character field, IntegerField for integer and DateTimeField for datetime. This tells Django what type of data each field holds.
The name of each Field instance (e.g. id or name) is the field’s name, in machine-friendly format. You will use this value in your Python code, and your database will use it as the column name.
You can use an optional first positional argument to a Field to designate a human-readable name.
I have specified the table name under class Meta. I have also specified the app label with empty string app_label = '' otherwise we will see error “RuntimeError: Model class djangomysql.models.User doesn’t declare an explicit app_label and isn’t in an application in INSTALLED_APPS.“
It is important to add __str__(self) method to model class, because object representations are used throughout Django application.
Now execute the following command to sync our database table. If table does not exist then table will be created in the database.
manage.py makemigrationsBy running makemigrations, you are telling Django that you have made some changes to your models and that you would like the changes to be stored as a migration. If there is no change then you will see No change detected in the output.
migrate command will run the migrations for you and manage your database schema automatically.
manage.py migrateQuery Database and Display User Data on View
Let’s do something with the project to display data from user table on the application UI (User Interface).
We will first edit settings.py file to remove unnecessary apps from INSTALLED_APPS section. The final INSTALLED_APPS section looks similar to the below:
INSTALLED_APPS = [
    'django.contrib.auth',
    'django.contrib.contenttypes'
]
Next we need to edit TEMPLATES section and replace the ‘DIRS’ : [] by the following line of code:
'DIRS': [os.path.join(BASE_DIR, 'djangomysql/templates')],The above path where I am going to put the template file which will be used for displaying data.
Now create a view file called views.py under djangomysql/djangomysql folder where settings.py file is there in the same folder.
from django.http import HttpResponse
from django.template import loader
#from django.shortcuts import render

from .models import User


def index(request):
	user_list = User.objects.order_by('id')

	template = loader.get_template('index.html')

	context = {
             'user_list': user_list,
        }

	return HttpResponse(template.render(context, request))

	#context = {'user_list': user_list}
	#return render(request, 'index.html', context)
What I am doing in the above file is loading user data from user table order by id in ascending order and rendering the template file – index.html.
The alternate way of loading the template file (index.html) is also shown in the above file with the commented lines of code.
The template file index.html is kept under djangomysql/djangomysql/templates folder, where the following piece code is written.
I simply iterate the list of users and display them in a table.
{% if user_list %}
    <table border="1" cellpadding="2" cellspacing="2">
		<tr>
			<th>Id</th>
			<th>Name</th>
			<th>Email</th>
			<th>Phone</th>
			<th>Address</th>
		</tr>
		{% for user in user_list %}
			<tr>
				<td>{{user.id}}</td>
				<td>{{user.name}}</td>
				<td>{{user.email}}</td>
				<td>{{user.phone}}</td>
				<td>{{user.address}}</td>
			</tr>
		{% endfor %}
    </table>
{% else %}
    <p>No user record available</p>
{% endif %}
Edit the urls.py file and add the required path for the project. Remove path('admin/', admin.site.urls), because we are not going to use admin module. Remove from django.contrib import admin as well for the same reason.
from django.urls import path

from . import views

urlpatterns = [
	path('', views.index, name='index')
]
Deploying Application
Execute the command manage.py runserver. The application will run on default port 8000. If you want to change the default host/port of the server then you can read tutorial here.
Testing the Application
Hit the URL http://localhost:8000/ in the browser, you will see the following output:
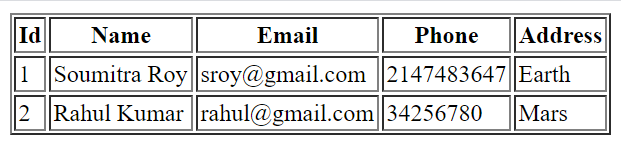
That’s all. Hope you got an idea how to configure Django and MySQL and how to perform database query using Django.
Source Code
Thanks for reading.