

In this article, we are going to learn about refresh tokens and their use in modern web application development. This is part of the ASP.NET Core Authentication with JWT and Angular series.
In the first part of this series, we learned how to implement authentication with ASP.Net Core on the server-side using the JSON web tokens (JWT). Then, in the second part, we looked at how to implement authentication and authorization in a front-end app using Angular.
Now, we are going to look at how we can implement refresh tokens in the authentication workflow.

Let’s start.
VIDEO: Refresh Token Implementation in .NET Core Web API.
Refresh Tokens
Let’s look at the JWT based authentication workflow that we implemented in the previous parts of this series:
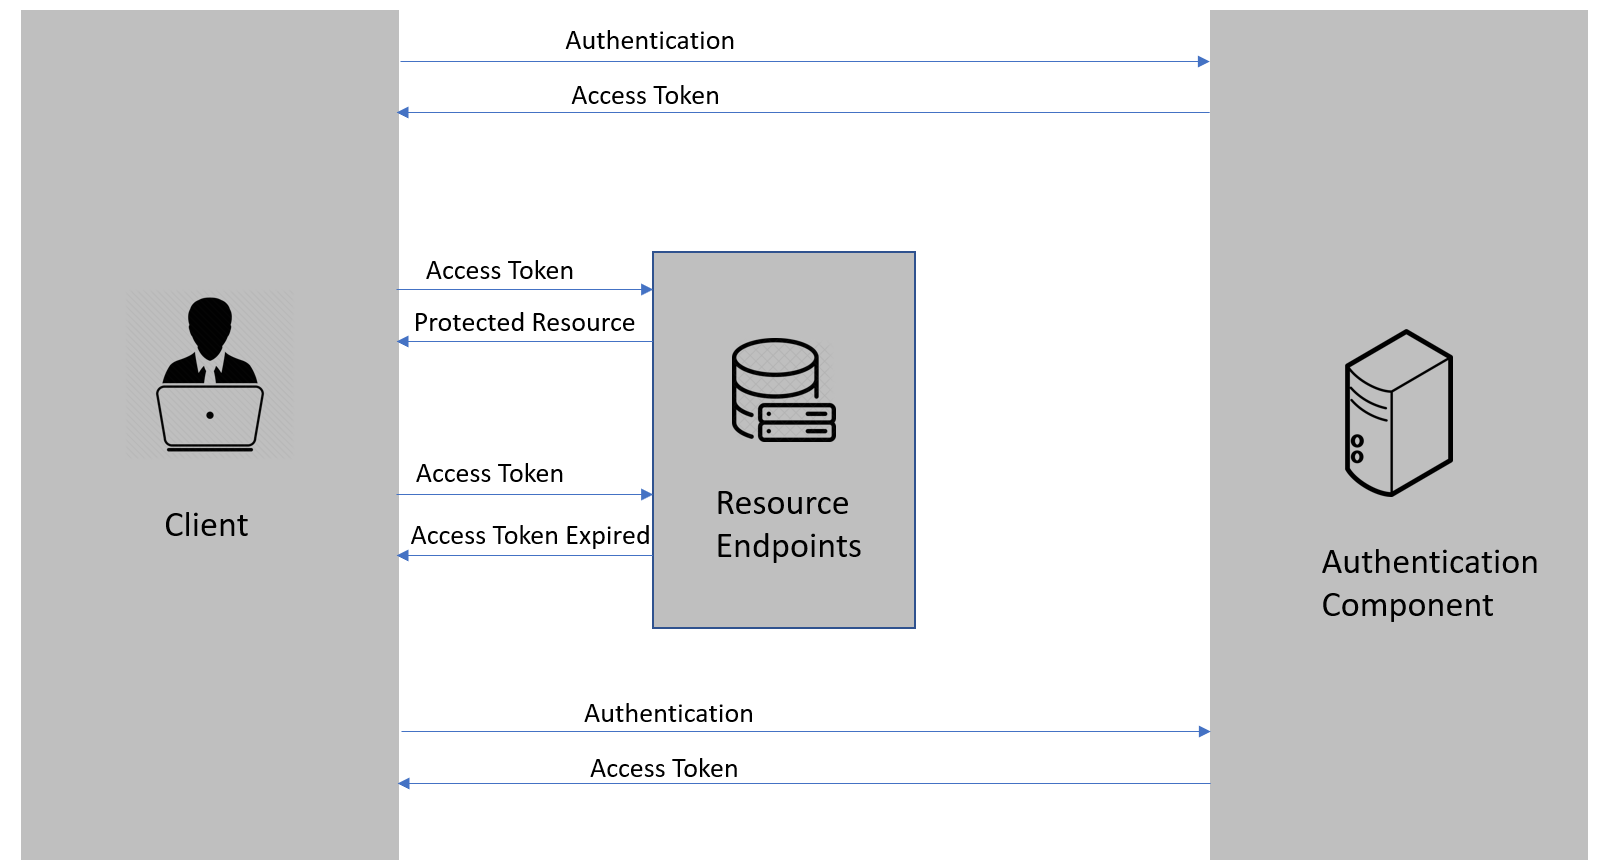
- First, the client authenticates with the authentication component by providing the credentials
- Then, the authentication component issues the access token
- After that, the client requests the resource endpoint for a protected resource by providing the access token
- The resource endpoint validates the access token and provides a protected resource
- Steps 3 & 4 keep on repeating until the access token expires
- Once the access token expires, the client needs to authenticate with the authentication component once again and the flow repeats from step 1
Let’s see how we can extend this flow.
Refresh token-based authentication workflow
Refresh tokens are credentials that can be used to acquire new access tokens. When access tokens expire, we can use refresh tokens to get a new access token from the authentication component. The lifetime of a refresh token is usually set much longer compared to the lifetime of an access token.
Now, we are going to introduce the refresh token to our authentication workflow:
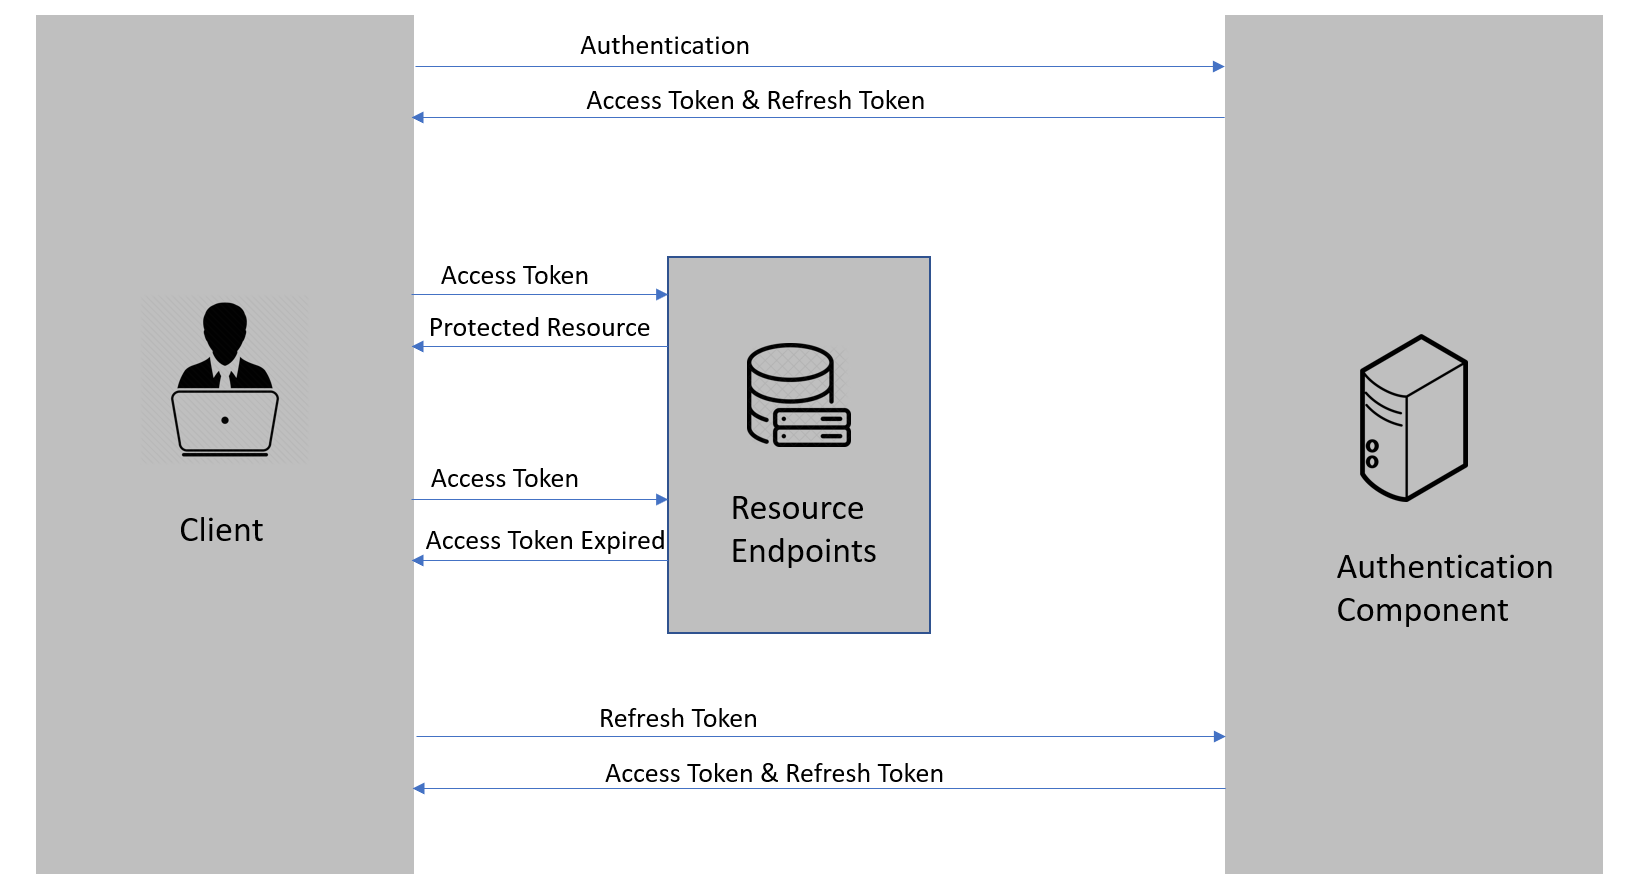
- First, the client authenticates with the authentication component by providing the credentials
- Then, the authentication component issues the access token and the refresh token
- After that, the client requests the resource endpoints for a protected resource by providing the access token
- The resource endpoint validates the access token and provides a protected resource
- Steps 3 & 4 keep on repeating until the access token expires
- Once the access token expires, the client requests a new access token by providing the refresh token
- The authentication component issues a new access token and refresh token
- Steps 3 through 7 keep on repeating until the refresh token expires
- Once the refresh token expires, the client needs to authenticate with the authentication server once again and the flow repeats from step 1
Now, let’s discuss why we actually need refresh tokens.
The Need for Refresh Tokens
So, why do we need both access tokens and refresh tokens? Why don’t we just set a long expiration date, like a month or a year for the access tokens? Because, if we do that and someone manages to get hold of our access token they can use it for a long period, even if we change our password!
The idea of refresh tokens is that we can make the access token short-lived so that, even if it is compromised, the attacker gets access only for a shorter period. With refresh token-based flow, the authentication server issues a one-time use refresh token along with the access token. The app stores the refresh token safely.
Every time the app sends a request to the server it sends the access token in the Authorization header and the server can identify the app using it. Once the access token expires, the server will send a token expired response. Once the app receives the token expired response, it sends the expired access token and the refresh token to obtain a new access token and refresh token.
If something goes wrong, the refresh token can be revoked which means that when the app tries to use it to get a new access token, that request will be rejected and the user will have to enter credentials once again and authenticate.
Thus, refresh tokens help in a smooth authentication workflow without the need for users to submit their credentials frequently, and at the same time, without compromising the security of the app.
Implementation
So far we have learned the concept of refresh tokens. Now without any delay, let’s dig into the implementation part.
Web API
There are some changes that we need to make in our Web API project.
Data Modelling
We need to move the user details into the database to implement the refresh token-based flow. We have explained how to create a database from our models using the EF Core Code-First approach in our article ASP.NET Core Web API with EF Core Code-First Approach.
First, we need to modify the login model to include a refresh token and its expiry:
public class LoginModel
{
    [Key]
    [DatabaseGenerated(DatabaseGeneratedOption.Identity)]
    public long Id { get; set; }
    public string? UserName { get; set; }
    public string? Password { get; set; }
    public string? RefreshToken { get; set; }
    public DateTime RefreshTokenExpiryTime { get; set; }
}
We are going to follow the steps that we discussed in the linked article to create a database from our model and add some seed data.
For that, let’s add a user DB context file and specify seed data in it:
public class UserContext : DbContext
{
    public UserContext(DbContextOptions dbContextOptions)
        : base(dbContextOptions)
    {
    }

    public DbSet<LoginModel>? LoginModels { get; set; }

    protected override void OnModelCreating(ModelBuilder modelBuilder)
    {
        modelBuilder.Entity<LoginModel>().HasData(new LoginModel
        {
            Id = 1,
            UserName = "johndoe",
            Password = "def@123"
        });
    }
}
Now we need to register our db context in the Program class:
builder.Services.AddDbContext<UserContext>(opts =>
    opts.UseSqlServer(builder.Configuration["ConnectionString:UserDB"]));
Let’s also make sure that we move the database connection string into appsettings.json:
"ConnectionString": {
  "UserDB": "server=.;database=UserDB;Integrated Security=True"
},
The next step is generating the database from code using migrations:
PM> Add-Migration InitialUserData
PM> Update-Database
This will create the UserDB database and LoginModels table with seed data.
Now, we need to do the credential validation against the database. We are also going to refactor the code a little bit by moving all the token related logic into a separate TokenService class.
TokenService
The logic for generating the access token, refresh token, and getting user details from the expired token goes into the TokenService class.
First, let’s define the ITokenService interface in the Services folder:
public interface ITokenService
{
    string GenerateAccessToken(IEnumerable<Claim> claims);
    string GenerateRefreshToken();
    ClaimsPrincipal GetPrincipalFromExpiredToken(string token);
}
Then, we are going to implement the TokenService class in the same folder:
public class TokenService : ITokenService
{
    public string GenerateAccessToken(IEnumerable<Claim> claims)
    {
        var secretKey = new SymmetricSecurityKey(Encoding.UTF8.GetBytes("superSecretKey@345"));
        var signinCredentials = new SigningCredentials(secretKey, SecurityAlgorithms.HmacSha256);

        var tokeOptions = new JwtSecurityToken(
            issuer: "https://localhost:5001",
            audience: "https://localhost:5001",
            claims: claims,
            expires: DateTime.Now.AddMinutes(5),
            signingCredentials: signinCredentials
        );

        var tokenString = new JwtSecurityTokenHandler().WriteToken(tokeOptions);
        return tokenString;
    }

    public string GenerateRefreshToken()
    {
        var randomNumber = new byte[32];
        using (var rng = RandomNumberGenerator.Create())
        {
            rng.GetBytes(randomNumber);
            return Convert.ToBase64String(randomNumber);
        }
    }

    public ClaimsPrincipal GetPrincipalFromExpiredToken(string token)
    {
        var tokenValidationParameters = new TokenValidationParameters
        {
            ValidateAudience = false, //you might want to validate the audience and issuer depending on your use case
            ValidateIssuer = false,
            ValidateIssuerSigningKey = true,
            IssuerSigningKey = new SymmetricSecurityKey(Encoding.UTF8.GetBytes("superSecretKey@345")),
            ValidateLifetime = false //here we are saying that we don't care about the token's expiration date
        };

        var tokenHandler = new JwtSecurityTokenHandler();
        SecurityToken securityToken;
        var principal = tokenHandler.ValidateToken(token, tokenValidationParameters, out securityToken);
        var jwtSecurityToken = securityToken as JwtSecurityToken;
        if (jwtSecurityToken == null || !jwtSecurityToken.Header.Alg.Equals(SecurityAlgorithms.HmacSha256, StringComparison.InvariantCultureIgnoreCase))
            throw new SecurityTokenException("Invalid token");

        return principal;
    }
}
Here, we create 3 methods.
GenerateAccessToken() contains the logic to generate the access token. This is a familiar logic that we already have in the AuthController (from a previous article), which we are going to remove from there.
GenerateRefreshToken() contains the logic to generate the refresh token. We use the RandomNumberGenerator class to generate a cryptographic random number for this purpose.
GetPrincipalFromExpiredToken() is used to get the user principal from the expired access token. We make use of the ValidateToken() method of JwtSecurityTokenHandler class for this purpose. This method validates the token and returns the ClaimsPrincipal object.
Let’s also make sure to register the TokenService for dependency injection in Program.cs:
builder.Services.AddTransient<ITokenService, TokenService>();
AuthController
Before we modify the AuthController, we have to modify the AuthenticatedResponse class:
public class AuthenticatedResponse
{
    public string? Token { get; set; }
    public string? RefreshToken { get; set; }
}
We add one additional property here.
Now, let’s modify the AuthController:
[Route("api/[controller]")]
[ApiController]
public class AuthController : ControllerBase
{
    private readonly UserContext _userContext;
    private readonly ITokenService _tokenService;

    public AuthController(UserContext userContext, ITokenService tokenService)
    {
        _userContext = userContext ?? throw new ArgumentNullException(nameof(userContext));
        _tokenService = tokenService ?? throw new ArgumentNullException(nameof(tokenService));
    }

    [HttpPost, Route("login")]
    public IActionResult Login([FromBody] LoginModel loginModel)
    {
        if (loginModel is null)
        {
            return BadRequest("Invalid client request");
        }

        var user = _userContext.LoginModels.FirstOrDefault(u =>
            (u.UserName == loginModel.UserName) && (u.Password == loginModel.Password));
        if (user is null)
            return Unauthorized();

        var claims = new List<Claim>
        {
            new Claim(ClaimTypes.Name, loginModel.UserName),
            new Claim(ClaimTypes.Role, "Manager")
        };
        var accessToken = _tokenService.GenerateAccessToken(claims);
        var refreshToken = _tokenService.GenerateRefreshToken();

        user.RefreshToken = refreshToken;
        user.RefreshTokenExpiryTime = DateTime.Now.AddDays(7);

        _userContext.SaveChanges();

        return Ok(new AuthenticatedResponse
        {
            Token = accessToken,
            RefreshToken = refreshToken
        });
    }
}
First, we inject the UserContext and TokenService. Then, we validate the user credentials against the database. Once validation is successful, we need to generate a refresh token in addition to the access token and save it along with the expiry date in the database:
TokenController
Before we implement the TokenController, we are going to add one more class in the Models folder:
public class TokenApiModel
{
    public string? AccessToken { get; set; }
    public string? RefreshToken { get; set; }
}
Next is the implementation of the TokenController:
[Route("api/[controller]")]
[ApiController]
public class TokenController : ControllerBase
{
    private readonly UserContext _userContext;
    private readonly ITokenService _tokenService;

    public TokenController(UserContext userContext, ITokenService tokenService)
    {
        this._userContext = userContext ?? throw new ArgumentNullException(nameof(userContext));
        this._tokenService = tokenService ?? throw new ArgumentNullException(nameof(tokenService));
    }

    [HttpPost]
    [Route("refresh")]
    public IActionResult Refresh(TokenApiModel tokenApiModel)
    {
        if (tokenApiModel is null)
            return BadRequest("Invalid client request");

        string accessToken = tokenApiModel.AccessToken;
        string refreshToken = tokenApiModel.RefreshToken;

        var principal = _tokenService.GetPrincipalFromExpiredToken(accessToken);
        var username = principal.Identity.Name; //this is mapped to the Name claim by default

        var user = _userContext.LoginModels.SingleOrDefault(u => u.UserName == username);

        if (user is null || user.RefreshToken != refreshToken || user.RefreshTokenExpiryTime <= DateTime.Now)
            return BadRequest("Invalid client request");

        var newAccessToken = _tokenService.GenerateAccessToken(principal.Claims);
        var newRefreshToken = _tokenService.GenerateRefreshToken();

        user.RefreshToken = newRefreshToken;
        _userContext.SaveChanges();

        return Ok(new AuthenticatedResponse()
        {
            Token = newAccessToken,
            RefreshToken = newRefreshToken
        });
    }

    [HttpPost, Authorize]
    [Route("revoke")]
    public IActionResult Revoke()
    {
        var username = User.Identity.Name;

        var user = _userContext.LoginModels.SingleOrDefault(u => u.UserName == username);
        if (user == null) return BadRequest();

        user.RefreshToken = null;

        _userContext.SaveChanges();

        return NoContent();
    }
}
Here, we implement a refresh endpoint, which gets the user information from the expired access token and validates the refresh token against the user. Once the validation is successful, we generate a new access token and refresh token and the new refresh token is saved against the user in DB.
We also implement a revoke endpoint that invalidates the refresh token.
Our Web API project is now ready.
Angular App Refresh Token Implementation
We need to make some changes in our Angular client app as well.
First, we have to modify the AuthenticatedResponse interface:
export interface AuthenticatedResponse{
  token: string;
  refreshToken: string;
}
Then, in the LoginComponent, we need to save the refresh token into the local storage along with the access token:
login = ( form: NgForm) => {
  if (form.valid) {
    this.http.post<AuthenticatedResponse>("https://localhost:5001/api/auth/login", this.credentials, {
      headers: new HttpHeaders({ "Content-Type": "application/json"})
    })
    .subscribe({
      next: (response: AuthenticatedResponse) => {
        const token = response.token;
        const refreshToken = response.refreshToken;
        localStorage.setItem("jwt", token);
        localStorage.setItem("refreshToken", refreshToken);
        this.invalidLogin = false;
        this.router.navigate(["/"]);
      },
      error: (err: HttpErrorResponse) => this.invalidLogin = true
    })
  }
}
Now, let’s modify the AuthGuard service:
import { AuthenticatedResponse } from './../_interfaces/authenticated-response.model';
import { HttpClient, HttpHeaders } from '@angular/common/http';
import { Injectable } from '@angular/core';
import { ActivatedRouteSnapshot, CanActivate, Router, RouterStateSnapshot } from '@angular/router';
import { JwtHelperService } from '@auth0/angular-jwt';

@Injectable({
  providedIn: 'root'
})
export class AuthGuard implements CanActivate  {

  constructor(private router:Router, private jwtHelper: JwtHelperService, private http: HttpClient){}

  async canActivate(route: ActivatedRouteSnapshot, state: RouterStateSnapshot) {
    const token = localStorage.getItem("jwt");

    if (token && !this.jwtHelper.isTokenExpired(token)){
      console.log(this.jwtHelper.decodeToken(token))
      return true;
    }

    const isRefreshSuccess = await this.tryRefreshingTokens(token);
    if (!isRefreshSuccess) {
      this.router.navigate(["login"]);
    }

    return isRefreshSuccess;
  }
}
We add some additional imports that we are going to use for the refresh token logic, and also if the token has expired, we call the tryRefreshingTokens function.
Now, let’s implement that function below the canActivate function:
private async tryRefreshingTokens(token: string): Promise<boolean> {
  const refreshToken: string = localStorage.getItem("refreshToken");
  if (!token || !refreshToken) {
    return false;
  }

  const credentials = JSON.stringify({ accessToken: token, refreshToken: refreshToken });
  let isRefreshSuccess: boolean;

  const refreshRes = await new Promise<AuthenticatedResponse>((resolve, reject) => {
    this.http.post<AuthenticatedResponse>("https://localhost:5001/api/token/refresh", credentials, {
      headers: new HttpHeaders({
        "Content-Type": "application/json"
      })
    }).subscribe({
      next: (res: AuthenticatedResponse) => resolve(res),
      error: (_) => { reject; isRefreshSuccess = false;}
    });
  });

  localStorage.setItem("jwt", refreshRes.token);
  localStorage.setItem("refreshToken", refreshRes.refreshToken);
  isRefreshSuccess = true;

  return isRefreshSuccess;
}
Here, once the access token is expired, we try refreshing it using the refresh token. If the refresh is successful, we store the new set of tokens in the local storage. If the refresh action does not work, we return false and redirect the user back to the login page.
Finally, in the HomeComponent, we need to remove the refresh token along with the access token during logout:
logOut = () => {
  localStorage.removeItem("jwt");
  localStorage.removeItem("refreshToken");
}
That’s it. We have implemented refresh tokens in our application. In the next section, we are going to test the functionality.
Testing
First, we are going to test the Web API using Postman. Let’s invoke /api/auth/login by supplying the user credentials:
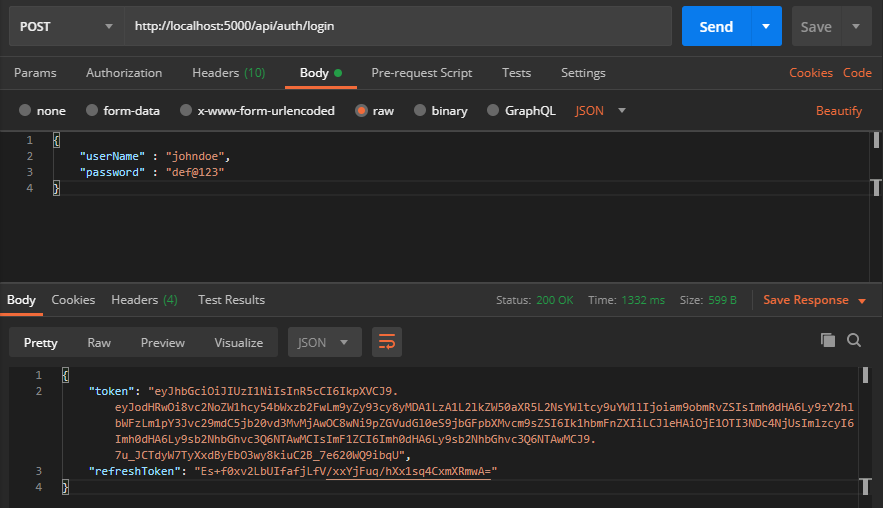
We can see that now the endpoint returns both access token and refresh token.
This updates both refresh token and expiry time in the database:

Now, let’s wait till the access token expires. Remember, we had set the access token expiry as 5 minutes.
Once the access token is expired, we can see our protected endpoints return 401- Unauthorized response. We can verify that by accessing /api/customers.
Now, we are going to refresh our access token using the refresh token. For that let’s do a POST request to /api/token/refresh with both the tokens that we received earlier:
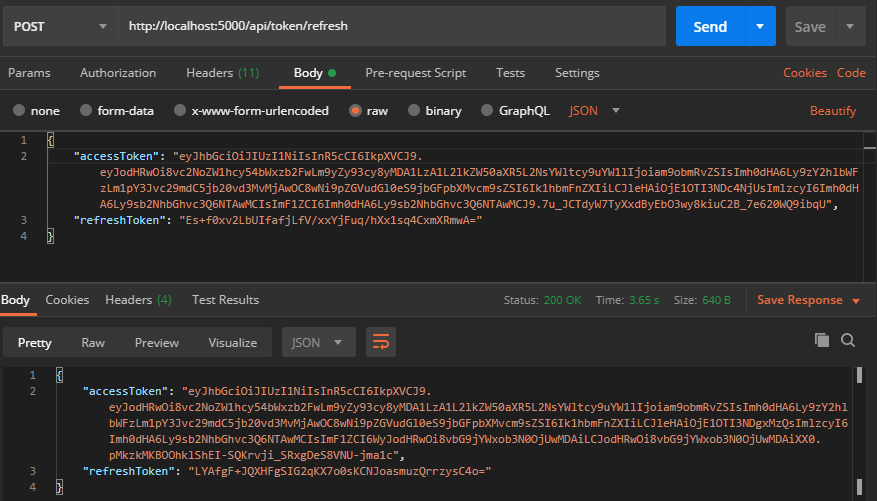
This will return a new set of tokens that can be used further.
We can continue this cycle until the refresh token expires. In case we want to revoke the refresh token, we can do so by invoking the /api/token/revoke endpoint. This will require users to provide credentials once the current access token is expired. This endpoint is implemented as a security measure and we can make use of this in case current tokens are compromised.
Now, let’s test the client app.
Earlier, the client app used to redirect us to the login page once the access token expired. Now, we can see that once the access token is expired, the app automatically refreshes the token and keeps the session alive. Users don’t have to know about these steps happening in the background and they can continue working on the app without any interruptions. They will need to log in again only once the refresh token expires, which gives them a longer window to work with.
By using an access token with a short expiry (typically, a few minutes) and a refresh token with a longer expiry (typically, a few days), we can make our application secure and at the same time give our users a seamless experience. If something goes wrong, we always have the option to revoke refresh tokens.
Conclusion
In this article, we have learned the following topics:
- The concept of refresh tokens
- Why do we need refresh tokens in our application
- How to implement refresh tokens in an ASP.NET Core Web API application with an Angular client app
- How to revoke refresh tokens, if required
Everything is Working Good. But in my Angular Code
if (token && !this.jwtHelper.isTokenExpired(token)){
debugger
console.log(this.jwtHelper.decodeToken(token))
return true;
}
!this.jwtHelper.isTokenExpired(token) this line is always getting False even token is valid or recently Created.
Im using Angular 14 Version. Please Help
Hi Viraj. Well, now I am not sure if I understand this but this !this.jwtHelper.isTokenExpired(token) will return false if the token is valid because it is prefixed with “!”. Now if only the check “isTokenExpired” returns false, then I am not really sure why is that. As much as I remember, I’ve used this code with Ang 14 and had no issues at all. Can you try downloading our source code and comparing it to yours? Also, you can try to decode the token before that condition just to check if everything is ok with it.
Thanks for immediate response.
i tried and it is working as expected.
i have another question.
How angular application will able to check token expiry without a token key.
Hi Viraj. I’m glad you resolved your issue. Regarding your question, I am not sure that I know the answer.
Thanks so much for this!
You are most welcome
Great article. Thanks. One niggling thing for me: when you validate your expired token in GetPrincipalFromExpiredToken(…), you include a check at the very end of the method to ensure the signing algorithm on the expired token is HmacSha256. I assume this is just an additional security step, because a potential attacker can disrupt the verification by modifying the algorithm in the token header. But should you not check for this before you validate the token? How can the token be validated if the signature (which the server produces using its private key and HmacSha256) is inconsistent with the algorithm specified in the token header. (I don’t yet understand the inner workings of the .Net code, but I presume it validates the signature using the algorithm specified in the header.)
I hope that was clear. I based my own code on yours, and I don’t like spurious code creeping in, so just wanted to check what the intention was. Many thanks again.
Hi Christopher. Yes, the question is clear enough. I am also not sure how the inner workings of that validation are done and I really never tested if the algorithm is changed, what would happen with the validation. But that said, I see no reason for you not to move that algorithm validation before the ValdiateToken method call. The result should still be the same. If the attacker modified the header algorithm, and for some reason, the validation passed, the exception will still be triggered and we won’t return the principal.
How to return Claims? I have 401 status code
I think in this article: https://code-maze.com/angular-role-based-authorization-with-aspnet-identity/ we do return claims to the client, so maybe it can help you.
I have a problem in _tokenService.GetPrincipalFromExpiredToken(accessToken) it works fine when the token is correct, but when is change a letter or remove a letter from the token it gives me this error:
This Is expected. If token Is corrupted it should return an error.
Ah yes, Is there any way to check it without throwing this exception? I wrapped it inside a try catch in controller and then return Unauthorized whenever that exception is thrown.
That’s the way. Maybe you don’t have to wrap it inside a controller
but just inside that method and return some meaningful response to the
controller. Any way you do it, you have to handle this exception.
In this case means refresh token no expiration date, the expiration date is only used for database updates only, the expiration date is only for access tokens?
No. The refresh token expires after 7 days (in this case) and once that happens the user should log in again to create a new refresh token with a new expiration date.
ok thank.one more question I have, when I want to refresh token with access token I created wrong, there is error “Signature validation failed. Token does not have a kid. Keys tried: ‘System.Text.StringBuilder’.” in method GetPrincipalFromExpiredToken, How to fix it?
This is expected. Please check this comment https://code-maze.com/using-refresh-tokens-in-asp-net-core-authentication/#comment-6504 If a token is corrupted in any way, you will get an exception and it is up to you to handle it.
Great article! Very helpful. One slight correction is needed in your Refresh action method in your TokenController. After generating the new refresh token, you update the token on the user object but you never update the “RefreshTokenExpiryTime” property before saving changes.
The way to code is now; at some point (i.e. after a week) the refresh action method would consistently return a “Invalid client request” without a clue of why it started failing unless someone debugged that logic.
Apart from that I would like to reiterate that this article REALLY helped me while I was working on a minimal API. Keep up the great work
Hello Ari. Thank you for the kind words here. About your suggestion, yes you are correct, we don’t add new 7 days to the expiry time because we want to force users to log in again after the refresh token expires and then the new refresh with a new expiry date will be generated (Now, that you said it, we probably should leave a more descriptive error message like Invalid Request try Logging in again… or something like that). This is more of a security concern because the main point of the refresh token logic is to refresh the access token, and the refresh token just changes the signature but the expiry time should stay the same. If we would extend the expiry of the refresh token in this method, users could be logged in forever, which is not good.
Thank you for the reply. Yup your feedback definitely makes sense. Your intention was to have the user login after 7 days regardless. And some way to distinguish between a truly invalid request and a natural token refresh expiration might be helpful. So I like your idea about a descriptive server side error message.
I was just thinking from a user experience standpoint; I have a client application, communicating with your API, and I left it running for 6 days 23 hours and 58 mins. I resume using my application and it still allows me to use the application without logging in again (because my last refresh token is still valid) then after 2 mins of usage then the login UI appears for no reason apparent to the user.
In order to address this, maybe we could also incorporate a user session inactivity threshold or some way to identify that a particular user has not requested an authorized resource in a long time (i.e. a period of time still within the refresh token expiry period). So that once that new “threshold” has elapsed; we prompt for a login even if the user has provided a non-expired refresh token. Users are more likely to comprehend having to login again because they did not use the application for a while (i.e. user session timeout) versus a refresh token expiration period that they are not privy to.
Now that I think about it, maybe what I am suggesting it out of scope for what you demonstrated. But I just wanted to also maybe get your opinion on what you thought regarding the scenario I mentioned above.
Thank you again for taking the time to talk! Much appreciated.
Hi Ari. Yes, the thing you suggest makes perfect sense. Just it would require a bit more logic and make this current solution even more complicated than it currently is. Also, a lot of client applications check for inactivity and if user is inactive sends a logout request to API, or something similar.
Correct me if I’m wrong but won’t this prevent the user from being able to stay logged in on multiple devices at the same time?
I don’t think so, but I didn’t try it as well, so can’t be sure about that.
really confused, when u need a new access token u send the refresh token to get the new access token. In this flow why the api will return a new refresh token along with??? a new refresh token is only required in the instance of a logout, password change, role change etc etc. pls clarify
By RFC documentation, the first time you log in, API should send both tokens. The next time you get an Access Token because it expired, the refresh token is optional, so you can send it or you don’t have to send it. It is up to you. We’ve shown here how things could be done, but of course, as with any other article on the internet, if it doesn’t specify that you MUST do something exactly like that, it is all up to you to adapt the solution to your needs.
Hi,
Just for fun and learning (still love this item) I’m try to deploy this to my own hosting.
What do you need to change in the code to do this?
I replaced all the localhost calls with call to my own hosting url, but can’t get it to work.
Login works but after that opening the Customer pages still gives an 401 error.
Probably not looking right (verry good at that :-))
Kind regards,
Desmond
Hi Desmond. Maybe you can take a look at this article: https://code-maze.com/net-core-web-development-part16/ where I deployed .NET Core + Angular app on IIS. So maybe it can help you.
Hi Marinko,
Thanks for the quick reaction, sorry for my late respone. didn’t have time to come here back earlier.
I will have look at this
THNX
In my opinion, I don’t see any advantage in using two tokens. I don’t see how using a refresh token can add more security to the application. In fact, I think it adds less security to it.
Imagine that Bob steals Alice’s two tokens and then Alice stops interacting with the web application for two days, so the web application will never be able to refresh Alice’s access token. Congratulations, now Bob will be able to refresh the access token for seven days (in this scenario it is assumed that the refresh token has that expiration) until it expires and access the API resources.
And even if Alice had had a single token with a 6-hour expiration, Bob would only have been able to access the resources for those 6 hours.
So what security does this provide? I don’t see any.
Hello MrDave. Let me quote you: “I don’t see how using a refresh token can add more security to the application.” – Well it doesn’t. A refresh token is not about security, it is about user experience. You can try to make it more secure by encrypting it before storing it in the storage, and that way if someone gets it, it will be of no use to them. Anyway, nothing is 100% secure, and if you want to create your app without the refresh token, that’s perfectly fine. You can sign out your users after 10-15 minutes and make them log in again – that’s perfectly fine (many apps, especially financial ones, are doing exactly the same).
I understand. I found an interesting answer that explains the advantage of using two tokens: https://stackoverflow.com/a/71445894 (maybe it will help someone else who reads your article)
Big THNX for the greate explanation, made a lot clear for me and one of the best examples I have see.
Only one small problem, if I do a git clone I only get the server part.
When downloading as a zip I get both.
Kind regards,
Desmond
Hello Desmond. Thanks a lot for the kind words. I am so glad you find this article useful.
Now, regarding the Github clone. When you do that, you probably see the master branch (the source code for the first article of this series), and that one has only the server part. But if you just switch branches, you will be able to find all the projects (both client and server).
Hi,
I’m on https://github.com/CodeMazeBlog/aspnetcore-jwt-auth/tree/aspnetcore-jwt-auth-refresh-tokens branche
but the clone url doesn’t change so you’ll get the master branche when cloning.
Maybe a git issue or still doing something wrong?
Hello Desmond. No matter which branch you are one, when you clone the repository it clones the whole repository, not just that branch. Try using GitHub Desktop, it is a great tool, you can see it in the image attached.
Duhh, sorry it was a short night looks like I need more coffee lol.
Switch branches in vscode and found it.
Thanks
First of all, this is a great article. Thank you for providing a solution to refreshing tokens.
One thing I couldn’t figure out is whether it supports multiple concurrent sessions of a user. Consider a scenario where a user logged in from two browsers at the same time. The later browser seems to override the Refresh Token stored in server. When the access token of the first browser expires, and tries to refresh the token, the refresh token doesn’t match with the database value. Is this scenario being handled?
Hello Bikash B. Thanks for reading the article. I am unsure about your question since I didn’t test the solution for that situation. But I think it wouldn’t work well as is. Maybe it should be one more field in the DB to state whether the user is already logged in, and once they log out or refresh token expires, it should be false. Again, this is just something on top of my head, I didn’t think about it at all.
Great article with implementation code.
If hacker can steal access token from browser’s local storage, what is stopping theft of refresh token? The only way this solution is secure if refresh token can NOT be stolen.
That’s why the access token is short lived. Once it expires the app generates new access and refresh tokens. That way attacker has less time or maybe no time at all to use them. Nothing is 100% secure, cookies have their own flaws and related dangers. But with this, we at least try to make the damage minimized if someone stills the token. If you have any other suggestion, feel free to share with us.
And what is stopping someone malicious to steal refresh token also, look up in the network and find endpoint for refreshing token?
He/She could call that api from postman easily.
I may be missing some parts for complete understanding.
Nothing is 100% secure, you will find nowhere a completely secure solution. But in this case, you can encrypt the refresh token before you store it in the storage, and then when you need it, you can decrypt it. That way, even if someone steals the RT it will mean nothing to them.
This is the bad approach I guess one should mark endpoint authorize to read refresh token and its time then match it with the dateTime value , Using current approach anyone can customize the refresh token expire time.
No, I don’t agree at all. You should reconsider your statement. First of all, if your token is expired you will have no means to access the protected resource on the Web API side. If you have the [Authorize] attribute on top of the action, your user must be authenticated with a valid token to access that action. That means that in the client app, you must have a logic to refresh the token only if it is already valid, which is not a good option. Why would you want to refresh already and ONLY valid tokens? There are practices where you want to allow token refresh if it is expired or if it is about to expire (a minute or two – as we did in our Blazor refresh token article) but providing logic to refresh only valid tokens is not a good practice at all. The second thing is that you have to send the expired token and valid refresh token to this endpoint in order to refresh the expired token, so I can’t see the benefit of using the Authorize attribute.
Ok I agree with Authorize attribute case, but what is the need of refresh token when everything can be validated using provided token , if it is fake or anything it wont validate?
We’ve explained clearly in the article why do you need the refresh token and why the access token is not enough secure on its own.
short clear and practical as always
good job guys thanks for that
Thank you milad.bg. It’s great to hear that.
you guys are great
good job
clear and complete as always
Thanks a ton man. God bless you
You are most welcome. Thank you too.
My comment: Nagging people who try to read the content of a page to give comments is very bad practice. Cheers!
I must say that I am not quite sure that I understand. If you are talking about that green chat icon on the left of the post, all I can say is that we force no one to do anything on our site. This icon represents the number of comments, if you want to read comments, you can click it and navigate to the comment section fast, and finally, if you want to add the comment great, if not, well, great again. I really can’t understand why would this bother anyone who came here to read and learn.
“var username = User.Identity.Name;”
Who is “User” here?
Line 62 from TokenController.
Not who but what. It is a property that you get by using the Authorize attribute. This property contains diffrenet claims regarding the token or the user currently authenticated.
Thank you!
I had a problem because I tried to use that property in my service class and not directly on a controller method. Eventually I writed like this and it works (I use userEmail instead of username):
IN CONTROLLER
————————
[HttpPost, Authorize]
[Route(“revoke”)]
public async Task<IActionResult> Revoke()
{
var userEmail = User.Identity.Name;
await _usersService.Revoke(userEmail);
return NoContent();
}
IN SERVICE CLASS
————————–
public async Task Revoke(string userEmail)
{
var user = Context.Users.SingleOrDefault(u => u.Email == userEmail);
if (user == null)
{
throw new BadHttpRequestException(“User doesn’t exist”);
}
user.RefreshToken = string.Empty;
await Context.SaveChangesAsync();
}
Thank you very much for your content of this topic.
It help me alot to understand Web Security issue especially accessToken & refreshToken flow for asp.net core & angular.
You are most welcome. We are glad you liked it.
Hi,
First of all thank you so much for the detailed explanation. However I have one doubt that you are storing the token in Local Storage but I have read some article that it is not good practice to store it in Local Storage. Can you recommend any other good approach to store the token.
It really depends on the application. There are situations where local storage is just fine. If you don’t want it you can always try with session storage. It removes the data once the page session ends.
But…session storage isn’t much better in terms of security.
Really we should be looking at secure cookie storage for these tokens, which is a whole different ball game in terms of implementation.
Nothing is 100% secure. You can find a lot of downsides with cookies as well. You can always encrypt the token before storing it to increase security if someone manages to get it.
I would think that anyone clever enough to steal from local or session storage is clever enough to work out any client-side decryption required to get the token 🙂
Even if the encryption/decryption is carried out server-side then the encrypted token will be what’s sent back to the API, in which case all a hacker has to do is steal the encrypted version and send that.
Cookies is pretty well established as being by far the best security option for these tokens. Not perfect obviously (and I agree, nothing is), but far far superior to local or session storage, encrypted or not.
There are techniques. Tokens are short lived and of course attackers are not aware wether the token is encrypted or not. Being shirt lived prevents the attacker to use that token at all. Again, I am not saying that cookies aren’t better solution, just this can be pretty secure as well. Of course the implementation is different as well, and we have some articles on that topic as well.
How the same thing can be achieved for the .net core mvc application. Suppose it does not need API, just mvc application and business logic layer.
In mvc, we can generate either token and apply jwt authentication scheme or generate cookie and use cookie authentication.
But either case, how we can catch unauthorized response and refresh token (Cookie) after 5/10 mins and re-hit the previous action that user performed initially?
Thanks!
Hello Rahul. To be honest with you, I’ve never done this with MVC. I worked on refresh token with MVC but I’ve used IS4 as my token provider. In our Security book, we are covering how to use IS4 with the MVC client app and also one of the sections is dedicated to refreshing tokens.
Hi Marinko, thanks for reply. Any reference you can suggest for the purpose I asked?
Well, I didn’t research about that particular topic at all (at least not for JWT with MVC) but I’ve just “asked” Google and I’ve found several articles there. So, I am not sure which one to recommend since I didn’t read them, but you may try it. I am pretty sure there is some useful information there.
Hi, well I have done configuring JWT with MVC already, but my question was different that how we can refresh cookie at short time interval in case of just mvc web application as we do with access token and refresh token.
Because after regenerating cookie by any possible way, I would need to hit previous request silently without letting user to know and enter credentials again, that’s all where I am stuck.
hi really nice stuff, may we implement the same using asp identity, i mean with aspnetusers table? could you please guide lil bit there
Hello Bhanu. In our Web API book, the second edition, that we are going to publish pretty soon, we do exactly that, use refresh token with Jwt and Identity. Until then, you can read our article where we do that thing but with Blazor Wasm as a client: https://code-maze.com/refresh-token-with-blazor-webassembly-and-asp-net-core-web-api/. I am sure it will help you.
If someone malicious user put expired “AccessToken” and valid “RefreshToken” and by using api call to “
/api/token/refresh” with both token parameters in postman with website URL same as issuer and audience. How to Prevent anyone to get new accesstoken??Well, that shouldn’t be happening, using HTTPS and setting the token expiration to a small value, and using the refresh token alongside the access token should prevent that or even lower the time for the attacker to execute malicious actions. You can search our comment section and will find some more explanations and even a link to one thread talking about this.
Thank you for your response. I go through your comment section and agree with you for lowering risk of access token stolen using refresh token. but it’s still hackable for some time.
Awesome article and series. Thanks very much.
You are most welcome. Thank you for reading the posts and for your comment.
Why do you send the access token AND the refresh token for a new access token . We could just get the claimsprincipal from the refresh token and just send a new access token without sending a new refresh token?
??
You can do it that way as well. With this flow, we want to validate the expired access token and verify that it was not tampered with and also by RFC docs, you can return a new refresh token as well, it is optional, but we wanted to do it that way.
I had some trouble getting refresh token working, it was never hitting the API.
I changed this to use Promises with then…
So in case someone else has the same issue.
I have a function (in a database service) containing the http call as given;
public refreshToken(credentials: string): Promise<any>{
    return this.http.post(this.apiUrl + "token/refresh", credentials, {
        headers: new HttpHeaders({
          "Content-Type": "application/json"
        }),
        observe: 'response'
      }).toPromise();
  }
in authguard, instead of setting a const for the response, I used it with the then(response)=>{//do stuff with response}) syntax.
Like so:
try{
      this.db.refreshToken(credentials).then(res => {
          const newToken = (<any>res).body.accessToken;
          const newRefreshToken = (<any>res).body.refreshToken;
          // If token refresh is successful, set new tokens in local storage.
          localStorage.setItem("jwt", newToken);
          localStorage.setItem("refreshToken", newRefreshToken);
          isRefreshSuccess = true;
          });
        }
        catch (ex){
          isRefreshSuccess = false;
        }
        return isRefreshSuccess;
This almost worked – tokens were refreshed but still went to login page. So I also changed the tryRefreshingTokens function to return a promise instead of awaiting.
private tryRefreshingTokens(token: string): Promise<boolean>{ return new Promise((resolve) => {Accidentally posted before finishing…
private tryRefreshingTokens(token: string): Promise<boolean>{
    return new Promise((resolve) => {
//replace all 'return' statements with resolve(true) or resolve(false)
})
And then canActivate modified to use Promise when resolved… Specifically, the call to this.tryRefreshingTokens
this.tryRefreshingTokens(token).then((isRefreshSuccess) => { if(!isRefreshSuccess){ localStorage.removeItem("jwt"); localStorage.removeItem("refreshToken"); this.router.navigate(["user/login"]); } return isRefreshSuccess; });Thank you for this. I must say, I am not sure why you had issues with our solution, since it is tested, but again, thank you for sharing your solution as well.
I’m not sure why it wasn’t quite working for me, I re-did it a few times assuming I’d made a mistake. Perhaps a version issue.
I should say I greatly appreciated the starting point though, the only well explained and not unnecessarily complicated solution I could find, so thank you! 🙂
var username = principal.Identity.Name; ………….getting username is null
Hello,
How can we use this implementation with interceptor?
Interceptor is something that you can implement on the vlient side to intercept your http requests and chreck for the token validity. On our site you can find an article about refresh token with Blazor WASM and there you will see how I use interceptor in the client app.
Your implementation is wonderful, in a single day I was able to create my first api, implement authentication and with my low level of English. And all thanks to people who share their knowledge.
Hi Carlos. I am glad you find this article usefull. It is always great hearing that.
Loving your tutorials! They are so well put together, easy to follow and without the fluff! One thing I noticed is that on TokenController.Refresh(), you should either check
if (tokenApiModel.RefreshToken is null)or change the front end auth-guard.service.ts to not call tryRefreshingTokens() if the token is null. Currently, with the code in your repo, if there is no jwt token in localstorage, the front-end will make an API call and there will be a server error on the TokenController.Refresh() method because tokenApiModel.AccessToken is null.Thank you very much Dnguyen for the suggestion and for all the kind words. We will look into that for sure.
Hello, I’m trying to implement the same in my Angular app. Seems like my auth guard is not asynchronously calling the refresh endpoint and as a result the isRefreshSuccess flag is always false and the user is redirected back to log in. Anything I’d miss?
It is not that easy for me to help you without your code, so I can suggest to download our source code and closely compare your solution. Just a quick question, did you forgot to use awate before calling a function?
This is one of the only articles on the internet that explains refresh tokens well and doesn’t have code that looks like it was written by someone on LSD.
You made me smile so hard 🙂 🙂 I am so glad you find it useful. We have also similar article with Blazor WebAssembly and Web API so, if you like WebAssembly as we do, you can read it here https://code-maze.com/refresh-token-with-blazor-webassembly-and-asp-net-core-web-api/ Thanks a lot for reading this one.
Great article. It’s really helped me get up to speed with token refreshing. One bit I don’t understand is if a refresh token is supposed to be a long-lived thing, why do we refresh it every time we get a new access token? Is the idea that while we change the refresh token each time, the expiry doesn’t shift, so at some point in the future, we will have to re-authenticate?
Hello Rob. Thanks for reading the article and we are so glad it helped you.
You are right regarding the refresh token process. Even though we create another refresh token, the expire date doesn’t change. So eventualy the user will have to re-authenticate. Creating a new refresh token when the access token expires is also a good thing for the security reasons.
Hi, what’s the purpose of generating new refresh token with old expiry date? Shouldn’t expiry date also be prolonged.
Also I have similar problems with this implementation:
If one user logs in from two different browsers the second one will overwrite refresh token so the first one will be invalid and directed to login page.
Is the same refresh token supposed to be given to the client on the second browser?
As I answered in the previous comment: “So eventually the user will have to re-authenticate.” If you refresh the expiry date of RT then the user will be logged in forever. This way, once the RT is expired the user must log in again. Regarding the second question, that is up to your custom implementation. You have to track if the same user is already logged in. That’s up to the system requirements (or the client requirements). There will always be edge cases.
Many thanks Nick … You are helping lots of developers who are looking for new opportunity in the time of COVID19 crisis. Many thanks man.. Please share your articles on Identity4 with JWT and the end to end example as the current one.
Can’t seem to find TokenApiModel?
Hi Nick. Please check our source code. You will fond it in the Models folder in the web api application.
Found it. Thanks! Great article, I’d learned a lot. However, I’m still unclear as to why use Refresh tokens. If someone get a hold of your Access token, wouldn’t it be likely that they’d get hold of the Refresh token as well (since you’re sending it more often, whenever the Access token expires)? So, if they get a hold of your access and refresh tokens, then they’d have free access to your data.
Also, because Access tokens expires in a shorter amount of time, wouldn’t it mean you’ll need to catch/detect when it expires and send out Refresh token where ever you call the server API? That means more code and slower client (because you need to make two server calls, one with the Access token and another one with the Refresh token whenever the server responds indicating the Access token has expired).
Hello Nick. Your questions are pretty reasonable and I will try to give you answer to them. First of all, one of the main purposes of the refresh token is a better user expirience. That means, after the access token expires, the user doesn’t have to login again but the app automatically refreshes that token and user still has access to the applications. For the securit reasons access tokens should be short-lived and that would make user enter their credentials every 5 or 10 minutes, which can be really anoying. Another purpose of the refresh token is the better security, since if the attacker gets possesion of your tokens, the access token will expire pretty fast and the attacker won’t have access to the API any more. There is an interesting thread about the question you asked here https://stackoverflow.com/questions/32060478/is-a-refresh-token-really-necessary-when-using-jwt-token-authentication so you can have a look there as well.
Regarding the second question. If you inspect our code, you will see that as soon as token expires, we catch that in the guard service, so we didn’t send the request to the server. We have the jwt library, implemented in previous parts of this series, which helps us indentify wheteher the token is expired. If it is, we just send the request to the refresh token. So it is only one request. Of course, if we successfully refresh the token, we send another request to the requested endpiont by the user. But this is the way to do such things.
Thanks again! That clears up a lot of the confusion.
Where’s the complete source code? can you provide git link?
Please check at the top of the article. You will find it in the red box, can’t miss it.