Ensuring Data Validity in Your WinForms Application Without Writing a Single Line of Code

The R2 2020 release of Telerik UI for WinForms came with a brand new validation management tool—the Telerik Validation Provider. Now you can define multiple validation rules and associate them with editors without having to write a single line of code!
One of the main challenges faced by WinForms developers while building desktop applications is ensuring the proper execution of the project. Very often that execution is directly tied to the users’ input. That is why, before managing the input data and submitting it to the server, it is important to ensure that all required editor controls on the form are filled out in the correct format.
I am very delighted to announce that as of R2 2020 Telerik UI for WinForms suite offers a powerful new tool for validation management—RadValidationProvider. This small, but very powerful, component provides data validation management for editor controls. You can easily define various validation rules and associate them with any RadEditorControl that is eligible for the specified validation logic.
Although RadValidationProvider allows you to define the rules programmatically, you are not required to write any code. Our main focus, while we were working on the internal component’s implementation, was to introduce an intuitive design-time experience which will facilitate the development process.
Now. let's take a deeper dive into the validation provider capabilities.
Imagine that we need to build a simple search form to book a summer holiday. Before executing the search query and find the appropriate results that the travel agency offers, we need to check the form for correctness.
Let’s start with the following design where we have two RadDateTimePicker controls for the start/end dates of the vacation, two RadSpinEditor controls to define our price range and one RadDropDownList to pick up the destination:
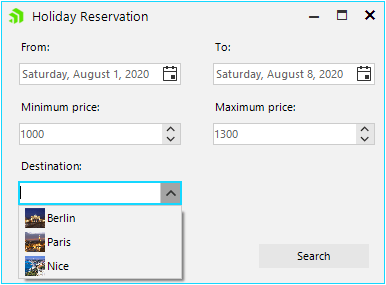
The first conditions that pop up in my mind in order to ensure that the search query will be correct are:
- "From" date should be less than "To" date
- "Minimum" price should be less than "Maximum" price
- The holiday Destination shouldn’t be empty
Before proceeding further, just drag a RadValidationProvider from the toolbox and drop it onto the form:
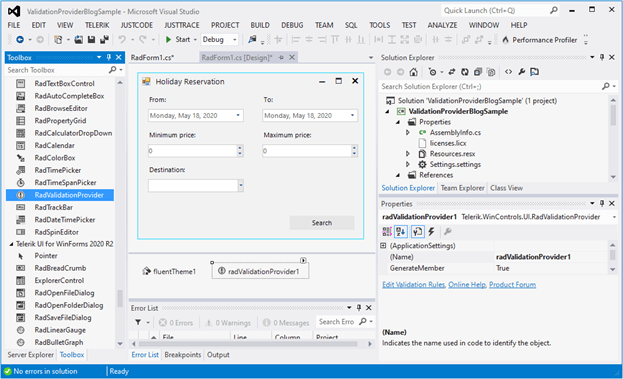
Let’s start with defining the validation rules:
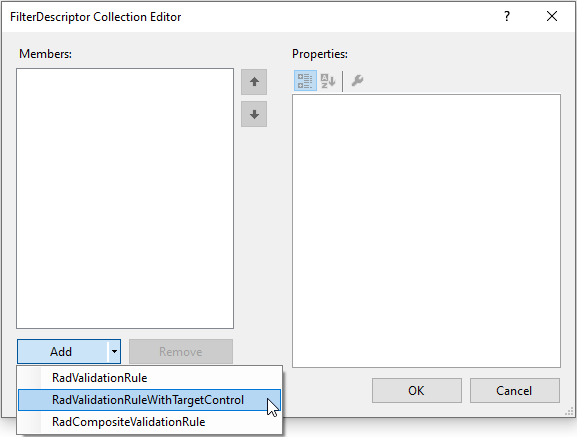
- Select RadValidationProvider and click the small arrow at the top right position in order to open the Smart Tag. Open the FilterDescriptor Collection Editor by clicking the Edit Validation Rules option in the Smart tag and add two RadValidationRuleWithTargetControl items:
- Open the Controls dropdown and check radDateTimePicker1:
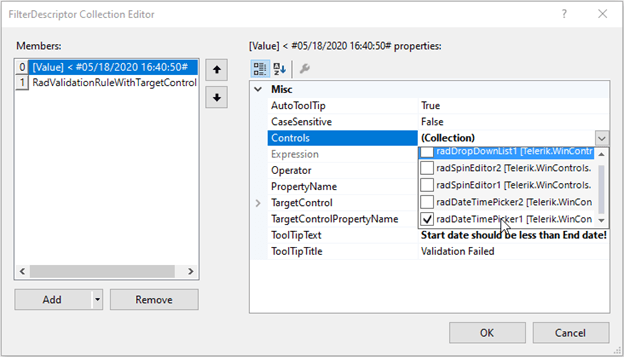
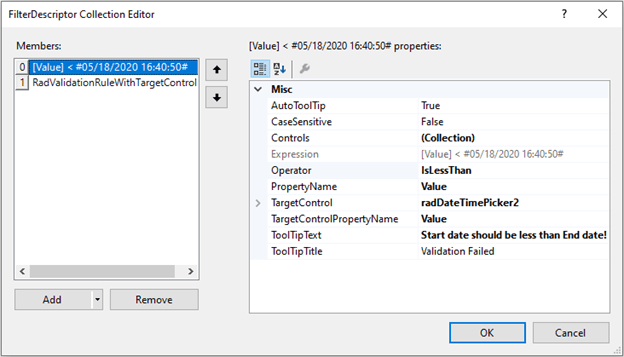
- Then, specify the Operator, PropertyName, TargetControl (set it to radDateTimePicker2), TargetControlPropertyName and TooltipText:
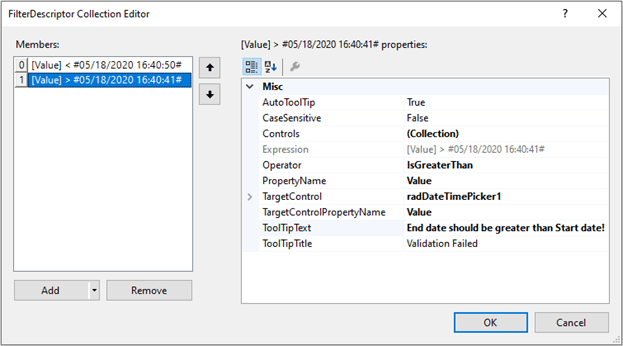
- Select the second RadValidationRuleWithTargetControl. This time, we will check radDateTimePicker2 from the Controls drop down and the TargetControl will be radDateTimePicker1:
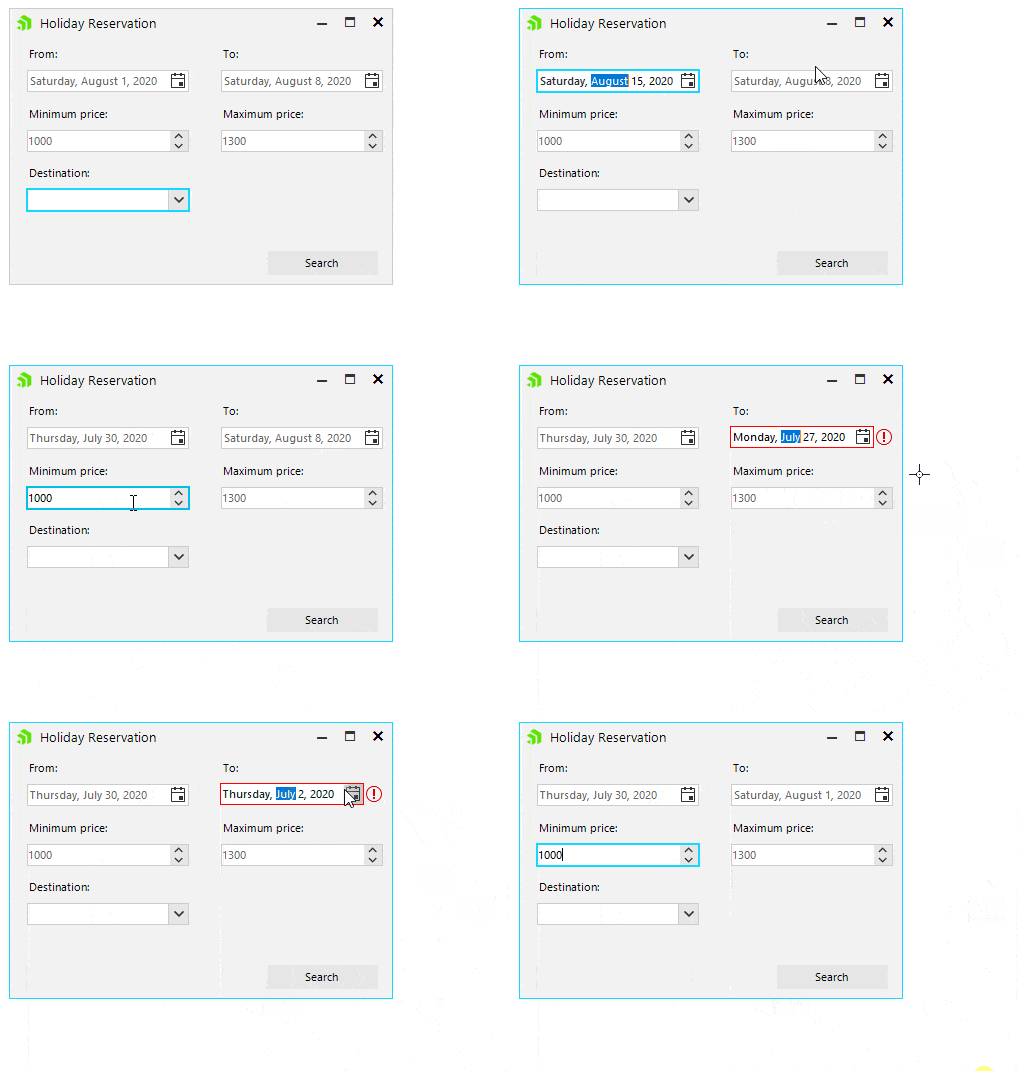
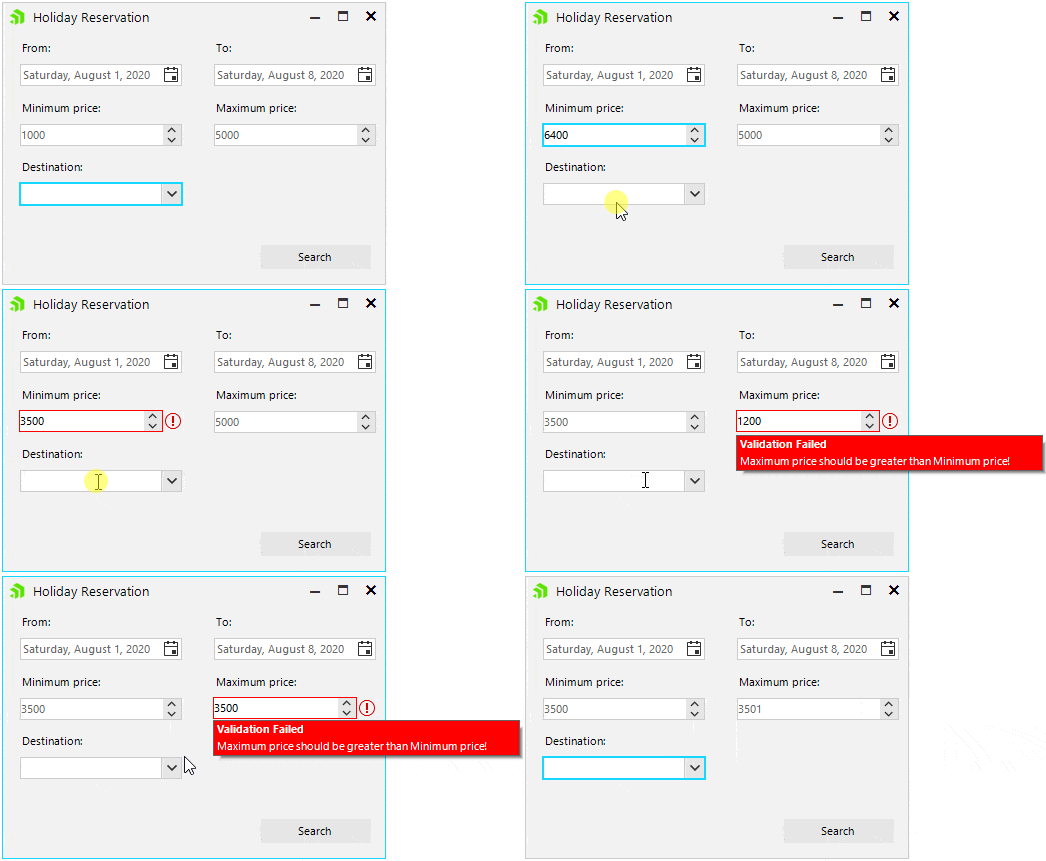
- Now, if you focus on the “From” RadDateTimePicker and select a date that is greater than the “To” RadDateTimePicker, you won’t be allowed to exit the control. Once you enter a valid value that meets that validation rule, you will be allowed to navigate to another control. If you focus on the “To” RadDateTimePicker and select a date that is less than the “From” RadDateTimePicker, the defined error message will pop up.
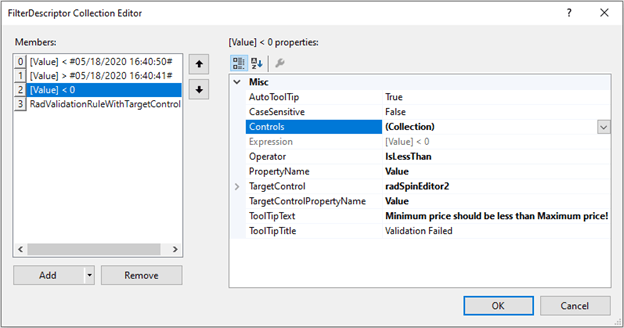
- In a similar way, we will define two more RadValidationRuleWithTargetControl items that validate that the “Minimum” price (radSpinEditor1) is less than the “Maximum” price (radSpinEditor2) and the “Maximum” price is greater than the “Minimum” price:
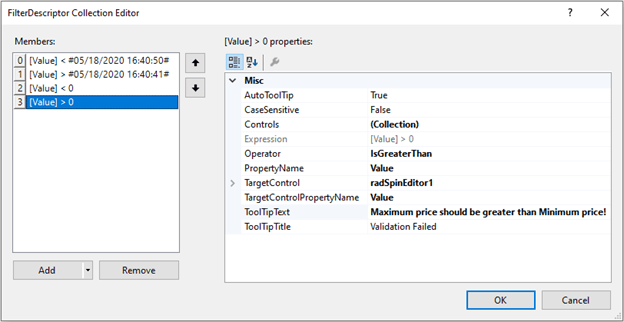
Please ensure that the initial values in both RadSpinEditor controls meet the validation. Otherwise, you may remain blocked when you focus the "Minimum” price RadSpinEditor for the first time, e.g. if both controls have initial value = 0. No matter what value you enter in the "Minimum” price RadSpinEditor, you won’t be able to validate it and exit the control.
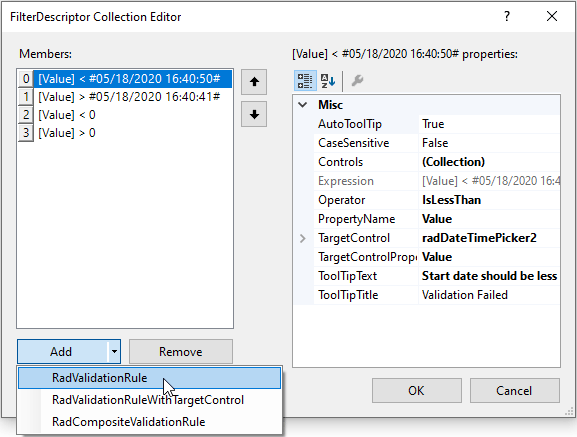
- The next step is to check whether the user has selected a destination. Add a RadValidationRule and toggle radDropDownList1 from the Controls drop down. Then, define validation logic to check whether the SelectedIndex is not -1:
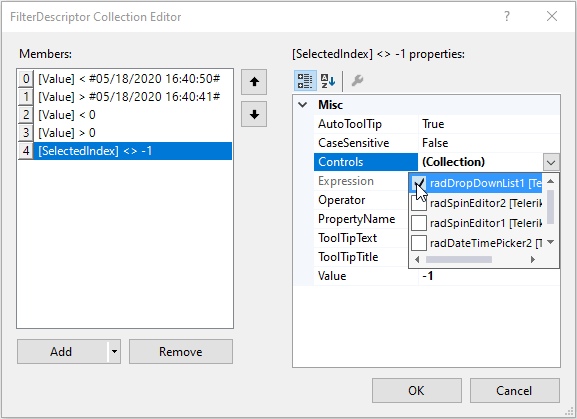
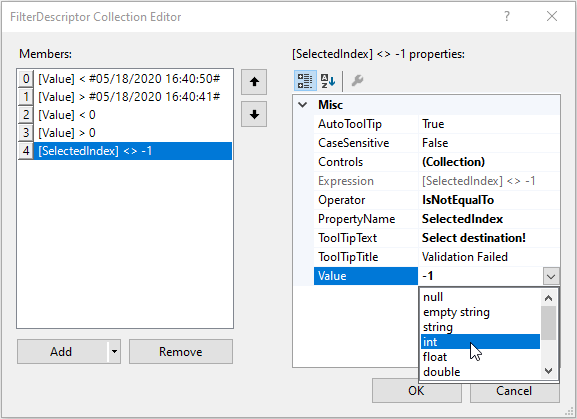
The data type of the Value can be specified after entering a value first and then selecting the type from the dropdown. Thus, the correct expression will be serialized.
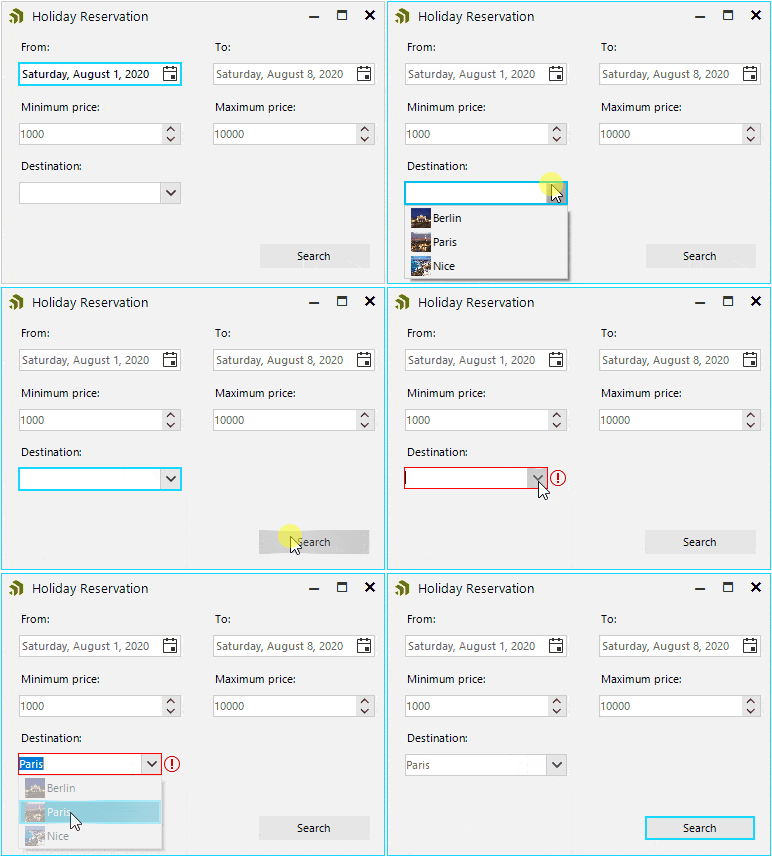
Voilà! Without even writing a single line of code we ensured basic data validity of our search form.
Composite Rules
RadValidationProvider also offers a third rule type, called RadCompositeValidationRule. It allows defining more complex validation logic by adding multiple simpler RadValidationRule or RadValidationRuleWithTargetControl items which are combined with a logical operator. The main purpose here is to cover the cases when a certain control’s value should meet certain requirements considering the values of multiple other controls. For example, if you need to add radSpinEditor3 which value must be greater than radSpinEditor1 and less than radSpinEditor2, the RadCompositeValidationProvider is the perfect fit:
- Add a RadCompositeValidationRule:
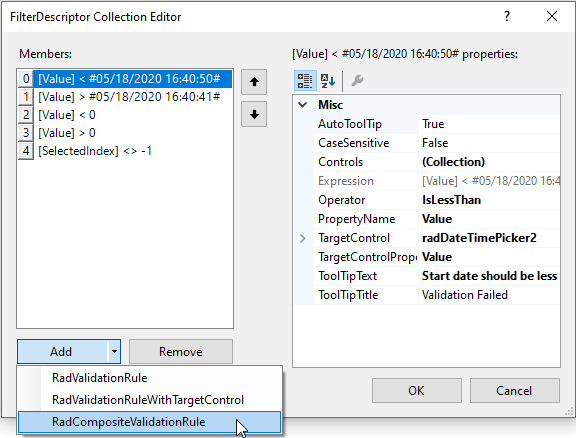
- Its ValidationRules collection allows you to define as many nested rules as you need:
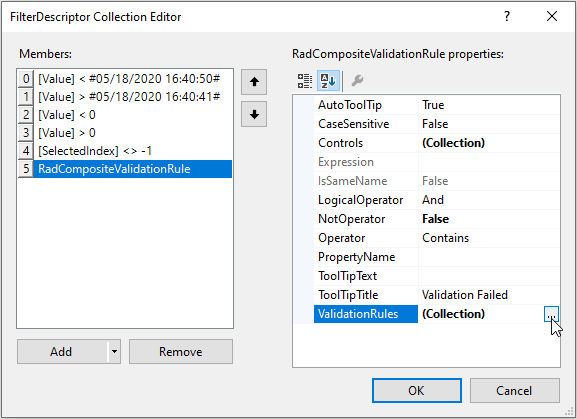
- Add two RadValidationRuleWithTargetControl items where radSpinEditor3 is checked in the Controls collection for both of them. The TargetControl for the first rule will be radSpinEditor1 and for the second rule will be radSpinEditor2. Define the greater than/less than logic and click OK:
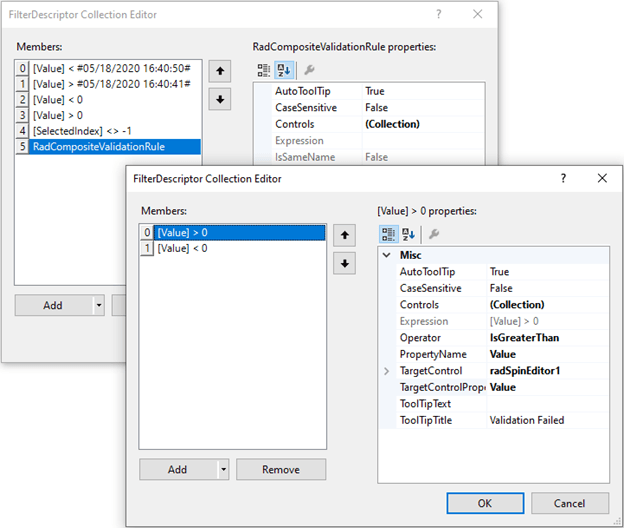
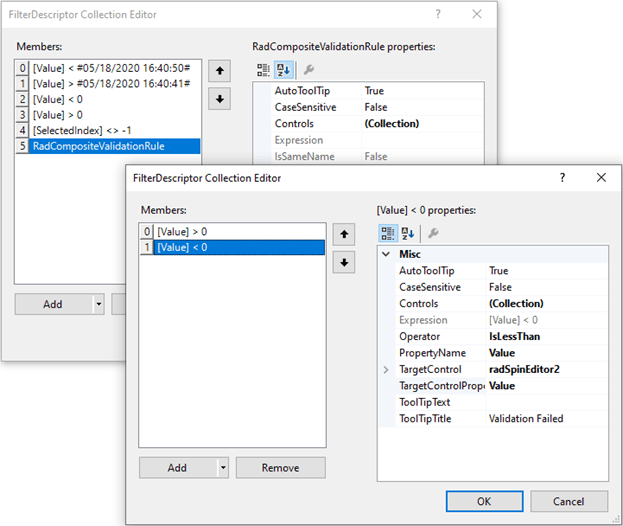
- Set the LogicalOperator to “And” and fill the ToolTipText:
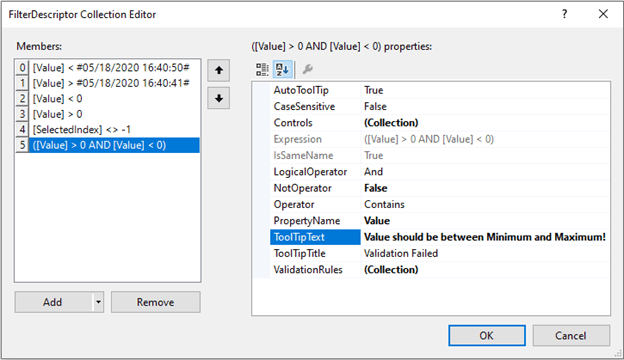
Run the project and try to enter a random value: 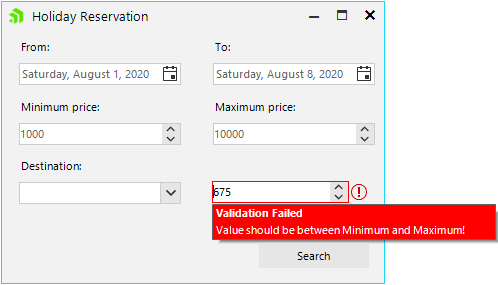
Note that none of the associated controls (e.g. radSpinEditor3) of a composite rule should be added as a target in any of the nested rules! Please be careful when defining composite rules in order to get the proper validation logic. Usually, it is even possible to simplify the validation logic and define separate RadValidationRuleWithTargetControls outside a composite rule.
That’s it! No code, but a diversity of validation logic everywhere. It is quite easy, isn’t it?
Happy validating!
Try it Out and Share Your Feedback
The R2 2020 new controls and features are currently available for download in customers’ accounts. If you are new to Telerik UI for WinForms, you can learn more about it via the product page. It comes with a 30-day free trial, giving you some time to explore the toolkit and consider using it for your current or upcoming WinForms development.

Desislava Yordanova
Desislava Yordanova is a proactive ambassador of diligent processes and a customer-caring professional. Currently, she is a Technical Support Engineer, Principal in the Document Processing team after a successful journey in the Telerik UI for WinForms team. She joined the company in 2013. Desislava holds a master’s degree in Computer Systems and Technologies from the Technical University in Sofia. Apart from her job, she is keen on snowboarding and travelling. You can find Desislava on LinkedIn.
