Virtually every game you play, especially on a personal computer, allows you to change the graphics settings to get the best performance and appearance you can on your device. These games save those settings and then reload them whenever the user reopens the project. Perhaps you might be wondering how it does all that? In the case of a typical Unity project, this is done by accessing the quality settings and changing the values to match with the player’s selection. Saving those settings is also simple by utilizing the Unity Player Preferences system. This method of saving data and preferences has been discussed before in this article.
Soon to follow is a tutorial showing how you access these parameters and allow the user to change them at their leisure. There are options for selecting a quality preset, where the game automatically chooses settings based on how nice the user wants the game to look, as well as options for setting the game to windowed or fullscreen. They’ll also be able to select the exact anti-aliasing and texture quality preferences they have as well as the resolution and the master volume. While these aren’t all the options the user can change, this article should give any Unity developer an idea of how to create a graphics settings menu.
As there are quite a few moving parts outside of the code, this tutorial is primarily focusing on the coding work involved in making a settings menu. You can use the codeless template below to follow along or recreate the user interface seen in the article yourself. An introduction to creating a user interface is detailed here. The template and complete version of the project also has music included for testing the master volume settings once it is programmed and ready. This music was created by Kevin MacLeod, and more info on it can be found directly below.
Music credit:
Night In Venice by Kevin MacLeod
Link: https://incompetech.filmmusic.io/song/5763-night-in-venice
License: http://creativecommons.org/licenses/by/4.0/
Of course, if you prefer a song from your own computer, feel free to use it. In addition, the project borrows a stone texture created by LowlyPoly. That asset can be viewed in the Unity Asset Store here. This asset is included in both the template and the complete project when downloaded from the links below.
Project Overview
To load an already existing project, click the Add button in the Unity Hub and navigate to the project in the dialog that appears. Select the folder containing the project, then click Select Folder.
First, here’s a quick overview of the project. From the start, you should see an already completed user interface shown in Figure 1, created using Unity’s default assets, with all the settings that can be changed. Next to it is a sphere object with the stone texture applied. This image has been included to help the user better tell the differences between the different settings.
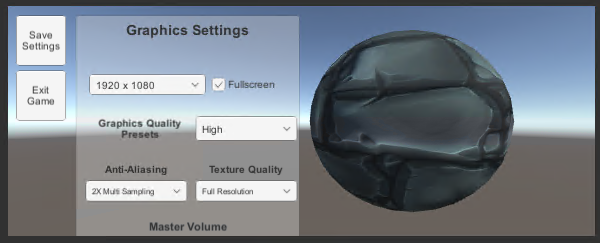
Figure 1: The Graphics Settings menu
The menu should consist of four drop-downs, a checkbox, and a slider. The drop-down for selecting resolutions has a few options already, but they are mere placeholders and can be ignored as Unity is capable of automatically filling in all resolution options available to the user. Options in the other three drop-downs all correspond to their respective Unity graphics settings. It has already been done, but if you were to recreate this menu from scratch, you would need to take care to match the order of drop-down options (except the resolution drop-down) with the order of options seen in the Unity settings. That order can be seen by clicking Edit->ProjectSettings then, in the window that appears (Figure 2), selecting Quality on the right-hand side.
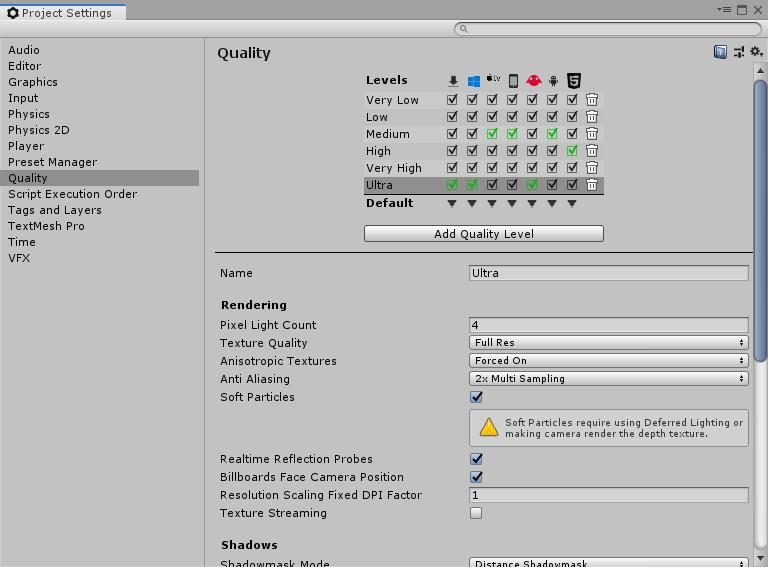
Figure 2: The project’s visual quality settings.
If you wish to set the default quality preset, you can do so by clicking the Default arrows matching with the build type (PC, Android, etc.) and selecting the preset. If downloading the projects from the Github links, the presets will have been modified to give each option more definition. For instance, by default, the Very Low preset’s Texture Quality is at half resolution, but the template has it set to eighth resolution. Feel free to edit them to your liking, but it is not required. You can also see individual settings, such as Texture Quality and Anti Aliasing, further down which this project allows the user to change. There are plenty of other settings here as well, but for the purpose of this tutorial, the options the user can change are limited to just a few. Accessing the other options in code is simple and will be explained in the coding section.
At the bottom is the master volume slider, which works a little differently from the other settings. Manipulating this slider changes the volume of the MainAudio audio mixer seen in the Assets window. If you were to double-click this asset, the Assets window would change to an Audio Mixer window where you could change audio settings from there. If building all this from scratch, you would create an audio mixer using right-click context menu in the Assets window, expose the Volume parameter, then link that with the AudioSource game object with the Output field.
Finally, there are two buttons on the left side of the menu, one for saving settings and one for closing the game. Between these two buttons, the save button is where most of your attention will go. As mentioned above, the Player Preferences system is used to save graphics settings. When the user reloads the project, any settings they saved are loaded according to their saved preferences.
Feel free to click around the editor and check out the other objects hidden under UI in the Hierarchy to get a better feel for what all the different objects are. When you’re ready, double-click the SettingsMenu script asset in the Assets window to begin the coding process.
SettingsMenu
To start, you’ll need the following using statements to accomplish everything this project sets out to do. Most of these should appear at the top of the script by default, but, to be safe, each one is listed.
|
1 2 3 4 5 |
using System; using System.Collections.Generic; using UnityEngine; using UnityEngine.Audio; using UnityEngine.UI; |
Within the class itself, you’ll need to be able to reference many of the objects within the settings menu. You also need to be able to change the volume of the audio mixer. Finally, two private variables are declared. The first is a float called currentVolume, which, as the name implies, stores the current volume. This variable primarily exists for saving purposes, since it’s unfortunately not easy to get the current volume of the MainAudio mixer. Next comes an array of resolutions. Remember when it was said that Unity automatically detects the possible resolutions for a user and fills out the drop-down from there? Those resolutions will be stored inside this array to be used later.
|
1 2 3 4 5 6 7 8 |
public AudioMixer audioMixer; public Dropdown resolutionDropdown; public Dropdown qualityDropdown; public Dropdown textureDropdown; public Dropdown aaDropdown; public Slider volumeSlider; float currentVolume; Resolution[] resolutions; |
Finally, the default Update method can be commented out or deleted, but keep the Start method. You’ll be coming back to this method later.
Now comes the time to begin properly coding the different methods that make this menu tick. A good place to start would be the SetVolume and SetFullscreen methods.
|
1 2 3 4 5 6 7 8 9 |
public void SetVolume(float volume) { audioMixer.SetFloat("Volume", volume); currentVolume = volume; } public void SetFullscreen(bool isFullscreen) { Screen.fullScreen = isFullscreen; } |
As you can see, the act of changing the settings is quite simple. In both methods, the actual change is occurring in just a single line. With SetVolume, you get the audioMixer's SetFloat method and pass in the volume parameter. How does Unity get this value? In the editor, the volume slider is given this method for its OnValueChanged event. In doing so, the slider is told that its current value is passed into SetVolume's volume parameter, thus providing the audioMixer with the new master volume value to be changed to. Finally, currentVolume is given the value of volume to hang onto whenever the user saves their settings.
SetFullscreen has the same idea, but with one less line of code. Additionally, it also gets the Unity Screen class, and then the fullScreen boolean variable from there. Like with SetVolume, the fullScreen value is changed according to the value passed into the isFullscreen parameter, which gets its value from whatever the current value of the FullscreenToggle checkbox in the user interface.
Next up is SetResolution, which puts the resolutions array declared earlier to use:
|
1 2 3 4 5 6 |
public void SetResolution(int resolutionIndex) { Resolution resolution = resolutions[resolutionIndex]; Screen.SetResolution(resolution.width, resolution.height, Screen.fullScreen); } |
Similar to the previous two methods, SetResolution uses a value passed in from the corresponding drop-down. The current resolution is then set using the resolutionIndex parameter, before passing the exact width and height of that resolution into Screen's SetResolution method.
The next two methods, SetTextureQuality and SetAntiAliasing are similar to each other in that they both call the QualitySettings class and change a value within that class. In addition, they both get the quality preset drop-down choice and set it to the value of six, which in this case would be the “custom” option.
|
1 2 3 4 5 6 7 8 9 10 |
public void SetTextureQuality(int textureIndex) { QualitySettings.masterTextureLimit = textureIndex; qualityDropdown.value = 6; } public void SetAntiAliasing(int aaIndex) { QualitySettings.antiAliasing = aaIndex; qualityDropdown.value = 6; } |
Speaking of the quality presets, the last major method for this settings menu is for the quality preset drop-down. This one has a few more steps to it than the others, but the reasons are a little strange. If you changed the quality settings presets when in the Project Settings window, you may need to adjust these values.
|
1 2 3 4 5 6 7 8 9 10 11 12 13 14 15 16 17 18 19 20 21 22 23 24 25 26 27 28 29 30 31 32 33 34 35 |
public void SetQuality(int qualityIndex) { if (qualityIndex != 6) // if the user is not using //any of the presets QualitySettings.SetQualityLevel(qualityIndex); switch (qualityIndex) { case 0: // quality level - very low textureDropdown.value = 3; aaDropdown.value = 0; break; case 1: // quality level - low textureDropdown.value = 2; aaDropdown.value = 0; break; case 2: // quality level - medium textureDropdown.value = 1; aaDropdown.value = 0; break; case 3: // quality level - high textureDropdown.value = 0; aaDropdown.value = 0; break; case 4: // quality level - very high textureDropdown.value = 0; aaDropdown.value = 1; break; case 5: // quality level - ultra textureDropdown.value = 0; aaDropdown.value = 2; break; } qualityDropdown.value = qualityIndex; } |
To start, you first check if the user selected the “custom” option. If they did, then there would typically be no reason to change the settings because the user is indicating they want to tweak the individual values themselves. But otherwise, the game sets the quality level preset to the user’s selection. Next comes a switch statement that changes the values of the texture quality and anti-aliasing drop-down boxes depending on which option the user selected.
Why bother with this? It is, admittedly, a little inelegant. This is done to update the drop-downs to show what the option is currently set to in code after selecting the preset. Without it, the drop-downs would show incorrect information. It would be inaccurate to say anti-aliasing is disabled when the “ultra” option is chosen without changing some information in the editor itself. On top of that, at the very end of the method, the qualityDropdown value is set to qualityIndex. What’s the point when the user already selected this? When changing the values of the texture quality and anti-aliasing drop-downs, the SetAntiAliasing and SetTextureQuality methods wind up being called. Remember that they’re called whenever the value is changed. When this happens, the quality preset menu changes to say “custom” which would not be correct in this instance, so it sets the drop-down to show what the user actually selected. It looks like the code runs the risk of firing over and over again due to all the value changes, but in testing this code, nothing of the sort occurred. As mentioned, though, it is a little “hacky.”
With all these methods created, the user can now change their game’s settings to their liking. Now you just need to permit them to save the settings and exit the game. In addition, the project needs to be able to load the saved settings. Best to start with the two remaining buttons. The exit game button is very simple, as it only has one line of code. Saving, on the other hand, is a little more involved.
|
1 2 3 4 5 6 7 8 9 10 11 12 13 14 15 16 17 18 19 |
public void ExitGame() { Application.Quit(); } public void SaveSettings() { PlayerPrefs.SetInt("QualitySettingPreference", qualityDropdown.value); PlayerPrefs.SetInt("ResolutionPreference", resolutionDropdown.value); PlayerPrefs.SetInt("TextureQualityPreference", textureDropdown.value); PlayerPrefs.SetInt("AntiAliasingPreference", aaDropdown.value); PlayerPrefs.SetInt("FullscreenPreference", Convert.ToInt32(Screen.fullScreen)); PlayerPrefs.SetFloat("VolumePreference", currentVolume); } |
As promised, the Player Preferences are being used to save the user’s preferred settings. Doing so requires creating a key with an attached value. The key can be named anything you like, and the value comes from any variable. In this case, each key is a string with a name that corresponds to its setting, and the current option selected in the various drop-downs are assigned to those keys. The last two keys, FullscreenPreference and VolumePreference, are a little different from the others. Since Screen.fullScreen is a boolean, you need to convert it to an integer. This is because Player Preferences can only save an integer, float, or string. Meanwhile, VolumePreference, a float, is simply being given the currentVolume variable you’ve been hanging on to.
The next method, LoadSettings, is very much like SaveSettings but in reverse. Using Player Preferences, you search for a key with a matching name. If there is one, you get the value of that key and assign it to the drop-down value. And since the game settings change the moment their corresponding menu values change, the graphics and volume settings changes immediately according to the user’s saved preferences. Of course, if there is no saved setting, then a default value is assigned.
|
1 2 3 4 5 6 7 8 9 10 11 12 13 14 15 16 17 18 19 20 21 22 23 24 25 26 27 28 29 30 31 32 33 34 |
public void LoadSettings(int currentResolutionIndex) { if (PlayerPrefs.HasKey("QualitySettingPreference")) qualityDropdown.value = PlayerPrefs.GetInt("QualitySettingPreference"); else qualityDropdown.value = 3; if (PlayerPrefs.HasKey("ResolutionPreference")) resolutionDropdown.value = PlayerPrefs.GetInt("ResolutionPreference"); else resolutionDropdown.value = currentResolutionIndex; if (PlayerPrefs.HasKey("TextureQualityPreference")) textureDropdown.value = PlayerPrefs.GetInt("TextureQualityPreference"); else textureDropdown.value = 0; if (PlayerPrefs.HasKey("AntiAliasingPreference")) aaDropdown.value = PlayerPrefs.GetInt("AntiAliasingPreference"); else aaDropdown.value = 1; if (PlayerPrefs.HasKey("FullscreenPreference")) Screen.fullScreen = Convert.ToBoolean(PlayerPrefs.GetInt("FullscreenPreference")); else Screen.fullScreen = true; if (PlayerPrefs.HasKey("VolumePreference")) volumeSlider.value = PlayerPrefs.GetFloat("VolumePreference"); else volumeSlider.value = PlayerPrefs.GetFloat("VolumePreference"); } |
Finally, it’s time to return to the Start method left alone earlier. All remaining code from here on goes inside this method. As mentioned before, Unity is capable of getting a list of all possible resolution options available to the user and filling in the resolution drop-down with those options. To do that, you first need to clear the placeholder list, create a new list of strings, and set the resolutions array to hold all the possible resolutions available. In addition, you’ll also create a new integer named currentResolutionIndex for use in selecting a resolution that matches the current user’s screen.
|
1 2 3 4 |
resolutionDropdown.ClearOptions(); List<string> options = new List<string>(); resolutions = Screen.resolutions; int currentResolutionIndex = 0; |
In order to find a matching resolution and assign it, you’ll need to loop through the resolutions array and compare the resolution width and height to the user’s screen width and height to find a match. While you’re at it, you’ll also add every resolution option to the options list.
|
1 2 3 4 5 6 7 8 9 |
for (int i = 0; i < resolutions.Length; i++) { string option = resolutions[i].width + " x " + resolutions[i].height; options.Add(option); if (resolutions[i].width == Screen.currentResolution.width && resolutions[i].height == Screen.currentResolution.height) currentResolutionIndex = i; } |
With the list created and a matching resolution found, the only task remaining is to update the resolution drop-down with the new options available and call LoadSettings to load any saved settings. You’ll also pass in currentResolutionIndex into LoadSettings to be used in case a saved resolution preference was not found.
|
1 2 3 |
resolutionDropdown.AddOptions(options); resolutionDropdown.RefreshShownValue(); LoadSettings(currentResolutionIndex); |
Adding this code not only completes the Start method, but also completes the entire script. While many of the individual methods act similarly to each other, the specifics are a little different with each one, thus creating a lot to go through. However, this code won’t do anything without being assigned to the different user interface elements first. Complete that, and the project will be finished. Remember to save your work if you haven’t already!
Final Tasks
To assign the different methods to their respective UI elements, you first must make sure the UI object is expanded to show all child objects in the Hierarchy. This is done by clicking the small arrow next to the UI object. From here, the process for assigning methods to menu elements is largely the same for each element. The following assigns the ResolutionDropdownMenu object to its respective method. First, select the object and scroll down in the Inspector window until you find the On Value Changed event list. Once found, click the small plus button on the lower right corner of the list to add a new event as shown in Figure 3.
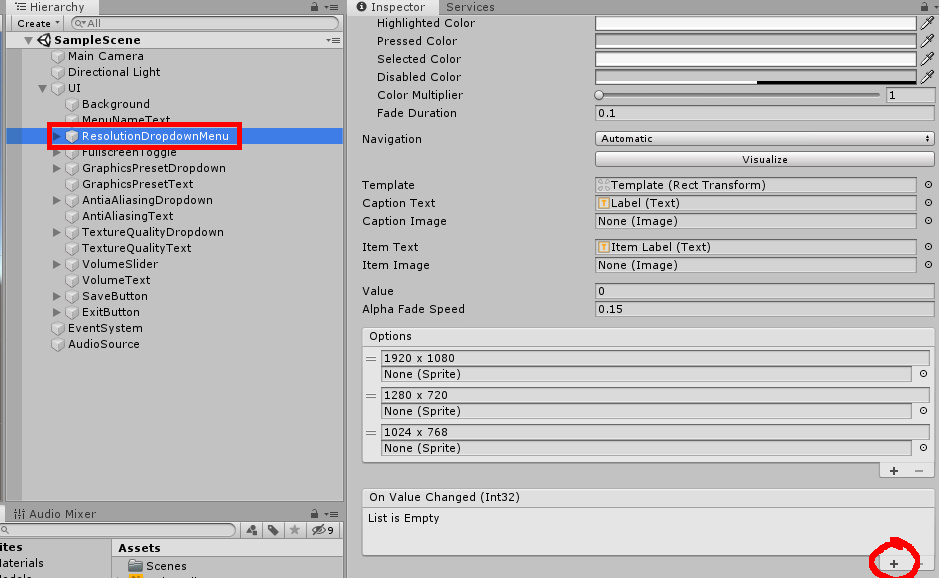
Figure 3: Creating a new On Value Changed event.
Click and drag UI from the Hierarchy into the object field. Doing this allows you to use functions from the SettingsMenu script currently attached to UI. Note that the template should have the SettingsMenu attached in advance. If doing from scratch, you’d simply select UI and drag the SettingsMenu script onto it as shown in Figure 4.
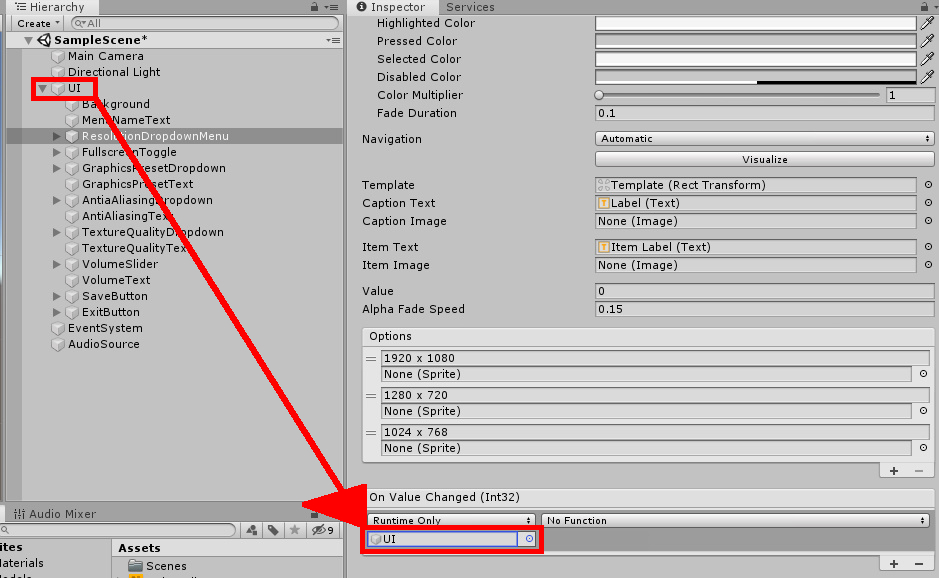
Figure 4: Setting the object field in the event.
Next, click the drop-down that currently says No Function. Navigate to SettingsMenu to show more options. You’ll need to select the SetResolution option, but there are two of them. Selecting the one under Static Parameters would create a new field in the event list where you can enter input for a parameter. The input changes constantly based on the player’s desires, so a better way to handle this is to select SetResolution under Dynamic Int, which is the top part of the function menu as shown in Figure 5.
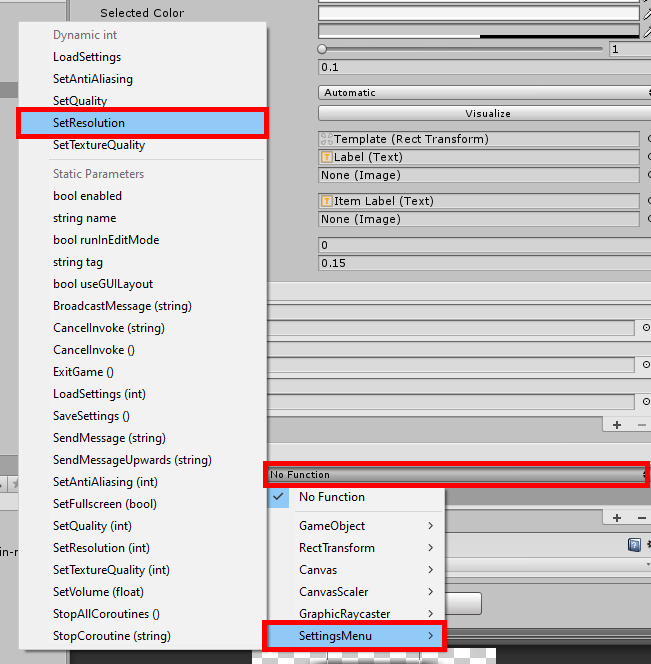
Figure 5: Choosing a function from the Dynamic portion of the submenu.
Everything but the save and exit buttons is set this way. Table 1 below shows all menu elements with their corresponding function. Keep in mind that different elements may show the Dynamic portion of the function list differently. For instance, when setting VolumeSlider’s value change function to SetVolume, you’ll select the function under the Dynamic Float section of the menu.
|
Object Name |
Function |
|
ResolutionDropdownMenu |
SetResolution() |
|
FullscreenToggle |
SetFullscreen() |
|
GraphicsPresetDropdown |
SetQuality() |
|
AntiAliasingDropdown |
SetAntiAliasing() |
|
TextureQualityDropdown |
SetTextureQuality() |
|
VolumeSlider |
SetVolume() |
Table 1: All UI elements and their respective functions
As mentioned, the save and exit buttons are set a little different. Instead of adding an On Value Changed event, you’ll be adding an On Click event. Like before, the object the function is pulled from is the parent UI object. When selecting a function, you’ll select SaveSettings() for the save game button and ExitGame() for the exit button. There is no dynamic portion of the submenu to look through, so you should only see one option for the function. Figure 6 has an example of setting a function to a button.
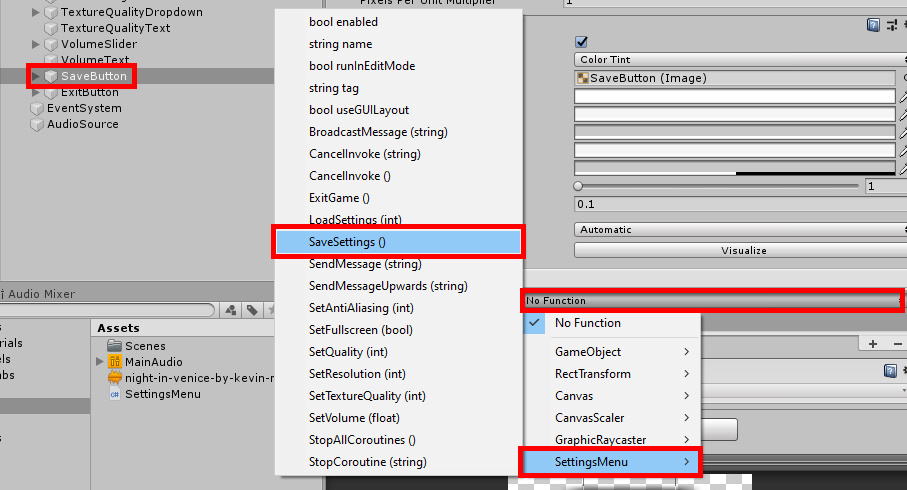
Figure 6: Setting the function for On Click.
The last step before testing is to let SettingsMenu know what all the different drop-downs are as well as the audio mixer and the volume slider. Select the UI object from the Hierarchy and find the SettingsMenu component. Each empty field in the component is given a corresponding object. The Audio Mixer receives MainAudio from the Assets window. All four drop-down fields get a drop-down object (Figure 7), making sure that the given object matches what the field is asking for. For instance, Resolution Dropdown should get the ResolutionDropdownMenu object from the Hierarchy. Finally, the Volume Slider field gets the game object of the same name.
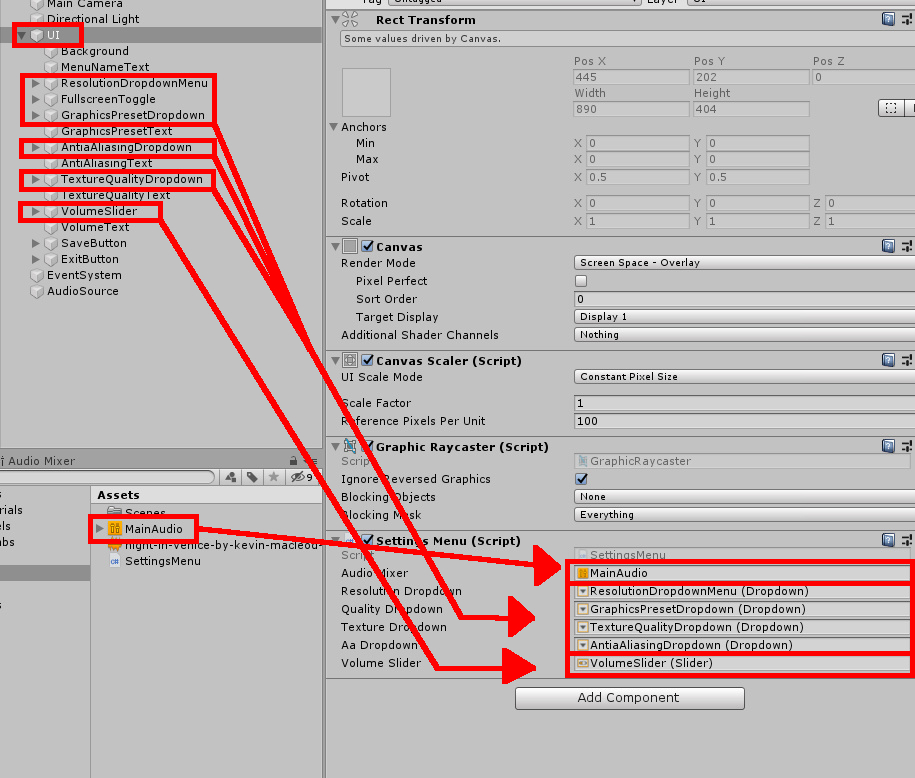
Figure 7: Filling in the empty Settings Menu fields.
While you can test out the project from the editor, you probably won’t be able to see the changes as well, if at all, when selecting different options in the menu. It is recommended you build an exe and play the game from the exe file. To do this, go to File->Build Settings in the top menu. In the window that opens, drag the SampleScene scene from the Scenes folder in the Assets window, into the Scenes In Build box as shown in Figure 8.

Figure 8: Selecting the scene to build.
Once you’ve done that, click the Build button, choose a build location, then run the game once the build is finished. Try messing around with the different settings and watch as the visuals of the game get higher or lower quality depending on your selection. Over to the right, you should be able to see the Sphere look better or worse, depending on your settings. If changing anti-aliasing, the edges may not be as smooth. Meanwhile, changing the texture quality makes the sphere appear more “grainy.” The differences can be subtle, so an easy way to see these effects is to jump from the Ultra graphics preset to the Very Low preset. You can also adjust the master volume for desired sound output. Note: if for any reason the volume slider appears to be doing nothing, double-check the name of the volume parameter in the audio mixer. You can do this by double-clicking MainAudio in the Assets window, clicking the exposed parameters button, and viewing the list of parameters. There should be one named Volume. If there isn’t, right-click the exposed parameter and rename it, or click the master mixer, navigate to the Inspector, right-click Volume, and select Expose.
Of course, you should also try saving your settings with the save button, closing the game, then reopening to see that your preferred settings have indeed been loaded from the start. Figure 9 shows the app in action.
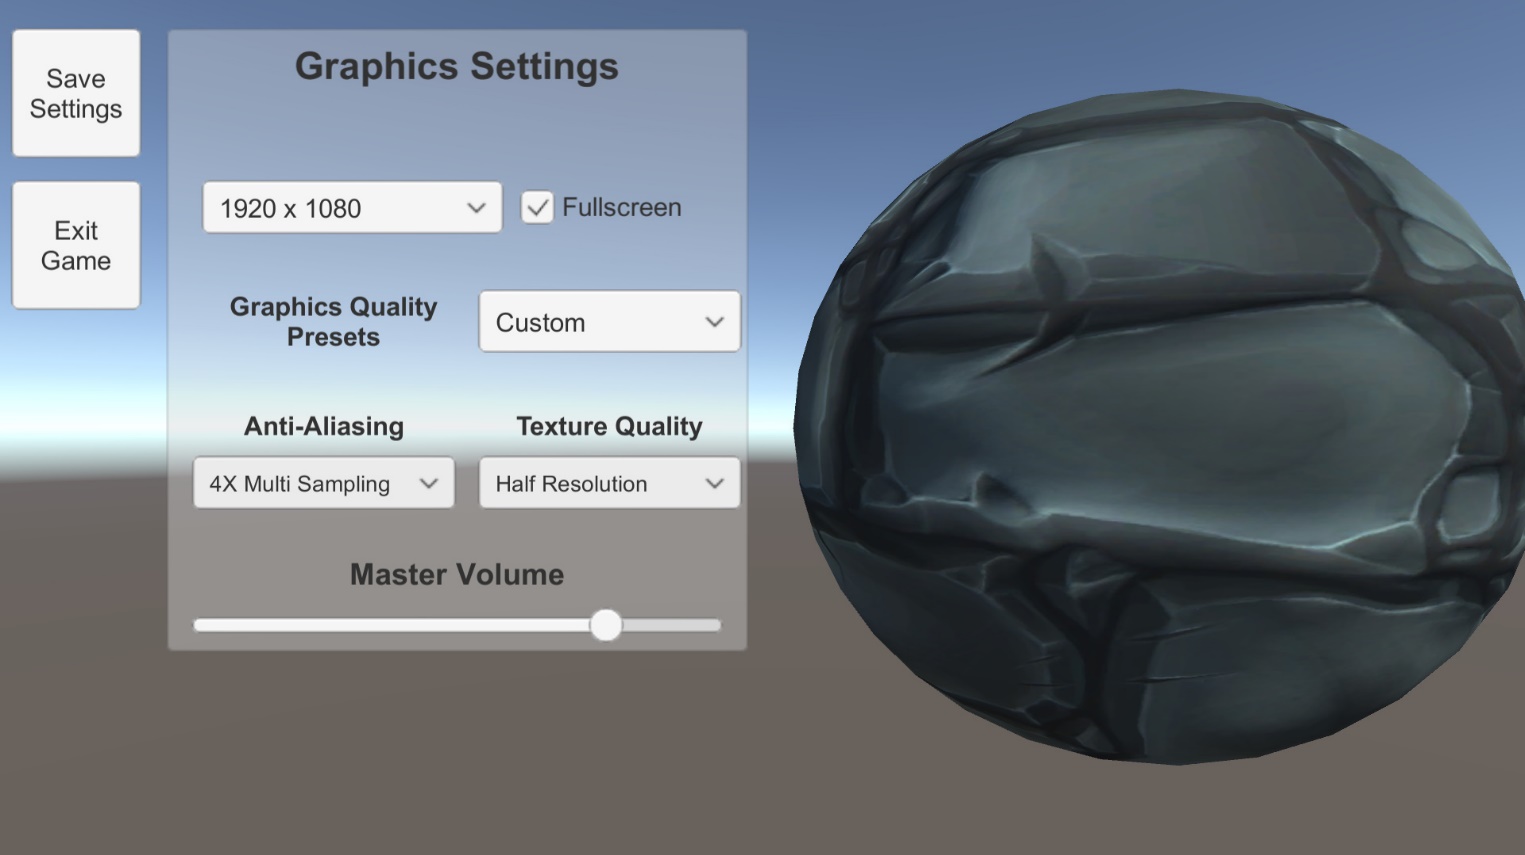
Figure 9: Project in action.
Conclusion
It’s often expected of any game to have some settings that can be tweaked and changed to a user’s liking. The options can be as simple as volume changes or as big as how the game displays its graphics. At first, one may think that creating such a menu for users can be a little challenging, but hopefully, this tutorial should prove that it’s easier than one may think. But why do this in the first place? Imagine a scenario where you have your Unity project you want to put out to the world, but some people don’t have the computer power to run it on normal settings. If you give them the tools to let the game run more smoothly on their machine, even if costs a little prettiness to do it, you give that user a chance to still use your software. In short, creating these options for your users creates the potential to expand your audience.

Load comments