OAuth2 has been a buzz word for a long time. The protocol proves itself when authentication features are demystified, and a common implementation is simply provided for dozens of different languages, platforms, and frameworks.
It was born under the perspective that, just like everything else in the distributed world, authentication and authorization processes also need to be distributed. For OAuth2, specifically, you always get an OAuth client and a server. The server provides tokens and the other protocol mechanisms.
Within the .NET universe, there’s a bunch of libraries that you can use. Options are available out there, but regardless of your choice, it is important to understand first how OAuth 2.0 works.
Because it’s big, a deep understanding is not necessary (unless you work specifically with rough APIs that require a lot of standardization). However, it does not absolve you from the basics.
This tutorial will dive into the implementation of a simple integration between GitHub and ASP.NET Core. It will make use of Octokit (a GitHub API client library for .NET) to retrieve information from your personal GitHub account after authenticating and authorizing a GitHub application (to be created).
What about OAuth2?
OAuth2 is all about clients (also known as consumers) and servers (more specifically, service providers). The client application knows the server endpoints to call for tokens. These tokens that usually have an expiration time are essential to prove that the same client is whom it says it is when it tries to access other sensitive endpoints of the API.
Every time a new request arrives, the request must have the returned token with it; otherwise, the resource is going to be denied.
The service provider, as you may have understood, is the one who generates the tokens (based on other flows, even third-party or proprietary validation flows) as well as authorizes the users.
For this to work out, the service provider needs to port an application. The application is the mechanism that communicates with the user before to ensure that he/she has that proper access (through authentication, in this case, via login in your GitHub account). It usually needs only a name and a redirect URI that the provider will use to redirect after the authentication and authorization processes finish.
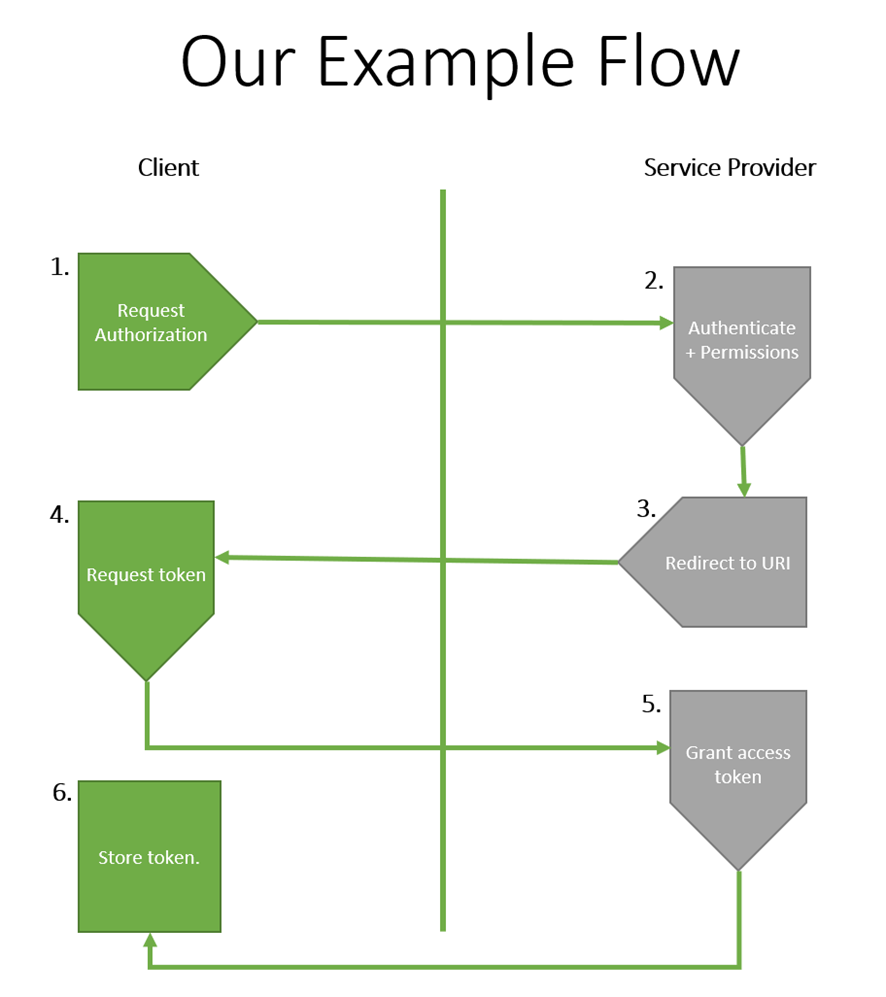
Figure 1. The OAuth2 flow of the GitHub example.
The flow divides into the following steps:
- First, after the GitHub application has been created, you make a request to GitHub service provider for the authorization. For this step to proceed, you’ll need to authenticate to your GitHub account.
- Once authenticated, you’ll be prompted to an authorization page in which you get to authorize the client to have access to your GitHub information through the application you’ve created.
- If authorized, the user will be redirected to the redirect URI informed previously in the moment of the GitHub application creation. GitHub will also place a temporary access token for more urgent operations.
- However, you still need the permanent token, so you’ll need to request it from the server in a subsequent call.
- Now that the permanent access token is granted, you can make the other calls to the GitHub API to get the data you want.
- In this example, you won’t save this token anywhere, just in the application session, because it’s a test. It’s crucial to have your own database structure for production applications, safely constructed to store sensitive information like these integration tokens.
You can read more about how GitHub authorizes OAuth apps here.
The example project
Now that you have a better understanding of how OAuth2 will play its role in GitHub integration, it’s time to move on to the implementation. (You can find the source code here.)
Please make sure you have the latest updated version of Visual Studio (the Community Edition is fine). No extra workloads are needed for this example, except for ASP.NET and web development. Check out this link if you don’t have it yet.
Now, open Visual Studio and go to the Create a new project option. Then, search for ASP.NET Core Web and select the C# implementation option (not Visual Basic), like in Figure 2.
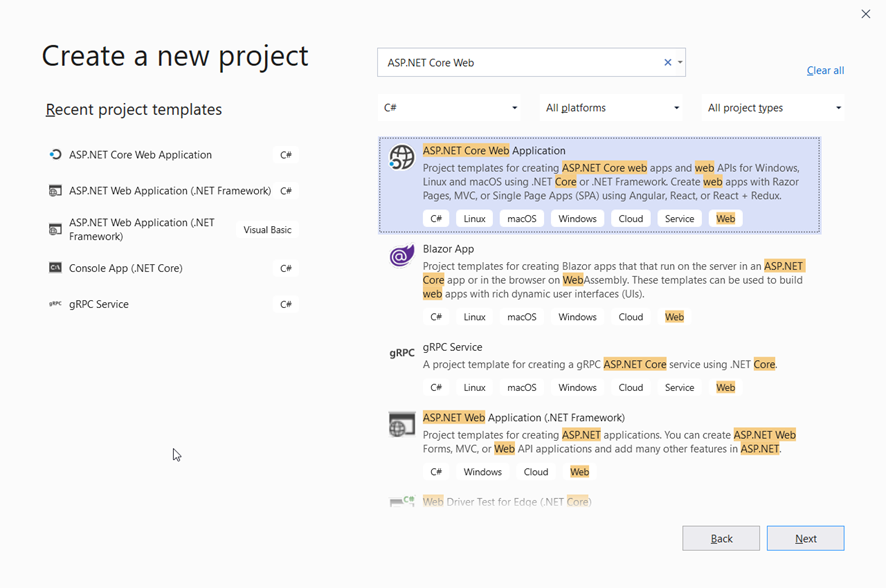
Figure 2. Creating a new ASP.NET Core Web application.
Click Next. Then, type the name of the project like in Figure 3. Select the folder of your preference and click Create.
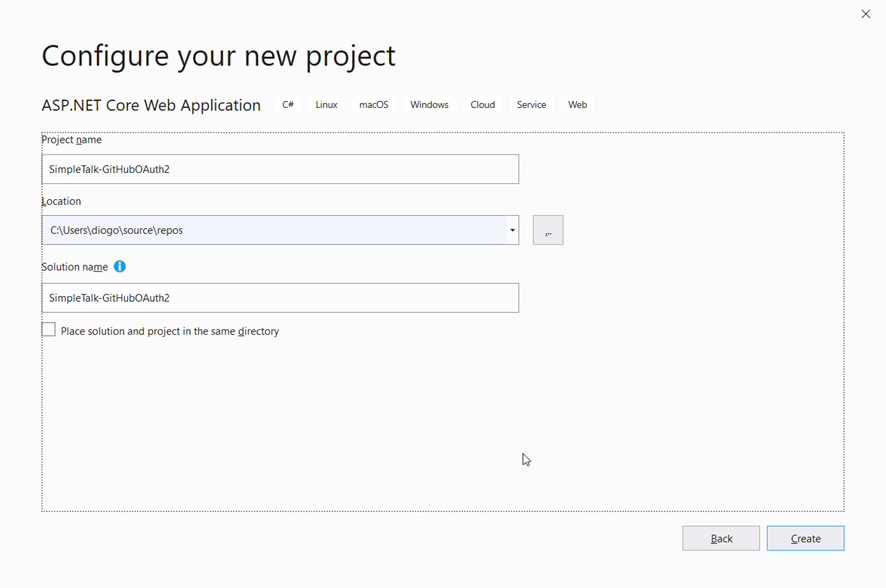
Figure 3. Giving the project a name.
For the next screen, select the option Web Application since you’re going to create a simple web application with Bootstrap and Razor Pages for simplicity. Check that your ASP.NET Core version is 3.1 or higher. The example in this article won’t work in older versions. Make sure to deselect the Configure for HTTPS option too.
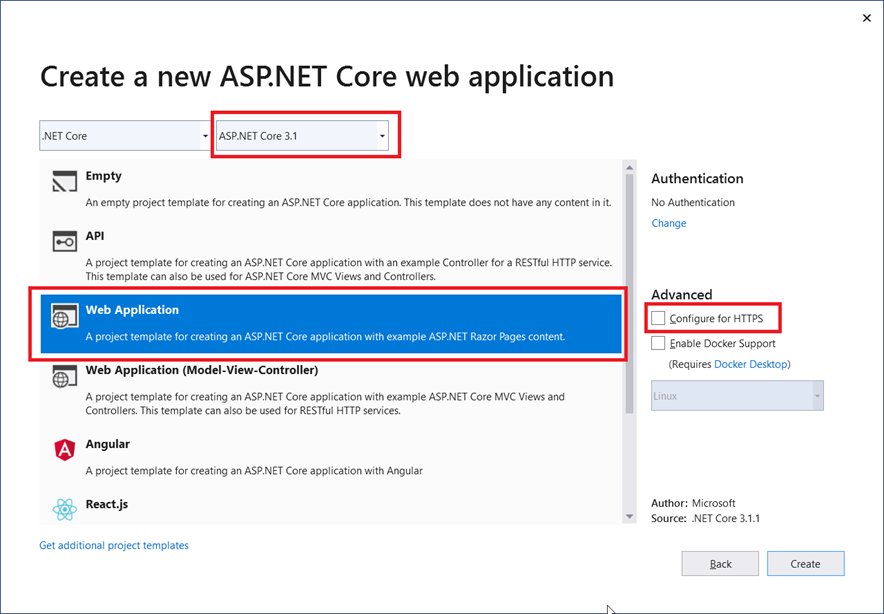
Figure 4. Selecting the project template.
Click Create. Go ahead and look at the generated files. If you’re not familiar with Razor, I suggest that you read this.
Before proceeding with the ASP.NET implementation, you must create the GitHub application. For this, login to your GitHub account and access the Developer Settings page.
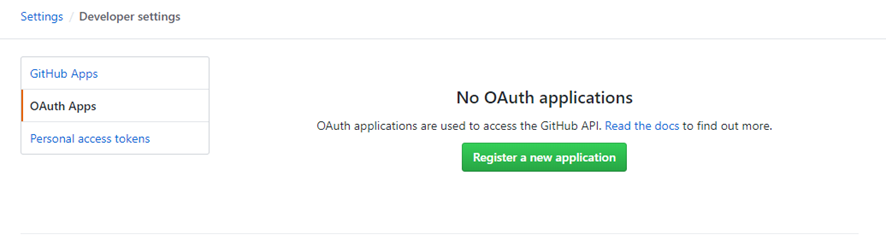
Figure 5. GitHub Developer Settings page.
Then, with the OAuth Apps option selected, click the Register a new application button.
Fill in the fields with the same data shown in Figure 6 below and click Register application.
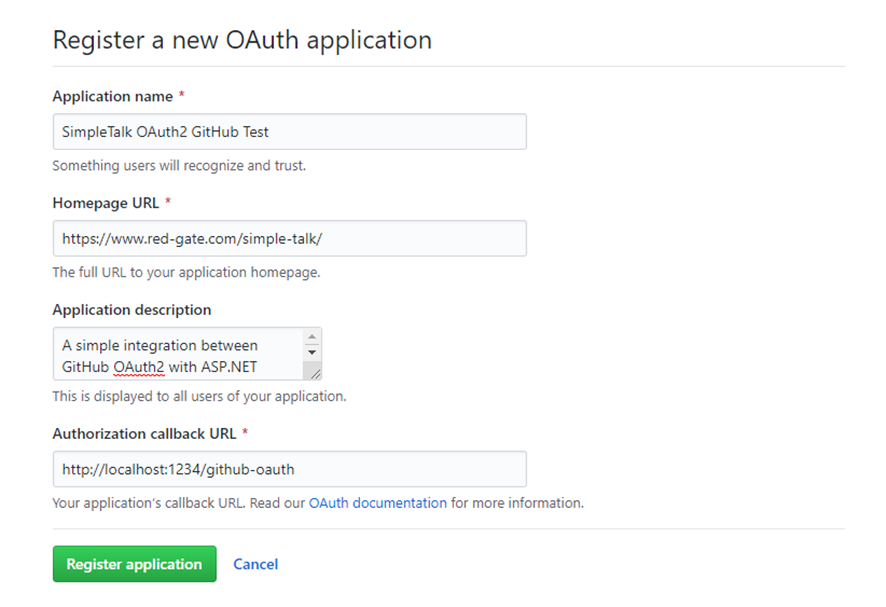
Figure 6. Creating a new GitHub application.
Note that you’re filling the authorization callback URL with the value http://localhost:1234/github-oauth because you’re anticipating the port the ASP application will run in as well as the endpoint you’ll set up in the redirect API to receive the temporary token.
After that, you’ll be redirected to the following page:
Figure 7. GitHub test application in details.
Here, you have the client id and client secret that you’ll use to register the same application in the ASP.NET implementation. You can also customize the application logo, name, website URL and other relevant information at any time on this page.
Now to get back to the project. Before proceeding, you need to have the following NuGet dependencies installed:
|
1 2 |
Install-Package Newtonsoft.Json Install-Package Octokit |
For that, open the Package Manager Console (via Tools > NuGet Package Manager) and run the above commands.
The first necessary change is the port you’ve just defined in the GitHub application. For this, open the launchSettings.json file under the Properties folder and change the applicationUrl under the issSettings property to http://localhost:1234/.
Then, go to the appsettings.json file (in the root folder) and add the following:
|
1 2 3 4 |
"GitHub": { "ClientId": "e0595ce4c2d2ad862220", "ClientSecret": "5acf556eb84a51181858e7425ff67e9142a7af2a" }, |
Make sure to change the values with yours. On to the code.
The most important part of the implementation will take place in the Startup class. Listing 1 shows how it should look like in its entirety.
Listing 1. Startup class code.
|
1 2 3 4 5 6 7 8 9 10 11 12 13 14 15 16 17 18 19 20 21 22 23 24 25 26 27 28 29 30 31 32 33 34 35 36 37 38 39 40 41 42 43 44 45 46 47 48 49 50 51 52 53 54 55 56 57 58 59 60 61 62 63 64 65 66 67 68 69 70 71 72 73 74 75 76 77 78 79 80 81 82 83 84 85 86 87 88 |
using System.Net.Http; using System.Net.Http.Headers; using System.Security.Claims; using System.Text.Json; using Microsoft.AspNetCore.Authentication; using Microsoft.AspNetCore.Authentication.Cookies; using Microsoft.AspNetCore.Authentication.OAuth; using Microsoft.AspNetCore.Builder; using Microsoft.AspNetCore.Hosting; using Microsoft.AspNetCore.Http; using Microsoft.Extensions.Configuration; using Microsoft.Extensions.DependencyInjection; using Microsoft.Extensions.Hosting; using Newtonsoft.Json.Linq; namespace SimpleTalk_GitHubOAuth2 { public class Startup { public Startup(IConfiguration configuration) { Configuration = configuration; } public IConfiguration Configuration { get; } // This method gets called by the runtime. Use this method to add services to the container. public void ConfigureServices(IServiceCollection services) { services.AddRazorPages(); services.AddAuthentication(options => { options.DefaultAuthenticateScheme = CookieAuthenticationDefaults.AuthenticationScheme; options.DefaultSignInScheme = CookieAuthenticationDefaults.AuthenticationScheme; options.DefaultChallengeScheme = "GitHub"; }) .AddCookie() .AddOAuth("GitHub", options => { options.ClientId = Configuration["GitHub:ClientId"]; options.ClientSecret = Configuration["GitHub:ClientSecret"]; options.CallbackPath = new PathString("/github-oauth"); options.AuthorizationEndpoint = "https://github.com/login/oauth/authorize"; options.TokenEndpoint = "https://github.com/login/oauth/access_token"; options.UserInformationEndpoint = "https://api.github.com/user"; options.SaveTokens = true; options.ClaimActions.MapJsonKey(ClaimTypes.NameIdentifier, "id"); options.ClaimActions.MapJsonKey(ClaimTypes.Name, "name"); options.ClaimActions.MapJsonKey("urn:github:login", "login"); options.ClaimActions.MapJsonKey("urn:github:url", "html_url"); options.ClaimActions.MapJsonKey("urn:github:avatar", "avatar_url"); options.Events = new OAuthEvents { OnCreatingTicket = async context => { var request = new HttpRequestMessage(HttpMethod.Get, context.Options.UserInformationEndpoint); request.Headers.Accept.Add(new MediaTypeWithQualityHeaderValue("application/json")); request.Headers.Authorization = new AuthenticationHeaderValue("Bearer", context.AccessToken); var response = await context.Backchannel.SendAsync(request, HttpCompletionOption.ResponseHeadersRead, context.HttpContext.RequestAborted); response.EnsureSuccessStatusCode(); var json = JsonDocument.Parse(await response.Content.ReadAsStringAsync()); context.RunClaimActions(json.RootElement); } }; }); } // This method gets called by the runtime. Use this method to configure the HTTP request pipeline. public void Configure(IApplicationBuilder app, IWebHostEnvironment env) { if (env.IsDevelopment()) { app.UseDeveloperExceptionPage(); } else { app.UseExceptionHandler("/Error"); } app.UseStaticFiles(); app.UseRouting(); app.UseAuthentication(); app.UseEndpoints(endpoints => { endpoints.MapControllers(); endpoints.MapRazorPages(); endpoints.MapControllerRoute( name: "default", pattern: "{controller}/{action=Index}/{id?}"); }); } } } |
Because it is a bit long, it’s broken up in sections so you can understand it better. The implementation will make use of the paradigms and patterns adopted by David McCullough on his excellent article about the demystifying of ASP.NET Auth System. Please, give it a read before proceeding since it explains each part of the ASP.NET Auth system like Identities, claims, verbs, handlers and more in detail.
- The method
ConfigureServices()received most of the changes. Here, you’re setting up theAddAuthentication()method to override the defaults and make GitHub scheme the new default one. - The authentication handler will be cookies. When you open the index page for the first time, depending on the ASP.NET Core version you’re using, it’s common to see the message that the website is making use of cookies. In other words, every time the full authentication process with GitHub finishes, the result is going to be stored in a cookie (see the further call to
AddCookie()method). - Then, you provide the implementation for the OAuth scheme GitHub. Note that it has the same name you gave to the default scheme before. They need to be the same. Regarding the implementation of this OAuth provider, you’ve seen already that the client id, secret and redirect path must be supplied. They come from the settings in the json file.
- Next, provide the endpoints where the provider will search for the auth, token and user information.
- The option
SaveTokensis important because it guarantees that the tokens will be stored after each request finishes. - The auth handler also needs the claim actions to understand which information must be injected. Those claims are the only ones explored here, but feel free to test more.
- Finally, in the
Configure()method, you need to remove the use of authorization (not needed) and add the use of authentication, along with theUseEndpoints()to map controllers and Razor pages, as well as the routes.
As you can see, this example makes use of the famous pattern for controllers and actions: {controller}/{action=Index}/{id?}.
Now create the first controller so you can see more clearly how this pattern applies. For this, create a new folder called Controllers in the root of the project. Then, create a new controller by selecting the Add > Controller > MVC Controller – Empty option, giving it a name (AuthController) and clicking Add. Then, change its content to the following:
|
1 2 3 4 5 6 7 8 9 10 11 12 13 14 |
using Microsoft.AspNetCore.Authentication; using Microsoft.AspNetCore.Mvc; namespace SimpleTalk_GitHubOAuth2.Controllers { [Route("[controller]/[action]")] public class AuthController : Controller { [HttpGet] public IActionResult Login(string returnUrl = "/") { return Challenge(new AuthenticationProperties() { RedirectUri = returnUrl }); } } } |
The controller reads the exact metadata information about the class and HTTP method, respectively. That means the names here are important, otherwise the Razor pages won’t find the right route to it.
Next, change the Index.cshtml content, which is located under the Pages folder. Take a look at Listing 2 for the new HTML code to place there.
Listing 2. Index.cshtml code.
|
1 2 3 4 5 6 7 8 9 10 11 12 13 14 15 16 17 18 19 20 21 22 23 24 25 26 27 28 29 30 31 32 33 34 35 36 37 38 39 40 41 42 43 44 45 46 47 48 49 50 51 52 53 54 55 56 57 58 59 60 61 62 63 64 65 66 67 68 69 70 71 72 73 74 75 76 77 78 79 80 81 82 83 84 85 86 87 88 89 90 91 92 |
@page @model IndexModel @{ ViewData["Title"] = "Home page"; } <div class="row"> @if (!User.Identity.IsAuthenticated) { <a <strong>asp-action</strong>="Login" <strong>asp-controller</strong>="Auth" class="btn btn-outline-primary">Log In with GitHub</a> } else { <div id="accordion" class="container-fluid"> <div class="card"> <div class="card-header" id="headingOne"> <h5 class="mb-0"> <button class="btn btn-link" data-toggle="collapse" data-target="#collapse-repos" aria-expanded="true" aria-controls="collapse-repos"> Repos </button> </h5> </div> <div id="collapse-repos" class="collapse show" aria-labelledby="headingOne" data-parent="#accordion"> <div class="card-body"> <ul> @foreach (var repo in Model.Repositories) { <li><a href="@repo.HtmlUrl">@repo.FullName</a></li> } </ul> </div> </div> </div> <div class="card"> <div class="card-header" id="headingTwo"> <h5 class="mb-0"> <button class="btn btn-link collapsed" data-toggle="collapse" data-target="#collapse-starred" aria-expanded="false" aria-controls="collapse-starred"> Starred Repositories </button> </h5> </div> <div id="collapse-starred" class="collapse" aria-labelledby="headingTwo" data-parent="#accordion"> <div class="card-body"> <ul> @foreach (var repo in Model.StarredRepos) { <li><a href="@repo.HtmlUrl">@repo.FullName</a></li> } </ul> </div> </div> </div> <div class="card"> <div class="card-header" id="headingThree"> <h5 class="mb-0"> <button class="btn btn-link collapsed" data-toggle="collapse" data-target="#collapse-followers" aria-expanded="false" aria-controls="collapse-followers"> Followers </button> </h5> </div> <div id="collapse-followers" class="collapse" aria-labelledby="headingThree" data-parent="#accordion"> <div class="card-body"> <ul> @foreach (var follower in Model.Followers) { <li><a href="@follower.HtmlUrl">@follower.Login</a></li> } </ul> </div> </div> </div> <div class="card"> <div class="card-header" id="headingFour"> <h5 class="mb-0"> <button class="btn btn-link collapsed" data-toggle="collapse" data-target="#collapse-following" aria-expanded="false" aria-controls="collapse-following"> Following </button> </h5> </div> <div id="collapse-following" class="collapse" aria-labelledby="headingFour" data-parent="#accordion"> <div class="card-body"> <ul> @foreach (var follower in Model.Followers) { <li><a href="@follower.HtmlUrl">@follower.Login</a></li> } </ul> </div> </div> </div> </div> } </div> |
This example uses the index model because it’s already created, but feel free to add new models by your preference. Here, it’s using a Bootstrap accordion to display several data about the logged in GitHub account.
If the user is not authenticated, it shows the login button. Otherwise, it displays the listing.
You’ll basically list the repositories, the followers and following users and starred repositories. All of them in a <ul> HTML list as bullets. All the values, in turn, come from the model itself, i.e., from the Index.cshtml.cs class. Open it and replace its content with the code in Listing 3.
Listing 3. Index.cshtml.cs code.
|
1 2 3 4 5 6 7 8 9 10 11 12 13 14 15 16 17 18 19 20 21 22 23 24 25 26 27 28 29 |
using System.Collections.Generic; using System.Security.Claims; using System.Threading.Tasks; using Microsoft.AspNetCore.Authentication; using Microsoft.AspNetCore.Mvc.RazorPages; using Octokit; using Octokit.Internal; namespace SimpleTalk_GitHubOAuth2.Pages { public class IndexModel : PageModel { public IReadOnlyList<Repository> Repositories { get; set; } public IReadOnlyList<Repository> StarredRepos { get; set; } public IReadOnlyList<User> Followers { get; set; } public IReadOnlyList<User> Following { get; set; } public async Task OnGetAsync() { if (User.Identity.IsAuthenticated) { string accessToken = await HttpContext.GetTokenAsync("access_token"); var github = new GitHubClient(new ProductHeaderValue("AspNetCoreGitHubAuth"), new InMemoryCredentialStore(new Credentials(accessToken))); Repositories = await github.Repository.GetAllForCurrent(); StarredRepos = await github.Activity.Starring.GetAllForCurrent(); Followers = await github.User.Followers.GetAllForCurrent(); Following = await github.User.Followers.GetAllFollowingForCurrent(); } } } } |
Here is the model data to display the information in the cshtml page. The GitHubClient class receives the generated access token as parameter to create the credential store and, in turn, returns the github object, which you’re using right below to access the GitHub account info.
All the operations are async; that’s why you need to await them to finish. Go ahead and check for the other objects and methods available. You’ll see that there are options for viewing your pull requests, comments and likes, and much more. This is the power of Octokit.
Now to test it. For this, run the application and, once it’s finished, it opens the following browser page:
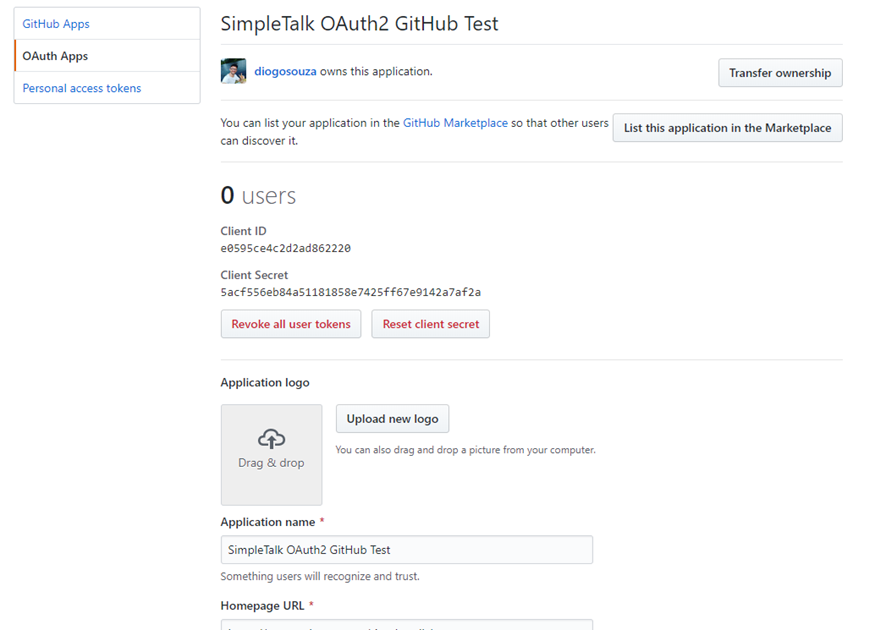
Figure 8. Index page.
When you click the Login button, you’ll be redirected to the GitHub official authorization web page, like in Figure 9. Then, click the Authorize {user} button and you’ll be redirected to the application again.
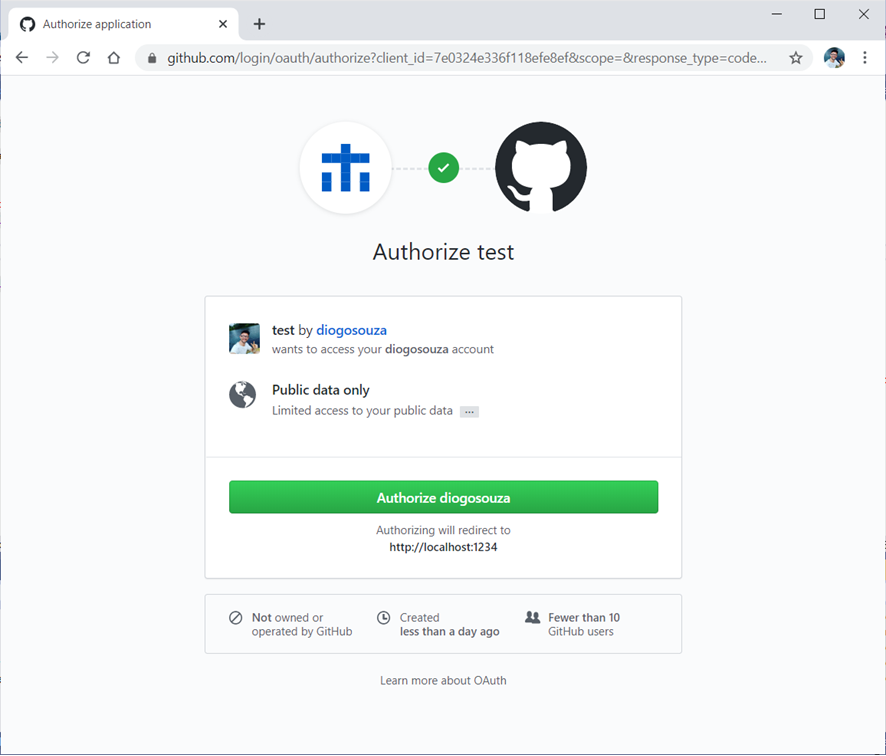
Figure 9. Authorizing the user in GitHub.
Figure 10 shows how the redirected page will look. You can switch from one accordion tab to another to check the list of data along with the respective URL links to each one.
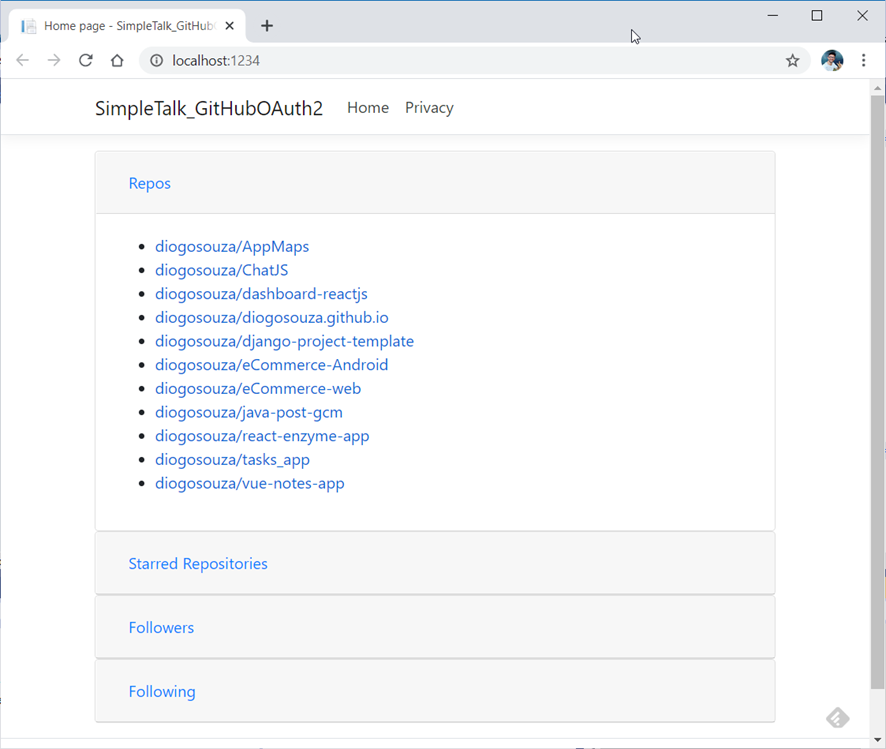
Figure 10. List of repositories, followers, following and starred repos
Conclusion
That’s it. Simple, isn’t it? Be aware that the configurations change a bit depending on the version of ASP.NET Core you’re using. This article uses version 3.1. For older versions of this integration, you’ll need different Razor config settings. When it comes to integrating it with ASP.NET MVC, you’ll need a different setup for the Startup class as well, so be careful when playing with them.
I’d strongly recommend that you read the official Octokit and GitHub OAuth documentation. Octokit, in particular , comes in many flavors: JavaScript, Ruby, Java, Python, etc. It’s a mature and well-supported library. It’s also very useful, especially if you’re connecting many applications (clients and servers) from different languages.

Load comments