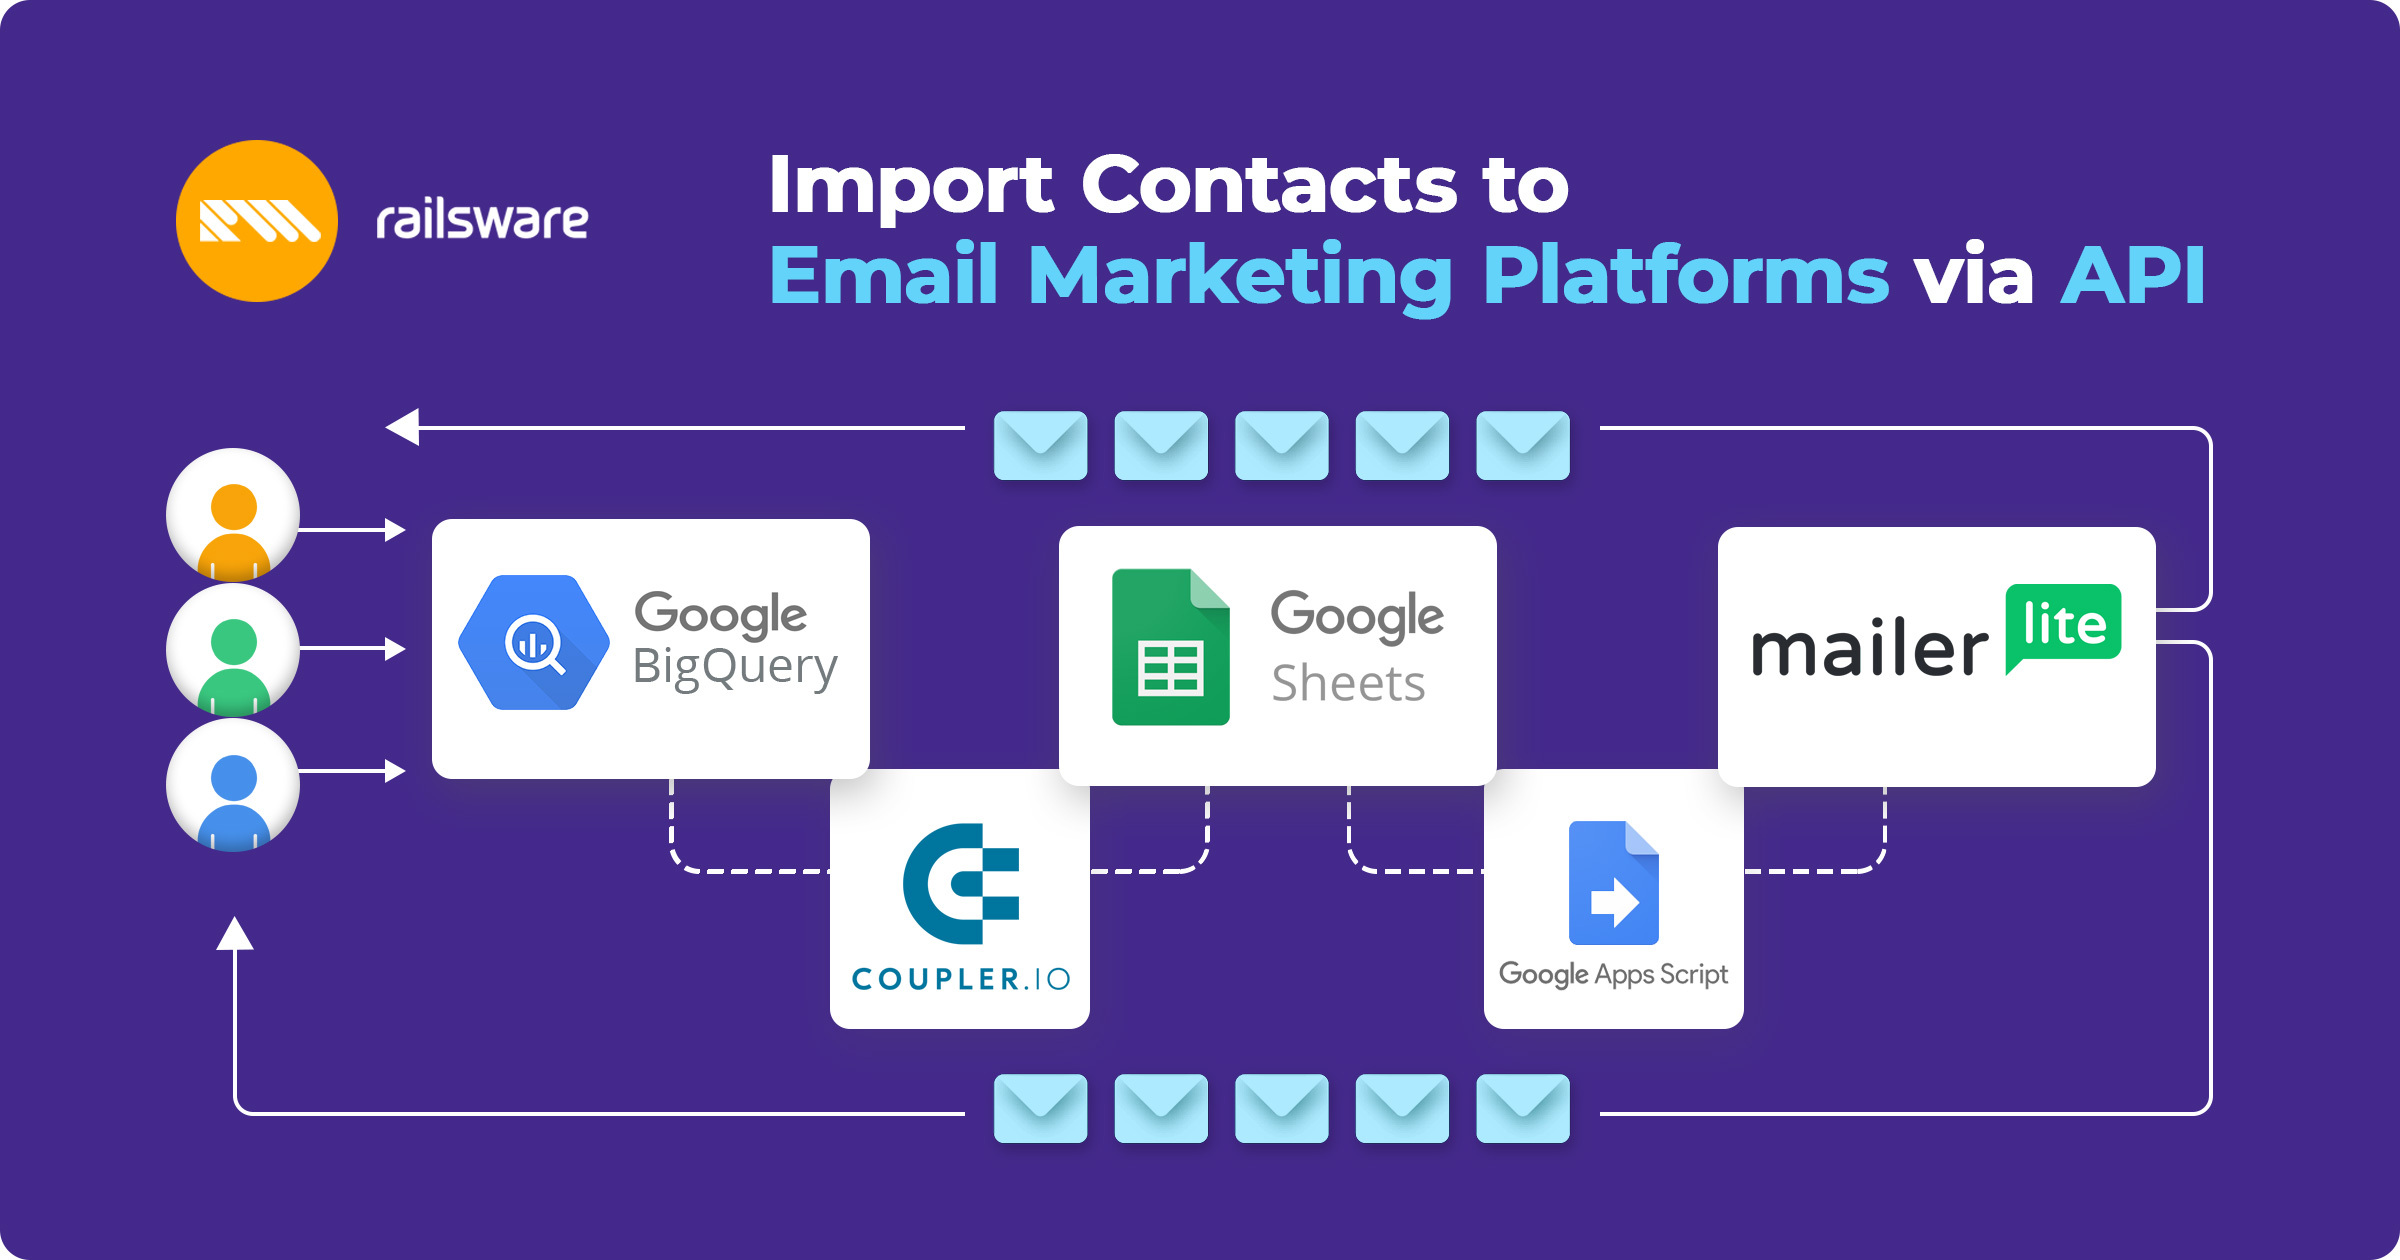
In this article, we describe how to automate importing users data from BigQuery to MailerLite (an email sending service) via API using Сoupler.io, GSheets and Apps Script. This approach will help you save time on collecting users’ data from various sources in a single email audience.
Step-by-step plan for data import setup
- Export data from BigQuery to GSheets using Coupler.io
- Set up data structure in GSheets
- Set up data structure in MailerLite to match the GSheets structure
- Export data from GSheets to MailerLite:
- Get data from spreadsheet
- Connect and send data to external API (MailerLite)
- Log API response data to GSheets (to collect time logs)
- Automate your Google Apps Script using time triggers.
- Export data from BigQuery to GSheets using Coupler.io
Export data from BigQuery to GSheets using Coupler.io
Our product gathers users’ data in BigQuery. We import data from BigQuery to GSheets using Сoupler.io. It takes only a few minutes to set it up. You can select how often you want to import data from BigQuery, and Coupler.io will do it automatically without reducing GSheets efficiency. To practice, download a data set with fake users’ data. If you want to move data in a reverse direction – integrate with BigQuery – Coupler.io can do this as well!

To export data directly from BigQuery to MailerLite, you may need help from a developer and a server. However, it is possible to build an automation yourself using GSheets as a mediator and Apps Script with triggers based on time. This way, the import will run automatically without a manual trigger.
Spreadsheet setup (initial source)
Our spreadsheet with data exported from BigQuery contains two tabs:
- “Users” – here we import data from BigQuery using Coupler.io: name, profession, email, and a trigger to differentiate between email campaigns (1- for free users, 0 – for paid users).

- “Logs” – here we will store the history of imports to double check when the data was sent and to monitor whether the automation worked. Prepare the needed headers in advance using your destination structure (in our case, MailerLite standard API responses).

We read the MailerLite documentation and we see that the API will respond with the “imported”, “unchanged”, “updated” and “errors” logs. So we use the same structure in the logs headers.
- “datetime” – custom, to know when each import has happened
- “imported” – how many new users have been added
- “unchanged” – how many of the same users appeared in this import
- “updated” – how many users’ data has changed (e.g. change of surname)
- “errors”
- “errors log” – a detailed description of errors that happened during this import
MailerLite setup (destination source)
In MailerLite, we want to automatically shape audiences for email campaigns and use different variables to customize emails (e.g. mentioning the user’s name in the email subject). The structure of the data in our initial source (i.e. spreadsheet) should match the structure in the destination source. So we first set up custom fields in MailerLite to have “full name”, “job”, and “trigger” fields. We also need to create a group. Go to “Groups” -> “Create group”. Add a group name, and it’s ready to go.
To connect our spreadsheet to the MailerLite API, we need to get a token. Each app you use has its own token. So make sure to find it. In our case, we use Integrations -> API use -> get the token (“API key”) and “Subscribers group ID” to import our data to the correct group.
Save both parameters in your notes – we will need those in the Apps Script code.
Google Apps Script
Getting back to GSheets, open Tools -> Script Editor. Each script is stored as a separate project in the “My Projects” folder on the Google Apps Script Dashboard. Each of your Apps Script projects is linked to a specific spreadsheet.
First, add the name of the project. Let’s call it “Export data to MailerLite”. In the script editor window, we have the next categories:
- function
- var – to declare variable (can be a number, text, true/false), variable name is custom for you to read and use it further in the script
- // comment
- return – what output we want to see
- const – to keep the values unchanged
We start from a standard naming “myFunction()”, which is customizable. You should change it to easily differentiate between functions you’ve created in this spreadsheet. In the future, you can only use this function in this spreadsheet. Just type “=myFunction()” and it will work like any other formula in GSheets. Let’s call this one “postUsersData”.

You can transfer additional parameters in parentheses. For example, we have 2 accounts in MailerLite: for Coupler.io and for Mailtrap.io (both Railsware products). We want to transfer Coupler.io users’ data to one MailerLite account, and Mailtrap.io users’ data to a different one. In this case, we will add a token as a parameter for data transfer. So, next time we want to run an import, we will type “=postUsersData(_exact-token-to-import-data_)”. This provides us with additional flexibility and better structure for data imports. We won’t be using this parameter in this case for the script to run automatically. If you want to activate the script manually, you can use various parameters.
Our key functionality should be described in { }. For the function to return a specific result based on the analysis, use the return keyword. The function will still run even without it. However, you won’t get any presented result that can be used later.
The Apps Script works based on JavaScript. Unfortunately, Google does not provide the description of the JS syntax for Apps Script; they only describe the Google Sheets functions. But we have found some useful JavaScript materials for you.
// Perform
  const data = getDataFromSpreadsheet()
  const response = postDataToMailerlite(data)
  logAction(response)
According to our action plan, we need to build 3 functions:
- getDataFromSpreadsheet()
- postDatatoMailerLite()
- logAction()
We refer to the previous function outcomes by using them as a parameter. Except for these three, we will also build supportive functions getSheetById() and makePayLoad() – we will explain why a bit later. Place the supportive functions after the main functions. If you want to refer to a specific function in your script, the order does not matter much. We can place the functions in a more readable order, but we only need to name those after all the functions that have been built.
Get data from spreadsheet

Build a function getDataFromSpreadsheet(). Add a GSheets “Users” tab as a variable. Click on the tab and get the ID from the link (it differs for each tab). Add a comment that these sheets IDs can be changed if needed.
Add another variable usersSheet pulled by ID. This should be done with the help of getSheetById() supportive function. In Google Apps Script, you cannot state the needed sheet by ID, only by its name. The problem is that anyone can change the name of your tab, so this is not a reliable parameter. Also, the code may not contain all the needed functions, so you have to create those yourself.
function getDataFromSpreadsheet() {
    var usersSheetId = 11111111 // // Put your SHEET ID here
    var usersSheet = getSheetById()
To address this issue, we add a supportive function getSheetById(). We found a ready-to-go solution for our task on StackOverFlow. Do not hesitate to google ready-to-go solutions; there is no need to spend too much time on figuring those out yourself.
function getSheetById(id) {
    // Get sheet by ID
    return SpreadsheetApp.getActive().getSheets().filter(
      function(s) {return s.getSheetId() === id;})[0];
  }
We add a parameter that needs to be added manually – getSheetById(id). The function takes the sheet ID and returns the correct spreadsheet based on this. Add a comment // Get sheet by ID to remind yourself what this function does.
- return – for the function to return the needed spreadsheet by its ID.
- SpreadsheetApp – for function to return the spreadsheet results (not GDocs or Google Slides results, as Google Apps Script is connected to many GSuite products).
- getActive() is how the script connects to the active spreadsheet. Scripts can exist even without being connected to a specific spreadsheet.
- getSheets() pulls all of the sheets you have here.
- Use filter() that contains a mini function that returns the sheet ID. You match this returned sheet ID with the (id) stated as a parameter in the very beginning on the higher-level function. We use [0] to return the first element of the function.
Now let’s try using it in our main function. Add a new variable usersSheet equal to the newly created function getSheetById with usersSheetId parameter. Add a comment to remind yourself that this one contains users data from BigQuery.
Add one more variable values. This function pulls the sheet object, and we need to get it structured with columns and rows. We need to pull the data in the next sequence: get the needed sheet (usersSheet), getDataRange (as a set of coordinates with data, to exclude empty rows and columns), and getValues.
function getDataFromSpreadsheet() {
    var usersSheetId = 11111111 // // Put your SHEET ID here
    var usersSheet = getSheetById(usersSheetId)
    // Users data from BigQuery
    var values = usersSheet.getDataRange().getValues()
In our case, each row is a single record. We want to shape a JSON for each record and send it to API. For this we will create a makePayLoad() supportive function. As parameters, we state the headers of columns and values (users’ data). makePayLoad() is needed to shape a single record of users’ information into a single JSON block for MailerLite to read it. This is a MailerLite specific format. For other apps, use their API documentation. The function receives one record as an input. We need to identify where in this record (row) the specific value is (for example, email). For this, we pull the headers using the indexOf function. It returns the order number of the needed column using the headers. Based on this order number, we pull the needed values for every single record.
Now we use the map function to extrapolate the makePayLoad() function to each record in the data set.
function postUsersData() {
  function getDataFromSpreadsheet() {
    var usersSheetId = 11111111 // // Put your SHEET ID here
    var usersSheet = getSheetById(usersSheetId)
    // Users data from BigQuery
    var values = usersSheet.getDataRange().getValues()

    return values.map(function(value) {
      return makePayload(values[0], value)
    })
  }
  function getSheetById(id) {
    // Get sheet by ID
    return SpreadsheetApp.getActive().getSheets().filter(
      function(s) {return s.getSheetId() === id;})[0];
  }
  function makePayload(headers, value) {
    // Make single user data JSON from BigQuery data based on row number
    return {
      'email': value[headers.indexOf('email')],
      'fields': {
        'full_name': value[headers.indexOf('name')],
        'job': value[headers.indexOf('job')],
        'trigger': value[headers.indexOf('trigger')]
      }
    }
  }
  // Perform
  const data = getDataFromSpreadsheet()
  const response = postDataToMailerlite(data)
  logAction(response)
}
Connect and send data to external API
Our next function is postDataToMailerLite(). We need to set up parameters for our API.
Our variables here are:
- url – the link to the MailerLite API
- token – the one we’ve saved in the previous step
- groupID – the one we’ve saved in the previous step
- groupUrl – the final URL to import users’ data
Read the MailerLite documentation as an example of how the API group URL should be built. The structure will be different for each new application, so make sure to read the API reference before using it. For MailerLite, the groupUrl should have this structure: = url + groupId + ‘/subscribers/import/’ (to add text, use single quotes). A semicolon is not necessary for this script to work; however, this is a part of code culture. Also, if the text shifts, the function will still work, as the tool will identify each part as a different piece of code.
To send the data to MailerLite, we need to shape JSON blocks for API transfer. We go to the MailerLite documentation again to see the requirements for the API connection parameters and add those to our script. Use JSON.stringify function to state that this is a JSON format. Not all APIs can recognize the JavaScript objects as a JSON directly.
Google Apps Script has a special function to get data from a URL. In our case, we need to use the groupUrl variable as the destination URL address. Add a response variable equal to UrlFetchApp.fetch function that connects to the stated URL using optional parameters.
Once we’ve sent the data, we should receive a response from the API server. We need to unpack this response with the help of the getContentText() function. The final step is to convert text data to JSON format via JSON.parse() to use the JSON object properties later.
function postDataToMailerlite(payload) {
    // API data
    var url = 'https://api.mailerlite.com/api/v2/groups/'
    var token = 'xxxxxxxxxxxxxxx' // Put your TOKEN here
    var groupId = 11111111 // // Put your GROUP ID here
    var groupUrl = url + groupId + '/subscribers/import'
    var params = {
      'method': 'POST',
      'muteHttpExceptions': true,
      'headers': {
        'Authorization': 'apikey ' + token,
        'Content-Type': 'application/json'
      },
      'payload': JSON.stringify({'subscribers': payload, 'resubscribe': false, 'autoresponders': true})
    };
    var response = UrlFetchApp.fetch(groupUrl, params)
    return JSON.parse(response.getContentText())
  }
Collect time logs via export of script data to GSheets
As you remember, we want to collect the import logs in a separate tab in GSheets. Let’s create the logAction() function. We need to get the “Logs” sheet by its ID. Create a new variable logsSheetId and get the needed value from the tab link. Add a comment that it can be changed if needed.
Add another variable logsSheet to easily refer to the needed sheet next time. Use our getSheetById() supportive function.The next variable logsSheetsValues reads the logs sheets’ data by using the same sequence we used earlier: logsSheet.getDataRange().getValues()
To unpack the API server response, let’s create a payload variable. We state the headers we have in the logs sheet in single quotes and state the needed data for each in this format:
- ‘datetime’: Date() – this is a standard function in Apps Script
- for other columns (‘imported’, ‘unchanged’, ‘updated’, ‘errors’) we use json.imported.length to count the number of records per category
- for ‘errors log’ we use json.errors to get a description of those
Payload acts as a dictionary consisting of values we’ve received. The headers stated act as the keys. We use the set of functions Object.keys(payload).foreach to create a loop. The key target is to write each value from the dictionary into the right cell in the last row.
Use getRange() to set the coordinates:
- logsSheetValues.length +1 – to add a new record to the last row
- logsSheetValues[0].indexOf(key)+1 – to place values in the needed columns
- setValue() – to place the needed value into the needed cell
We added a Logger.log() function to see the status (‘Done’) and the current date. Don’t forget to save!
function logAction(json) {
    var logsSheetId = 11111111 // // Put your SHEET ID here
    var logsSheet = getSheetById(logsSheetId)
    var logsSheetValues = logsSheet.getDataRange().getValues()
    var payload = {
      'datetime': Date(),
      'imported': json.imported.length,
      'unchanged': json.unchanged.length,
      'updated': json.updated.length,
      'errors': json.errors.length,
      'errors log': json.errors
    }
    Object.keys(payload).forEach(function(key) {
       logsSheet.getRange(logsSheetValues.length + 1, logsSheetValues[0].indexOf(key) + 1).setValue(payload[key])
    })
    Logger.log('Done ' + Date())
  }
Here is how the final script should look like:
function postUsersData() {
  function getDataFromSpreadsheet() {
    var usersSheetId = 11111111 // // Put your SHEET ID here
    var usersSheet = getSheetById(usersSheetId)
    // Users data from BigQuery
    var values = usersSheet.getDataRange().getValues()

    return values.map(function(value) {
      return makePayload(values[0], value)
    })
  }
  function postDataToMailerlite(payload) {
    // API data
    var url = 'https://api.mailerlite.com/api/v2/groups/'
    var token = 'xxxxxxxxxxxxxxxxx' // // Put your TOKEN here
    var groupId = 11111111 // // Put your GROUP ID here
    var groupUrl = url + groupId + '/subscribers/import'
    var params = {
      'method': 'POST',
      'muteHttpExceptions': true,
      'headers': {
        'Authorization': 'apikey ' + token,
        'Content-Type': 'application/json'
      },
      'payload': JSON.stringify({'subscribers': payload, 'resubscribe': false, 'autoresponders': true})
    };
    var response = UrlFetchApp.fetch(groupUrl, params)
    return JSON.parse(response.getContentText())
  }
  function logAction(json) {
    var logsSheetId = 11111111 // // Put your SHEET ID here
    var logsSheet = getSheetById(logsSheetId)
    var logsSheetValues = logsSheet.getDataRange().getValues()
    var payload = {
      'datetime': Date(),
      'imported': json.imported.length,
      'unchanged': json.unchanged.length,
      'updated': json.updated.length,
      'errors': json.errors.length,
      'errors log': json.errors
    }
    Object.keys(payload).forEach(function(key) {
       logsSheet.getRange(logsSheetValues.length + 1, logsSheetValues[0].indexOf(key) + 1).setValue(payload[key])
    })
    Logger.log('Done ' + Date())
  }
  function getSheetById(id) {
    // Get sheet by ID
    return SpreadsheetApp.getActive().getSheets().filter(
      function(s) {return s.getSheetId() === id;})[0];
  }
  function makePayload(headers, value) {
    // Make single user data JSON from BigQuery data based on row number
    return {
      'email': value[headers.indexOf('email')],
      'fields': {
        'full_name': value[headers.indexOf('name')],
        'job': value[headers.indexOf('job')],
        'trigger': value[headers.indexOf('trigger')]
      }
    }
  }
  // Perform
  const data = getDataFromSpreadsheet()
  const response = postDataToMailerlite(data)
  logAction(response)
}
Run the script. When you run it for the first time in a spreadsheet, the system will ask you to save your project. Click “Yes” and give a name to your project. You’ll see a yellow status line. Once it disappears this means that your function was completed. Press Ctrl + Enter (or Command + Enter for Mac) to see functions logs. In your GSheets “Logs” tab you’ll see a new record with the current time and date. Also, in MailerLite you will see the new contacts added.
Automate your Google Apps Script using time triggers
The last step is to schedule the script to run automatically based on the time triggers. Click on the clock icon and choose “Current project triggers”. Add a trigger, choose the function you want to run from the list of functions connected to this spreadsheet. Select event source – this is what will act as a trigger. We chose “time-driven”. Set a daytimer and select the exact time for the trigger to act. You can also set up a notifications schedule. Save and we are done!
