
- 0. Introduction: Full Stack Development 101
- 1. Setting Up a Django Project
- 2. Setting Up the Database with Django
- 3. A Basic Interface with Vue Components in a Django Template
- 4. Connecting Vue.js Store to Collect Django’s Database Using Vuex
- 5. Routing URLs between Django and Vue Router
- 6. Testing Everything
- Full SPA Code
- Looking Forward: Microservices!
- Wrapping Up
- Frequently Asked Questions (FAQs) on Building a Web App Prototype with Django and Vue
0. Introduction: Full Stack Development 101
I’ll cover how to prototype a custom web app, and to keep it as short and sweet as possible, the context information here will be rather brief. However, I will provide — hopefully — enough resources so that you know where to go should you need more information. To this end I’ll fully mash up data management, presentation, and routing between Django and Vue.js — so get ready!About Django
About Vue.js
- Vue Router for route/view mapping
- Vuex for state management
Python + JavaScript = WIN!
authors and articles, and a minimal user interface (UI) to interact with them.
1. Setting Up a Django Project
Very quickly, we’ll set up a project from scratch. If you already know how to handle Django projects, you can skip this section. We’ll assume you already have Python installed. For a more in-depth guide, see How to install Django on the Django documentation site.Python Virtual Environment
Let’s open a console and create a virtual environment (see Virtual Environments in Python Made Easy for more info):$ virtualenv myenvironment
Using base prefix 'c:\\users\\luzdealba\\appdata\\local\\programs\\python\\python37'
New python executable in C:\Users\luzdealba\Development\myenvironment\Scripts\python.exe
Installing setuptools, pip, wheel …
done
$ cd myenvironment
$ Scripts\activate
$ cd myenvironment
$ source bin/activate
Django Package
Let’s install Django:(myenvironment) $ pip install django
Collecting django
  Downloading Django-3.0.3-py3-none-any.whl (7.5 MB)
Collecting sqlparse>=0.2.2
  Downloading sqlparse-0.3.1-py2.py3-none-any.whl (40 kB)
Collecting pytz
  Using cached pytz-2019.3-py2.py3-none-any.whl (509 kB)
Collecting asgiref~=3.2
  Downloading asgiref-3.2.3-py2.py3-none-any.whl (18 kB)
Installing collected packages: sqlparse, pytz, asgiref, django
Successfully installed asgiref-3.2.3 django-3.0.3 pytz-2019.3 sqlparse-0.3.1
The Project
Let’s start a project calledmyproject:
(myenvironment) $ django-admin startproject myproject
(myenvironment) $ cd myproject
The App
Start an app calledmyapp:
(myenvironment) $ django-admin startapp myapp
myapp.apps.MyappConfig to the INSTALLED_APPS constant list in myproject/settings.py to enable the app.
2. Setting Up the Database with Django
Here we’ll define the back-end database with Django, which we’ll later integrate with a front-end storage with Vuex.Django Models
Models are Django’s way to implement an object-relational database management system (ORDBMS). In other words, plain text files where you can define database tables and fields, and from where these will propagate to the application layer and the DB engine. Let’s code the following models for our app inmyapp/models.py:
from django.db import models

class Article(models.Model):
    """Table schema to store articles."""
    name = models.CharField(max_length=64)
    author = models.ForeignKey('myapp.Author', on_delete=models.CASCADE)
    content = models.TextField()
    slug = models.CharField(default='', max_length=64)

    def __str__(self):
        return '%s' % self.name

class Author(models.Model):
    """Table schema to store auhtors."""
    name = models.CharField(max_length=64)
    slug = models.CharField(default='', max_length=64)

    def __str__(self):
        return '%s' % self.name
Django Admin
Before we can manage these models through the admin site, we’ll first need toregister them so that Django makes them available to us.
Let’s simply edit myapp/admin.py so that it looks like this:
from django.contrib import admin

from .models import Article
from .models import Author

# register models to use in admin site
admin.site.register(Article)
admin.site.register(Author)
Django Migrations
From the Django’s Migrations documentation:Migrations are Django’s way of propagating changes you make to your models (adding a field, deleting a model, etc.) into your database schema.In short: migrations do everything; no SQL commands required. First, let’s create the migration files:
(myenvironment) $ python manage.py makemigrations
Migrations for 'myapp':
  myapp\migrations\0001_initial.py
    - Create model Author
    - Create model Article
(myenvironment) $ python manage.py migrate
Operations to perform:
  Apply all migrations: admin, auth, contenttypes, myapp, sessions
Running migrations:
  Applying contenttypes.0001_initial... OK
  Applying auth.0001_initial... OK
  Applying admin.0001_initial... OK
  Applying admin.0002_logentry_remove_auto_add... OK
  Applying admin.0003_logentry_add_action_flag_choices... OK
  Applying contenttypes.0002_remove_content_type_name... OK
  Applying auth.0002_alter_permission_name_max_length... OK
  Applying auth.0003_alter_user_email_max_length... OK
  Applying auth.0004_alter_user_username_opts... OK
  Applying auth.0005_alter_user_last_login_null... OK
  Applying auth.0006_require_contenttypes_0002... OK
  Applying auth.0007_alter_validators_add_error_messages... OK
  Applying auth.0008_alter_user_username_max_length... OK
  Applying auth.0009_alter_user_last_name_max_length... OK
  Applying auth.0010_alter_group_name_max_length... OK
  Applying auth.0011_update_proxy_permissions... OK
  Applying myapp.0001_initial... OK
  Applying sessions.0001_initial... OK
Author and Article tables were created, but also all of Django’s default schemas.
For more info, see Migration operations in the Django documentation site.
3. A Basic Interface with Vue Components in a Django Template
Here’s one of the most interesting parts of the mashup, as we’ll mix closely related tools from different technologies.Django View
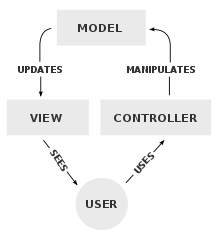 Django goes by the model–view–controller (MVC) software design pattern, which divides the related program logic into three interconnected elements.
We’ll code the following view in
Django goes by the model–view–controller (MVC) software design pattern, which divides the related program logic into three interconnected elements.
We’ll code the following view in myapp/views.py:
from django.shortcuts import render

from .models import Article
from .models import Author

def frontend(request):
    """Vue.js will take care of everything else."""
    articles = Article.objects.all()
    authors = Author.objects.all()

    data = {
        'articles': articles,
        'authors': authors,
    }

    return render(request, 'myapp/template.html', data)
Django Template
Django has a rich template language with built-in template tags and filters, and an API for Python programmers; but yes, you guessed it — we won’t cover much of that here. 😅 What we will do, however, is use Bootstrap’s Starter template to set a very basic navigation layout for the app:- light gray background
- white foreground
- centered content
myapp/templates/myapp/template.html (you’ll need to create the sub-directories templates/myapp/ within myapp/):
<!doctype html>
<html lang="en">
  <head>
    <!-- Required meta tags -->
    <meta charset="utf-8">
    <meta name="viewport" content="width=device-width, initial-scale=1, shrink-to-fit=no">

    <!-- Bootstrap CSS -->
    <link rel="stylesheet" href="https://stackpath.bootstrapcdn.com/bootstrap/4.4.1/css/bootstrap.min.css" integrity="sha384-Vkoo8x4CGsO3+Hhxv8T/Q5PaXtkKtu6ug5TOeNV6gBiFeWPGFN9MuhOf23Q9Ifjh" crossorigin="anonymous">

    <title>Django and Vue.js</title>
  </head>
  <body class="bg-light">
    <div class="bg-white container">
      <h1>Prototyping a Web App with Django and Vue.js</h1>

      <!-- Content -->
    </div>

    <!-- Vue.js -->
    <script src="https://unpkg.com/vue"></script>
    <script src="https://unpkg.com/vue-router"></script>

    <!-- jQuery first, then Popper.js, then Bootstrap JS -->
    <script src="https://code.jquery.com/jquery-3.4.1.slim.min.js" integrity="sha384-J6qa4849blE2+poT4WnyKhv5vZF5SrPo0iEjwBvKU7imGFAV0wwj1yYfoRSJoZ+n" crossorigin="anonymous"></script>
    <script src="https://cdn.jsdelivr.net/npm/popper.js@1.16.0/dist/umd/popper.min.js" integrity="sha384-Q6E9RHvbIyZFJoft+2mJbHaEWldlvI9IOYy5n3zV9zzTtmI3UksdQRVvoxMfooAo" crossorigin="anonymous"></script>
    <script src="https://stackpath.bootstrapcdn.com/bootstrap/4.4.1/js/bootstrap.min.js" integrity="sha384-wfSDF2E50Y2D1uUdj0O3uMBJnjuUD4Ih7YwaYd1iqfktj0Uod8GCExl3Og8ifwB6" crossorigin="anonymous"></script>
  </body>
</html>
Vue.js Templates
Vue.js also has a template syntax available, and it furthermore allows us to create our own HTML tags. We’ll create four templates:article-list, author-list, article-item and author-item:
<template id="article-list-template">
  <div class="article-list">
    <h2>Articles</h2>
    <article-item
      v-for="article in articles"
      v-bind:key="article.slug"
      v-bind:name="article.name"
      v-bind:slug="article.slug"
      v-bind:content="article.content"
    ></article-item>
  </div>
</template>

<template id="author-list-template">
  <div class="author-list">
    <h2>Authors</h2>
    <author-item
      v-for="author in authors"
      v-bind:key="author.slug"
      v-bind:name="author.name"
      v-bind:slug="author.slug"
    ></author-item>
  </div>
</template>

<template id="article-item-template">
  <div class="article-item">
    <span v-if="$route.params.slug">
      <h3>
        <router-link
          v-bind:to="'/article/' + $route.params.slug + '/'"
          v-html="$store.getters.getArticleBySlug($route.params.slug)['name']"
        ></router-link>
      </h3>
      <div v-html="$store.getters.getArticleBySlug($route.params.slug)['content']"></div>
    </span>
    <span v-else>
      <h3>
        <router-link
          v-bind:to="'/article/' + slug + '/'"
          v-html="name"
       ></router-link>
     </h3>
      <div v-html="content"></div>
      <hr />
    </span>
  </div>
</template>

<template id="author-item-template">
  <div class="author-item">
    <span v-if="$route.params.slug">
      <b>
        <router-link v-bind:to="'/author/' + $route.params.slug + '/'">
          [[ $store.getters.getAuthorBySlug($route.params.slug)['name'] ]]
        </router-link>
      </b>
      ([[ $route.params.slug ]])
    </span>
    <span v-else>
      <b>
        <router-link v-bind:to="'/author/' + slug + '/'">
          [[ name ]]
        </router-link>
      </b> ([[ slug ]])
    </span>
  </div>
</template>
Breakdown
What we did here, in a nutshell:- List rendering with
v-for. - Data binding in HTML attributes with
v-bind. - Conditional rendering with
v-ifandv-else. - Raw HTML rendering with
v-html.
$store and $route will make more sense in a moment when we introduce storage and routing.
Text Interpolation between Django and Vue.js Templates
Just like with Django, the most basic form of text interpolation in Vue.js is with the “Mustache” syntax (double curly brackets). Like this:<span>Message: {{ msg }}</span>
delimiters: ['[[', ']]']
Vue.js Themes
Did you know you can “theme” Vue.js?- Drop-in themes for Vue.js
- Vuetify.js, Material Design component framework
- BootstrapVue, Bootstrap components and grid system for Vue.js
- Buefy, lightweight UI components for Vue.js based on Bulma
- Element UI, a component library for developers, designers and product managers
- Vue Material, Material Design and Vue.js
- Quasar Framework, high-performance Vue.js UI
Vue.js Components
Components are reusable Vue instances. What that means is that we can define a component, code an HTML template for it, and then use it as many times as we need it with Vue.js handling the DOM for us. We’ll show the entire single-page application (SPA) code in the end. For now, let’s introduce a few snippets. Just as with templates, we’ll define four components —ArticleList, AuthorList,, ArticleItem, and AuthorItem:
ArticleList = Vue.component('article-list', {
  data: function () { return { articles: store.state.articles } },
  template: '#article-list-template',
});

AuthorList = Vue.component('author-list', {
  data: function () { return { authors: store.state.authors } },
  template: '#author-list-template',
});

ArticleItem = Vue.component('article-item', {
  delimiters: ['[[', ']]'],
  props: ['name', 'slug', 'content'],
  template: '#article-item-template',
});

AuthorItem = Vue.component('author-item', {
  delimiters: ['[[', ']]'],
  props: ['name', 'slug'],
  template: '#author-item-template',
});
Breakdown
- When in a component,
datamust be a function ($storewill be explained in a moment). - We use the templates previously defined.
- To disambiguate text interpolation, make sure you set
delimitersthat are different from Django’s ({{/}}). - We use
propslisted as an array to pass data to our components.
4. Connecting Vue.js Store to Collect Django’s Database Using Vuex
 A rich front end might have many loosely coupled components, each with its own set of parameters, which can make it complicated to share data or to manage the state of variables.
Here’s where Vuex comes in handy:
A rich front end might have many loosely coupled components, each with its own set of parameters, which can make it complicated to share data or to manage the state of variables.
Here’s where Vuex comes in handy:
It serves as a centralized store for all the components in an application, with rules ensuring that the state can only be mutated in a predictable fashion.
Creating a Vuex Store
Let’s create and define a store in our Django template, and let’s use the data shared in the Django View:const store = new Vuex.Store({
state: {
authors: [
{% for author in authors %}
{
name: '{{ author.name }}',
slug: '{{ author.slug }}',
},
{% endfor %}
],
articles: [
{% for article in articles %}
{
content: '{{ article.content | linebreaksbr }}',
name: '{{ article.name }}',
slug: '{{ article.slug }}',
},
{% endfor %}
],
},
getters: {
getArticleBySlug: (state) => (slug) => {
return state.articles.find(articles => articles.slug === slug)
},
getAuthorBySlug: (state) => (slug) => {
return state.authors.find(authors => authors.slug === slug)
},
}
})
Breakdown
Let’s review what just happened:- We’ve created a store using
Vuex.Store(). - We defined a Vuex state where all of the
articlesandauthorsare collected. - We used the
forloop that’s built into the Django templates to iterate through all of thearticlesandauthors. - We’ve created two Vuex getters to get an article or an author by their slug,
getArticleBySlugandgetAuthorBySlug, respectively.
5. Routing URLs between Django and Vue Router
Django has a powerful URL dispatcher, which we’ll use in combination with Vue.js routing. We’ll create an application that:- uses dynamic route matching to seamlessly switch between pages without refreshes (see example)
- works with nested routes (see example)
With Django
Reactive URLs usually need a special configuration on the server to work properly, but Django lets us design URLs however we want, so no need to set rewrite rules for Apache or NGINX. We’ll editmyproject/urls.py so that it uses the base directory / as the route for our app:
from django.contrib import admin
from django.urls import path
# don't forget to import the app's view!
from myapp import views as myapp_views
urlpatterns = [
path('admin/', admin.site.urls),
# paths for our app
path('', myapp_views.frontend),
path('article/<slug:slug>/', myapp_views.frontend),
path('author/<slug:slug>/', myapp_views.frontend),
]
With Vue Router
By default, Vue Router uses “hash mode” (i.e: http://site/#/path) as a JavaScript trick to load parts of the page using anchors. However, we’ll leverage Vue Router’s HTML5 History Mode, which means that all of our URLs will change seamlessly without reloading the page and without using hashes. We’ll set the router to match each path to their respective component previously defined:const routes = [
{ component: ArticleList, path: '/article/', },
{ component: AuthorList, path: '/author/', },
{ component: ArticleItem, path: '/article/:slug/', },
{ component: AuthorItem, path: '/author/:slug/', },
]
const router = new VueRouter({
mode: 'history',
routes: routes,
})
6. Testing Everything
Now that we’ve got all of the pieces together, it’s time to do some gray box testing and see how things work!Create a Django Superuser
Before we can log in to the admin, we’ll need to create a superuser. Let’s create an administrator:(myenvironment) $ python manage.py createsuperuser
Run a Local Server
We’ll run Django’s built-in server withrunserver to launch the website on our local system.
On a console:
(myenvironment) $ python manage.py runserver
Watching for file changes with StatReloader
Performing system checks...
System check identified no issues (0 silenced).
March 09, 2020 - 19:41:22
Django version 3.0.3, using settings 'myproject.settings'
Starting development server at http://127.0.0.1:8000/
Quit the server with CTRL-BREAK.
Create Database Entries
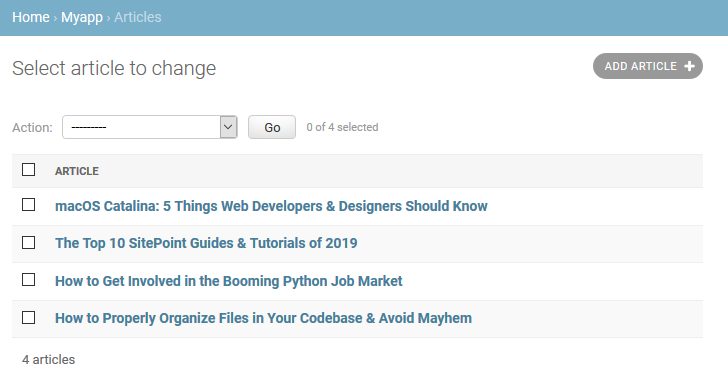
We’ll now populate the database so that we can browse something on the front end. Let’s head to http://127.0.0.1:8000/admin/ and enter the admin credentials you’ve just created so that we can create two authors and four articles:- On the MYAPP pane, next to Authors, click on the Add link and create at least two authors.
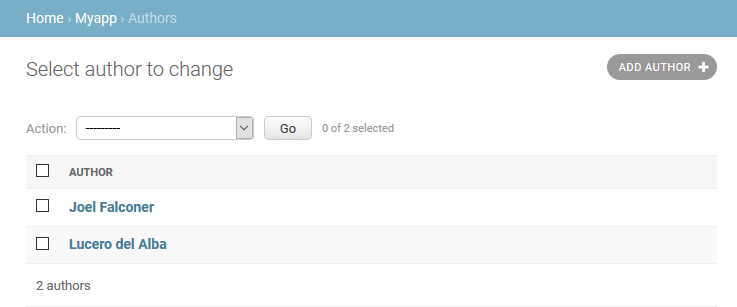
- On the MYAPP pane, next to Articles, click on the Add link and create at least two different articles for each author.
Browse the Site!
Now’s the time to see how it all plays together!Full SPA Code
You can navigate all of the project code in my GitHub repository, luzdealba / djangovuejs. Anyway, this is probably what you’re most interested in:<!doctype html>
<html lang="en">
<head>
<!-- Required meta tags -->
<meta charset="utf-8">
<meta name="viewport" content="width=device-width, initial-scale=1, shrink-to-fit=no">
<!-- Bootstrap CSS -->
<link rel="stylesheet" href="https://stackpath.bootstrapcdn.com/bootstrap/4.4.1/css/bootstrap.min.css" integrity="sha384-Vkoo8x4CGsO3+Hhxv8T/Q5PaXtkKtu6ug5TOeNV6gBiFeWPGFN9MuhOf23Q9Ifjh" crossorigin="anonymous">
<title>Django and Vue.js</title>
<style>
.router-link-active {
color: black;
text-decoration: none;
}
</style>
</head>
<body class="bg-light">
<div class="bg-white container">
<div class="jumbotron">
<h1 class="display-4">Django and Vue.js</h1>
<p class="lead">
Wouldn’t it be cool if you could prototype a custom web application that’s responsive (mobile ready), reactive (light-speed fast), with a full–featured back office site to manage the content; all of that in no time? Actually, with a mashup between Django’s and Vue.js, you can! 😁
</p>
</div>
<!-- Content -->
<div id="myapp">
<nav class="navbar navbar-expand-lg navbar-light bg-light">
<ul class="navbar-nav mr-auto">
<li class="nav-item">
<router-link
class="nav-link text-primary"
to="/author/"
>
Go to Authors
</router-link>
</li>
<li class="nav-item">
<router-link
class="nav-link text-primary"
to="/article/"
>
Go to Articles
</router-link>
</li>
</ul>
</nav>
<br />
<router-view></router-view>
</div>
</div>
<!-- Vue.js -->
<script src="https://unpkg.com/vue"></script>
<script src="https://unpkg.com/vue-router"></script>
<script src="https://unpkg.com/vuex"></script>
<!-- Vue templates -->
<template id="article-list-template">
<div class="article-list">
<h2>Articles</h2>
<article-item
v-for="article in articles"
v-bind:key="article.slug"
v-bind:name="article.name"
v-bind:slug="article.slug"
v-bind:content="article.content"
></article-item>
</div>
</template>
<template id="author-list-template">
<div class="author-list">
<h2>Authors</h2>
<author-item
v-for="author in authors"
v-bind:key="author.slug"
v-bind:name="author.name"
v-bind:slug="author.slug"
></author-item>
</div>
</template>
<template id="article-item-template">
<div class="article-item">
<span v-if="$route.params.slug">
<h3>
<router-link
v-bind:to="'/article/' + $route.params.slug + '/'"
v-html="$store.getters.getArticleBySlug($route.params.slug)['name']"
></router-link>
</h3>
<div v-html="$store.getters.getArticleBySlug($route.params.slug)['content']"></div>
</span>
<span v-else>
<h3>
<router-link
v-bind:to="'/article/' + slug + '/'"
v-html="name"
></router-link>
</h3>
<div v-html="content"></div>
<hr />
</span>
</div>
</template>
<template id="author-item-template">
<div class="author-item">
<span v-if="$route.params.slug">
<b>
<router-link v-bind:to="'/author/' + $route.params.slug + '/'">
[[ $store.getters.getAuthorBySlug($route.params.slug)['name'] ]]
</router-link>
</b>
([[ $route.params.slug ]])
</span>
<span v-else>
<b>
<router-link v-bind:to="'/author/' + slug + '/'">
[[ name ]]
</router-link>
</b> ([[ slug ]])
</span>
</div>
</template>
<!-- Vue app -->
<script>
// store
const store = new Vuex.Store({
  state: {
      authors: [
      {% for author in authors %}
          {
            name: '{{ author.name }}',
            slug: '{{ author.slug }}',
          },
      {% endfor %}
      ],
      articles: [
      {% for article in articles %}
          {
            content: '{{ article.content | linebreaksbr }}',
            name: '{{ article.name }}',
            slug: '{{ article.slug }}',
          },
      {% endfor %}
      ],
  },
  getters: {
    getArticleBySlug: (state) => (slug) => {
      return state.articles.find(articles => articles.slug === slug)
    },
    getAuthorBySlug: (state) => (slug) => {
      return state.authors.find(authors => authors.slug === slug)
    },
  }
})
// components
ArticleList = Vue.component('article-list', {
data: function () { return { articles: store.state.articles } },
template: '#article-list-template',
});
AuthorList = Vue.component('author-list', {
data: function () { return { authors: store.state.authors } },
template: '#author-list-template',
});
ArticleItem = Vue.component('article-item', {
delimiters: ['[[', ']]'],
props: ['name', 'slug', 'content'],
template: '#article-item-template',
});
AuthorItem = Vue.component('author-item', {
delimiters: ['[[', ']]'],
props: ['name', 'slug'],
template: '#author-item-template',
});
// router
const routes = [
  { component: ArticleList, path: '/article/', },
  { component: AuthorList,  path: '/author/',  },
  { component: ArticleItem, path: '/article/:slug/', },
  { component: AuthorItem,  path: '/author/:slug/',  },
]

const router = new VueRouter({
  mode: 'history',
  routes: routes,
})
// app
const myapp = new Vue({
router,
store,
}).$mount('#myapp');
</script>
<!-- jQuery first, then Popper.js, then Bootstrap JS -->
<script src="https://code.jquery.com/jquery-3.4.1.slim.min.js" integrity="sha384-J6qa4849blE2+poT4WnyKhv5vZF5SrPo0iEjwBvKU7imGFAV0wwj1yYfoRSJoZ+n" crossorigin="anonymous"></script>
<script src="https://cdn.jsdelivr.net/npm/popper.js@1.16.0/dist/umd/popper.min.js" integrity="sha384-Q6E9RHvbIyZFJoft+2mJbHaEWldlvI9IOYy5n3zV9zzTtmI3UksdQRVvoxMfooAo" crossorigin="anonymous"></script>
<script src="https://stackpath.bootstrapcdn.com/bootstrap/4.4.1/js/bootstrap.min.js" integrity="sha384-wfSDF2E50Y2D1uUdj0O3uMBJnjuUD4Ih7YwaYd1iqfktj0Uod8GCExl3Og8ifwB6" crossorigin="anonymous"></script>
</body>
</html>
Looking Forward: Microservices!
At this point, you already have a solid prototype that can work as a proof of concept to present an idea to your prospect clients or colleagues, or as a foundation for your own project. While the interface we created can present database registries, you can’t really interact with them in any other way through the front end, such as making new additions, editions, or deleting such entries. For that, you’ll need an API. Believe it or not, implementing a microservice through a REST API is fairly straightforward with Django. All you need is the Django REST framework add-on, which is extremely well documented and, as all things Django, powerful, flexible, and secure. With an exposed API, the next thing you can do is manage data right there on your front end with Vue.js. I can’t cover the details here, but you can check the “Using Axios to Consume APIs” article in the Vue.js Cookbook.Wrapping Up
How’s that for a primer on full-stack development? We’ve prototyped a project that can be the foundation for a web application. And I didn’t water down anything! In fact, because we’re using Vuex storage for state management and Vue Router for dynamic route matching from the get-go, there aren’t substantial changes that we’ll need to do as the application scales. So you can essentially take it from there and expand in whichever direction you need to — customizing the database, improving the interface, and even creating a microservice! Don’t be shy if your Python or JavaScript knowledge is somewhat limited. We all need to start somewhere. Read further, code further, and stay curious!Frequently Asked Questions (FAQs) on Building a Web App Prototype with Django and Vue
How Can I Integrate Django and Vue.js in a Single Project?
Integrating Django and Vue.js in a single project involves setting up Django to serve as the backend and Vue.js as the frontend. First, you need to create a Django project and a Vue.js application separately. Then, you can use Django’s static files functionality to serve the Vue.js application. You can also use Django’s template system to render the Vue.js application. However, this approach requires careful handling of Django’s template language and Vue.js’s template syntax, as they can conflict.
What are the Benefits of Using Django with Vue.js?
Django and Vue.js are both powerful frameworks that can be used to build robust web applications. Django is a high-level Python web framework that encourages rapid development and clean, pragmatic design. It provides a lot of built-in features such as an ORM, authentication, and an admin interface, which can speed up development. On the other hand, Vue.js is a progressive JavaScript framework for building user interfaces. It is easy to integrate with other libraries or existing projects, and it is capable of powering advanced single-page applications. By using Django for the backend and Vue.js for the frontend, you can leverage the strengths of both frameworks.
How Can I Use Django’s REST Framework with Vue.js?
Django’s REST framework is a powerful toolkit for building Web APIs, and it can be used with Vue.js to build dynamic web applications. You can create a Django REST API that provides data to your Vue.js application. The Vue.js application can make HTTP requests to the Django REST API to retrieve data and update the user interface. You can use libraries such as axios or fetch to make these HTTP requests in Vue.js.
How Can I Handle User Authentication in a Django and Vue.js Application?
User authentication is a critical aspect of many web applications. In a Django and Vue.js application, you can handle user authentication using Django’s built-in authentication system or using Django’s REST framework JWT (JSON Web Token) authentication. The Django backend can handle user registration, login, and logout, and it can provide endpoints that the Vue.js application can use to authenticate users. The Vue.js application can then use HTTP requests to interact with these endpoints and manage user sessions.
How Can I Deploy a Django and Vue.js Application?
Deploying a Django and Vue.js application involves several steps. First, you need to build your Vue.js application for production. This will create a dist folder with static files that can be served by a web server. Then, you can configure Django to serve these static files. Finally, you can deploy your Django project to a web server. There are many options for deploying Django projects, including cloud platforms like Heroku, AWS, and Google Cloud, or traditional web servers like Apache or Nginx.
How Can I Test a Django and Vue.js Application?
Testing is an essential part of software development. Django provides a built-in testing framework that you can use to write unit tests for your backend code. For the Vue.js frontend, you can use testing libraries such as Jest or Mocha to write unit tests. You can also use end-to-end testing tools like Cypress or Nightwatch.js to test the interaction between the frontend and backend.
How Can I Use Vue.js Components in a Django Template?
You can use Vue.js components in a Django template by including the Vue.js script in your Django template and then using the Vue.js component syntax in your HTML. However, you need to be careful to avoid conflicts between Django’s template language and Vue.js’s template syntax. You can use the verbatim template tag in Django to prevent Django from interpreting Vue.js syntax.
How Can I Use Django Forms with Vue.js?
Django forms are a powerful feature for handling form data and validation. However, in a Django and Vue.js application, you might want to handle forms on the client side with Vue.js. You can create a Vue.js form component that makes an HTTP request to a Django view when the form is submitted. The Django view can then process the form data and return a response.
How Can I Use Django’s ORM with Vue.js?
Django’s ORM (Object-Relational Mapping) is a powerful tool for interacting with your database. In a Django and Vue.js application, you can use Django’s ORM to create, retrieve, update, and delete data in your database. You can create a Django REST API that provides endpoints for these operations, and your Vue.js application can make HTTP requests to these endpoints to interact with the data.
How Can I Handle Errors in a Django and Vue.js Application?
Error handling is an important part of building a robust web application. In a Django and Vue.js application, you can handle errors on both the backend and frontend. Django provides built-in error handling for common HTTP errors, and you can also create custom error handlers. On the frontend, Vue.js provides error handling options in its component lifecycle hooks. You can also use try/catch blocks in your JavaScript code to handle errors.
 Lucero del Alba
Lucero is a programmer and entrepreneur with a feel for Python, data science and DevOps. Raised in Buenos Aires, Argentina, he's a musician who loves languages (those you use to talk to people) and dancing.