How To Install Jitsi Meet Video Conferencing Solution on Debian 10
Jitsi Meet is a free and open-source video-conferencing application that can be used as a standalone application or embed in your web application. It is based on WebRTC and provides multi-person video conference rooms without installing additional software or browser extensions.
Features
- Screen sharing, group chat, presentations, and more
- Integration with Google and Microsoft Calendar
- Invite other users to a conference via a simple URL
- Support end-to-end TLS encryption
- Universal multi-platform availability
- Collaborative document editing
In this tutorial, we will show you how to install Jitsi Meet Video Conferencing application on Debian 10.
Prerequisites
- A server running Debian 10 with a minimum 4 GB RAM.
- A valid domain name is pointed with your server ip. In this tutorial, we will use jitsi.linuxbuz.com sub-domain of linuxbuz.com domain.
- A root password is set up on your server.
Getting Started
Before starting, it is a good idea to update your system's package to the latest version. You can update them using the following command:
apt-get update -y
apt-get upgrade -y
Once all the packages are updated, restart your system to apply the changes.
Install Nginx Web Server
Before installing Jitsi Meet, you will need to install the Nginx web server in your system. You can install it using the following command:
apt-get install nginx -y
Once the Nginx has been installed, you can proceed to the next step.
Install Jitsi Meet
First, install the required dependencies in your system with the following command:
apt-get install gnupg2 apt-transport-https software-properties-common -y
Once installed, download and add the GPG key for Jitsi by running the following command:
wget -qO - https://download.jitsi.org/jitsi-key.gpg.key | apt-key add -
Next, add the Jitsi repository with the following command:
sh -c "echo 'deb https://download.jitsi.org stable/' > /etc/apt/sources.list.d/jitsi-stable.list"
Once the repository is added, update the repository with the following command:
apt-get update -y
Next, install the Jitsi Meet by running the following command:
apt-get install jitsi-meet
During the installation you will be asked to provide the FQDN of your server as shown below:
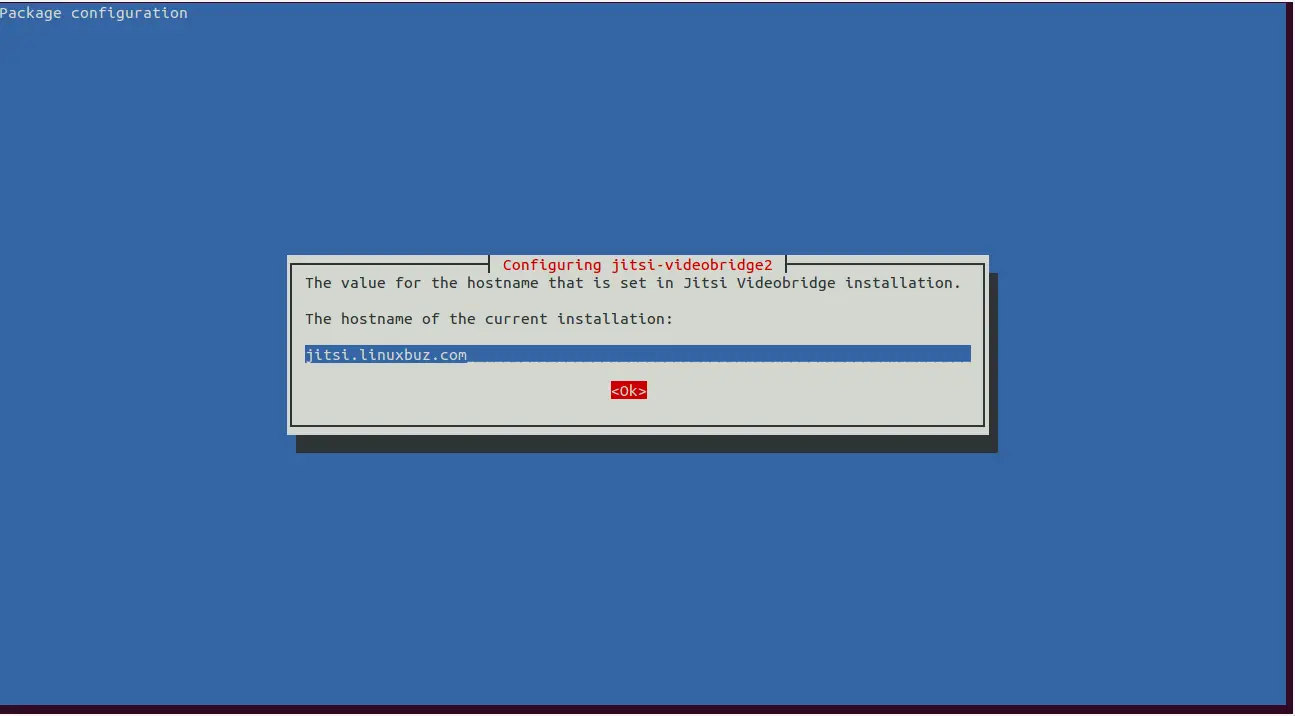
Provide your valid domain name and hit Enter. You will be asked about the SSL certificate as shown below:
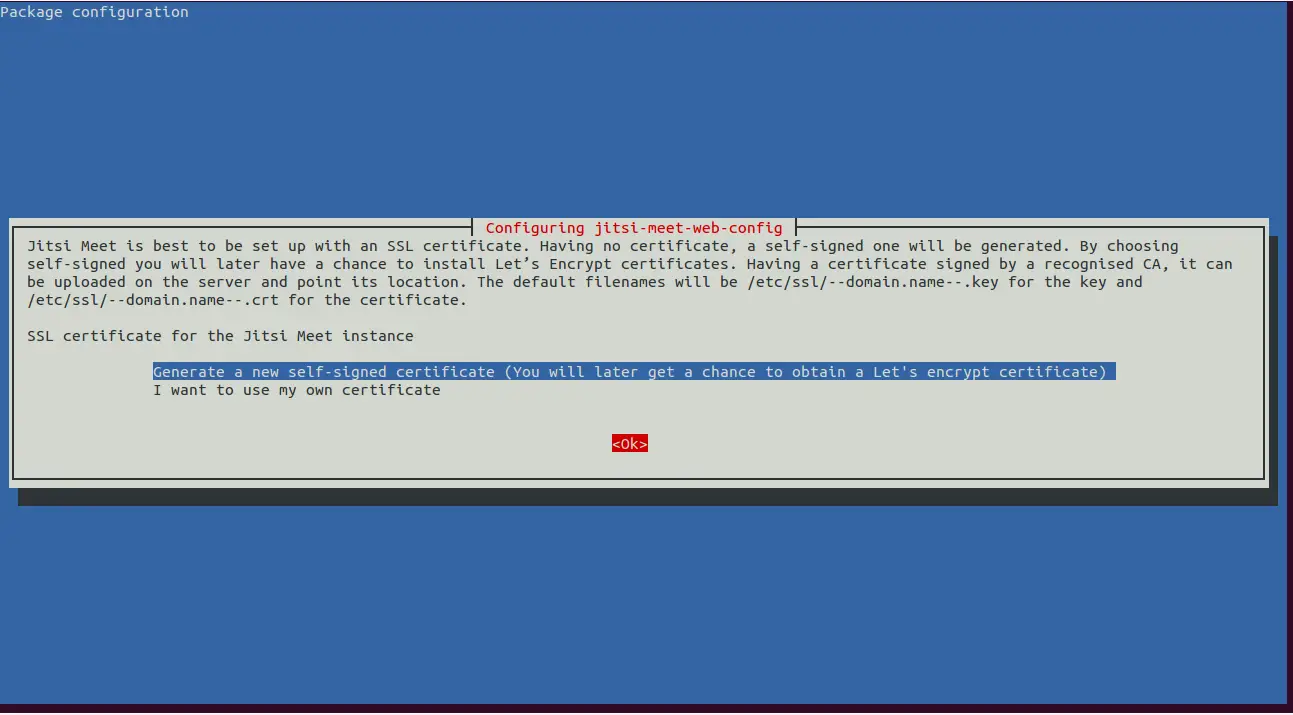
Choose the Generate a new self-signed certificate (You will later get a chance to obtain a Let's Encrypt certificate) option and hit Enter to finish the installation.
Once the installation has been finished, you can proceed to the next step.
Secure Jitsi Meet with Let's Encrypt SSL
At this point, Jitsi Meet is installed in your system. Next, you will need to generate a Let’s Encrypt SSL certificate for your server.
By default, the Certbot is not available in the Debian 10 default repository. So you will need to add Certbot repository in your system.
You can add it with the following command:
echo "deb http://ftp.debian.org/debian buster-backports main" >> /etc/apt/sources.list
Next, update the repository and install the Certbot client for Nginx with the following command:
apt-get update -y
apt-get install python3-certbot-nginx -t buster-backports
You can do it by running the following script:
/usr/share/jitsi-meet/scripts/install-letsencrypt-cert.sh
You will be asked to provide your e-mail address as shown below:
-------------------------------------------------------------------------
This script will:
- Need a working DNS record pointing to this machine(for domain jisti.linuxbuz.com)
- Download certbot-auto from https://dl.eff.org to /usr/local/sbin
- Install additional dependencies in order to request Let’s Encrypt certificate
- If running with jetty serving web content, will stop Jitsi Videobridge
- Configure and reload nginx or apache2, whichever is used
- Configure the coturn server to use Let's Encrypt certificate and add required deploy hooks
- Add command in weekly cron job to renew certificates regularly

You need to agree to the ACME server's Subscriber Agreement (https://letsencrypt.org/documents/LE-SA-v1.1.1-August-1-2016.pdf)
by providing an email address for important account notifications
Enter your email and press [ENTER]: [email protected]
Provide your valid e-mail address and hit Enter to continue. Once the process has been completed successfully, you should see the following output:
Saving debug log to /var/log/letsencrypt/letsencrypt.log
Plugins selected: Authenticator webroot, Installer None
Obtaining a new certificate
Performing the following challenges:
http-01 challenge for jisti.linuxbuz.com
Using the webroot path /usr/share/jitsi-meet for all unmatched domains.
Waiting for verification...
Cleaning up challenges
Running deploy-hook command: /etc/letsencrypt/renewal-hooks/deploy/0000-coturn-certbot-deploy.sh
Output from deploy-hook command 0000-coturn-certbot-deploy.sh:
Configuring turnserver

IMPORTANT NOTES:
 - Congratulations! Your certificate and chain have been saved at:
   /etc/letsencrypt/live/jisti.linuxbuz.com/fullchain.pem
   Your key file has been saved at:
   /etc/letsencrypt/live/jisti.linuxbuz.com/privkey.pem
   Your cert will expire on 2020-07-28. To obtain a new or tweaked
   version of this certificate in the future, simply run certbot-auto
   again. To non-interactively renew *all* of your certificates, run
   "certbot-auto renew"
 - If you like Certbot, please consider supporting our work by:

   Donating to ISRG / Let's Encrypt:   https://letsencrypt.org/donate
   Donating to EFF:                    https://eff.org/donate-le
Once you are finished, you can proceed to the next step.
Access Jitsi Meet
At this point, your Jitsi Meet web application is secured with Let's Encrypt SSL.
Open your web browser and type the URL https://jitsi.linuxbuz.com. You will be redirected to the following screen:
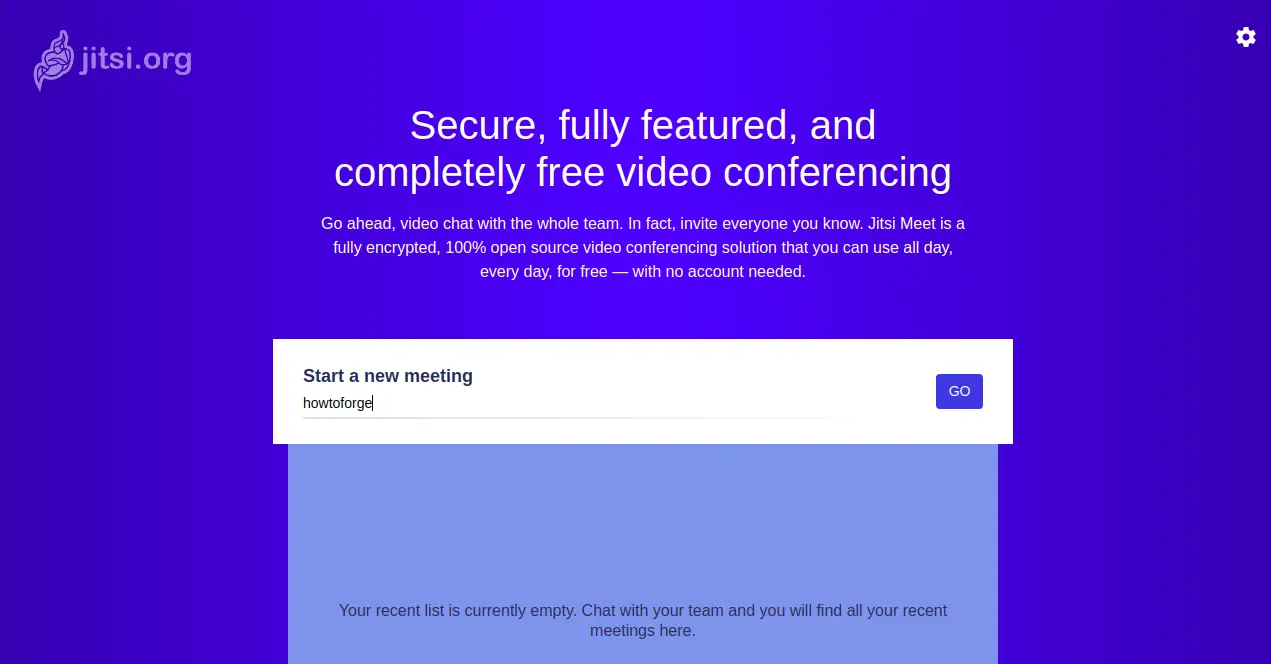
Provide your conference name and click on the GO button. You will be asked to allow a microphone and camera as shown below:

Click on the Allow button. You will be redirected to the conference room as shown below:

Once you are finished, you can proceed to the next step.
Set Up User Authentication for Jitsi Meet
By default, Jitsi Meet allows anyone to visit your Jitsi server, create a room and start a meeting. This not desirable for unauthorized users. So you will need to configure user authentication for Jitsi Meet so that only registered users can create new conference rooms.
You can configure it by editing the file jitsi.linuxbuz.com.cfg.lua.
nano /etc/prosody/conf.avail/jitsi.linuxbuz.com.cfg.lua
Find the following line:
authentication = "anonymous"
And replace it with the following line:
authentication = "internal_plain"
Next, add the following lines at the end of the file:
VirtualHost "guest.jitsi.linuxbuz.com"
    authentication = "anonymous"
    c2s_require_encryption = false
Save and close the file when you are finished.
The above configuration will allow anonymous users to join conference rooms that were created by an authenticated user.
Next, open the Jitsi Meet configuration file /etc/jitsi/meet/jitsi.linuxbuz.com-config.js as shown below:
nano /etc/jitsi/meet/jitsi.linuxbuz.com-config.js
Find the following line:
// anonymousdomain: 'guest.example.com',
And, replace it with the following line:
anonymousdomain: 'guest.jitsi.linuxbuz.com',
Save and close the file when you are finished.
Next, open the Jicofo configuration file as shown below:
nano /etc/jitsi/jicofo/sip-communicator.properties
Add the following line at the end of this file:
org.jitsi.jicofo.auth.URL=XMPP:jitsi.linuxbuz.com
Save and close the file when you are finished.
At this point, Jitsi Meet is now configured so that only registered users can create conference rooms. Once a conference room is created, any user can join it without providing any credentials. You only need the unique conference room address and an optional password set by the room’s creator.
Next, you will need to create a new user account for Jitsi and set password for it.
You can create it with the following command:
prosodyctl register jitsiuser jitsi.linuxbuz.com password
You can now use the user created above to create a conference room.
Finally, restart the Jitsi Meet services by running the following command:
systemctl restart prosody
systemctl restart jicofo
systemctl restart jitsi-videobridge2
Now, verify the status of all services with the following command:
systemctl status jitsi-videobridge2 prosody jicofo
You should see the following output:
? jitsi-videobridge2.service - Jitsi Videobridge
   Loaded: loaded (/lib/systemd/system/jitsi-videobridge2.service; enabled; vendor preset: enabled)
   Active: active (running) since Wed 2020-04-29 16:17:33 UTC; 49s ago
  Process: 11623 ExecStartPost=/bin/bash -c echo $MAINPID > /var/run/jitsi-videobridge/jitsi-videobridge.pid (code=exited, status=0/SUCCESS)
 Main PID: 11622 (java)
    Tasks: 39 (limit: 65000)
   Memory: 161.0M
   CGroup: /system.slice/jitsi-videobridge2.service
           ??11622 java -Xmx3072m -XX:+UseConcMarkSweepGC -XX:+HeapDumpOnOutOfMemoryError -XX:HeapDumpPath=/tmp -Dnet.java.sip.communicator.SC_

Apr 29 16:17:33 debian10 systemd[1]: Starting Jitsi Videobridge...
Apr 29 16:17:33 debian10 systemd[1]: Started Jitsi Videobridge.

? prosody.service - Prosody XMPP Server
   Loaded: loaded (/lib/systemd/system/prosody.service; enabled; vendor preset: enabled)
   Active: active (running) since Wed 2020-04-29 16:17:21 UTC; 1min 1s ago
     Docs: https://prosody.im/doc
 Main PID: 11537 (lua5.2)
    Tasks: 1 (limit: 4701)
   Memory: 14.1M
   CGroup: /system.slice/prosody.service
           ??11537 lua5.2 /usr/bin/prosody

Apr 29 16:17:21 debian10 systemd[1]: Started Prosody XMPP Server.

? jicofo.service - LSB: Jitsi conference Focus
   Loaded: loaded (/etc/init.d/jicofo; generated)
   Active: active (running) since Wed 2020-04-29 16:17:27 UTC; 56s ago
     Docs: man:systemd-sysv-generator(8)
  Process: 11555 ExecStart=/etc/init.d/jicofo start (code=exited, status=0/SUCCESS)
    Tasks: 80 (limit: 4701)
   Memory: 163.4M
   CGroup: /system.slice/jicofo.service
           ??11564 java -Xmx3072m -XX:+HeapDumpOnOutOfMemoryError -XX:HeapDumpPath=/tmp -Dnet.java.sip.communicator.SC_HOME_DIR_LOCATION=/etc/j

Apr 29 16:17:27 debian10 systemd[1]: Starting LSB: Jitsi conference Focus...
Now, open your web browser and type the URL https://jitsi.linuxbuz.com. You should see the following screen:
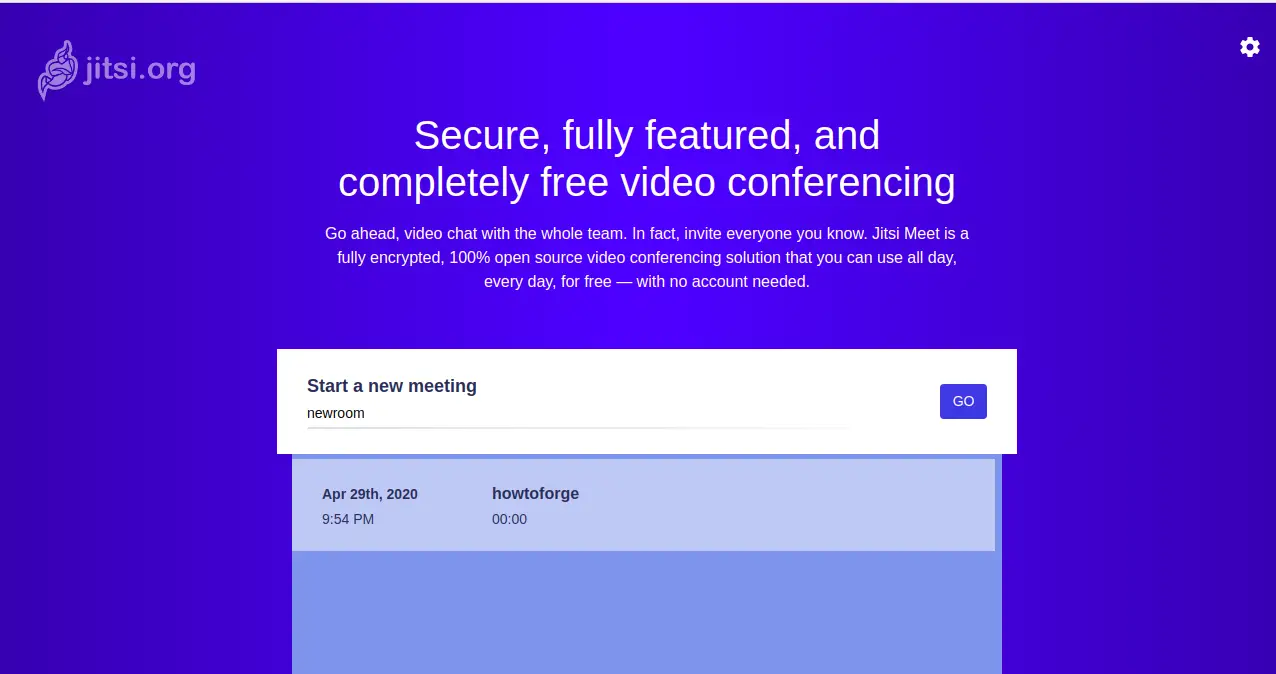
Provide your room name and click on the GO button. You will be asked to provide a username and password as shown below:
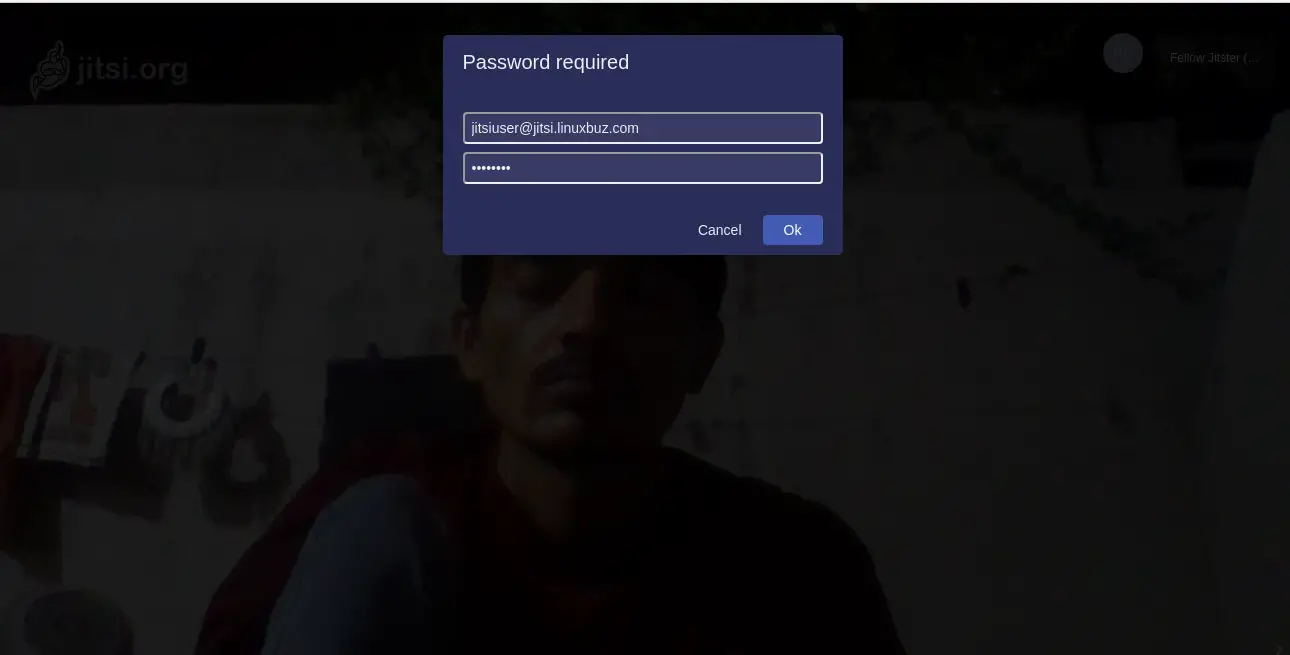
Provide your username, password and click on the OK button.
Conclusion
Congratulations! you have successfully installed Jitsi Meet on Debian 10 server. You can now share the link, set a password, configure the audio and video quality and more through the web browser.

