
Why expose the Couchbase database on the public network?
Below are some examples:
-
Cross-Data Center Replication (XDCR) for High Availability and Disaster Recovery
-
Client SDK access to Couchbase cluster
-
Database-as-a-Service (DBaaS) platforms
*Note – All of these use cases share a common goal; they allow clients to access the database instance without having to establish a VPN to a Kubernetes instance. They also require TLS protected secure communication that is sometimes difficult to achieve with typical Kubernetes architecture.
How we solved public networking using Kubernetes External DNS?
When deploying apps on Kubernetes, you usually use Kubernetes resources like Service and Ingress to expose apps outside the Kubernetes cluster at your desired domain. This involves a lot of manual configuration of Kubernetes resources and also the DNS records at your provider, which can be a time consuming and erring process. This can soon become a snag as your application grows in complexity, and also when the external IP changes, it is necessary to update the DNS records accordingly.
To address this, the Kubernetes sig-network team created the External DNS solution to manage external DNS records in an autonomous way from within a Kubernetes cluster. Once you deploy the External DNS, it works in the background and requires almost no additional configuration. It creates DNS records at DNS providers external to Kubernetes such that Kubernetes resources are discoverable via the external DNS providers, and allows you to control DNS records dynamically in a DNS provider agnostic way. Whenever it discovers a Service or Ingress being created or updated, the External DNS controller will update the records instantly.
While deploying the Couchbase database using the public networking with External DNS strategy for its network architecture, Couchbase cluster nodes are exposed using load-balancer services that have public IP addresses allocated to them. The External DNS controller will then be responsible for managing dynamic DNS (DDNS) in a cloud-based provider to provide stable addressing and a basis for TLS.
Now, Let’s see it in action!
We will now go through the steps to deploy the Couchbase cluster using Autonomous Operator 2.0 in EKS and access the Couchbase cluster through public networking that is managed through External DNS. Below is a quick overview of the architecture of our deployment.
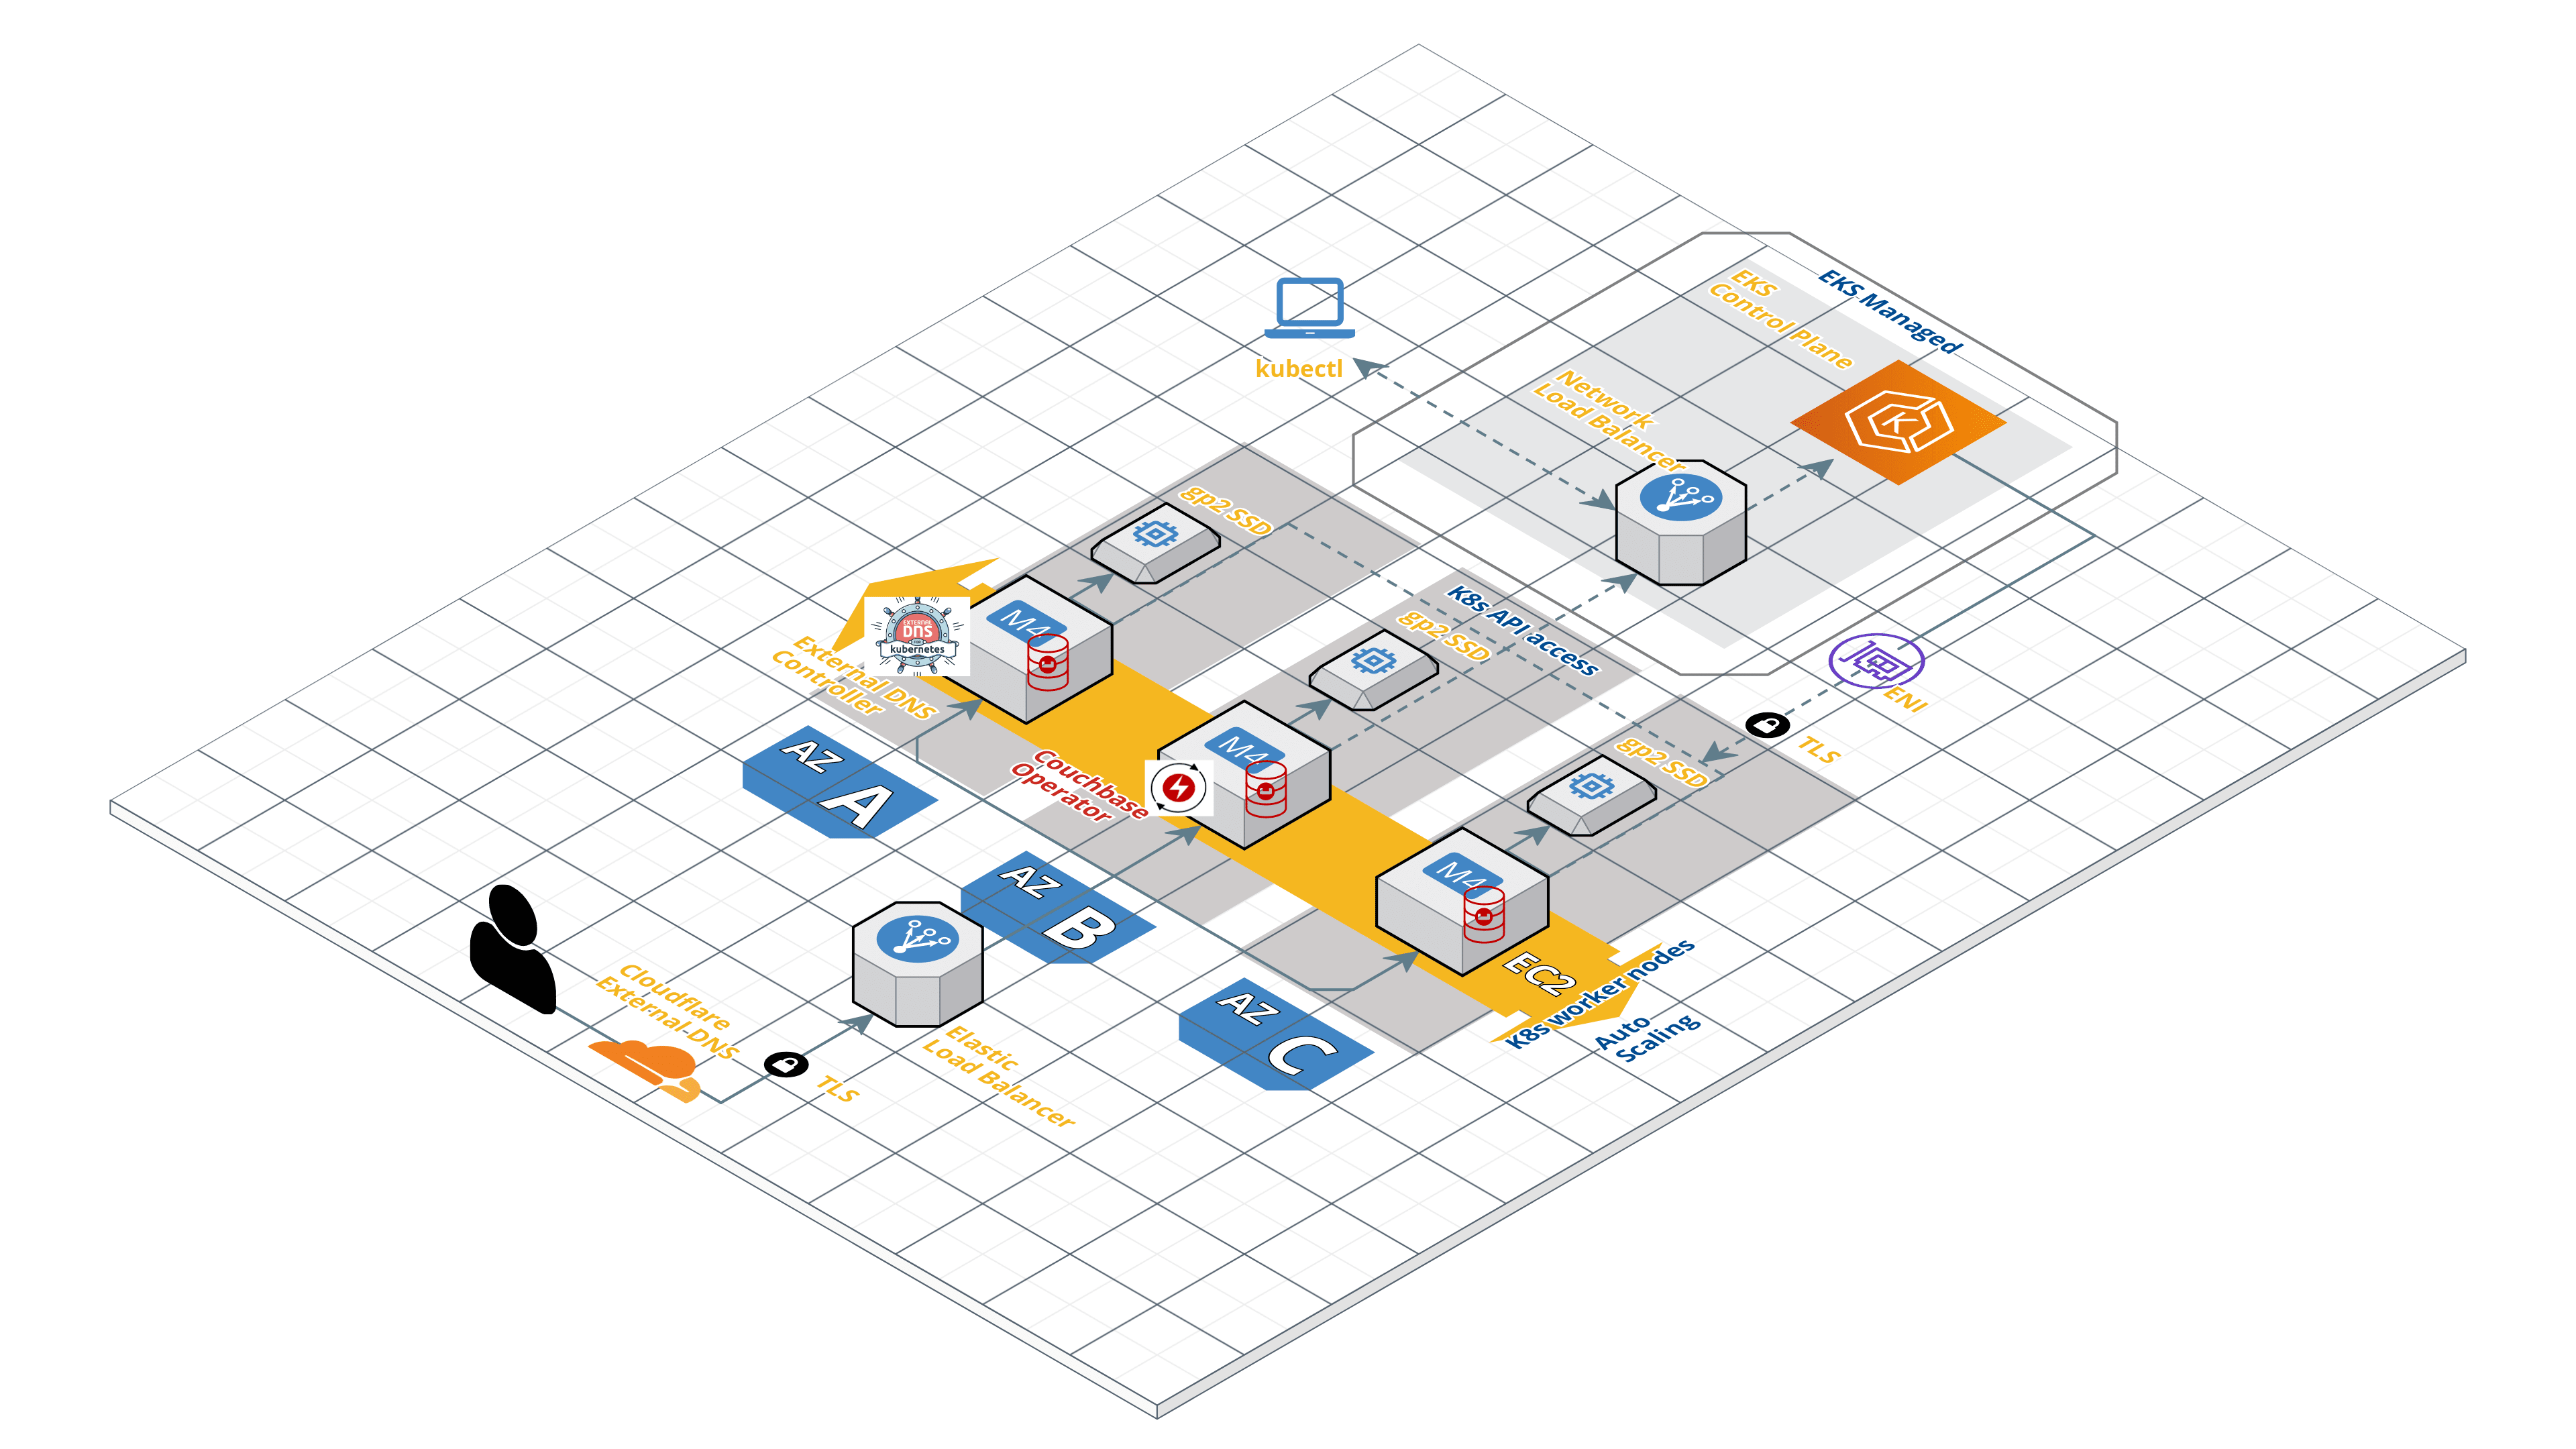
Public Networking with Couchbase Autonomous Operator using Kubernetes External DNS
Prerequisites
Before we begin, there are few important prerequisites below.
- Install and setup kubectl on your local machine – kubectl is a command-line interface for running commands against Kubernetes clusters.
- Install the latest AWS CLI – The AWS CLI is a unified tool that enables you to interact with AWS services using commands in your command-line shell. In this case, we will be using AWS CLI to communicate securely with the Kubernetes cluster running on AWS.
- Deploy the EKS cluster. The EKS cluster can be deployed using the AWS console or eksctl. In this article, we will be deploying the EKS cluster in the us-east-1 region with 3 worker nodes in three availability zones as mentioned below.
|
1 2 3 4 5 6 7 8 9 10 |
$ eksctl create cluster \ --name cb-op2-edns \ --region us-east-1 \ --zones us-east-1a,us-east-1b,us-east-1c \ --nodegroup-name eks-workers \ --node-type m4.xlarge \ --nodes 3 \ --nodes-min 3 \ --nodes-max 6 \ --node-ami auto |
4. You will need a public DNS domain. The domain can be purchased from a registrar such as GoDaddy, AWS Route 53, Namecheap, etc. For this article, I’m using my own registered (GoDaddy) domain balajiacloud.guru and I would suggest getting yours before continuing further.
5. Finally, you will need an External DNS provider. During the life cycle of a Couchbase cluster, nodes may be added and removed for cluster scaling, upgrades, or fault recovery. In each instance, new DNS names need to be created for any new Couchbase pods that are created, or DNS names removed from pods that are deleted. The DDNS provider exposes a REST API that allows the External DNS controller in Kubernetes to synchronize what the Couchbase cluster looks like with public DNS.
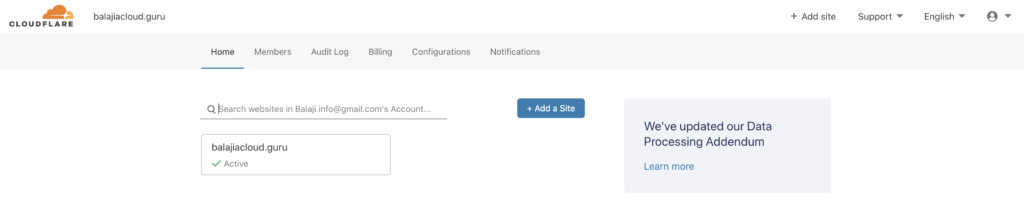
Here is the list of all documented and known External DNS solutions for the Kubernetes platform. In this article, we will be using Cloudflare as our External DNS provider. If you plan to use Cloudflare as your External DNS provider, then you will need to create a Cloudflare account and add the DNS domain to the account.
Creating TLS Certificates
The Operator ensures you configure your Couchbase clusters securely. If the Operator detects a cluster is being exposed on the public internet, it will enforce TLS encryption.
Before we generate TLS certificates we need to determine what DNS domain the Couchbase cluster will be in. We can use our balajiacloud.guru directly, but then it can only ever be used by a single Couchbase cluster. Therefore we shall use a subdomain called cbdemo.balajiacloud.guru as a unique namespace for our cluster. In general, a wildcard DNS name (*.cbdemo.balajiacloud.guru) will handle all public DNS names generated by the Operator. This needs to be added to the Couchbase cluster certificate.
We will use the EasyRSA to create the TLS Certificates. EasyRSA by OpenVPN makes operating a public key infrastructure (PKI) relatively simple and is the recommended method to get up and running quickly.
1. Let’s create a directory called tls and clone the EasyRSA repository.
|
1 2 3 4 5 6 7 8 |
$ git clone https://github.com/OpenVPN/easy-rsa Cloning into 'easy-rsa'... remote: Enumerating objects: 26, done. remote: Counting objects: 100% (26/26), done. remote: Compressing objects: 100% (20/20), done. remote: Total 1979 (delta 9), reused 19 (delta 6), pack-reused 1953 Receiving objects: 100% (1979/1979), 5.75 MiB | 1.92 MiB/s, done. Resolving deltas: 100% (859/859), done. |
2. Initialize and create the CA certificate/key. You will be prompted for a private key password and the CA common name (CN), something like Couchbase CA is sufficient. The CA certificate will be available as pki/ca.crt.
|
1 |
$ cd easy-rsa/easyrsa3 |
|
1 2 3 4 |
$ ./easyrsa init-pki init-pki complete; you may now create a CA or requests. Your newly created PKI dir is: /Users/balajinarayanan/k8s/couchbase/operator/tls/easy-rsa/easyrsa3/pki |
|
1 2 3 4 5 6 7 8 9 10 11 12 13 14 15 16 17 18 19 20 21 |
$ ./easyrsa build-ca Using SSL: openssl LibreSSL 2.8.3 Enter New CA Key Passphrase: Re-Enter New CA Key Passphrase: Generating RSA private key, 2048 bit long modulus ..........................................+++ ................................................................+++ e is 65537 (0x10001) You are about to be asked to enter information that will be incorporated into your certificate request. What you are about to enter is what is called a Distinguished Name or a DN. There are quite a few fields but you can leave some blank For some fields there will be a default value, If you enter '.', the field will be left blank. ----- Common Name (eg: your user, host, or server name) [Easy-RSA CA]:Couchbase CA CA creation complete and you may now import and sign cert requests. Your new CA certificate file for publishing is at: /Users/balajinarayanan/k8s/couchbase/operator/tls/easy-rsa/easyrsa3/pki/ca.crt |
3. Create the Couchbase Cluster Server Certificate.
You need to create a server wildcard certificate and a key to be used on Couchbase Server pods. In this article, we will use the below command to generate a certificate for the Couchbase cluster cbopedns in the demo namespace and using the cbdemo.balajiacloud.guru subdomain.
|
1 2 3 4 5 6 7 8 9 10 11 12 13 14 15 16 17 |
$ ./easyrsa --subject-alt-name="DNS:*.cbopedns,DNS:*.cbopedns.demo,DNS:*.cbopedns.demo.svc,DNS:*.demo.svc,DNS:cbopedns-srv,DNS:cbopedns-srv.demo,DNS:cbopedns-srv.demo.svc,DNS:localhost,DNS:*.cbopedns.cbdemo.balajiacloud.guru,DNS:*.cbdemo.balajiacloud.guru" build-server-full couchbase-server nopass Using SSL: openssl LibreSSL 2.8.3 Generating a 2048 bit RSA private key ..............................+++ .......................................................+++ writing new private key to '/Users/balajinarayanan/k8s/couchbase/operator/tls/easy-rsa/easyrsa3/pki/easy-rsa-10086.2Q0Q2S/tmp.emWXHL' ----- Using configuration from /Users/balajinarayanan/k8s/couchbase/operator/tls/easy-rsa/easyrsa3/pki/easy-rsa-10086.2Q0Q2S/tmp.Phz9Az Enter pass phrase for /Users/balajinarayanan/k8s/couchbase/operator/tls/easy-rsa/easyrsa3/pki/private/ca.key: Check that the request matches the signature Signature ok The Subject's Distinguished Name is as follows commonName :ASN.1 12:'couchbase-server' Certificate is to be certified until Aug 5 17:44:19 2022 GMT (825 days) Write out database with 1 new entries Data Base Updated |
Note: Password-protected keys are not supported by Couchbase Server or the Operator.
The key/certificate pair can be found in pki/private/couchbase-server.key and pki/issued/couchbase-server.crt and used as pkey.key and chain.pem, respectively, in the spec.networking.tls.static.serverSecret cluster parameter.
4. Private Key Formatting – Due to a limitation with Couchbase Server’s private key handling, server keys need to be PKCS#1 formatted.
First, let’s copy the .key and .pem file to the tls directory for easy access.
|
1 2 3 4 5 |
$ cp easy-rsa/easyrsa3/pki/private/couchbase-server.key pkey.key $ cp easy-rsa/easyrsa3/pki/issued/couchbase-server.crt chain.pem $ cp easy-rsa/easyrsa3/pki/ca.crt ca.crt |
Now, Lets format the server keys.
|
1 2 |
$ openssl rsa -in pkey.key -out pkey.key.der -outform DER writing RSA key |
|
1 2 |
$ openssl rsa -in pkey.key.der -inform DER -out pkey.key -outform PEM writing RSA key |
We will use these keys to create the Couchbase cluster server secret.
Deploy Couchbase Autonomous Operator 2.0 (Latest)
The Couchbase Autonomous Operator for Kubernetes enables cloud portability and automates operational best practices for deploying and managing Couchbase.
The operator is composed of two components: a per-cluster dynamic admission controller (DAC) and a per-namespace Operator. Refer to the operator architecture for additional information on what is required and security considerations.
1. Download the Operator package
You can download the latest Couchbase Autonomous Operator package and unzip it to the local machine. The Operator package contains YAML configuration files and command-line tools that you will use to install the Operator.
2. Install the Custom Resource Definition (CRD)
The first step in installing the Operator is to install the custom resource definitions (CRD) that describe the Couchbase resource types. This can be achieved by running the below command from the Operator package directory:
|
1 2 3 4 5 6 7 8 9 10 11 12 |
$ kubectl create -f crd.yaml customresourcedefinition.apiextensions.k8s.io/couchbasebuckets.couchbase.com created customresourcedefinition.apiextensions.k8s.io/couchbaseephemeralbuckets.couchbase.com created customresourcedefinition.apiextensions.k8s.io/couchbasememcachedbuckets.couchbase.com created customresourcedefinition.apiextensions.k8s.io/couchbasereplications.couchbase.com created customresourcedefinition.apiextensions.k8s.io/couchbaseusers.couchbase.com created customresourcedefinition.apiextensions.k8s.io/couchbasegroups.couchbase.com created customresourcedefinition.apiextensions.k8s.io/couchbaserolebindings.couchbase.com created customresourcedefinition.apiextensions.k8s.io/couchbaseclusters.couchbase.com created customresourcedefinition.apiextensions.k8s.io/couchbasebackups.couchbase.com created customresourcedefinition.apiextensions.k8s.io/couchbasebackuprestores.couchbase.com created |
3. Install the Dynamic Admission Controller (DAC)
The DAC allows custom resources to be modified and interrogated before a resource is accepted and committed to etcd. Running the DAC allows us to add sensible defaults to Couchbase cluster configurations thus minimizing the size of specifications. It also allows us to maintain backward compatibility when new attributes are added and must be populated. This makes the experience of using Couchbase resources similar to that of native resource types.
Now, let’s install the Dynamic Admission Controller.
Open a Terminal window and go to the directory where you unpacked the Operator package and cd to the bin folder. Run the following command to install the DAC into the default namespace.
|
1 2 3 4 5 6 7 8 9 10 |
$ ./cbopcfg --no-operator --namespace default | kubectl create -n default -f - serviceaccount/couchbase-operator-admission created clusterrole.rbac.authorization.k8s.io/couchbase-operator-admission created clusterrolebinding.rbac.authorization.k8s.io/couchbase-operator-admission created secret/couchbase-operator-admission created deployment.apps/couchbase-operator-admission created service/couchbase-operator-admission created mutatingwebhookconfiguration.admissionregistration.k8s.io/couchbase-operator-admission created validatingwebhookconfiguration.admissionregistration.k8s.io/couchbase-operator-admission created |
Confirm the admission controller has deployed successfully.
|
1 2 3 4 |
$ kubectl get deployments NAME READY UP-TO-DATE AVAILABLE AGE couchbase-operator-admission 1/1 1 1 70s |
4. Create a Namespace
Namespaces are a way to allocate cluster resources, plus set network and security policy between multiple applications. We will create a unique namespace called demo to deploy the Operator and later will use the demo namespace to deploy the Couchbase cluster.
Run the following command to create the namespace.
|
1 2 3 |
$ kubectl create namespace demo namespace/demo created |
Confirm the Namespace is created successfully.
|
1 2 3 4 5 6 7 8 |
$ kubectl get namespaces NAME STATUS AGE default Active 37m demo Active 39s kube-node-lease Active 37m kube-public Active 37m kube-system Active 37m |
5. Configure TLS
Secrets are specified in the CouchbaseCluster resource, and you will notice that in the cluster definition YAML while we deploy the Couchbase cluster.
Server Secret
Server secrets need to be mounted as a volume within the Couchbase Server pod with specific names. The certificate chain must be named chain.pem and the private key as pkey.key. Run the below command to create the Couchbase server secret.
|
1 2 3 |
$ kubectl create secret generic couchbase-server-tls -n demo --from-file tls/chain.pem --from-file tls/pkey.key secret/couchbase-server-tls created |
Operator Secret
The Operator client secrets are read directly from the API. It expects only a single value to be present; ca.crt is the top-level CA which is used to authenticate all TLS server certificate chains. Run the below command to create the Operator secret.
|
1 2 3 |
$ kubectl create secret generic couchbase-operator-tls -n demo --from-file tls/ca.crt secret/couchbase-operator-tls created |
6. Install the Couchbase Operator
Now let’s deploy the Operator in the demo namespace by running the following command, from the bin folder in the Operator package directory.
|
1 2 3 4 5 6 7 |
$ ./cbopcfg --no-admission --namespace demo | kubectl create -n demo -f - serviceaccount/couchbase-operator created role.rbac.authorization.k8s.io/couchbase-operator created rolebinding.rbac.authorization.k8s.io/couchbase-operator created deployment.apps/couchbase-operator created service/couchbase-operator created |
Running the above command downloads the Operator Docker image and creates a deployment, which manages a single instance of the Operator. The Operator pod is run-as deployment so that Kubernetes can reinitialize upon failure.
After you run the kubectl create command, it generally takes less than a minute for Kubernetes to deploy the Operator and for the Operator to be ready to run.
Check the status of the Operator Deployment
You can use the following command to check on the status of the deployment:
|
1 2 3 4 |
$ kubectl get deployments -n demo NAME READY UP-TO-DATE AVAILABLE AGE couchbase-operator 1/1 1 1 97s |
If you run this command immediately after the Operator is deployed, the output will have the AVAILABLE column as 0. However, the AVAILABLE field indicates that the pod is not ready yet since its value is 0 and not 1.
Run the following command to verify that the Operator pod has started successfully. If the Operator is up and running, the command returns an output where the READY field shows 1/1, such as:
|
1 2 3 4 |
$ kubectl get pods -l app=couchbase-operator -n demo NAME READY STATUS RESTARTS AGE couchbase-operator-7f799565f8-c29ts 1/1 Running 0 2m47s |
You can also check the logs to confirm that the Operator is up and running, by running the below command.
|
1 2 3 4 5 6 7 8 9 |
$ kubectl logs -f couchbase-operator-7f799565f8-c29ts -n demo {"level":"info","ts":1588493860.1096337,"logger":"main","msg":"couchbase-operator","version":"2.0.0 (build 317)","revision":"release"} {"level":"info","ts":1588493860.1100397,"logger":"leader","msg":"Trying to become the leader."} {"level":"info","ts":1588493860.1653795,"logger":"leader","msg":"No pre-existing lock was found."} {"level":"info","ts":1588493860.1700613,"logger":"leader","msg":"Became the leader."} {"level":"info","ts":1588493860.2087,"logger":"kubebuilder.controller","msg":"Starting EventSource","controller":"couchbase-controller","source":"kind source: /, Kind="} {"level":"info","ts":1588493860.3104734,"logger":"kubebuilder.controller","msg":"Starting Controller","controller":"couchbase-controller"} {"level":"info","ts":1588493860.4107096,"logger":"kubebuilder.controller","msg":"Starting workers","controller":"couchbase-controller","worker count":4} |
Deploy the External DNS
Assuming you have already completed the above steps to deploy the Operator in a namespace; the demo namespace, the next thing you need to install is the External DNS controller. This must be installed before the Couchbase cluster as the Operator will wait for DNS propagation before creating in Couchbase Server pods. This is because clients must be able to reach the Couchbase Server pods in order to serve traffic and prevent application errors.
1. Create a service account for the External DNS controller in the namespace where you are installing the Operator.
|
1 2 3 |
$ kubectl --namespace demo create serviceaccount external-dns serviceaccount/external-dns created |
2. The External DNS controller requires a role in order for it to be able to poll for resources and look for DNS records to replicate into the DDNS provider.
|
1 2 3 4 5 6 7 8 9 10 11 12 13 14 15 16 17 18 |
$ kubectl --namespace demo create -f - <<EOF apiVersion: rbac.authorization.k8s.io/v1beta1 kind: ClusterRole metadata: name: external-dns rules: - apiGroups: [""] resources: ["services","endpoints","pods"] verbs: ["get","watch","list"] - apiGroups: ["extensions"] resources: ["ingresses"] verbs: ["get","watch","list"] - apiGroups: [""] resources: ["nodes"] verbs: ["get","watch","list"] EOF clusterrole.rbac.authorization.k8s.io/external-dns created |
3. Now, link the external DNS role to the service account.
|
1 2 3 4 5 6 7 8 9 10 11 12 13 14 15 16 |
$ kubectl --namespace demo create -f - <<EOF apiVersion: rbac.authorization.k8s.io/v1beta1 kind: ClusterRoleBinding metadata: name: external-dns roleRef: apiGroup: rbac.authorization.k8s.io kind: ClusterRole name: external-dns subjects: - kind: ServiceAccount name: external-dns namespace: demo EOF clusterrolebinding.rbac.authorization.k8s.io/external-dns created |
4. The last step is to deploy the External DNS. Don’t forget to update the below values specific to your deployment.
-
- The spec.template.spec.serviceAccountName attribute ensures External DNS pods are running as the service account we set up. This grants the controller permission to poll resources and look for DDNS requests.
- The – -domain-filter argument tells External DNS to only consider DDNS entries that are associated with DNS entries related to our balajiacloud.guru domain.
- The – -txt-owner-id argument tells External DNS to label TXT management records with a string unique to the External DNS instance. External DNS uses TXT records to record metadata , especially ownership information associated with the DNS records it is managing. If the balajiacloud.guru domain is used by multiple instances of External DNS without specifying any ownership, then they would conflict with one another.
- The CF_API_KEY environment variable is used by the Cloudflare provider to authenticate against the Cloudflare API.
- The CF_API_EMAIL environment variable is used by the Cloudflare provider to identify what account to use against the Cloudflare API.
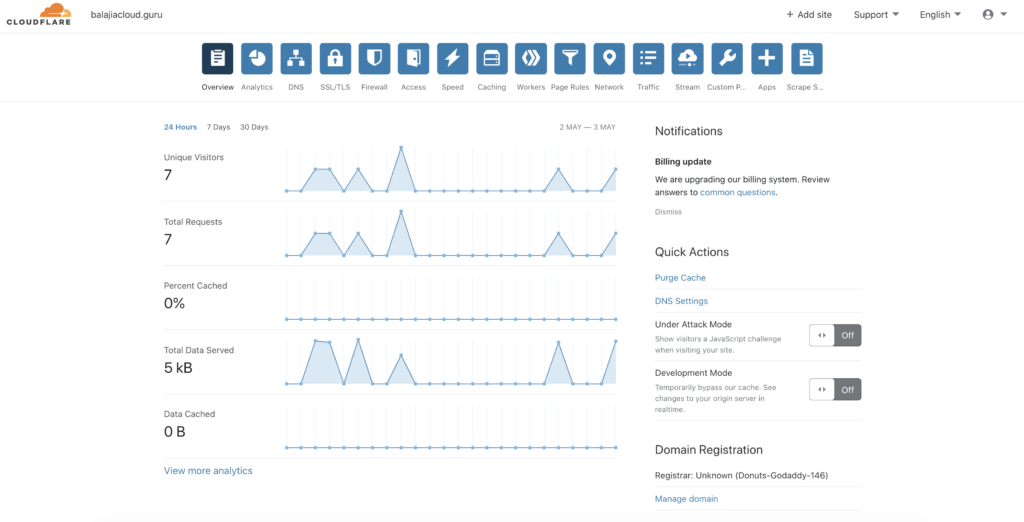
You can get the CF_API_KEY from the Cloudfare account’s overview page. Click on “Get your API token” link as shown below and view the Global API Key.

Deploy the External DNS
Finally, install the External DNS deployment by running the below command.
|
1 2 3 4 5 6 7 8 9 10 11 12 13 14 15 16 17 18 19 20 21 22 23 24 25 26 27 28 29 30 31 |
$ kubectl --namespace demo create -f - <<EOF apiVersion: apps/v1 kind: Deployment metadata: name: external-dns spec: selector: matchLabels: app: external-dns template: metadata: labels: app: external-dns spec: serviceAccountName: external-dns containers: - name: external-dns image: registry.opensource.zalan.do/teapot/external-dns:latest args: - --source=service - --domain-filter=balajiacloud.guru - --provider=cloudflare - --txt-owner-id=cbop-edns-demo env: - name: CF_API_KEY value: YOUR_CF_API_KEY - name: CF_API_EMAIL value: YOUR_CF_API_EMAIL EOF deployment.apps/external-dns created |
Check the status of the External DNS Deployment
You can use the following command to check on the status of the deployment:
|
1 2 3 4 5 |
$ kubectl get deployments -n demo NAME READY UP-TO-DATE AVAILABLE AGE couchbase-operator 1/1 1 1 10m external-dns 1/1 1 1 21s |
Run the following command to verify that the external-dns has started successfully. If the external-dns is up and running, the command returns an output where the RUNNING field shows 1/1, such as:
|
1 2 3 4 5 |
$ kubectl get pods -n demo NAME READY STATUS RESTARTS AGE couchbase-operator-7f799565f8-c29ts 1/1 Running 0 11m external-dns-6f74575d54-fp2wh 1/1 Running 0 59s |
You can also check the logs to confirm that the external-dns is up and running.
|
1 2 3 4 5 6 |
$ kubectl logs -f external-dns-6f74575d54-fp2wh -n demo time="2020-05-03T08:27:44Z" level=info msg="config: {Master: KubeConfig: RequestTimeout:30s IstioIngressGatewayServices:[] ContourLoadBalancerService:heptio-contour/contour SkipperRouteGroupVersion:zalando.org/v1 Sources:[service] Namespace: AnnotationFilter: FQDNTemplate: CombineFQDNAndAnnotation:false IgnoreHostnameAnnotation:false Compatibility: PublishInternal:false PublishHostIP:false AlwaysPublishNotReadyAddresses:false ConnectorSourceServer:localhost:8080 Provider:cloudflare GoogleProject: GoogleBatchChangeSize:1000 GoogleBatchChangeInterval:1s DomainFilter:[balajiacloud.guru] ExcludeDomains:[] ZoneIDFilter:[] AlibabaCloudConfigFile:/etc/kubernetes/alibaba-cloud.json AlibabaCloudZoneType: AWSZoneType: AWSZoneTagFilter:[] AWSAssumeRole: AWSBatchChangeSize:1000 AWSBatchChangeInterval:1s AWSEvaluateTargetHealth:true AWSAPIRetries:3 AWSPreferCNAME:false AzureConfigFile:/etc/kubernetes/azure.json AzureResourceGroup: AzureSubscriptionID: AzureUserAssignedIdentityClientID: CloudflareProxied:false CloudflareZonesPerPage:50 CoreDNSPrefix:/skydns/ RcodezeroTXTEncrypt:false AkamaiServiceConsumerDomain: AkamaiClientToken: AkamaiClientSecret: AkamaiAccessToken: InfobloxGridHost: InfobloxWapiPort:443 InfobloxWapiUsername:admin InfobloxWapiPassword: InfobloxWapiVersion:2.3.1 InfobloxSSLVerify:true InfobloxView: InfobloxMaxResults:0 DynCustomerName: DynUsername: DynPassword: DynMinTTLSeconds:0 OCIConfigFile:/etc/kubernetes/oci.yaml InMemoryZones:[] OVHEndpoint:ovh-eu PDNSServer:http://localhost:8081 PDNSAPIKey: PDNSTLSEnabled:false TLSCA: TLSClientCert: TLSClientCertKey: Policy:sync Registry:txt TXTOwnerID:cbop-edns-demo TXTPrefix: Interval:1m0s Once:false DryRun:false UpdateEvents:false LogFormat:text MetricsAddress::7979 LogLevel:info TXTCacheInterval:0s ExoscaleEndpoint:https://api.exoscale.ch/dns ExoscaleAPIKey: ExoscaleAPISecret: CRDSourceAPIVersion:externaldns.k8s.io/v1alpha1 CRDSourceKind:DNSEndpoint ServiceTypeFilter:[] CFAPIEndpoint: CFUsername: CFPassword: RFC2136Host: RFC2136Port:0 RFC2136Zone: RFC2136Insecure:false RFC2136TSIGKeyName: RFC2136TSIGSecret: RFC2136TSIGSecretAlg: RFC2136TAXFR:false RFC2136MinTTL:0s NS1Endpoint: NS1IgnoreSSL:false TransIPAccountName: TransIPPrivateKeyFile:}" time="2020-05-03T08:27:44Z" level=info msg="Instantiating new Kubernetes client" time="2020-05-03T08:27:44Z" level=info msg="Using inCluster-config based on serviceaccount-token" time="2020-05-03T08:27:44Z" level=info msg="Created Kubernetes client https://10.100.0.1:443" |
We have now successfully deployed the External DNS.
Deploy the Couchbase Cluster
Now that we have deployed the Couchbase Autonomous Operator and the External DNS in EKS, now let’s deploy the Couchbase Cluster.
We will deploy the Couchbase cluster with 3 data nodes in 3 availability zones with the minimum required configuration parameters. Please refer to the Configure Public Networking for the required configuration options.
Create the Secret for Couchbase Admin Console
Let’s create a secret credential that will be used by the administrative web console during login. When you create the below secret in your Kubernetes cluster, the secret sets the username to Administrator and the password to password.
|
1 2 3 4 5 6 7 8 9 10 11 12 |
$ kubectl --namespace demo create -f - <<EOF apiVersion: v1 kind: Secret metadata: name: cb-example-auth type: Opaque data: username: QWRtaW5pc3RyYXRvcg== # Administrator password: cGFzc3dvcmQ= # password EOF secret/cbopedns-auth created |
Deploy the Couchbase cluster definition
We will use the default StorageClass that we get with EKS, let’s check by running the following command. You can create a storage class that meets your requirements.
|
1 2 3 4 |
$ kubectl get sc NAME PROVISIONER AGE gp2 (default) kubernetes.io/aws-ebs 67m |
To deploy a Couchbase Server cluster using the Operator, all you have to do is create a Couchbase cluster definition that describes what you want the cluster to look like (e.g. the number of nodes, types of services, system resources, etc), and then push that cluster definition into Kubernetes.
The Operator package contains an example CouchbaseCluster definition file (couchbase-cluster.yaml).
The below cluster definition will deploy the Couchbase cluster with 3 Data pods across 3 different zones using persistent volumes. Please check the Couchbase Cluster Resource documentation for the complete list of the cluster configuration.
|
1 2 3 4 5 6 7 8 9 10 11 12 13 14 15 16 17 18 19 20 21 22 23 24 25 26 27 28 29 30 31 32 33 34 35 36 37 38 39 40 41 42 43 44 45 46 47 48 49 50 51 52 53 54 55 56 57 58 59 60 61 62 63 64 65 66 67 68 69 70 71 72 73 74 75 76 77 78 79 80 81 |
$ kubectl --namespace demo create -f - <<EOF apiVersion: couchbase.com/v2 kind: CouchbaseBucket metadata: name: default --- apiVersion: couchbase.com/v2 kind: CouchbaseCluster metadata: name: cbopedns spec: image: couchbase/server:6.5.0 networking: tls: static: serverSecret: couchbase-server-tls operatorSecret: couchbase-operator-tls exposeAdminConsole: true adminConsoleServiceType: LoadBalancer exposedFeatures: - xdcr - client exposedFeatureServiceType: LoadBalancer dns: domain: cbdemo.balajiacloud.guru disableBucketManagement: false cluster: clusterName: cbopedns dataServiceMemoryQuota: 2048Mi security: adminSecret: cbopedns-auth servers: - name: data-east-1a size: 1 services: - data serverGroups: - us-east-1a pod: volumeMounts: default: pvc-default # /opt/couchbase/var/lib/couchbase data: pvc-data # /mnt/data - name: data-east-1b size: 1 services: - data serverGroups: - us-east-1b pod: volumeMounts: default: pvc-default data: pvc-data - name: data-east-1c size: 1 services: - data serverGroups: - us-east-1c pod: volumeMounts: default: pvc-default data: pvc-data volumeClaimTemplates: - metadata: name: pvc-default spec: storageClassName: gp2 resources: requests: storage: 1Gi - metadata: name: pvc-data spec: storageClassName: gp2 resources: requests: storage: 5Gi EOF couchbasebucket.couchbase.com/default created couchbasecluster.couchbase.com/cbopedns created |
After receiving the configuration, the Operator automatically begins creating the cluster. The amount of time it takes to create the cluster depends on the configuration. You can track the progress of cluster creation using the cluster status.
Verifying the Deployment
To check the progress run the below command, which will watch (-w argument) the progress of pods creating. If all goes fine then we will have three Couchbase cluster pods hosting the services as per the Couchbase cluster definition.
|
1 2 3 4 5 6 7 |
kubectl get pods --namespace demo -w cbopedns-0000 1/1 Running 0 9m15s cbopedns-0001 1/1 Running 0 8m34s cbopedns-0002 1/1 Running 0 8m couchbase-operator-7f799565f8-c29ts 1/1 Running 1 36m external-dns-6f74575d54-fp2wh 1/1 Running 0 26m |
If for any reason there is an exception, then you can find the details of exception from the couchbase-operator log file. To display the last 20 lines of the log, copy the name of your Operator pod and run the below command by replacing the Operator pod name with the name in your environment.
|
1 2 3 4 5 6 7 8 9 10 11 12 13 14 15 16 17 |
$ kubectl logs couchbase-operator-7f799565f8-c29ts -n demo --tail 20 {"level":"info","ts":1588495709.7896624,"logger":"cluster","msg":"Watching new cluster","cluster":"demo/cbopedns"} {"level":"info","ts":1588495709.7898946,"logger":"cluster","msg":"Janitor starting","cluster":"demo/cbopedns"} {"level":"info","ts":1588495709.7987065,"logger":"cluster","msg":"Couchbase client starting","cluster":"demo/cbopedns"} {"level":"info","ts":1588495709.818881,"logger":"cluster","msg":"Cluster already exists, the operator will now manage it","cluster":"demo/cbopedns"} {"level":"info","ts":1588495709.8903878,"logger":"cluster","msg":"Running","cluster":"demo/cbopedns"} {"level":"info","ts":1588495710.0405645,"logger":"couchbaseutil","msg":"Cluster status","cluster":"demo/cbopedns","balance":"unbalanced","rebalancing":false} {"level":"info","ts":1588495710.0406282,"logger":"couchbaseutil","msg":"Node status","cluster":"demo/cbopedns","name":"cbopedns-0000","version":"6.5.0","class":"data-east-1a","managed":true,"status":"active"} {"level":"info","ts":1588495710.0406532,"logger":"couchbaseutil","msg":"Node status","cluster":"demo/cbopedns","name":"cbopedns-0001","version":"6.5.0","class":"data-east-1b","managed":true,"status":"pending_add"} {"level":"info","ts":1588495710.040662,"logger":"couchbaseutil","msg":"Node status","cluster":"demo/cbopedns","name":"cbopedns-0002","version":"6.5.0","class":"data-east-1c","managed":true,"status":"pending_add"} {"level":"info","ts":1588495710.0406775,"logger":"scheduler","msg":"Scheduler status","cluster":"demo/cbopedns","name":"cbopedns-0000","class":"data-east-1a","group":"us-east-1a"} {"level":"info","ts":1588495710.0406868,"logger":"scheduler","msg":"Scheduler status","cluster":"demo/cbopedns","name":"cbopedns-0001","class":"data-east-1b","group":"us-east-1b"} {"level":"info","ts":1588495710.040695,"logger":"scheduler","msg":"Scheduler status","cluster":"demo/cbopedns","name":"cbopedns-0002","class":"data-east-1c","group":"us-east-1c"} {"level":"info","ts":1588495755.230221,"logger":"couchbaseutil","msg":"Rebalancing","cluster":"demo/cbopedns","progress":0} {"level":"info","ts":1588495759.2380211,"logger":"cluster","msg":"Rebalance completed successfully","cluster":"demo/cbopedns"} {"level":"info","ts":1588495759.286947,"logger":"cluster","msg":"Reconcile completed","cluster":"demo/cbopedns"} |
Let’s make sure we check the external-dns logs to see if the DNS records for the Couchbase pods are being created.
|
1 2 3 4 5 6 7 8 |
$ kubectl logs -f external-dns-6f74575d54-fp2wh -n demo time="2020-05-03T08:46:46Z" level=info msg="Changing record." action=CREATE record=cbopedns-0000.cbdemo.balajiacloud.guru targets=1 ttl=1 type=CNAME zone=c3b835b8ec89e43a2492b62d5d82cc86 time="2020-05-03T08:46:46Z" level=info msg="Changing record." action=CREATE record=cbopedns-0002.cbdemo.balajiacloud.guru targets=1 ttl=1 type=CNAME zone=c3b835b8ec89e43a2492b62d5d82cc86 time="2020-05-03T08:46:47Z" level=info msg="Changing record." action=CREATE record=cbopedns-0001.cbdemo.balajiacloud.guru targets=1 ttl=1 type=CNAME zone=c3b835b8ec89e43a2492b62d5d82cc86 time="2020-05-03T08:46:47Z" level=info msg="Changing record." action=CREATE record=cbopedns-0000.cbdemo.balajiacloud.guru targets=1 ttl=1 type=TXT zone=c3b835b8ec89e43a2492b62d5d82cc86 time="2020-05-03T08:46:47Z" level=info msg="Changing record." action=CREATE record=cbopedns-0002.cbdemo.balajiacloud.guru targets=1 ttl=1 type=TXT zone=c3b835b8ec89e43a2492b62d5d82cc86 time="2020-05-03T08:46:47Z" level=info msg="Changing record." action=CREATE record=cbopedns-0001.cbdemo.balajiacloud.guru targets=1 ttl=1 type=TXT zone=c3b835b8ec89e43a2492b62d5d82cc86 |
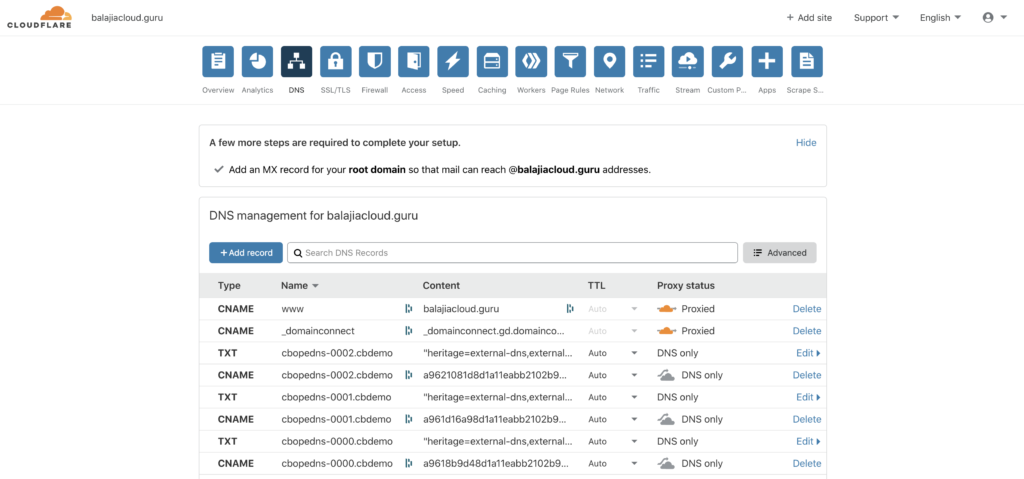
At this point, you can also check the DNS page by logging to your Cloudfare account. You can see the CNAME and TXT records added by your External DNS provider.
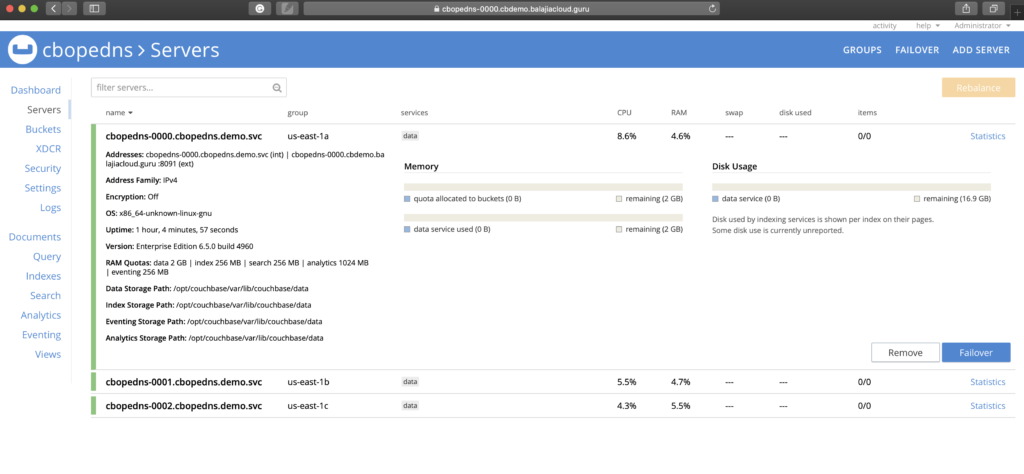
Accessing the Couchbase Web Console
Now, you have a publicly addressable cluster that you can start using it. In the EKS environment, the Couchbase web console can be accessed through an exposed LoadBalancer service of a specific pod. You should be able to connect to the Couchbase console using the URL https://cbopedns-0000.cbdemo.balajiacloud.guru:18091/ (replace the pod name and the DNS domain based on your environment).
Please refer to Access the Couchbase Server User Interface documentation for more details on how to connect to the Couchbase console. Also, you can check Configure Client SDKs for details on how to connect client SDK with the Couchbase cluster while using DNS Based Addressing with External DNS.
Conclusion
In this blog, we saw how the Couchbase cluster can be publicly addressable using Couchbase Operator with Kubernetes External DNS. We discussed how the External DNS solution helps to dynamically manage the external DNS records from within a Kubernetes cluster. In this article, we used Amazon EKS as our Kubernetes environment but the same steps would also be applicable if you are using other Kubernetes environments like AKS, GKE, OpenShift, etc.
Resources
- Try it out: Download Couchbase Autonomous Operator 2.0
- Share your thoughts on the Couchbase Forums
- Documentation:
Thanks Balaji. This is useful.
Is registering a new public DNS domain necessary? I mean, an aws domain (e.g. ap-south-1.elb.amazonaws.com) can not be used, may be with a subdomain?