Have you ever dealt with RPC? It stands for Remote Procedure Call, a famous term from distributed computing for when you need to call a service routine from one machine to another . It’s like the basics for anyone who wishes to create REST/SOAP requests or GraphQL architectures. You need to understand a bunch of concepts like parallelism, clusters, network latency, failover and fallbacks, just to get started. This article discusses integrating ASP.NET Core with gRPC.
Although it’s an interesting topic to discuss, that’s not the focus here. I’ll talk about gRPC, the official Google’s modernization of the protocol into a powerful framework. It is modern, open source and can run in any type of environment. It adds inherent load balancing, tracing, health checking and authentication (this one, by the way, is required right at the beginning).
Before you start thinking that Google wants to “remake” the web, since you already have HTTP and web services to provide such features, gRPC goes a bit beyond. It’s based in HTTP/2 which, automatically, says it’s much faster. Besides that, Google redesigned it in a way speed is at the top of the priority list.
In always-needy architectures like those huge companies (like Netflix, Cisco and Google itself) have, efficiency is a must. Microservices and distributed systems may communicate with each other through protocols and channels that should be fast.
Think about it: if you choose RESTful, there’s a couple of design patterns and rules you need to obey. In turn, you’re going to be working under HTTP (verbose) and making hundreds of calls because your code design can’t be messed up by ugly endpoints. While there are already have options like GraphQL, for example, does it really need to communicate with HTTP-only?
If your client and server applications are made by you (or your company), and there’s no need to expose it out there (still, options would be available through public Web Services, API Gateway, etc.), why not?
It’s faster, available to 10 programming languages (including web, i.e., JavaScript into Docker images), bi-directional (for cases where you need constant data flowing through streams from both sides) and so much more.
All the magic happens with Protocol Buffers and stubs. Of course, protobuf is Google’s as well. It’s their language/platform-neutral mechanism for data serialization and deserialization. The good news is that you’re not stuck into the proto universe, gRPC is encoding agnostic too, which means that JSON, XML, etc. can also be used to serialize the data if you prefer so.
Like everything else, there are pros and cons. While it is good to have the familiar JSON syntax, protobuf allows validations, data types, service creation. On the other hand, it is not human readable, hard to decode and takes more time to process compared to JSON.
This is how a gRPC workflow takes place:
Protobufs > protoc > generated code/stubs > client/server
First, you create your proto files, defining not only the data structure, types and validations but also the services to be implemented by the server app along with the contract to be followed by the client stubs.
Then, depending on the language and platform you’re using, and after you compile it (protoc, the proto compiler), some code is going to be autogenerated, based on those definitions. After that, you can create your server and client code.
It’s time to stop talking now and move to action. For this article, I’ll demonstrate how to create a gRPC server based in a proto contract, as well as two clients: one for a Console App and another for a fully-functional web application (made with ASP.NET Web MVC), for you to check how this type of integration works for the two worlds.
Setup
Please, make sure you have the latest version of Visual Studio (Community Edition). When installing it, check the ASP.NET and web development workload. If you already have VS installed, but not this workload, please refer to this link. Finally, .NET Core 3.0 SDK (or later) is also needed.
There’s no need to install anything related to gRPC. Visual Studio already has presets for it, and the rest are NuGet dependencies.
Open Visual Studio and go to “Create a new project” option. (The completed project can be found here.)Then, search for the “grpc” term and select the option like below:
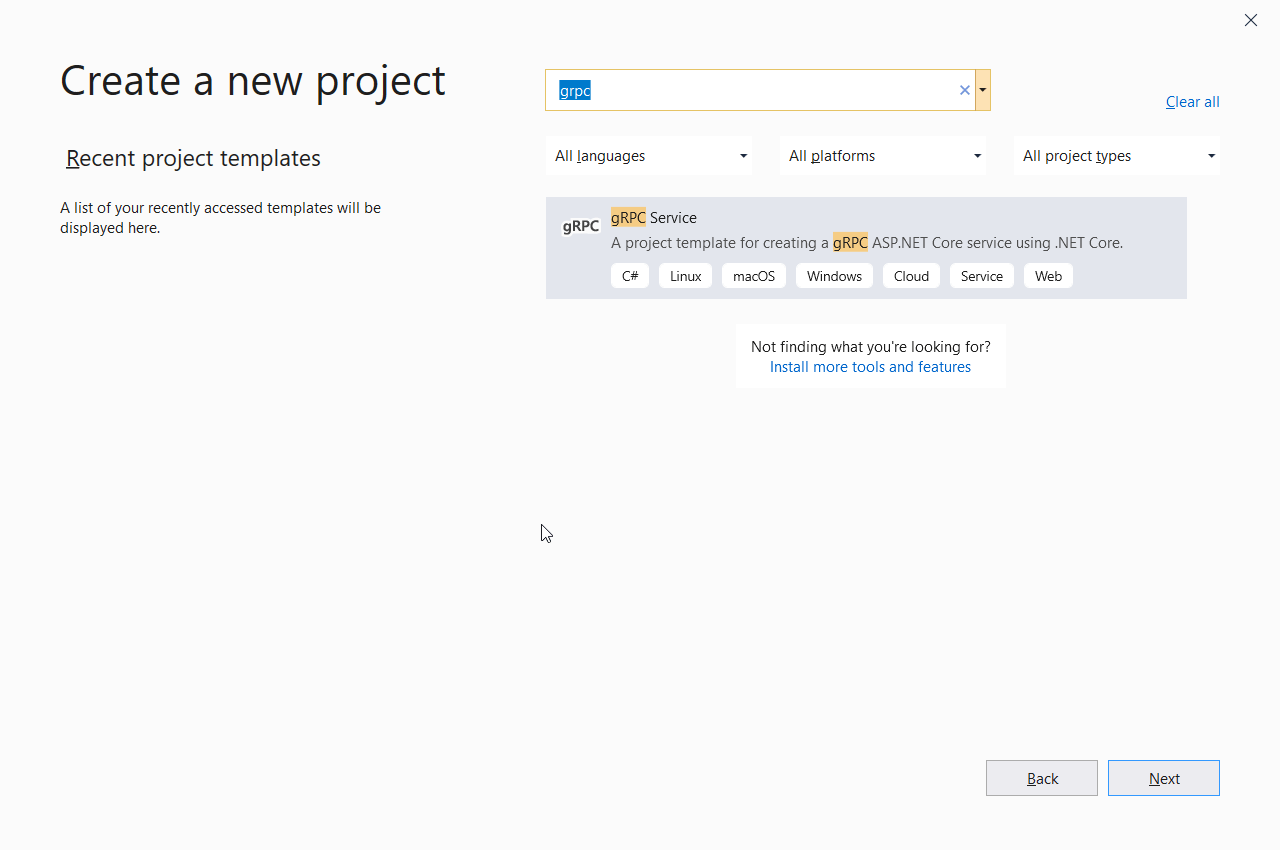
Figure 1. Creating a new gRPC service project
Click Next. Then, type the name of the project like in Figure 2, select the directory of preference and click Create.
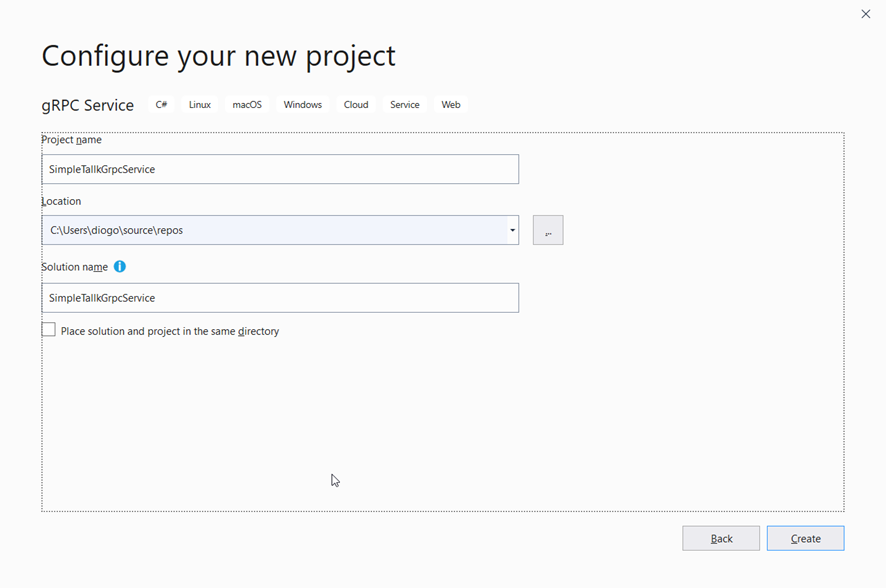
Figure 2. Giving the project a name
For the next screen, select the only available option “gRPC Service” and, finally, click the Create button.
Take a look at the generated files:
- greet.proto: this is the protobuf file I mentioned earlier. Here, you get to see:
- The syntax. It’s important because it tells which version of protobuf syntax is used in the file.
- The optional namespace for the C# service. This option comes just because it’s using the VS gRPC template. Giving a proper namespace is important since the autogenerated code reflects this setting.
- The service, Greeter. This config sets the methods (types, params and returns) of the interface contract. It’s here where you say how clients and servers communicate with each other.
- The types. For each different object that is not a primitive type, you need to declare it as a message. It is like the class you’re used to. Note also that each message’s attribute must receive a type (primitive or another message), a name and a number. The number refers to the order of that attribute in the message.
- The Services folder: the implementation, also autogenerated, of each service declared in the proto.
- The rest of the files are just the common ones.
Have a look at Startup.cs. There, the methods to configure the services add gRPC services to the service collection, mapping to the generated service class. You don’t need to change anything here.
Now move to the Console App client. Open a new instance of Visual Studio and create a new project again. This time, a Console App (.NET Core). Click Next, enter a name for the project and click Create.
Nothing new. However, note that no gRPC template was applied to this project. It means that you still need to add the dependencies via NuGet. For that, open the Package Manager Console (via Tools > NuGet Package Manager) and run the following command:
|
1 2 3 |
Install-Package Grpc.Net.Client Install-Package Google.Protobuf Install-Package Grpc.Tools |
Those are important because they implement the client for gRPC in .NET Core projects, as well as the API for protobuf handling in C# and the autogenerating code features.
Since the proto file is the contract between both worlds, you need to copy the greet.proto (along with the folder) generated in the server project to this one. Then, edit the .csproj file by right-clicking the project and, then, “Edit Project file”. Add the following:
|
1 2 3 |
<ItemGroup> <Protobuf Include="Protos\greet.proto" GrpcServices="Client" /> </ItemGroup> |
That reference is important so the gRPC tools can autogenerate code by the proto file. For that, after everything’s saved, build the project. No code file is visible in the project tree; they’ll be in the background.
Now, update your Program.cs file to the following:
Listing 1. Calling the gRPC service.
|
1 2 3 4 5 6 7 8 9 10 11 12 13 14 15 16 17 18 19 |
using System; using Grpc.Net.Client; using SimpleTalkGrpcService; namespace GrpcGreeterClient { class Program { static async Task Main(string[] args) { using var channel = GrpcChannel.ForAddress("https://localhost:5001"); var client = new Greeter.GreeterClient(channel); var reply = await client.SayHelloAsync( new HelloRequest { Name = "GreeterClient" }); Console.WriteLine("Greeting: " + reply.Message); Console.WriteLine("Press any key to exit..."); Console.ReadKey(); } } } |
Everything works around the GrpcChannel class. It opens the channel (if it is on, obviously) and returns the channel to that connection. Now, it’s time to make use of the autogenerated object via Greeter class: you instantiate its service constructor by passing the channel as a parameter. The rest is just methods and attributes created in the proto before being used in C# code.
In order to test, just start first the service and wait for it to print the info messages at the console, then start the client. You’ll see the following message:
|
1 2 |
Greeting: Hello GreeterClient Press any key to exit... |
Congrats! This is your first client-server example working.
Simple, isn’t it? Time to complicate a bit more with a web application involved.
Creating the ASP.NET example
The second example includes a web page that is going to be managed by jQuery and Ajax calls. Even though it is now possible to work with gRPC calls from the web browser, the backend of the API (made in ASP.NET) will handle that. First, because you can get to see how an API can orchestrate remote procedure calls and, second, because this part of the gRPC framework still has some limitations.
However, before proceeding, create the proto file. This is the one which defines the methods and signatures for the CRUD of products. It is the contract ruler, so neither the client nor the service can do anything without the proper protobuf settings.
Go back to the services project. Listing 2 shows how it’ll look. Make sure to add the code after creating the product.proto file into the existing Protos folder.
Listing 2. The product.proto file.
|
1 2 3 4 5 6 7 8 9 10 11 12 13 14 15 16 17 18 19 20 21 22 23 24 |
syntax = "proto3"; option csharp_namespace = "ProductsService"; package products; service ProductService { rpc GetAll (Empty) returns (ProductList) {} rpc Get (ProductId) returns (Product) {} rpc Insert (Product) returns (Product) {} rpc Update (Product) returns (Product) {} rpc Delete (ProductId) returns (Empty) {} } message Empty {} message Product { int32 productId = 1; string name = 2; int32 amount = 3; string brand = 4; float value = 5; } message ProductList { repeated Product products = 1; } message ProductId { int32 id = 1; } |
Some things are new this time. The service is wider, with more methods than the previous version. Most of them deal with new messages as well which, in turn, have new attributes (like int32 for integers and float for decimal numbers). Go ahead and have a look over the possible data types for protobufs.
Since you’re already in the server project, take this chance to update the project to the CRUD needs. It’s going to be an in-memory CRUD; it means that you’ll maintain a list of the products in the memory that’ll survive until the server project stops. While it’s better to store the data permanently (feel free to upgrade in such way with a database of your choice), for this example, the in-memory list is enough. The web client will be restarted from time to time, but the server is going to be up all the time, so it emulates how a database in production would look.
Remember that Visual Studio needs to know it is a gRPC project, for client and server, too. So, again, right-click the project, go to Edit Project file and add the following:
|
1 2 3 |
<ItemGroup> <Protobuf Include="Protos\product.proto" GrpcServices="Server" /> </ItemGroup> |
First, change the service. You can decide to create a new one or change the current one to the shown in Listing 3.
Listing 3. The GrpcCrudService.cs code.
|
1 2 3 4 5 6 7 8 9 10 11 12 13 14 15 16 17 18 19 20 21 22 23 24 25 26 27 28 29 30 31 32 33 34 35 36 37 38 39 40 41 42 43 44 45 46 47 48 49 50 51 52 53 54 55 56 57 58 59 60 61 62 63 64 65 66 67 |
using System; using System.Collections.Generic; using System.Linq; using System.Threading.Tasks; using Grpc.Core; using Microsoft.Extensions.Logging; namespace ProductsService { public class GrpcCrudService : ProductService.ProductServiceBase { private readonly List<Product> _products = new List<Product>(); private int idCount = 0; private readonly ILogger<GrpcCrudService> _logger; public GrpcCrudService(ILogger<GrpcCrudService> logger) { _logger = logger; _products.Add(new Product() { ProductId = idCount++, Name = "Farm Flour", Amount = 10, Brand = "Bill's Corn", Value = 2.33f }); } public override Task<ProductList> GetAll(Empty empty, ServerCallContext context) { ProductList pl = new ProductList(); pl.Products.AddRange(_products); return Task.FromResult(pl); } public override Task<Product> Get(ProductId productId, ServerCallContext context) { return Task.FromResult( // (from p in _products where p.ProductId == productId.Id select p).FirstOrDefault()); } public override Task<Product> Insert(Product product, ServerCallContext context) { product.ProductId = idCount++; _products.Add(product); return Task.FromResult(product); } public override Task<Product> Update(Product product, ServerCallContext context) { var productToUpdate = (from p in _products where p.ProductId == product.ProductId select p).FirstOrDefault(); if (productToUpdate != null) { productToUpdate.Name = product.Name; productToUpdate.Amount = product.Amount; productToUpdate.Brand = product.Brand; productToUpdate.Value = product.Value; return Task.FromResult(product); } return Task.FromException<Product>(new EntryPointNotFoundException()); } public override Task<Empty> Delete(ProductId productId, ServerCallContext context) { var productToDelete = (from p in _products where p.ProductId == productId.Id select p).FirstOrDefault(); if (productToDelete == null) { return Task.FromException<Empty>(new EntryPointNotFoundException()); } _products.Remove(productToDelete); return Task.FromResult(new Empty()); } } } |
First, and most importantly, note the extends made in the class declaration. After you save everything and rebuild the project, the autogenerated classes are re-generated. Don’t forget to update the extends alike. The namespace must also change according to what’s informed in the proto file. You’re creating a product and adding it to the initial list, in order to have some data for testing.
The rest are just methods corresponding to each one of the declarations made in the proto. Since gRPC works with an async API, you must provide signatures that attend the same (by the use of System.Threading.Tasks.Task class). The manipulation over the list makes use of Linq, to simplify your life. Plus, for the cases where the given id was not found in the list, the code throws exceptions via FromException method, provided by Task class. Feel free to customize with your own exceptions.
Note that, for this part of the code, you’re also using the same classes declared in the proto, because they were re-generated. In case your VS can’t find them, comment any line of code with compilation errors and try to build the project again. Repeat it until the proto classes become recognizable by Visual Studio.
Final changes belong to the Startup class. Open it and change the name of the service in the generics of the MapGrpcService method. Change it to GrpcCrudService, the new service. Also, add the following to the ConfigureServices method:
|
1 |
services.AddSingleton<GrpcCrudService>(); |
And the respective import at the beginning of the file:
|
1 |
using ProductsService; |
You need this to transform the service in a singleton, in order to maintain the list and its values every time a new request arrives. Otherwise, the list would be created for each request, since each request represented a new instance of the service.
Move on to the web project. For this, open a new window of Visual Studio and create another project. Search for ASP.NET Core Web and select it like in Figure 3.
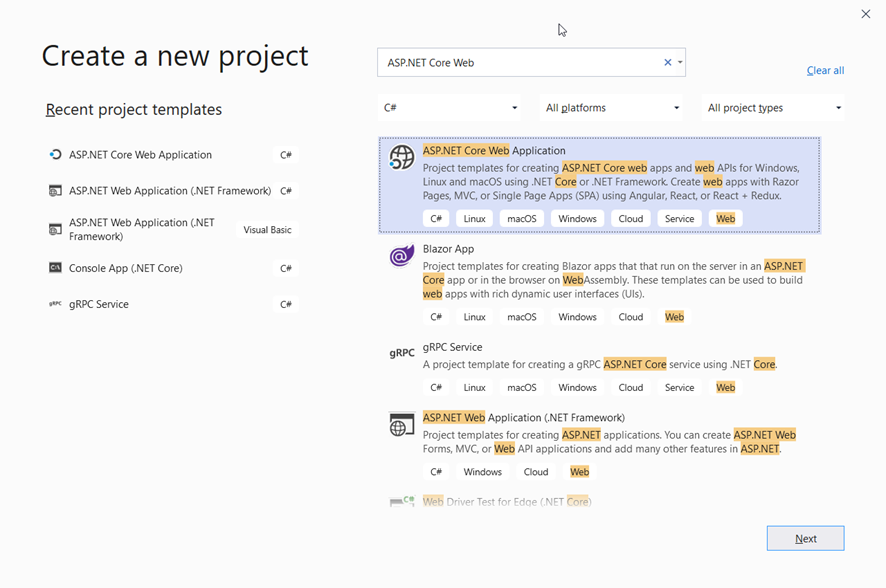
Figure 3. Creating a new ASP.NET Core Web Application.
Click Next. Give it the name of SimpleTalkGrpcWebClient and click Create.
In the next screen, make sure to select the options .NET Core and ASP.NET Core 3.1 right at the beginning. Then, locate the option Web Application (Model-View-Controller), as you see in Figure 4. Regarding the HTTPS configuration, it’s ok to leave it selected unless you want to keep only HTTP.
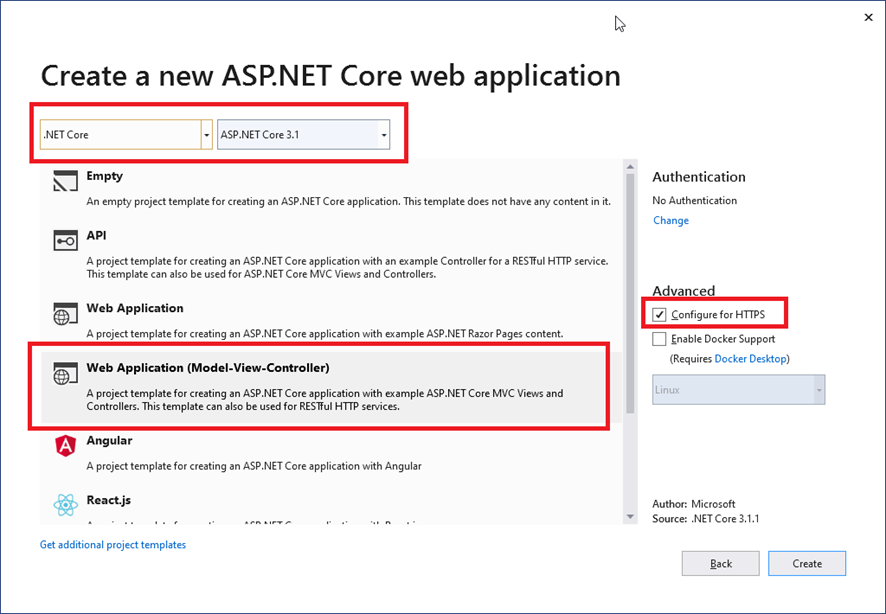
Figure 4. Selecting options for the web application.
The project is created. If you’re not familiar with MVC in ASP.NET (which is not the focus of this article), I’d advise you to read this.
Again, the proto file is the most important so, first, make sure to copy the folder Protos from the server project to this one.
Then, run the following commands to install all the needed NuGet dependencies:
|
1 2 3 |
Install-Package Grpc.Net.Client Install-Package Google.Protobuf Install-Package Grpc.Tools |
Those are the only ones you need since the nature of the project already injected the Microsoft.NETCore.App and Microsoft.AspNetCore.App frameworks for the API and MVC files.
Then, edit the project (right-click at the project > Edit Project File) and add the following:
|
1 2 3 |
<ItemGroup> <Protobuf Include="Protos\product.proto" GrpcServices="Client" /> </ItemGroup> |
Rebuild it. Visual Studio has already created a controller, error model and a basic home view made of a good templating system. Leave them as they are. The wwwroot also stores CSS and JavaScript files, along with jQuery and Bootstrap (which you’ll use for the CRUD page). Go ahead and explore a bit the files; it’s very straightforward.
Start by the ProductsController.cs. In the Controllers folder, create this class and add the code in Listing 4.
Listing 4. Creating the ProductsController class.
|
1 2 3 4 5 6 7 8 9 10 11 12 13 14 15 16 17 18 19 20 21 22 23 24 25 26 27 28 29 30 31 32 33 34 35 36 37 38 39 40 41 42 43 44 45 46 47 48 49 50 51 52 53 54 55 56 57 58 59 60 61 |
using Grpc.Net.Client; using Microsoft.AspNetCore.Mvc; using ProductsService; using System.Collections.Generic; using System.Linq; namespace SimpleTalkGrpcWebClient.Controllers { [ApiController] [Route("api/[controller]")] public class ProductsController : Controller { private readonly GrpcChannel channel; public ProductsController() { channel = GrpcChannel.ForAddress("https://localhost:5001"); } [HttpGet] public List<Product> GetAll() { var client = new ProductService.ProductServiceClient(channel); return client.GetAll(new Empty()).Products.ToList(); } [HttpGet("{id}", Name = "GetProduct")] public IActionResult GetById(int id) { var client = new ProductService.ProductServiceClient(channel); var product = client.Get(new ProductId { Id = id }); if (product == null) { return NotFound(); } return new ObjectResult(product); } [HttpPost] public IActionResult Post([FromBody] Product product) { var client = new ProductService.ProductServiceClient(channel); var createdProduct = client.Insert(product); return CreatedAtRoute("GetProduct", new { id = createdProduct.ProductId }, createdProduct); } [HttpPut] public IActionResult Put([FromBody] Product product) { var client = new ProductService.ProductServiceClient(channel); var udpatedProduct = client.Update(product); if (udpatedProduct == null) { return NotFound(); } return NoContent(); } [HttpDelete("{id}")] public IActionResult Delete(int id) { var client = new ProductService.ProductServiceClient(channel); client.Delete(new ProductId { Id = id }); return new ObjectResult(id); } } } |
This controller differs a bit from the Home controller. Mainly because it was made to be an API controller, not a controller to serve models and views. HomeController is important the way it is because it serves the entry point for the index HTML page.
The REST endpoints, in turn, communicates to the gRPC service. You can also create your own client services to organize it better but stick to this structure for the sake of simplicity.
First thing, you need the channel, remember? Create it at the controller’s constructor. Then, for each request, a new client must be instantiated. The client has all the methods defined in the proto, so you’ll just make use of each one in the corresponding HTTP operation.
Move on to the CSHTML code. Open the Index.cshtml, located into Views/Home folder, and change its content to the one in Listing 5.
Listing 5. Index.cshtml code.
|
1 2 3 4 5 6 7 8 9 10 11 12 13 14 15 16 17 18 19 20 21 22 23 24 25 26 27 28 29 30 31 32 33 34 35 36 37 38 39 40 41 42 43 44 45 46 47 48 49 50 51 52 53 54 55 56 57 58 59 60 61 62 63 64 65 66 67 68 69 70 71 72 73 74 75 76 |
@{ ViewData["Title"] = "Home Page"; } <div class="container"> <div class="py-3 text-center"> <img class="d-block mx-auto mb-4" src="https://www.bloorresearch.com/wp-content/uploads/2019/04/REDGATE-logo-300x470-.png" alt="" width="272"> <h2>Product's List</h2> <p class="lead">A CRUD made with ASP.NET Core, Bootstrap and gRPC</p> </div> <button type="button" class="btn redgate" data-toggle="modal" data-target="#productModal" onclick="clearStuff();">New Product</button><br /><br /> <table class="table table-bordered table-striped table-hover"> <thead> <tr> <th> ID </th> <th> Name </th> <th> Amount </th> <th> Brand </th> <th> Value </th> <th> Actions </th> </tr> </thead> <tbody class="tbody"> </tbody> </table> </div> <div class="modal fade" id="productModal" role="dialog"> <div class="modal-dialog"> <div class="modal-content"> <div class="modal-header"> <h4 class="modal-title">Add Product</h4> <button type="button" class="close" data-dismiss="modal">×</button> </div> <div class="modal-body"> <form> <div class="form-group"> <label for="ProductId">ID</label> <input type="text" class="form-control" id="ProductID" placeholder="Id" disabled="disabled" /> </div> <div class="form-group"> <label for="Name">Name</label> <input type="text" class="form-control" id="Name" placeholder="Name" /> </div> <div class="form-group"> <label for="Amount">Amount</label> <input type="number" class="form-control" id="Amount" placeholder="Amount" /> </div> <div class="form-group"> <label for="Brand">Brand</label> <input type="text" class="form-control" id="Brand" placeholder="Brand" /> </div> <div class="form-group"> <label for="Value">Value</label> <input type="number" step="0.01" min="0" class="form-control" id="Value" placeholder="Value" /> </div> </form> </div> <div class="modal-footer"> <button type="button" class="btn redgate" id="btnAddProduct" onclick="return AddProduct();">Add</button> <button type="button" class="btn redgate" id="btnUpdateProduct" style="display:none;" onclick="UpdateProduct();">Update</button> <button type="button" class="btn btn-default" data-dismiss="modal">Close</button> </div> </div> </div> </div> |
Since the jQuery, Bootstrap and common CSS/JS files are already imported in the _Layout.cshtml file, you only need to provide the content for the CRUD.
This code is made basically of the table to display results from the server (the header only, because the body is going to be mounted by the JavaScript code), and a modal you’ll use to add and update the data.
Speaking of JavaScript code, copy the code presented in Listing 6 to the site.js (under the wwwroot/js folder).
Listing 6. Content of site.js file.
|
1 2 3 4 5 6 7 8 9 10 11 12 13 14 15 16 17 18 19 20 21 22 23 24 25 26 27 28 29 30 31 32 33 34 35 36 37 38 39 40 41 42 43 44 45 46 47 48 49 50 51 52 53 54 55 56 57 58 59 60 61 62 63 64 65 66 67 68 69 70 71 72 73 74 75 76 77 78 79 80 81 82 83 84 85 86 87 88 89 90 91 92 93 94 95 96 97 98 99 100 101 102 103 104 105 106 107 108 109 110 111 112 113 114 115 116 117 118 119 120 121 122 123 124 125 126 127 128 129 130 131 132 133 134 135 136 137 138 139 140 141 142 143 144 145 146 147 148 149 150 151 152 153 154 155 156 157 158 |
function LoadProducts() { $.ajax({ url: "/api/products", type: "GET", contentType: "application/json;charset=utf-8", dataType: "json", success: function (result) { var output = ''; $.each(result, function (key, item) { output += '<tr>'; output += '<td>' + item.productId + '</td>'; output += '<td>' + item.name + '</td>'; output += '<td>' + item.amount + '</td>'; output += '<td>' + item.brand + '</td>'; output += '<td>' + item.value + '</td>'; output += `<td><a href="#" class="btn redgate" onclick="SetUpEditModal(${item.productId})">Edit</a> | <a href="#" class="btn redgate" onclick="DeleteProduct(${item.productId})">Delete</a></td>`; output += '</tr>'; }); $('.tbody').html(output); }, error: function (message) { console.log(message.responseText); } }); } function AddProduct() { var res = validateForm(); if (res == false) { return false; } var productObj = { name: $('#Name').val(), amount: parseInt($('#Amount').val()), brand: $('#Brand').val(), value: parseFloat($('#Value').val()) }; $.ajax({ url: "/api/products", data: JSON.stringify(productObj), type: "POST", contentType: "application/json;charset=utf-8", success: function () { LoadProducts(); $('#productModal').modal('hide'); }, error: function (message) { console.log(message.responseText); } }); } function SetUpEditModal(id) { $('form input').css('border-color', 'grey'); $('#productModal h4').text('Edit Product'); $.ajax({ url: "/api/products/" + id, typr: "GET", contentType: "application/json;charset=UTF-8", dataType: "json", success: function (result) { $('#ProductID').val(result.productId); $('#Name').val(result.name); $('#Amount').val(result.amount); $('#Brand').val(result.brand); $('#Value').val(result.value); $('#productModal').modal('show'); $('#btnUpdateProduct').show(); $('#btnAddProduct').hide(); }, error: function (message) { console.log(message.responseText); } }); return false; } function UpdateProduct() { if (!validateForm()) { return false; } var productObj = { ProductID: parseInt($('#ProductID').val()), Name: $('#Name').val(), Amount: parseInt($('#Amount').val()), Brand: $('#Brand').val(), Value: parseFloat($('#Value').val()), }; $.ajax({ url: "/api/products", data: JSON.stringify(productObj), type: "PUT", contentType: "application/json;charset=utf-8", dataType: "json", success: function () { LoadProducts(); $('#productModal').modal('hide'); clearStuff(); }, error: function (message) { console.log(message.responseText); } }); } function DeleteProduct(id) { if (confirm("Are you sure?")) { $.ajax({ url: "/api/products/" + id, type: "DELETE", contentType: "application/json;charset=UTF-8", dataType: "json", success: function () { LoadProducts(); }, error: function (message) { console.log(message.responseText); } }); } } /** Utility functions **/ function clearStuff() { $('form').trigger("reset"); $('#btnUpdateProduct').hide(); $('#productModal h4').text('Add Product'); $('#btnAddProduct').show(); } function validateForm() { var isValid = true; if ($('#Name').val().trim() == "") { $('#Name').css('border-color', '#c00'); isValid = false; } else { $('#Name').css('border-color', 'grey'); } if ($('#Amount').val().trim() == "") { $('#Amount').css('border-color', '#c00'); isValid = false; } else { $('#Amount').css('border-color', 'grey'); } if ($('#Brand').val().trim() == "") { $('#Brand').css('border-color', '#c00'); isValid = false; } else { $('#Brand').css('border-color', 'grey'); } if ($('#Value').val().trim() == "") { $('#Value').css('border-color', '#c00'); isValid = false; } else { $('#Value').css('border-color', 'grey'); } return isValid; } LoadProducts(); |
Note that for each one of the HTTP requests for the CRUD operations, you also have a different JavaScript function to handle it. It helps to simplify the separation. Here, you’re using jQuery ajax function to help with the remote requests and responses to the Products API.
This function takes a bunch of inputs regarding the URL, content type, headers, params and two functions for success and error handling in the requesting/responding process.
The first function, LoadProducts(), makes an HTTP GET over the respective API endpoint to retrieve the list of products from the gRPC server project. If the request is successful, the results must come as a parameter, which will be iterated to get each one of the values and, finally, display them in the table’s tbody. Due to Ajax’s async nature, you may notice that the list takes a bit to appear. In case any error occurs, it’ll be displayed in the console.
Both adding and updating functions make use of the utility function validateForm(). This auxiliary function is just to make sure the data is correct and filled, before sending to the API. You can change it to your own code or lib.
For the adding, updating and deleting actions, you need to re-render the list of products by calling the loading function again. And, then, hide the modal.
When loading the table’s elements, you also need to create the links for editing and deleting calls. Note that the first triggers the function SetUpEditModal() which, in turn, will seek for that specific product by the provided id and fill each of the modal form’s inputs with the returned values. That’s important since you want to show each input prefilled with the respective value before updating them.
The UpdateProduct() function is the one that, in fact, summarize the updated input values and send them to the server. Here, in case of success, and after hiding the modal and refreshing the product’s table, you also need to rename the title of the modal (remember, it’s one single modal for both operations). The clearStuff() function exists to reset the form and show/hide proper buttons and texts.
At the end of the JS file, you also make sure to call the LoadProducts() function, since every time the page loads, you need the table filled.
Before going to the tests, check two things. First, make sure to have the following snippet just after the jQuery and Bootstrap JavaScript imports (not before), located in Views/Shared/_Layout.cshtml:
|
1 |
<script <strong>src</strong>="~/js/site.js" <strong>asp-append-version</strong>="true"></script> |
Second, open the site.css file under wwwroot/css folder and add the following class:
|
1 2 3 4 |
.redgate { background-color: #c00; color: #fff; } |
It’s important to add the background color effect related to the RedGate website.
Test it now. With the server project up and running, start your web application (Ctrl + F5). When the browser window open, you should see something like Figure 5.
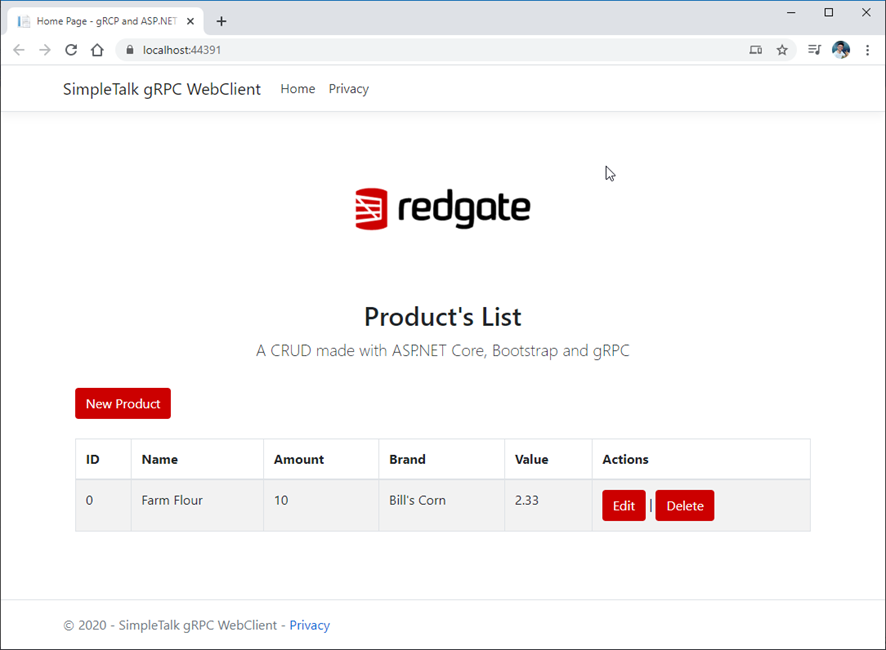
Figure 5. Web client application running in the browser.
Integrating ASP.NET Core with gRPC
This is it. Go ahead and play with the other operations. Feel free to customize the way you prefer the screen and the overall architecture.
Please, also refer to the official docs for more on what (and how) you can do with gRPC in .NET. It’s the most complete and trustworthy source for your studies. Regarding tests and performance, please also refer to their Benchmarking page.
As a challenge, you can try to upgrade your implementation to integrate it with the Web version of gRPC, along with the current CRUD page. Good luck with the studies!

Load comments