State Transitions With Web Components
Join the DZone community and get the full member experience.
Join For FreeWeb user interfaces have become much more complex than they were a couple of years ago. Complex SPAs using multiple vendor widgets needing to work with open source widgets etc., are taxing developers and taking a toll on their productivity. There is a need for a development paradigm that frees developers from this grinding exercise and makes developing web applications a fun experience. Enter Web Components. Web Components is a w3c specification. It helps developing web UI applications in a modular way.
In this article, I explore the use of web components for a non-trivial web UI application, like a To-Do web application. Additionally, I'll also use a state machine so the resulting application is more robust than otherwise. In a previous article, I presented a state machine based web UI development approach using vanilla JavaScript. It was shown that the resulting application was very modular. The modular nature of the approach naturally leads us to use web components.
State Transitions
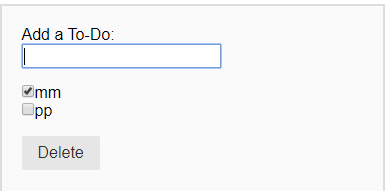
The approach proposed here suggests we first write a set of state transitions for our UI application. So for the To-Do application which has a screen mock-up like:
I assume that the following are the required state transitions.
| Initials State | Pre-Event | Processor | Post-Event | Final State |
| unknownState | onload | processOnload() | onloadSuccess | readyForAdd |
| readyForAdd | addTodo | processAddTodo() | addTodoSuccessNoneSelected | readyForAddSelect |
| readyForAddSelect | addTodo | processAddTodo() | addTodoSuccessNoneSelected | readyForAddSelect |
| readyForAddSelect | changeTodo | processChangeTodo() | changeTodoSuccessSomeSelected | readyForAddSelectUnselectDelete |
| readyForAddSelect | changeTodo | processChangeTodo() | changeTodoSuccessAllSelected | readyForAddUnselectDelete |
| readyForAddUnselectDelete | addTodo | processAddTodo() | addTodoSuccessSomeSelected | readyForAddSelectUnselectDelete |
| readyForAddUnselectDelete | changeTodo | processchangeTodo() | changeTodoSuccessNoneSelected | readyForAddSelect |
| readyForAddUnselectDelete | changeTodo | processchangeTodo() | changeTodoSuccessSomeSelected | readyForAddSelectUnselectDelete |
| readyForAddUnselectDelete | deleteTodo | processDeleteTodo() | deleteTodoSuccessAllDeleted | readyForAdd |
| readyForAddSelectUnselectDelete | addTodo | processAddTodo() | addTodoSuccessSomeSelected | readyForAddUnselectDelete |
| readyForAddSelectUnselectDelete | changeTodo | processChangeTodo() | changeTodoSuccessAllSelected | readyForAddUnselectDelete |
| readyForAddSelectUnselectDelete | changeTodo | processChangeTodo() | changeTodoSuccessSomeSelected | readyForAddSelectUnselectDelete |
| readyForAddSelectUnselectDelete | changeTodo | processChangeTodo() | changeTodoSuccessNoneSelected | readyForAddSelect |
| readyForAddSelectUnselectDelete | changeTodo | processChangeTodo() | changeTodoSuccessSomeSelected | readyForAddSelectUnselectDelete |
| readyForAddSelectUnselectDelete | deleteTodo | processDeleteTodo() | deleteTodoSuccessNoneSelected | readyForAddSelect |
Note that I have identified four application states: readyForAdd, readyForAddSelect, readyForAddUnselectDelete, and readyForAddSelectUnselectDelete. The state readyForAdd, for instance, implies only add events can be emitted from this state, while the readyForAddSelect state can only emit add and select events, etc.
The steps for the UI development include:
- Set up an HTML layout file for the UI application identifying the locations for the custom elements to be backed by the web components.
- Add script tags to the HTML file to reference the web component files.
- Configure the states and events identified above in the application-specific JavaScript.
- Write code in the
processor()functions to communicate with the web components via the corresponding custom elements. - Add the state machine controller code.
1. To-Do application Web UI Layout Template
The web UI template corresponding to the above mock-up that will be using for our To-Do app is:
xxxxxxxxxx
<html>
<head>
<meta charset="ISO-8859-1">
<meta name="description" content="Using State Transitions and Web Components for a TodoMVC UI application">
<meta name="keywords" content="state transitions, web components, todomvc, to-do app, todo app">
<title>State Transitions with Web Components</title>
<link rel="stylesheet" href="https://unpkg.com/purecss@1.0.1/build/pure-min.css"
integrity="sha384-oAOxQR6DkCoMliIh8yFnu25d7Eq/PHS21PClpwjOTeU2jRSq11vu66rf90/cZr47" crossorigin="anonymous">
<style>
.grids-custom {
background: rgb(250, 250, 250);
margin-left: 50px auto;
padding: 20px;
padding-bottom: 100px;
width: 50%;
border: 2px solid #ddd;
margin-bottom: 50px;
text-align: left;
}
.xsmall {
font-size: 70%;
}
.small {
font-size: 85%;
}
.red {
color: #FF5733;
}
</style>
</head>
<body onload="handleAppEvent('onload', '')">
<p> </p>
<section id="todoApp" style="width: 90%">
</section>
<div class="pure-g" style="height: 90%;">
<div class="pure-u-1-4"> </div>
<section id="todoApp" class="pure-u-1-2">
<div> </div>
<div id="currentState" class="red"> </div>
<div> </div>
<div class="grids-custom">Add a To-Do:
<section id="addTodoView" style="display: none;">
<input-comp id="addTodo" data-request="" data-response=""></input-comp>
</section>
<section id="changeTodoView" style="display: none;">
<p></p>
<checkbox-group-comp id="changeTodo" data-request="" data-response=""></checkbox-group-comp>
<p></p>
</section>
<section id="deleteTodoView" style="display: none;">
<button-comp id="deleteTodo" data-request=""></button-comp>
</section>
</div>
</section>
<div class="pure-u-1-4"> </div>
</div>
<!-- web components -->
<!-- app js -->
</body>
</html>
This template is not to be confused with the HTML Template feature of the Web Component specification. The above is just a UI layout for our application. Note that I have identified three custom element tags usage — input-comp, checkbox-group-comp and button-comp. The attributes used in these tags follow the APIs published by the corresponding web components.
For our demo purposes, I am using the data-request and data-response pattern so we can send the data (JSON) to the web component at the data-request attribute and get a JSON response at the data-response attribute. Also note the script tags for the JavaScript files — input-comp.js, checkbox-group-comp.js and button-comp.js.
2. Web Components
The source for the three web components are:
input-comp.js
xxxxxxxxxx
class InputComp extends HTMLElement {
static get observedAttributes() {
return ['data-request'];
}
constructor() {
super();
}
attributeChangedCallback(name, oldVal, newVal) {
if (newVal != null && newVal != undefined && newVal.length > 0 && name === 'data-request') {
const data = JSON.parse(newVal);
if (data != null && data.action === 'create') {
this.innerHTML = this.createInputTxtElem(data);
}
}
}
createInputTxtElem(data) {
return `<div id="${data.name}_div">
<input type="text" name="${data.name}" placeholde="Enter text..." value="${data.todoText}">
</div>`
}
}
window.customElements.define('input-comp', InputComp);
Note that for brevity of discussion, I am not using the Shadow DOM feature of web components.
checkbox-group-comp.js
xxxxxxxxxx
class CheckboxGroupComp extends HTMLElement {
static get observedAttributes() {
return ['data-request'];
}
constructor() {
super();
}
attributeChangedCallback(name, oldVal, newVal) {
if (newVal != null && newVal != undefined && newVal.length > 0 && name === 'data-request') {
let data = JSON.parse(newVal);
if (data != null && data.action === 'create') {
this.innerHTML += this.createCheckboxElement(data);
} else if (data != null && data.action === 'delete') {
for(let i of data.values) {
this.removeChild(document.getElementById("div" + i));
}
} else if (data != null && data.action === 'update') {
//we are sending a data response below
for(let el of this.getElementsByTagName('input')){
if(!el.checked){
el.removeAttribute("checked");
}
else {
let attr = document.createAttribute("checked");
el.setAttributeNode(attr);
}
}
}
//update data-response
//get the selectedItems and itemsCount
let nodesArray = Array.from(this.getElementsByTagName('input'));
let total = nodesArray.length;
let selected = nodesArray.filter(n => n.checked).map(n => Number(n.value));
let allItems = nodesArray.map(n => Number(n.value));
let maxVal = Math.max(allItems);
let resp = { itemsCount: total, selectedItems: selected, maxId: maxVal }
this.setAttribute("data-response", JSON.stringify(resp));
}
}
createCheckboxElement(data) {
const name = data.name;
const nextId = data.value;
const label = data.todoText;
return `<div id="div${nextId}">
<input type="checkbox" name="${name}" value="${nextId}"><label id="lbl${nextId}">${label}</label>
</div>`;
}
}
window.customElements.define('checkbox-group-comp', CheckboxGroupComp);
The CheckboxGroupComp class handles three actions — create, delete, and update. After the action is performed, it writes back the items count and selected items of the checkbox group to the data-response attribute.
button-comp.js
xxxxxxxxxx
class ButtonComp extends HTMLElement {
static get observedAttributes() {
return ['data-request'];
}
constructor() {
super();
}
attributeChangedCallback(name, oldVal, newVal) {
if (newVal != null && newVal != undefined && newVal.length > 0 && name === 'data-request') {
const data = JSON.parse(newVal);
if (this.getElementsByTagName('input')[0] == undefined) {
this.innerHTML = this.createInputButtonElement(data);
}
}
}
createInputButtonElement(data) {
return `<input type="button" name="${data.name}" class="pure-button" value="${data.value}">`;
}
}
window.customElements.define('button-comp', ButtonComp);
3. Events and States Configuration
The events and states identified in the table above can be configured using JavaScript const objects.
The states are configured in todoApp.js like:
xxxxxxxxxx
const appStates = {
readyForAdd: function (e) {
document.getElementById("addTodoView").style.display = "block";
document.getElementById("changeTodoView").style.display = "none";
document.getElementById("deleteTodoView").style.display = "none";
document.getElementById("currentState").innerHTML = e.type + ' => readyForAdd';
},
readyForAddSelect: function (e) {
document.getElementById("addTodo").getElementsByTagName("input")[0].value = "";
document.getElementById("addTodo").getElementsByTagName("input")[0].focus();
document.getElementById("addTodoView").style.display = "block";
document.getElementById("changeTodoView").style.display = "block";
document.getElementById("deleteTodoView").style.display = "none";
document.getElementById("currentState").innerHTML = e.type + ' => readyForAddSelect';
},
readyForAddUnselectDelete: function (e) {
document.getElementById("addTodoView").style.display = "block";
document.getElementById("changeTodoView").style.display = "block";
document.getElementById("deleteTodoView").style.display = "block";
document.getElementById("currentState").innerHTML = e.type + ' => readyForAddUnselectDelete';
},
readyForAddSelectUnselectDelete: function (e) {
document.getElementById("addTodoView").style.display = "block";
if (appData.itemsCount() > 0) document.getElementById("changeTodoView").style.display = "block";
else document.getElementById("changeTodoView").style.display = "none";
document.getElementById("deleteTodoView").style.display = "block";
document.getElementById("currentState").innerHTML = e.type + ' => readyForAddSelectUnselectDelete';
}
};
The appStates object sets the visibility status of the various components. So, it acts as a "View" in the MVC pattern.
The events are configured in todoApp.js like:
xxxxxxxxxx
const appEvents = {
onload: {
process: function (e, handlePostEvent) {
//for onload just ceate a new input textbox element
const data = { name: "addTodo", action: "create", todoText: "" };
let el = document.getElementById("addTodo");
el.setAttribute("data-request", JSON.stringify(data));
handlePostEvent(new CustomEvent('onloadSuccess'));
}
},
onloadSuccess: {
nextState: function (e) {
return appStates.readyForAdd(e);
}
},
addTodo: {
process: function (e, handlePostEvent) {
//user entered a todo text, create a new input checkbox element
let el = document.getElementById("changeTodo");
let maxId = appData.maxId() + 1;
let data = { name: "changeTodo", value: maxId, action: "create", todoText: e.detail.value };
el.setAttribute("data-request", JSON.stringify(data));
//determine whether none selected or some selected
let evttype = '';
if (appData.selectedCount() > 0 &&
appData.itemsCount() - appData.selectedCount() > 0) {
evttype = 'addTodoSuccessSomeSelected';
} else {
evttype = 'addTodoSuccessNoneSelected';
}
handlePostEvent(new CustomEvent(evttype));
}
},
addTodoSuccessNoneSelected: {
nextState: function (e) {
return appStates.readyForAddSelect(e);
}
}
,
addTodoSuccessSomeSelected: {
nextState: function (e) {
return appStates.readyForAddSelectUnselectDelete(e);
}
},
changeTodo: {
process: function (e, handlePostEvent) {
let selectedItem = e.detail.value
let evttype = '';
console.log(">>> selected value: ", selectedItem);
//if checked then create a delete button
if (selectedItem != null) {
let data = { name: "deleteTodo", value: "Delete" };
document.getElementById("deleteTodo").setAttribute("data-request", JSON.stringify(data));
//update the selectedCount
data = { name: "changeTodo", action: "update", value: Number(selectedItem) };
document.getElementById("changeTodo").setAttribute("data-request", JSON.stringify(data));
}
if (appData.selectedCount() > 0) {
if (appData.selectedCount() == appData.itemsCount()) {
evttype = 'changeTodoSuccessAllSelected';
} else if (appData.itemsCount() - appData.selectedCount() > 0) {
evttype = 'changeTodoSuccessSomeSelected';
}
} else {
evttype = 'changeTodoSuccessNoneSelected';
}
handlePostEvent(new CustomEvent(evttype));
}
},
changeTodoSuccessSomeSelected: {
nextState: function (e) {
return appStates.readyForAddSelectUnselectDelete(e);
}
},
changeTodoSuccessAllSelected: {
nextState: function (e) {
return appStates.readyForAddUnselectDelete(e);
}
},
changeTodoSuccessNoneSelected: {
nextState: function (e) {
return appStates.readyForAddSelect(e);
}
},
deleteTodo: {
process: function (e, handlePostEvent) {
//delete selected items
let data = { name: "changeTodo", action: "delete", values: appData.selectedItems() };
console.log(">>> data: ", appData.selectedItems());
document.getElementById("changeTodo").setAttribute("data-request", JSON.stringify(data));
//determine whether none selected or all deleted
let evttype = '';
if (appData.itemsCount() > 0 &&
appData.selectedCount() == 0) {
evttype = 'deleteTodoSuccessNoneSelected';
}
else evttype = 'deleteTodoSuccessAllDeleted';
handlePostEvent(new CustomEvent(evttype));
}
},
deleteTodoSuccessNoneSelected: {
nextState: function (e) {
return appStates.readyForAddSelect(e);
}
},
deleteTodoSuccessAllDeleted: {
nextState: function (e) {
return appStates.readyForAdd(e);
}
}
};
Note that I have used the nextState() function in the appEvents object instead of in the appStates object since we see that only an event knows what the next state should be. Also, note that the process() functions are used for the pre-events, and the nextState() functions are used for the post-events. This, again, follows directly from the state transitions table.
4. Processor Functions
It is interesting to note that the process() functions communicate with the custom element tags by posting their JSON data to the data-request attribute and collect a JSON response at the data-response attribute. The processor functions read the JSON data stored in the data-response attributes using a utility object, called appData.
The source for appData (defined as a const in todoApp.js):
xxxxxxxxxx
const appData = {
maxId: function () {
let data = document.getElementById("changeTodo").getAttribute("data-response");
if (data.length > 0) {
return JSON.parse(data).maxId;
}
return 0;
},
selectedCount: function () {
return appData.selectedItems().length;
},
itemsCount: function () {
let data = JSON.parse(document.getElementById("changeTodo").getAttribute("data-response"));
return data.itemsCount;
},
selectedItems: function () {
let data = JSON.parse(document.getElementById("changeTodo").getAttribute("data-response"));
return data.selectedItems;
}
};
The above appData object acts as a "Model" for the MVC pattern.
5. Controller
The engine of our state machine consists of these simple controller functions (in todoApp.js):
xxxxxxxxxx
function handleAppEvent(customEventName, eventDta) {
//receive the onload event
appEventHelper(customEventName, eventDta);
//receive the input textbox event
document.getElementById("addTodo").addEventListener('change', e => {
appEventHelper('addTodo', e.target.value);
});
//receive the checkbox event
document.getElementById("changeTodo").addEventListener('change', e => {
appEventHelper('changeTodo', e.target.value);
});
document.getElementById("deleteTodo").addEventListener('click', e => {
appEventHelper('deleteTodo', e.target.value);
});
};
function appEventHelper(customEventName, eventDta){
let todoEvent = new CustomEvent(customEventName, {
detail: {
value: eventDta
}
});
stateTransitionsManager(todoEvent);
}
function stateTransitionsManager(todoEvent) {
var todoEventAft = appEvents[todoEvent.type].process(todoEvent, handlePostEvent);
}
function handlePostEvent(e) {
appEvents[e.type].nextState(e);
}
The handleAppEvent() function listens and receives all the HTML DOM events (pre-events), including those raised by the web component. Note that even if Shadow DOM is used, we can still receive the events at the custom element (see Eric Bidelman). The callback function, handlePostEvent(), handles all post-events.
Note that for brevity of discussion the CustomEvent that is created above is used merely as a data transfer object and routed to the appropriate process function via the stateTransitionsManager() function. If these custom events are dispatched then all the process() functions should be updated to listen to these events.
How One Transition Works
When the user performs an action on the screen the following steps are triggered:
- HTML DOM event (pre-event) is captured in the
handleAppEvent()function. - This event is wrapped in a custom event and sent to the
stateTransitionsManager(). - The
stateTransitionsManager()uses theappEventsconfiguration and calls the required processor function passing it a callback function. - The processor function communicates with the required web components and determines and creates a custom event (post-event) and passes it to the callback function,
handlePostEvent(). - The
handlePostEvent()function uses theappEventsconfiguration and calls thenexState()function. - The
nextState()function uses theappStatesconfiguration to set the visibility status of a web component. - The screen is now ready to receive the next user action.
Demo
A demo of the application is available at TodoApp. As the user walks through each transition listed in the table above, they can also view the result of each step on the same page as a log message.
Download
All the source for this article is available for download in GitHub.
Conclusions
A new approach to developing web UI applications using the state machine and MVC patterns is proposed. The approach is demonstrated for developing the TodoMVC application. Use of the Web Components is shown to further enhance the modular nature of the resulting application.
A uniform mechanism to communicate with the web components via data-request and data-response custom element attributes is found to enable state transitions as per the design. The state transitions table is shown to serve as a requirements aid, a development aid, and as a test case aid.
Related Works:
Readers interested in exploring the use of web components for the To-Do app can checkout Polymer TodoMVC. Readers interested in using the Shadow DOM feature of the web components specification can checkout this video — Web Components: It’s about Time.
Opinions expressed by DZone contributors are their own.
Comments