
In this post, we will be exploring various Azure services - Azure Notebooks, Machine Learning Service, Container Instances and Container Registry. This post is beginner-friendly and can be used by anyone to deploy their machine learning models to Azure in a Standard format.
Even high school kids are creating Machine Learning models these days, using popular machine learning frameworks like Keras, PyTorch, Caffe, etc.
The model format created in one framework slightly differs with the model format created in the other.
Here are the two important issues faced once an AI models are built-to-scale:
- Deployment to cloud so that they can be used by millions of customers around the globe.
- Acceleration of the models on different kinds of edge devices with different hardware architectures. This issue is solved by using the ONNX(Open Neural Network Exchange) format.
Thanks to Azure Machine Learning Service(https://azure.microsoft.com/en-in/services/machine-learning/), these issues can be easily solved.
Contents of this post:
- Create a CNN Classifier for Handwritten Digits with Keras framework
- An Overview of Azure Notebooks
- Convert the custom AI model to the standard ONNX format
- Setup up the Azure Machine Learning Service
- Deploy the ONNX Model to Azure Machine Learning Service
- Test the consumable API of the deployment
- Next Steps
Architecture of the Project
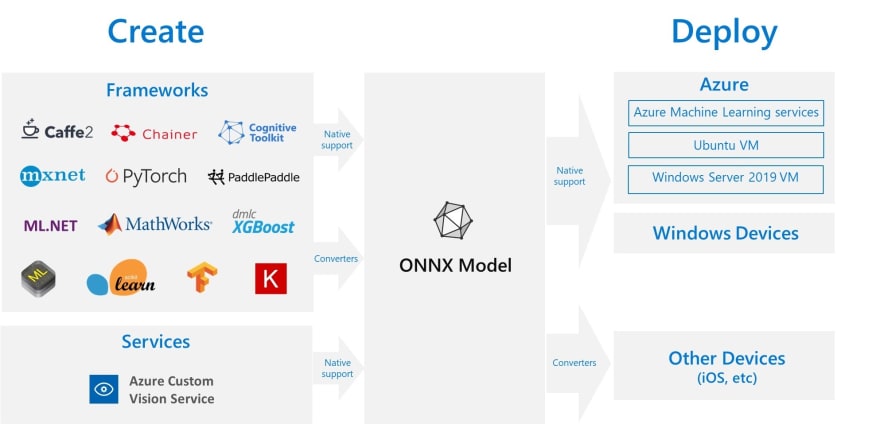
The models are created using any Machine Learning framework, converted to a standard ONNX format, and then deployed onto Azure Machine Learning Service.
Create a CNN Classifier for Handwritten Digits
The Classifier is based on a Convolutional Neural Network(CNN) model using Keras. If you are new to or have forgotten about CNNs, you can give this post a read.
The code below creates a model to classify handwritten digits from 1-9. With 12 epochs, the accuracy of the model is about 99.3%.
An Overview of Azure Notebooks
- Head over to https://notebooks.azure.com/
- Sign in with your Microsoft account and create a new Project.
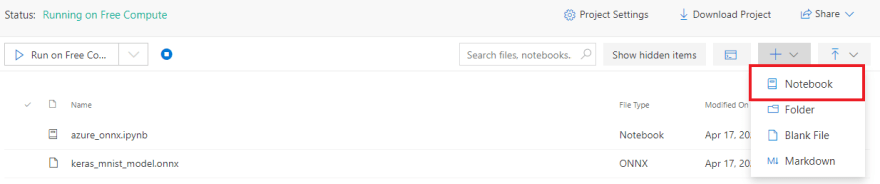
- Add a new Notebook in the Project that you created
- Start coding. The interface is similar to a Jupyter Notebook. Press Ctrl+Enter to run a code cell

Please Note: The coding for the sections to follow will be done in Azure Notebooks only. For your convenience, I have attached GitHub gists of code cells for every section
Converting the Model to ONNX Format
ONNX Format? Now, what is this?
The Open Neural Network Exchange Format (ONNX) is a new standard/ format for exchanging deep learning models. It will make deep learning models portable thus preventing vendor lock in. ONNX is designed to allow framework interoperability.
The ONNX Runtime can run on different types of Hardware libraries, and the plug-in like architecture can be used to accelerate models in almost any hardware architecture. You can easily accelerate the same model on cloud and edge devices, with or without GPU, with maximum efficiency. Isn't it awesome?
Here is the code to convert the Keras CNN model into ONNX format. It creates a file named keras_mnist_model.onnx that contains the trained model in ONNX format.
You can inference the model defined above with any ML framework out there!
Setup the Azure Machine Learning Service
We will now proceed to deploy the ONNX model to Azure, so that we can get a consumable web API for reuse, by millions of customers:
Creating a Machine Learning Workspace accessible from the Azure Notebook
We will create a workspace using the Workspace module from azureml.core library. Make sure to replace subscription-id with your Azure account's subscription ID. Azure will create a new resourcegroup with the name if it doesn't exist.
You can check the newly created Machine Learning Instance in your Azure portal.

We will now register the model with our workspace created
Create a container image to deploy model
It involves the following steps:
- Create a scoring python script file
score.pyfor scoring the new observations that the API is polled with
- Create an environment configuration Cell in the Notebook
We use the CondaDependencies module from the azureml.core.conda_dependencies library.
- Create an image configuration
- Create container image
The creation of the image configuration is complete is you see a similar message, after executing the code cell:

And the final step:
Deploy the Container to Azure ML Service
If the deployment succeeds and the container is healthy, its time to test out our deployment. Now, our deployment is ready to be consumed with an API.

Let's test out our deployment
We can use the Uniform Resource Identifier of the web service and make requests using the requests library, postman etc.
Here is the code for doing it. We are testing the model against 14 random test data images from the MNIST dataset. You can change the value of n=15 to test any number of images.
This is how the output will look like:

Let's now, test the ONNX model directly and check the results graphically with matplotlib:
You will see the images and labels, with perfect predictions:

Wow! Congratulations for completing the tutorial.
References:
[1] https://keras.io/examples/mnist_cnn/
[2] https://benalexkeen.com/deploying-neural-network-models-to-azure-ml-service-with-keras-and-onnx/
Next Steps
You can now create a web application(preferably with django or flask framework), to classify Handwritten Digits in real-time without having to run the Machine Learning model in your system. Stay tuned for a follow-up post for the same.


Top comments (2)
why is this error coming ''KerasTensor' object has no attribute 'graph'' when I try to create ONNX model.
This was really helpful, thank you!