blog
Setting up ClusterControl as a Bastion Host for your Database Servers

A bastion host is a gateway host between an inside network and an outside network. It is commonly used to access remote hosts sitting on a different network which has no direct connection between the two endpoints. Bastion host acts as a middle-man to connect both ends, thus making it a “jump” host to access to the other side. This is one of the popular ways to secure the server from being exposed to the outside world.
In this blog post, we are going to look at how simple it is to set up ClusterControl as a bastion host to restrict remote SSH access to our database and proxy servers. Our architecture for this setup is looking like this:
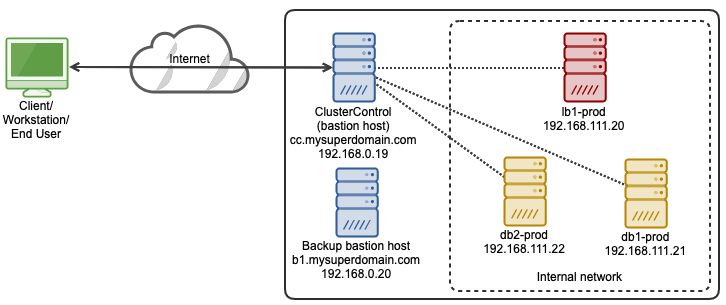
In this setup, we have two database servers with a load balancer server deployed and managed by ClusterControl and another host acts as a backup bastion host. The bastion hosts sit in between the end-user and the internal network hosting our production database tier.
Deploy or Import a Database Into ClusterControl
The very first step is to install ClusterControl on a host that is not part of your database server or cluster, in this case is cc.mysuperdomain.com. Then setup a passwordless SSH from ClusterControl server to all databases and load balancer hosts. In this example, we have an OS user called “vagrant” on all hosts which also has sudo privileges. Thus, on ClusterControl server:
$ whoami
vagrant
$ ssh-keygen -t rsa # press enter on all prompts
$ cat /home/vagrant/.ssh/id_rsa.pub
Copy the public key entry as shown in the last command above and paste it into /home/vagrant/.ssh/authorized_keys on all other hosts that we want to monitor. If the target hosts support password authentication, there is a simpler way by using the following command:
$ ssh-copy-id [email protected]
$ ssh-copy-id [email protected]
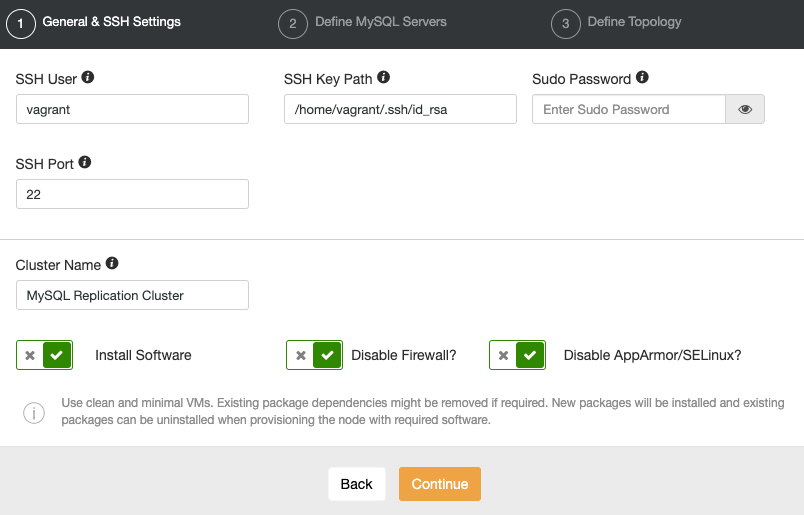
$ ssh-copy-id [email protected]Basically, we are authorizing the above hosts with that particular SSH key so the source host can access to the destination hosts without password, where the public key of the source host is in the allowed list in authrorized_keys file of the destination servers. Once done, open ClusterControl UI in a browser and go to “Deploy” to deploy a new database server/cluster or “Import” to import an existing server/cluster into ClusterControl. Under the “General & SSH Settings” section, specify the SSH user as “vagrant” with SSH Key Path “/home/vagrant/.ssh/id_rsa.pub”, similar to the following screenshot:
Since ClusterControl requires a root or sudo user of the database hosts (as shown above), it surely can be used as a bastion host for SSH service to access the database and load balancer tiers from the external network. We can then close down all unnecessary communication from the outside world and make our production environment more secure.
Web-based SSH
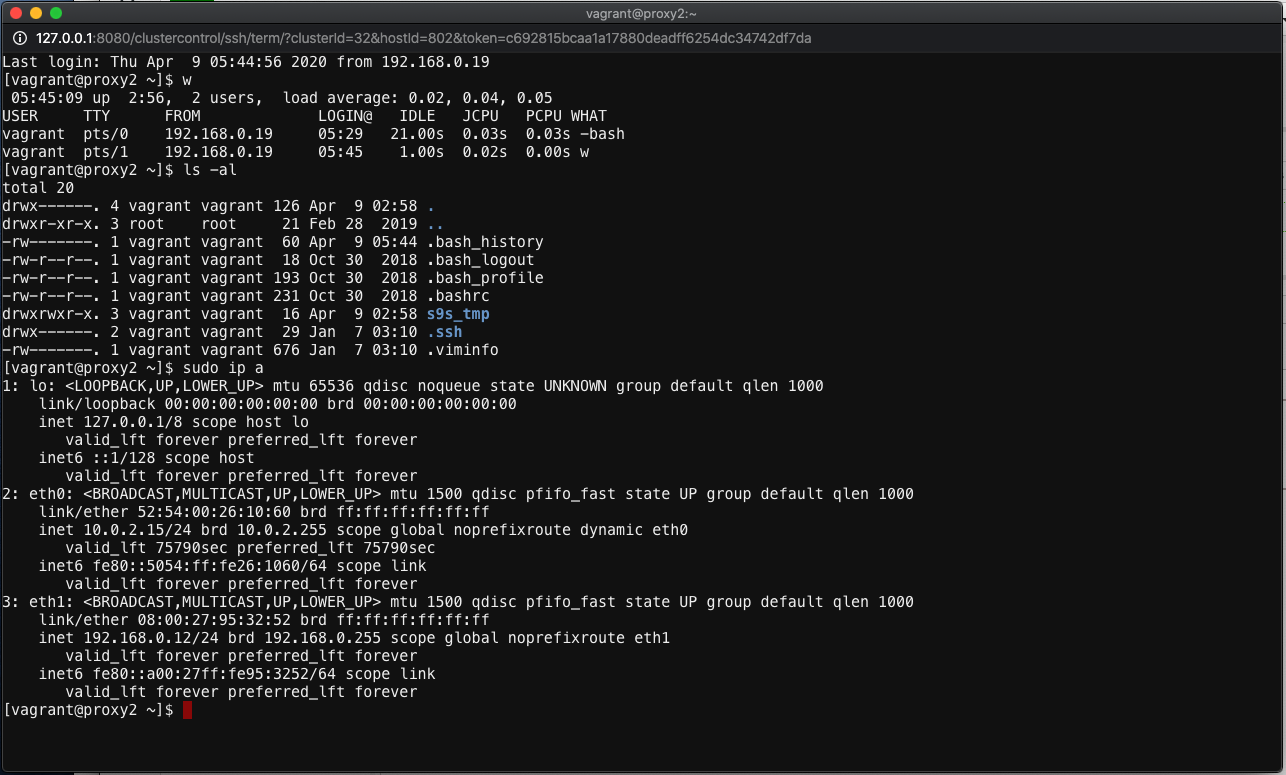
Once the database server/cluster is deployed, we can use the ClusterControl SSH module to access the monitored host by going to ClusterControl -> Nodes -> pick a node -> Node Actions -> SSH Console. A new browser window will be popped up like below:
ClusterControl web-based SSH console is an extension module which works only on Apache 2.4 and later with proxy_module and WebSocket API. It comes as dependencies with the ClusterControl UI package and is enabled by default. ClusterControl uses the same SSH user, authenticated via passwordless SSH that is required when you first deploy or import the database server/cluster into ClusterControl.
The web SSH console mimics common terminal experience with popular emulator tools in the market. You can perform all Linux commands without character escaping, using the standard copy and paste methods (Ctrl+C/Ctrl+V) and the responses are in real time. You can open as many windows as you want and each of them will be established as a new SSH session that originates from the same IP address, which is the ClusterControl host address. The following output shows the active users for the current session if we have opened 3 web SSH windows:
Last login: Thu Apr  9 05:44:11 2020 from 192.168.0.19
[vagrant@proxy2 ~]$ w
 05:44:21 up  2:56, 3 users,  load average: 0.05, 0.05, 0.05
USER     TTY   FROM             LOGIN@ IDLE   JCPU  PCPU  WHAT
vagrant  pts/0 192.168.0.19     05:29  1:17   0.03s 0.03s -bash
vagrant  pts/1 192.168.0.19     05:44  17.00s 0.02s 0.02s -bash
vagrant  pts/2 192.168.0.19     05:44  2.00s  0.02s 0.01s w
To close the active SSH connection, type “exit” or “logout”. Closing the web browser directly will NOT close the session which makes the connection stay idle. You may need to kill the connection manually from another session or wait until it reaches idle connection timeout.
Due to concern of security over this feature, this module can be disabled by setting the following constant inside /var/www/html/clustercontrol/bootstrap.php to “false”, as shown below:
define('SSH_ENABLED', false);Note that disabling the web SSH feature will not disable the current active SSH connection to the host until the window is closed. We encourage you to only use this feature if necessary, for example, in this case where ClusterControl is the bastion host to the database and load balancer tiers.
SSH Proxying via Bastion Host
Alternatively, we can use SSH ProxyCommand to relay the SSH communication to the end servers sitting behind the bastion host. Otherwise, we have to jump twice – one from client to the bastion host and another jump from the bastion host to the database host in the private network.
To simplify SSH communication from our workstation to the end servers behind the bastion host, we can make use of SSH client configuration. Create a default SSH client configuration file at ~/.ssh/config and define them all like this:
Host cc-bastion
  Hostname cc.mysuperdomain.com
  User vagrant
  IdentityFile /Users/mypc/.ssh/mykey.pem

Host db1-prod
  Hostname 192.168.111.21
  User vagrant
  IdentityFile /Users/mypc/.ssh/bastion.pem
  ProxyCommand ssh -q -A cc-bastion -W %h:%p

Host db2-prod
  Hostname 192.168.111.22
  User vagrant
  IdentityFile /Users/mypc/.ssh/bastion.pem
  ProxyCommand ssh -q -A cc-bastion -W %h:%p

Host lb1-prod
  Hostname 192.168.111.20
  User vagrant
  IdentityFile /Users/mypc/.ssh/bastion.pem
  ProxyCommand ssh -q -A cc-bastion -W %h:%p
The SSH private key “bastion.pem” can be created by copying the content of /home/vagrant/.ssh/id_rsa on the ClusterControl server (since this key is already allowed in all database and load balancer servers). Login into ClusterControl server and run:
(bastion-host)$ cp /home/vagrant/.ssh/id_rsa bastion.pemRemote copy bastion.pem from ClusterControl host back to your workstation:
(workstation)$ scp cc.mysuperdomain.com:~/bastion.pem /Users/mypc/.ssh/For mykey.pem, you can create the private key manually inside your workstation:
(workstation)$ ssh-keygen -t rsa -f /Users/mypc/.ssh/mykey.pem
(workstation)$ cat /Users/mypc/.ssh/mykey.pem.pub
From the “cat” output above, add the entry into /home/vagrant/.ssh/authorized_keys on ClusterControl server (or use ssh-copy-id command as explained before). Note that on every section of the production servers, there is a ProxyCommand entry to relay our communication via bastion host to the servers in the private network.
From our workstation, we can simply use the following command:
(workstation)$ ssh db1-prod
Last login: Thu Apr  9 09:30:40 2020 from 192.168.0.101
[vagrant@db1: ~]$ hostname
db1.production.local
At this point you are connected to db1-prod via bastion host, cc1.mysuperdomain.com.
Security Configurations
Now, we have verified our database servers can be accessed from ClusterControl UI. It’s time to restrict the access to the bastion hosts, ClusterControl server (192.168.0.19), and also a backup host (192.168.0.20), in case the ClusterControl server becomes unreachable. We can achieve this by using two methods:
- TCP wrappers.
- Firewalls (pf, iptables, firewalld, ufw, csf).
TCP Wrappers (hosts.allow/hosts.deny)
TCP wrappers protect specific software using hosts.allow and hosts.deny files. For example you could use it to prevent people from connecting by telnet except from specific permitted addresses. TCP wrapper works as in the following order:
- The /etc/hosts.allow file is read first – from top to bottom.
- If a daemon-client pair matches the first line in the file, access is granted.
- If the line is not a match, the next line is read and the same check is performed.
- If all lines are read and no match occurs, the /etc/hosts.deny file is read, starting at the top.
- If a daemon-client pair match is found in the deny file, access is denied.
- If no rules for the daemon-client pair are found in either file, or if neither file exists, access to the service is granted.
Thus if we want to allow only ClusterControl (192.168.0.19) and a backup bastion host (192.168.0.20) to the server, we would need to add the following lines into /etc/hosts.allow on every database host:
sshd : 192.168.0.19,192.168.0.20And add the following lien inside /etc/hosts.deny to deny other hosts apart from the above:
sshd : ALLWhen connecting from a host that is not allowed, one would see the following error:
[vagrant@host1 ~]$ hostname -I
192.168.0.211
[vagrant@host1 ~]$ ssh 192.168.0.23
ssh_exchange_identification: read: Connection reset by peer
iptables
Contrary to TCP wrappers, firewalls treat all software the same. There are basically two popular networking filters in the UNIX world called PF (Packet Filter, popular in BSD) and Netfilter (use iptables as the frontend, popular in Linux). Since ClusterControl only supports Linux-based operating systems, we will use iptables to configure the firewall. There are many configuration tools for iptables like firewalld, ufw (Uncomplicated Firewall) and csf (ConfigServer Firewall) to simplify the management of access list, firewall rules and policy chains.
The following iptables commands can be used to allow the SSH connections only from the bastion hosts:
$ iptables -A INPUT -p tcp -s 192.168.0.19 --dport 22 -m comment --comment 'Allow bastion host to SSH port' -j ACCEPT
$ iptables -A INPUT -p tcp -s 192.168.0.20 --dport 22 -m comment --comment 'Allow bastion host to SSH port' -j ACCEPT
$ iptables -A INPUT -p tcp -s 0.0.0.0/0 --dport 22 -m comment --comment 'Drop everything on SSH apart from the above' -j DROP
To save the current active rules, run:
$ iptables-save > ~/ssh.rulesIf you want to load a saved rules, simply do:
$ iptables-restore < ~/ssh.rulesSince iptables can also be used for other purposes like packet forwarding, packet altering, NAT, PAT, rate limiting and much more, it could be a bit complicated to maintain depending on how complex your security policy is.
Conclusion
Using a bastion host (or jump host) can reduce the security threat of SSH service, which is one of the most critical services to manage Linux machines remotely.