How to Install and Configure VNC Server on CentOS 8
VNC stands for "Virtual Network Computing" is a GUI desktop sharing application that can be used to access and control other computers over a network. It uses the Remote Frame Buffer protocol and works on a client/server model. Generally, it is used by technical support people to manage and troubleshoot desktop, server and other network devices remotely.
In this tutorial, we will show you how to install VNC server on CentOS 8.
Prerequisites
- A system running CentOS 8 Desktop operating system.
- A root password is configured on your server.
Getting Started
By default, SELinux is enabled in CentOS 8 operating system and the VNC server will not work properly if SELinux is enabled. So it is a good idea to disable the SELinux in your system. You can disable it by editing the following file:
nano /etc/sysconfig/selinux
Find the following line:
SELINUX=enforcing
And, replace it with the following line:
SELINUX=disabled
Save and close the file when you are finished. Then, restart your system to implement the changes.
Install VNC Server
By default, TigerVNC is available in the CentOS 8 default repository. You can install it by running the following command:
dnf install tigervnc-server tigervnc-server-module -y
Once the installation has been completed, you can proceed to the next step.
Create New User and Set VNS Password
Next, you will need to create a new user for VNC remote desktop session. You can create a new user with name hitesh as shown below:
useradd hitesh
Next, set password for this user with the following command:
passwd hitesh
Next, switch the user to the hitesh and set VNC password for this user with the following command:
su - hitesh
 vncpasswd
Provide your desired password and hit enter to create the password as shown below:
Password:
Verify:
Would you like to enter a view-only password (y/n)? n
A view-only password is not used
Next, exit from the hitesh user with the following command:
exit
Create Systemd Service File for VNC
Next, you will need to create a systemd service file for VNC. You can create it with the following command:
nano /etc/systemd/system/[email protected]
Add the following lines:
[Unit]
Description=Remote Desktop VNC Service
After=syslog.target network.target

[Service]
Type=forking
WorkingDirectory=/home/hitesh
User=hitesh
Group=hitesh

ExecStartPre=/bin/sh -c '/usr/bin/vncserver -kill %i > /dev/null 2>&1 || :'
ExecStart=/usr/bin/vncserver -autokill %i
ExecStop=/usr/bin/vncserver -kill %i

[Install]
WantedBy=multi-user.target
Save and close the file when you are finished. Then, reload the systemd daemon with the following command:
systemctl daemon-reload
Next, start the VNC service on display 1 and enable to start after system reboot with the following command:
systemctl start vncserver@:1.service
 systemctl enable vncserver@:1.service
You can now check the status of VNC service with the following command:
systemctl status vncserver@:1.service
You should get the following output:
? vncserver@:1.service - Remote Desktop VNC Service
   Loaded: loaded (/etc/systemd/system/[email protected]; disabled; vendor preset: disabled)
   Active: active (running) since Fri 2020-03-06 03:45:50 EST; 45s ago
  Process: 2196 ExecStart=/usr/bin/vncserver -autokill :1 (code=exited, status=0/SUCCESS)
  Process: 2190 ExecStartPre=/bin/sh -c /usr/bin/vncserver -kill :1 > /dev/null 2>&1 || : (code=exited, status=0/SUCCESS)
    Tasks: 180 (limit: 12537)
   Memory: 347.3M
   CGroup: /system.slice/system-vncserver.slice/vncserver@:1.service
           ??2203 /usr/bin/Xvnc :1 -auth /home/hitesh/.Xauthority -desktop centos8:1 (hitesh) -fp catalogue:/etc/X11/fontpath.d -geometry 1024>
           ??2210 sh -c (/home/hitesh/.vnc/xstartup; /usr/bin/vncserver -kill :1) >> '/home/hitesh/.vnc/centos8:1.log' 2>&1 &
           ??2211 /bin/sh /home/hitesh/.vnc/xstartup
           ??2212 /usr/libexec/gnome-session-binary
           ??2221 dbus-launch --sh-syntax --exit-with-session
           ??2222 /usr/bin/dbus-daemon --syslog --fork --print-pid 6 --print-address 8 --session
           ??2230 /usr/bin/ssh-agent /etc/X11/xinit/Xclients
           ??2246 /usr/libexec/at-spi-bus-launcher
           ??2251 /usr/bin/dbus-daemon --config-file=/usr/share/defaults/at-spi2/accessibility.conf --nofork --print-address 3
           ??2253 /usr/libexec/at-spi2-registryd --use-gnome-session
           ??2257 /usr/libexec/gvfsd
           ??2264 /usr/libexec/gvfsd-fuse /home/hitesh/.gvfs -f -o big_writes
           ??2292 /usr/bin/gnome-keyring-daemon --start --components=secrets
           ??2336 /usr/libexec/gsd-power
VNC server is now started and listening on port 5901. You can check it with the following command:
netstat -tunlp | grep 5901
You should get the following output:
tcp        0      0 0.0.0.0:5901            0.0.0.0:*               LISTEN      2203/Xvnc
tcp6       0      0 :::5901                 :::*                    LISTEN      2203/Xvnc
Access VNC Server
VNC server is now installed and configured, it's time to access your VNC server from the remote computer.
On the Windows/Linux machine, open the VNC Viewer application and provide your VNC server address as shown below:
Your-server-ip:5901
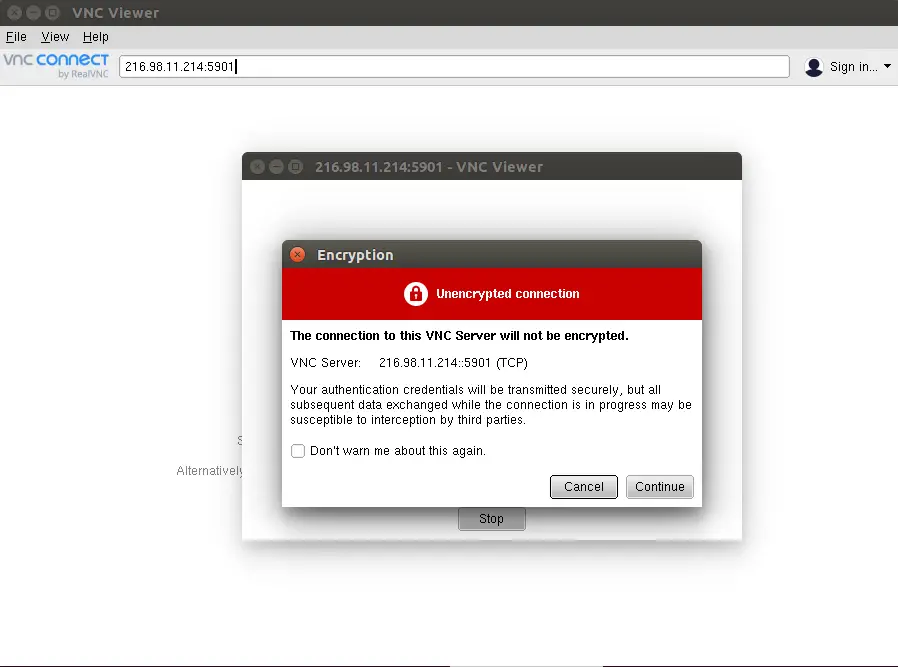
Click on the Continue button. You should see the following screen:
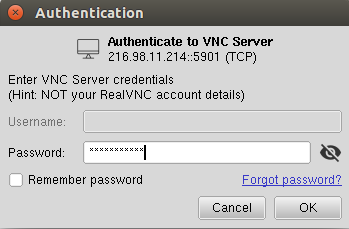
Provide your VNC password and click on the OK button. Once you are connected, you should see your CentOS desktop in the following screen:

Conclusion
Congratulations! you have successfully installed and configured the VNC server on CentOS 8. I hope this will help you to manage remote computers easily over the network.

