
From a Java Application to a Kubernetes Deployment
In this tutorial, we’ll start with a Java Web Application, create a Docker image with the application inside, and then deploy the image on a local Kubernetes cluster. This guide shows you all necessary steps from compiling the Web Application to running it on Kubernetes. While there are great open source tools which can execute all these steps, we’ll perform each step on the command line manually.
Kubernetes is a system for deploying containerized applications on a cluster. It allows to separate the concern of creating a web application from running it on a server. The entities that run on Kubernetes clusters are typically containerized applications such as Docker images.
For this tutorial, you will use the docker and kubectl (Kubernetes) command line tools. Both these tools can be installed through Docker desktop tools. As part of this tutorial, you will install the Docker tools, this way you can issue the same commands on your machine as described in this tutorial. At the end of the tutorial you will have a web app deployed on your own Kubernetes cluster. 😊
Running the Web Application on your OS
The web app we’re going to use is a Java Spring Boot web application. For simplicity, we’ll use a simple existing application from the official Spring Boot Tutorials. This web app is a REST service exposing one HTTP GET endpoint.
As a prerequisite for this section, you need Git, JDK (Java 8 or newer) and Maven. First, start by downloading the Java Project, then compile it using Maven:
$ git clone https://github.com/spring-guides/gs-rest-service.git
$ cd gs-rest-service\complete
$ mvn clean package
$ cp target/rest-service-0.0.1-SNAPSHOT.jar ../..
$ cd ../..
The third command compiles the Java Application and packages the web app in a JAR File. You’ll find the JAR file in the target folder.
Next, you can run the web app using the java command:
$ java -jar rest-service-0.0.1-SNAPSHOT.jar
You’ll see lots of lines flying by on your terminal, telling you that the Spring-Application context gets initialized and your application is exposed on port 8080:
  .   ____          _            __ _ _
 /\\ / ___'_ __ _ _(_)_ __  __ _ \ \ \ \
( ( )\___ | '_ | '_| | '_ \/ _` | \ \ \ \
 \\/  ___)| |_)| | | | | || (_| |  ) ) ) )
  '  |____| .__|_| |_|_| |_\__, | / / / /
 =========|_|==============|___/=/_/_/_/
 :: Spring Boot ::        (v2.2.2.RELEASE)

2020-03-26 20:56:13.857  INFO 18504 --- [           main] c.e.restservice.RestServiceApplication   : Starting RestServiceApplication v0.0.1-SNAPSHOT on Philipp-PC with PID 18504 [...]
[...]
2020-03-26 20:56:17.477  INFO 18504 --- [           main] o.s.b.w.embedded.tomcat.TomcatWebServer  : Tomcat started on port(s): 8080 (http) with context path ''
2020-03-26 20:56:17.481  INFO 18504 --- [           main] c.e.restservice.RestServiceApplication   : Started RestServiceApplication in 4.834 seconds (JVM running for 5.736)
You can verify the web application runs properly by calling the REST Service with a GET method. In your favorite web browser, navigate to the URL: http://localhost:8080/greeting. You can see the following message:
{"id":1,"content":"Hello, World!"}
Introduction to Docker images
Make sure you have the Docker desktop tools installed. You can find all installation instructions here.
Docker falls under the category PaaS (platform as a service) and it is open source. Simply put, Docker runs applications (such as our web app) in a container. Containers are isolated from the outside world and contain an operating system, the application to be run and all its dependencies. The Docker workflow looks as follows:
- Start with a base image, which contains an operating system and the most used dependencies such as a JDK or Python.
- Add your own application to the base image. Also add all dependencies which aren’t part of the base image.
- The output is a custom image with our application inside.
- Run the application inside the image.
Build and run a Docker application
Docker images are layered: Each image builds on another one by adding more entities. In order to make the image creation process more transparent, we use a Docker file. This Docker file contains all information on how our Docker image is created. Create a file named Dockerfile with the following content:
FROM openjdk:8-jre-alpine
COPY rest-service-0.0.1-SNAPSHOT.jar /my-app.jar
CMD java -jar /my-app.jar
In the first line, we specify the base image, which contains the Java 8 runtime environment. On the next line, we copy our web application into the image. On the last line, we describe what happens when the image is run as Docker container: our web application is executed.
Now let’s use the Docker file to create our own image:
$ docker build -t my-app:0.0.1 .
We can list all known Docker images with the following command:
$ docker images
REPOSITORY  TAG           IMAGE ID      CREATED         SIZE
my-app      0.0.1         32b488088806  25 minutes ago  103MB
openjdk     8-jre-alpine  f7a292bbb70c  10 minutes ago  84.9MB
The above command should show our custom image called my-app. We are now ready to run our Docker image. Note that we don’t use Kubernetes at this point and instead run the image through the docker command directly:
$ docker run -p 8080:8080 -d my-app:0.0.1
c5a91de6d0d6ffe692434548ff2ce6fdcc2c89fa02f7bc621c0c132ddfe2589a
Congrats, you just started a web service in a Docker container 😊 Check that the web app runs as expected by navigating to the URL http://localhost:8080/greeting. Docker offers a variety of commands to create, run and monitor Docker images. To list the running Docker images, you just type:
$ docker ps
CONTAINER ID  IMAGE          COMMAND                  CREATED        STATUS         PORTS                    NAMES
c5a91de6d0d6  my-app:0.0.1   "/bin/sh -c 'java -j…"   2 minutes ago  Up 21 seconds  0.0.0.0:8080->8080/tcp   funny_dhawan
Finally, you can stop the running container by typing docker stop.
For a more thorough documentation on Docker files, please refer to the official documentation here.
Introduction to Kubernetes
Kubernetes is a system for deploying, monitoring and scaling your applications in the cloud. It was originally developed by Google and is open source. Kubernetes takes care of running your containerized application.
In Kubernetes, a single running instance of your image is called a pod, and with RESTful webservices, you normally have multiple pods of the same app running in parallel. Kubernetes makes it easy to allocate computing resources to your pods, start more pods when the workload is heavy, or detect unhealthy pods.
Your installation of Docker desktop tools contains a local Kubernetes server. You can deploy your workloads on Kubernetes locally, just as you would in the cloud, but beware that this is only meant for testing purposes. In real life, you would use Kubernetes to deploy your application to a real cloud infrastructure such as Amazon Cloud or Google Cloud.
Run your application on Kubernetes cluster
In this section, you will use Kubernetes to deploy your Docker image. More specifically, you will use the kubectl command line tool together with a Kubernetes file to run your app.
First make sure you have Kubernetes active and running on your machine (see description here).
Second, we want to launch a pod. For this purpose we typically use Deployment files. Kubernetes will make sure the necessary pods get started and it will even replace an unhealthy pod when necessary.
Create the following Deployment file deployment.yml:
apiVersion: apps/v1
kind: Deployment
metadata:
  name: my-app-deploy
spec:
  replicas: 1
  selector:
    matchLabels:
      app: my-app
  template:
    metadata:
      labels:
        app: my-app
    spec:
      containers:
      - name: my-app
        image: my-app:0.0.1
        ports:
        - containerPort: 8080
The Deployment file specifies the docker image to run (containers: name), the number of pods to launch (replicas) as well as the port that gets exposed (containerPort). Optionally, we could add resource constraints such as maximal CPU and memory usage.
$ kubectl apply -f deployment.yml
deployment.apps/my-app-deploy created

$ kubectl get deployments
NAME            READY   UP-TO-DATE   AVAILABLE   AGE
my-app-deploy   1/1     1            1           1min

$ kubectl describe deployment my-app-deploy
In the first line, we create the Kubernetes Deployment. This automatically starts the associated pods, as you can check with kubectl get pods. On the second line you get a list of all Deployments and on the third line, you query all details of our Deployment. Note that our Deployment is configured to start only one pod. We can change this configuration to two replicas:
$ kubectl scale --replicas=2 deployment/my-app-deploy
deployment.extensions/my-app-deploy scaled

$ kubectl describe deployments my-app-deploy
You can see that we have two running pods, both in state “available”.
At this point, we have our web app running on our cluster, but we can’t directly access the web app. The IP address of our pods are only accessible from within the Kubernetes cluster. So now the question is: how can we test our web app from outside the cluster? This questions becomes even more tricky when you consider the fact that one of our pods could be replaced in the future and thus the IP address would change. The good news is that Kubernetes offers a simple solution called Services.
Kubernetes Services are an abstract way to expose multiple pods on just one IP address. You can create the Service through a file service.yml:
apiVersion: v1
kind: Service
metadata:
  name: my-app-service
spec:
  ports:
    - port: 80
      targetPort: 8080
  selector:
    app: my-app
$ kubectl create -f service.yml
service/my-app-service created

$ kubectl get services
NAME             TYPE        CLUSTER-IP      EXTERNAL-IP   PORT(S)   AGE
kubernetes       ClusterIP   10.96.0.1       <none>        443/TCP   5d1h
my-app-service   ClusterIP   10.104.130.56   <none>        80/TCP    24s
The IP address of our my-app-service Service is still only accessible from within the cluster. We can use port forwarding to resolve that problem. Note though that for a production ready environment, you would use another solution such as a Service of type NodePort or LoadBalancer.
$ kubectl port-forward service/my-app-service 8081:80
Our web app is now accessible on localhost at the URL http://localhost:8081/greeting. Congrats, your Kubernetes cluster is now hosting your web app and you can access it from your web browser😊
To turn off your Services and pods, you can type:
$ kubectl delete deployment my-app-deploy
deployment.extensions "my-app-deploy" deleted

$ kubectl delete service my-app-service
service "my-app-service" deleted
Summary
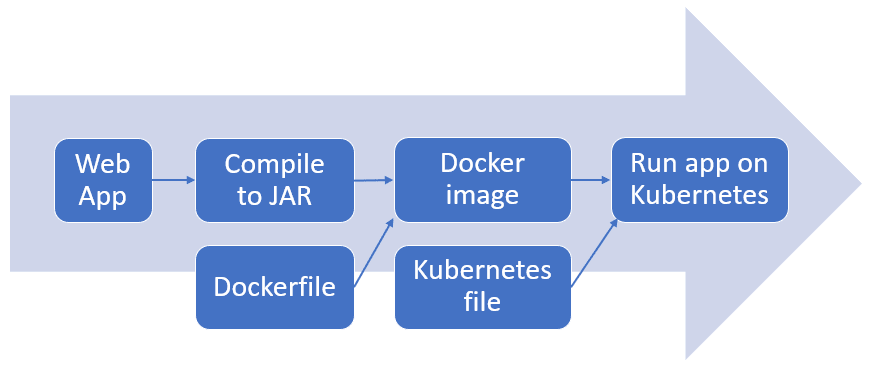
Let’s summarize the most important steps in our cloud deployment pipeline:
- Package the web app as JAR
- Create a Docker image with the JAR file inside
- Create a Kubernetes Deployment
- Kubernetes will automatically start the pods with our Docker image inside
- Create a Kubernetes Service which serves as entry point to all running pods
Thanks for your interest in this subject! Please leave a comment if you have any questions or recommendations!


Top comments (1)
it's a good tutorial, very well explained, thanks