TL;DR — This one is a long read, but may be worth it. The feature is still very new and perhaps there is still room for improvement, but so far, it is my favorite feature that I wrote for the nuxt-socket-io module. The idea in a nutshell is: simply request the API from your server when you need it, and like magic, all it's supported methods will be there, ready to be used by your app! Also, when the server emits events, the data from those events will magically appear. Just reference the data property you want and it'll be there! And, if you have a client API you wish to share back with the server, you can do that too! R.I.P. API docs!
The knowledgeable or impatient may wish to skip straight to "Implementation Details"
Disclaimer: I am the author of the nuxt-socket-io module
Introduction
Prior to reading this article, it is highly recommended for the reader to read my previous articles, which serve as precursors to this one:
- Re-Thinking Web IO -- Discusses concepts of "emit", "listen" and "broadcast"
- Re-Thinking Web APIs to be Dynamic and Run-Time Adaptable -- Discusses Dynamic API concepts and what I call "KISS Dynamic API format". That format will be used throughout the article.
In the second article, I discuss some of the problems with static application peripheral interfaces (APIs). Namely, whenever a server-side developer changes its API, the client-side developer has to update his code in order for the client-side application to still work. Even if the server allows the client to access older API versions, the client may be missing out on all the benefits the new API offers.
Normally, when there are server API changes, if the client-side developer wants to use that new API, he must read through lengthy docs and manually update his code in order to use those new methods. This manual process is even more time-consuming if it is the developer's first time interacting with that API or if the changes are grandiose; that is, he must learn a huge set of methods and schemas. The API docs are only as good as the person who can understand them, and it can be easy to overlook fine but important details. Even if this were not the case, it usually feels like a total drag to manually maintain APIs and the corresponding documentation.
Since any running instance of code already knows what it can do, it seems most logical to ask that instance for its API instead of referring to some hosted docs. Things would be far more efficient, in my opinion, if the actual server instance communicated its capabilities when an appropriate client asked for them. Likewise, the server in return may wish to know what that client's capabilities are too, so that it knows what supported events would actually be worth sending or not. This way, no API docs need to be written or read ahead of time, as the actual supported API is communicated on-demand, and the methods can be created on-the-fly. What are API methods any way? Are they not just emitters of events? For the most part, I'd like to think so. Just use the correct schemas and both sides will be good to go.
A small digression
I would like to return to my extreme example from a previous article, involving our beloved astronaut. Let's call her Lena. Suppose Lena left for Mars way back in 2014, but before she left, she had the most perfect app for interacting with Google Finance. Her app used the Google Finance APIs from 2014, and could retreive stock prices, histories, dividends, news, etc. She left for Mars and came back several years later to find out how her portfolio is doing using her beautiful app. What does she find? Her entire app is broken! Several pretty containers with no data to show! Why? All the APIs changed without her and the server never communicated those changes!
In order for her to get her app back up into somewhat working order, she now has to familiarize herself will all the new Google APIs, and update all the parts of her code where she is making requests. While her URLs still point to "finance.google.com" she has to change the messages she sends, and maybe even the code for validating the responses. Some responses may be quite incomplete. It would be great if she could just send one request "getAPI" to instantly get the new supported methods ready to be run. While there might still be UI tweaks to be made, this may make it easier for her to adapt to the new changes. The API will be right there for to her to inspect in her browser's dev tools.
Implementation Details
Returning to topic, with a client not having any prior knowledge of a given server (i.e., Lena does not know the new Google Finance) and with a server not having any prior knowledge of a given client, the problems the nuxt-socket-io module intends to solve are:
- How can we know what the server's supported methods are at any given time? What are the events it will emit? What format will its messages be in?
- Same question for the client? How do we tell the server what the client can and will do?
- Can the IO server be considered a peer of the client? If so, the client already knows what the peer can do.
It's not enough though to just know the answers to above questions for the plugin to be useful. It would be even more helpful if the plugin built out the methods and listeners on demand and once they are known. So that if a supported method getQuote became known, the client could simply run ioApi.getQuote({symbol}) and it would work. Likewise, if the client knows an event priceChanged will come in, the client can simply just point to ioData.priceChanged, and the data will be there. No extra manual effort needed to listen for new events.
A Few Words of Caution
In order for the plugin to pull off the magic that it does, it requires both sides of the channel to follow the "KISS Dynamic API Format", which I tried to keep as simple as I could. The format is needed so that the plugin knows how to organize data and set things up correctly.
As a reminder, here is the high-level view of that format:

The format is expected to be a JSON object containing "label" (optional), "version" (recommended), "evts" (optional), and "methods" (optional). After the plugin successfully receives and registers an API, it will set an additional property: "ready".
The other word of caution is that the plugin slightly goes against Vue guidelines by using a bit of magic, and not everyone is a fan of magic. However, I can make a case for the magic. It's needed to allow the dynamic behavior to occur, and the magic will only be contained to the "ioApi" and "ioData" properties I'll describe below.
The plugin has to make use of this.$set so that the data it assigns can still be reactive. Normally, Vue wants data to be defined up front, which is fine and simple if there is a small set of data, but if the data needs to be changed, especially if it's a large model, manual updates will become quite tedious.
And, perhaps most important consideration is to make sure you trust your IO servers! If the IO server wanted to be malicious, it could overload your app with unwanted events and messages! (A security model would have to be considered, but is beyond the scope of this article)
The $nuxtSocket Vuex Module
As of v1.0.22, the plugin will now register a namespaced Vuex module "$nuxtSocket" if it does not already exist. If planning to use the module, the name "$nuxtSocket" should be considered reserved. Disabling this is discouraged.
The module will build out the following states which can then be accessed by $store.state.$nuxtSocket[prop], where prop is one of:
-
clientApis: contains the client apis for each component See the section on client APIs for more details. -
ioApis: contains the server apis for each IO server. See the section on server APIs for more details -
sockets: contains the persisted sockets, if any. (persistence is discussed in the git repo). -
emitErrors: contains emit errors that have occurred, organized by the socket label, and then by the emit event. -
emitTimeouts: contains emit timeouts that have occurred, organized by the socket label and then by the emit event.
Even if an API is considered a peer, it will be cached in "ioApis". Beyond the scope of this discussion are the mutations and actions also registered in the vuex module (if interested, refer to the git repo).
Server API Registration
First recall from the very first article on nuxt-socket-io, sockets are configured in nuxt.config in a sockets array, where each entry specifies a socket name and url. This makes it easy to reference the socket throughout the app (using the name). The name is also used for helping organizing APIs.
As a very simple example, suppose nuxt.config contained the following sockets:
io: {
  sockets: [{
    name: 'home',
    url: 'http://localhost:3000'
  }]
}
Then, to instantiate the nuxtSocket, it can be done in the mounted() lifecycle hook. Usually, a channel is also specified to connect to a specific namespace on that server. If it is desired to opt-in to register the server's API, there are only a few things the developer has to do. First is first define a container for the API (ioApi), and another for the API's data (ioData). Then, to let the plugin know to register the API, he must specifying a serverAPI as a JSON object (the JSON object contains registration options):
data() {
  return {
      ioApi: {}, // APIs in "KISS" format will get stored here
      ioData: {} // APIs data will live here, re-actively
  }
},
mounted() {
  this.socket = this.$nuxtSocket({
    name: 'home', // use the "home" socket
    channel: '/dynamic', // use the "/dynamic" namespace
    serverAPI: {} // register the server's API,
  })
}
And that's it! In it's most simple form, that's all that the developer would have to do to start using the API. Optional overrides will be discussed a little later.
When the plugin first gets instantiated, the plugin will emit an event "getAPI" with an empty JSON object to the server. When the server responds with its API, first the plugin will determine the caching requirements: if a version mismatch is detected, the cache is updated. By default, the API cache stored in Vuex will use a label "[socketName][channel]".
For all the methods that are defined in the API, the plugin will attach those methods to the ioApi property you defined, and will initialize ioData with the default values specified by each method's "msg" and "resp" schemas, respectively. This way, if even a very basic request were to be tested, it would work.
For all the events that are defined in the API, the plugin will listen for those events, warning the developer about any duplicated listeners. As those events are received, the incoming data will be sent to ioData.
An example (server)
So, suppose the server provides the following API:
const api = {
  version: 1.02,
  evts: {
    itemRxd: {
      methods: ['getItems'],
      data: {
        progress: 0,
        item: {}
      }
    },
    msgRxd: {
      data: {
        date: new Date(),
        msg: ''
      }
    }
  },
  methods: {
    getItems: {
      resp: [Item]
    },
    getItem: {
      msg: {
        id: ''
      },
      resp: Item
    }
  }
}
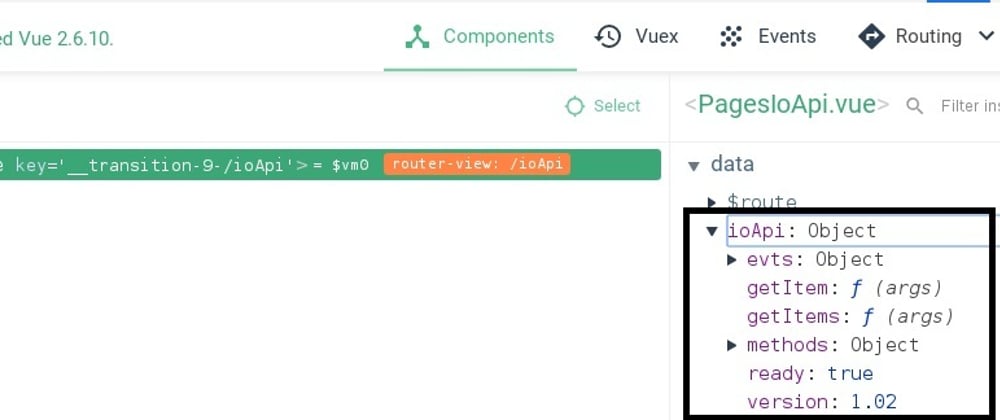
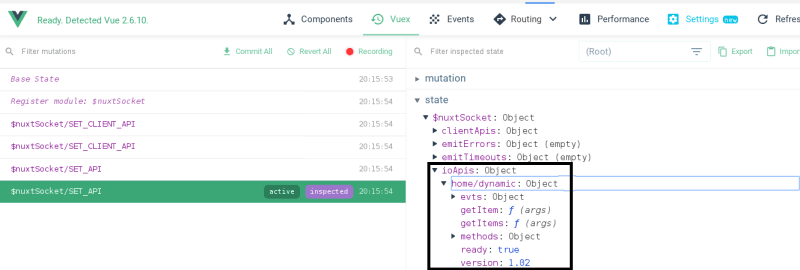
The very first time the client receives this, it has no cache and stores the API based on the socket's name and connected namespace "home/dynamic". Inspecting this API is extremely easy with Vue dev tools. The API will be in two places:
1) It will be in Vuex:
2) It will be in the component inspector: (this may be easier)

The "evts" and "methods" get saved to this.ioApi and contain the schemas. The actual methods get attached to ioApi. As you can see, ioApi.getItems and ioApi.getItem are already defined functions.
The other thing has happened is the initialization of ioData:

This means that your UI controls can now be data-bound to those ioData values. Running any of the API methods will also send the message contained in ioData for that method, and send its response back to that ioData's container.
For example, ioApi.getItems() is already set to go (as indicated by ioApi.ready == true, and simply running this method will also send ioData.getItems.msg with it. The response will get sent to ioData.getItems.resp, in exactly the format that was initially set up. Also, since "itemRxd" was specified as an event that would be emitted by "getItems", ioData already has a home for that event's data too. When "itemRxd" event is received, it will be sent to ioData.getItems.itemRxd.
Looking at the "getItem" method, when ioApi.getItem() is run, it will send ioData.getItem.msg which was initialized as a JSON object, with "id" set to ''. The "id" can be bound to UI controls, so that if the id were changed, that "id" would get sent (that id is ioData.getItem.msg.id).
Server API Registration Overrides
The registration options at this time give you some control over what API you can request and how. You don't have to use the API label that the plugin creates for you, you can specify your own. Also, by default, the emitted event "getAPI" is used to get the API, but you can specify your own here too. Additionally, you can specify the message you want to send with that event, perhaps including the API version you want.
Also, if for whatever reason, you would prefer a different name to use for "ioApi" or "ioData", it's done with "ioApiProp" and "ioDataProp", respectively. For example, you may instantiate multiple sockets on the same page, but would probably want to avoid using the same API object for different sockets.
Lastly, if the server will be too noisy (i.e., emits too many events), you can specify the events to ignore with apiIgnoreEvts (which today is an Array of strings; globbing would require overriding socket.io's internal methods, which I'd prefer to avoid).
Here's what the overrides look like:
data() {
  return {
    serverApi: {},
    serverData: {},
  }
},
mounted() {
  this.socket = this.$nuxtSocket({
    name: 'home', // use the "home" socket
    channel: '/dynamic', // use the "/dynamic" namespace,
    ioApiProp: 'serverApi',
    ioDataProp: 'serverData',
    apiIgnoreEvts: ['noisyAlert'], // ignore this event
    serverAPI: { // register the server's API,
      label: 'myApi', // API label for this server will be used
      evt: 'getServerApi', // server-side method that will return server API
      msg: {
        version: 'latest' // server to return latest API version
      }
    }
  })
}
This way you may be able request exactly the API version you want, and the API will go to exactly where you want. No need to look up API docs on some website, the API will just be in your dev tools. Plus, if you have localStorage.debug = nuxt-socket-io the API will also get logged into the console log, for your convenience.
The other override you have is choosing what message gets sent when you run an API method. I personally think it's easier to separate the methods from the data, but users may want to run the methods with arguments they pass to them. This certainly possible. So, if in the example above, if the user wanted to run ioApi.getItem({ id: 'xyz' }) or ioApi.getItem({ someData: 222 }), both functions will emit the same "getItem" event with the supplied arguments as messages, but the former call would be expected to work, while the latter wouldn't, since it's not following the schema. Calling ioApi.getItem() with empty arguments would always be expected to work because it will always use ioData.getItems which was created directly from the server's API.
An important note: all server methods are expected to return something, at least an acknowledgement. The socket.emit method that the plugin uses needs that response so it can resolve its promise.
Client API Registration
Client API Registration is a bit easier, because the client already knows its API. It just has to communicate that to a server that requests it. This time, when the client API specifies "methods", this is letting the server know what events it (server) can emit; i.e., the client will listen for those events. On the other hand, when the client API specifies "evts", those are events that it will emit. Some events may require acknowledgement others may not.
You opt-in to register the client API by providing a clientAPI JSON object when you instantiate the nuxtSocket:
mounted() {
  this.socket = this.$nuxtSocket({
    name: 'home',
    channel: '/dynamic',
    clientAPI: {} // Here, you choose what methods to expose
  })
},
methods: { // Define client API methods here

}
Here, the clientAPI object represents the API in KISS API format. Unlike before, where the serverAPI object represented the means for retrieving the API, the clientAPI here is the API that the plugin will send to the server on request. A very important distinction. So, the "methods" in the clientAPI are events that the client will listen for, and the "evts" are events that the client will emit. (It can sound confusing, but the vue methods run when the server emits the event of the same name, therefore client is listening for that event)
After the page mounts, the plugin will listen for an event getAPI, and upon receiving that event, will send back the API to the server that requested it.
An example (client)
Consider the following Client API: (this describes the client's exposed methods and events at a page ioApi.vue)
const ChatMsg = {
  date: new Date(),
  from: '',
  to: '',
  text: ''
}

const clientAPI = {
  label: 'ioApi_page',
  version: 1.31,
  evts: {
    warnings: {
      data: {
        lostSignal: false,
        battery: 0
      }
    }
  },
  methods: {
    receiveMsg: {
      msg: ChatMsg,
      resp: {
        status: ''
      }
    }
  }
}
Here, clientAPI is given a label, a version, evts and methods. The plugin expects that for each event name in "evts", there is at least a data property defined in the page. Here, it would expect warnings = {} and the plugin would initialize the warnings data to what was defined in the API (warnings.lostSignal = false and warnings.battery = 0). For each event name, the plugin will create methods "[eventName]Emit", so that when the client wants to emit any of the events, it just calls that method (NOTE: on my roadmap, I may consider using property watchers that do the emitting automatically).
Registering the clientAPI looks as follows:
data() {
  return {
    /* Server API and Data (from before) */
    ioApi: {},
    ioData: {}

    /* Client Data */
    warnings: {} // warnings data
  }
},

mounted() {
  this.socket = this.$nuxtSocket({
    channel: '/dynamic',
    serverAPI: {},
    clientAPI
  })
},

methods: {
  someMethod() {
    // Not specified in API, so server should not know about this one.
  },

  receiveMsg(msg) { // Exposed method, server should be able to call it
    // Run this when server calls "receiveMsg(msg)"
  }
}
Now, when the server calls a method "receiveMsg(msg)" on it's end, the page on the client can expect the msg to be of type ChatMsg that it defined in its API. Here, it's up to the client's method to decide what to do with that msg. The plugin just passes it to the method.
On the other hand, when the client wants to emit "warnings", it does so by calling a method the plugin created for it "warningsEmit". To send warnings, it's as simple as this.warningsEmit() and the data contained in this.warnings will be sent as the message. Again, if it is desired instead to send a different message, it would be done with arguments passed to the emit method: this.warningsEmit({ battery: 98 }). The emit method can also accept an ack boolean if the client requires acknowledgement on the event it emitted.
Conclusion
This article described the first implementation of dynamic API registration used by the nuxt-socket-io module and, at only 2 weeks old, may still have a lot of room for improvement. Expect pain points at first, but give it a fair chance and hopefully it will make it easier for your web apps to adapt to your server-side changes.


Top comments (0)