
In this article, we are going to learn about IdentityServer4 Integration with the ASP.NET Core project. We are going to start with some explanations related to JWT, OAuth, OpenIdConnect, and Endpoints, to get familiar with the basics. After the theory part, we are going to jump into the code and explain IdentityServer4 integration.
To navigate through the entire series, visit the IdentityServer4 series page.
About a Token and How We Can Use It
Before we start learning about OAuth and OpenID Connect, we have to understand what the token is. If we want to access a protected resource, the first thing we have to do is to retrieve a token. When we talk about token-based security, most of the time we refer to the JSON web token or JWT. We have great articles about JWT authentication with ASP.NET Core so, we won’t explain JWT here in-depth. It is a JSON object we use for secure data transmission. Again, feel free to visit the linked article, to learn more about JWT.

Now, let’s see how we exchange our Credentials for a Token:
- A user provides credentials to the authorization server and the server responds with a token
- After that, a user can use that token to talk to the API and retrieve the required data. Of course, behind the scenes, the API will validate that token and decide whether the user has access or not to the requested endpoint
- Finally, a user can use a token with the third-party application that communicates with the API and retrieves data from it. Of course, a third-party application has to provide a token to the API via headers. After the token validation, the API provides data to the client application and that client application returns data to a user.
As we can see, we are not using our credentials with the third-party application, instead, we use a token, which is a more secure way.
About OAuth2 and OpenID Connect
OAuth2 and OpenId Connect are protocols that allow us to build more secure applications. OAuth2 is the industry-standard protocol for authorization. It delegates user authentication to the service that hosts the user’s account and authorizes third-party applications to access that account. It provides different flows for our applications, whether they are web applications or desktop or mobile applications. OAuth stands for Open standard for Authorization.
With authorization, we prove that we have access to a certain endpoint. But if we want to add authentication in the process, we have to refer to the OpenId Connect. So, OpenID Connect complements OAuth2 with the authentication part. It is a simple identity layer on top of the OAuth2 protocol that allows clients to verify their identity after they perform authentication on the authorization server. We can extract more information about the end-user by using OpenID Connect.
OAuth2 and OpenID Endpoints and Flows
It is quite important to have in mind that there is great documentation regarding OAuth 2.0 – RFC 6749 that helps us a lot to understand OAuth related topics. One of those topics is related to the OAuth endpoints. So, let’s inspect them:
/authorize– a client uses this endpoint (Authorization endpoint) to obtain authorization from the resource owner. We can use different flows to obtain authorization and gain access to the API/token– a client uses this endpoint to exchange an authorization grant for an access token. This endpoint is used for the token refresh actions as well/revocation– this endpoint enables the token revocation action.
OpenID Connect allows us to do some additional things with different endpoints:
/userinfo– retrieves profile information about the end-user/checksession– checks the session of the current user/endsession– ends the session for the current user- …
There are different flows we can use to complete authorization actions: Implicit, Authorization Code, Resource Owner Password Credentials, Client Credentials, Hybrid (mix of authorization code and implicit flow).
The flow determines how the token is returned to the client and each flow has its specifics.
You can read more about these different flows at the mentioned documentation as well.
IdentityServer4 Integration
After we’ve learned the basics, we can start with the coding part.
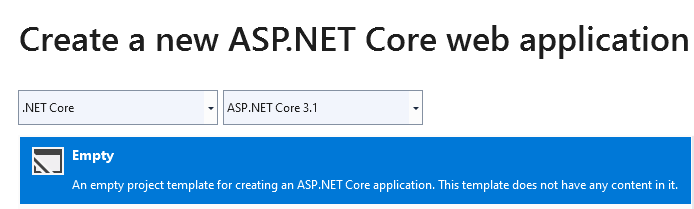
Let’s start by creating an empty web application:
After that, let’s modify the launchsettings.json file:
{
  "profiles": {
    "CompanyEmployees.OAuth": {
      "commandName": "Project",
      "launchBrowser": true,
      "applicationUrl": "https://localhost:5005;http://localhost:5006",
      "environmentVariables": {
        "ASPNETCORE_ENVIRONMENT": "Development"
      }
    }
  }
}
Now, let’s install a required IdentityServer4 package (Do not use the preview version of this library, use the last stable version):

After the installation, we are going to add IdentityServer to our application by modifying the ConfigureServices method:
public void ConfigureServices(IServiceCollection services)
{
    services.AddIdentityServer();
}
Additionally, we have to add IdentityServer to the request pipeline by modifying the Configure method:
public void Configure(IApplicationBuilder app, IWebHostEnvironment env)
{
    if (env.IsDevelopment())
    {
        app.UseDeveloperExceptionPage();
    }

    app.UseIdentityServer();
}
As you can see, we have removed an additional code from this method because we don’t need it.
So, if we try to start the application now, we are going to get an error. That’s because IdentityServer requires an additional configuration. So, let’s add the required code.
IdentityServer4 In-Memory Configuration
The first thing, we are going to do is create a new Configuration folder with the InMemoryConfig class inside. This class will consist of different configurations related to Users, Clients, IdentityResources, etc. So, let’s add them one by one.
First, we are going to add IdentityResources:
public static class InMemoryConfig
{
    public static IEnumerable<IdentityResource> GetIdentityResources() =>
      new List<IdentityResource>
      {
          new IdentityResources.OpenId(),
          new IdentityResources.Profile()
      };
}
For IdentityResource, we have to use IdentityServer4.Models namespace. Identity resources map to scopes that give access to identity-related information. With the OpenId method, we support a subject id or sub value to be included. We include the Profile method as well to support profile information like given_name or family_name.
After that, let’s add the users into the configuration:
public static List<TestUser> GetUsers() =>
  new List<TestUser>
  {
      new TestUser
      {
          SubjectId = "a9ea0f25-b964-409f-bcce-c923266249b4",
          Username = "Mick",
          Password = "MickPassword",
          Claims = new List<Claim>
          {
              new Claim("given_name", "Mick"),
              new Claim("family_name", "Mining")
          }
      },
      new TestUser
      {
          SubjectId = "c95ddb8c-79ec-488a-a485-fe57a1462340",
          Username = "Jane",
          Password = "JanePassword",
          Claims = new List<Claim>
          {
              new Claim("given_name", "Jane"),
              new Claim("family_name", "Downing")
          }
      }
  };
For the TestUser and Claim classes, we have to include additional namespaces:
using IdentityServer4.Test;
using System.Security.Claims;
As we can see, these users have SubjectId supported by the OpenId IdentityResource and the given_name and family_name claims supported by the Profile IdentityResource.
Finally, let’s add a client:
public static IEnumerable<Client> GetClients() =>
    new List<Client>
    {
       new Client
       {
            ClientId = "company-employee",
            ClientSecrets = new [] { new Secret("codemazesecret".Sha512()) },
            AllowedGrantTypes = GrantTypes.ResourceOwnerPasswordAndClientCredentials,
            AllowedScopes = { IdentityServerConstants.StandardScopes.OpenId }
        }
    };
So, we provide the ClientId and the ClientSecret for this client. The secret is hashed with the Sha512 algorithm. The AllowedGrantTypes provides the information about the flow we are going to use to get the token. For this initial example, we use ResourceOwnerPasswordAndClientCredentials flow which allows us to trade user credentials for the token. Additionally, we can use this flow to exchange only the ClientId and the Secret for the token. Finally, we just provide allowed scopes for the client.
Excellent. Now, we can register this in the Startup class:
public void ConfigureServices(IServiceCollection services)
{
    services.AddIdentityServer()
        .AddInMemoryIdentityResources(InMemoryConfig.GetIdentityResources())
        .AddTestUsers(InMemoryConfig.GetUsers())
        .AddInMemoryClients(InMemoryConfig.GetClients())
        .AddDeveloperSigningCredential(); //not something we want to use in a production environment;
}
Here, we register in-memory identity resources, test users and clients. Additionally, we use the AddDeveloperSigningCredential method to set temporary signing credentials. It’s quite enough for the development environment. For the production environment, you should use the AddSigningCredentials method and provide a valid certificate.
Testing Our Authorization Server
Once we start our application, we are going to get information that our server is up and running and using in-memory grant store:
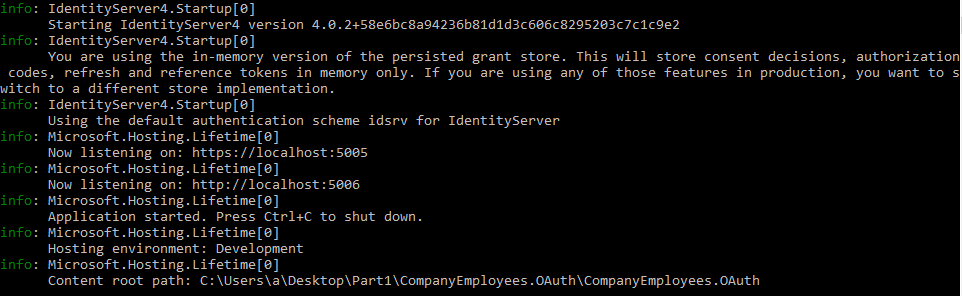
So, let’s try now to retrieve a token from our authorization server with a Postman request:
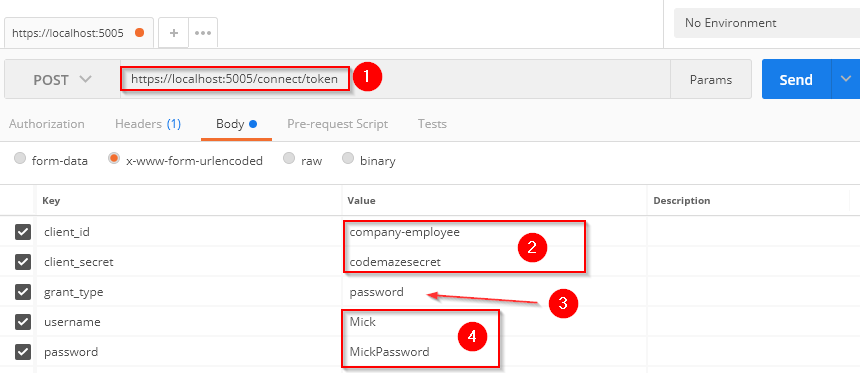
As you can see, we are using /connect/token endpoint to retrieve the token from the server. For parameters, we provide client-id, client_secret, password as a grant_type because we want to exchange user credentials for the token, and username and password. Once we press the Send button, we are going to receive our token:
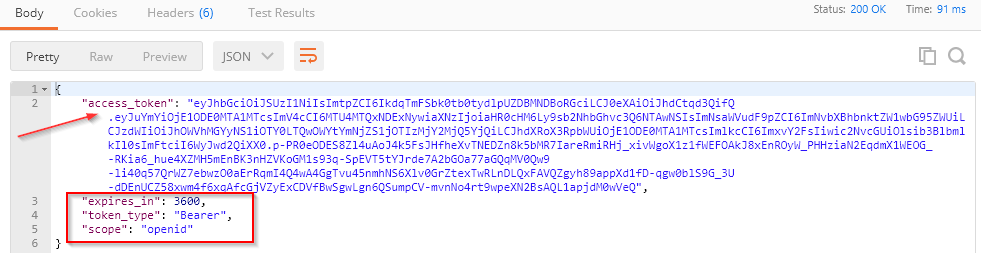
Next to the access token, we have an expiration period, the token type, and the allowed scope for the client.
We can inspect the console logs as well:
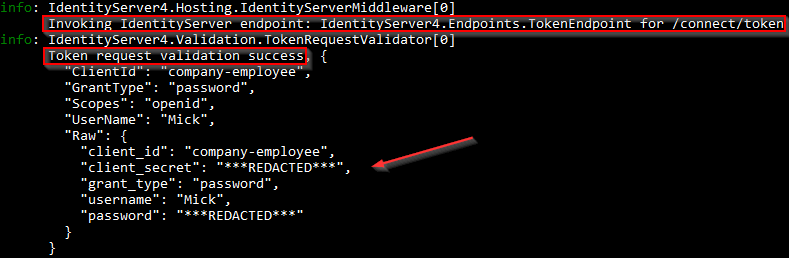
We can see an end-point we use to retrieve the token, the message stating the validation has passed, and the information about the client. So, everything works as expected. But, if we try to modify, for example, client_id parameter:
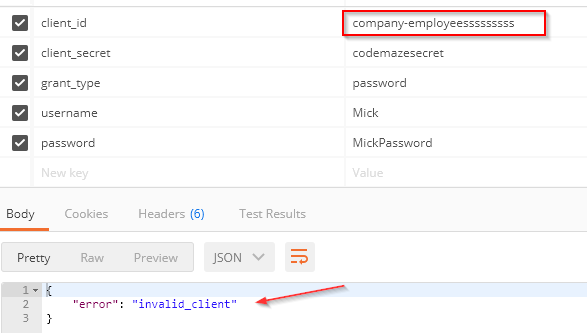
We can see the request fails. Additionally, we can confirm this from the logs as well:

Great job.
As of IdentityServer library version 4, we can’t just send the request with the client_credentials grant type, the server returns an error about invalid scopes. But we will create our scopes in the next article and see how our API use client_credentials grant type to communicate with the authorization server.
Conclusion
Our authorization server works and we can retrieve a token from it using different flows.
So we can sum up. We have learned:
- About Token, Endpoint, and Flows
- How to integrate IdentityServer4 in the ASP.NET Core application
- The way to setup in-memory configuration
- How to retrieve tokens with the ResourceOwnerPassword flow
Our server doesn’t have a valid UI, but in the next article, we are going to add that feature. Additionally, we are going to learn how to protect our Web API project.
So, see you there.
Sorry to say but after following step by step I get an 400 bad request…
Even did it start to finish 3 times to make sure I didn’t miss a step…same result
Well, that is normal. Once you start the server, you will see in a console that your server is up and running and that you are using in-memory config. But you still don’t have an UI, that’s why you get 404. Just continue with the article. Use postman to send the POST request and you will see that you will get a token. After finishing with this article, just move to another from the series. In a next one, you will add the UI for the server.
I forgot to set the Call to Post..getting 200 now
Hello Team, thank you for your hard work and spot on content, it really helps me to understand complex security concepts much better. Great work and great content.
I have one rookie question which might be absolutely out of context, so beg your pardon if it’s irrelevant. Microsoft has AD FS solution, which also supports OpenId/OAuth. Hence, is it safe to assume, that material that you mention here in terms of IdentityServer library 4 would also be applicable to AD FS?
Thank you!
Hello Vladimir. I must admit, I didn’t use AD FS at all, but if they support OIDC and OAuth flows (and as much as I saw, they do), then the concept should be the same. I am not saying that the code is the same, but the concept should be. Basically, once I learned IS4, it was easy for me to understand Auth0 or any other external token provider because they all use the OIDC, OAuth flows. Of course, interface was different, but that is no problem at all once you know how this complete logic works.
simple and spot on article!
Thanks Faran. I hope you will find the entire series helpful. All the best.
Make sure you turn off SSL verification in Postman otherwise this will not work!! Took a while to figure this out.
Well, let me be honest with you. I didn’t know that either. That option is turned off in my Postman, so didn’t think about that at all. Thanks a lot for that suggestion.
Yeah not sure if they changed it but I downloaded it on a new MacBook today and it was set by default.
The 5006 endpoint will work but you will just get an invalid request with no help if you try the 5005 endpoint. Took a good 30 minutes trying to figure out what was wrong.