How to Install an Email Server with ISPConfig on Debian 10
On this page
This Tutorial uses a single server setup as an example. ISPConfig 3.1 is installed on Debian 10.0, Buster (see ISPConfig Perfect Server installation tutorial for the actual server installation), the purpose of this guide is to show you the steps after having installed the initial server to set up a working mail system for your own domain name. I upgraded ISPConfig to 3.1.15 during testing this tutorial.
What is needed
To use this Tutorial successfully for a properly working e-mail server you need
- a host where you install ISPConfig (and an Operating System)
- I recommend 2 GB memory with 4 GB swap, should be enough for mail server.
- host must have Internet connection with port 25 open both ways
- host has a fixed IP-address
- host must have A record for its IP-address (or AAAA if using IPv6)
- you must create MX record to DNS name service for the host
- you must get host reverse DNS name service PTR record that matches hosts FQDN
The memory requirement is for SPAM filters. You can get by with 1 GB memory even with SPAM filters running if the 4 GB swap is there to avoid out of memory situations.
Open ports
Mail server must have port 25 open both ingoing and outgoing. Make sure your host does have that port open before setting up the e-mail server on that host.
There are ways to get e-mail working even when port 25 is not open, but it involves sending e-mails out via another host that does have port 25 open. It may make more sense to install e-mail server on that other host and forget the first altogether as far as e-mail goes.
DNS Name Service entries
Mail server needs an FQDN, Fully Qualified Domain name(Read about it from Wikipedia: FQDN). In this example, domain name is taleman.ovh. To show that mail server hostname need not be mail, we use posti as hostname. So the FQDN is posti.taleman.ovh.
This host is installed on a service providers system, they offer registering domains, name service and reverse name service. I used those.
IP address is 178.33.154.66. I did the following:
- registered the domain taleman.ovh
- added this IP-address as A record to DNS name service with name posti.taleman.ovh
- added MX record for domain taleman.ovh with value posti.taleman.ovh
- added reverse name service PTR record for that IP-address, pointing to posti.taleman.ovh
The MX record is created for the e-mail domain. So I create it for taleman.ovh, and it points to posti.taleman.ovh, the e-mail server that receives e-mail for that domain.
Reverse name service
Read about reverse name service from Name Service tutorial. In this example case, reverse name service must return posti.taleman.ovh.
My service provider checked existence of A record before adding corresponding PTR was possible, I had a bit of a problem before I figured that is why adding failed.
Testing name service
Better to test name service now, since sending and receiving e-mails is not going to work if name service is not set up correctly. If your workstation is Windows instead of Linux or Unix, use command nslookup instead of host.
$ host taleman.ovh
 taleman.ovh has address 188.165.143.5
 taleman.ovh mail is handled by 10 posti.taleman.ovh.
The above result shows the domain name does have an IP-number associated (which in this case is different from the e-mail server IP-number, but that does not affect e-mails), and there is an MX record that points to posti.taleman.ovh. The "mail is handled by" part comes from the MX record. This MX record is needed if e-mail sent to @taleman.ovh addresses is to be received at posti.taleman.ovh.
Then check the name service entry for the mail server FQDN (in this case posti.taleman.fi) is an A record and points to the correct IP-number.
$ dig posti.taleman.ovh |grep "ANSWER SECTION" --after-context=3
;; ANSWER SECTION:
 posti.taleman.ovh. 3600 IN A 178.33.154.66
;; Query time: 56 msec
Finally check the reverse name service resolves the IP-number back to the FQDN of the mail server.
$ host 178.33.154.66
 66.154.33.178.in-addr.arpa domain name pointer posti.taleman.ovh.
Instead of commands host and dig you can use web pages that test name service. I know of intoDNS and MXToolbox.
If you can not get the above tests to succeed, you can try this Setting up Name Service -tutorial.
Installing OS
I use Debian version 10 Buster, so I follow this tutorial:
https://www.howtoforge.com/tutorial/debian-10-buster-minimal-server/
Replace the IP-number, hostname and domain name with your values.
Since I write this tutorial in English, I chose English as Language, but Finland as Country and United_Kingdom en_GB.UTF-8 as locale setting.
root@posti:/tmp# cat /etc/debian_version 10.0
root@posti:~# locale
 LANG=en_GB.UTF-8
 LANGUAGE=en_GB:en
 LC_CTYPE="en_GB.UTF-8"
 LC_NUMERIC="en_GB.UTF-8"
 LC_TIME="en_GB.UTF-8"
 LC_COLLATE="en_GB.UTF-8"
 LC_MONETARY="en_GB.UTF-8"
 LC_MESSAGES="en_GB.UTF-8"
 LC_PAPER="en_GB.UTF-8"
 LC_NAME="en_GB.UTF-8"
 LC_ADDRESS="en_GB.UTF-8"
 LC_TELEPHONE="en_GB.UTF-8"
 LC_MEASUREMENT="en_GB.UTF-8"
 LC_IDENTIFICATION="en_GB.UTF-8"
 LC_ALL=
 root@posti:~# cat /etc/timezone
 Europe/Helsinki
Verify you have set up hostname correctly. The mail system configuration ISPConfig does is not going to work if hostname is wrong.
root@posti:~# hostname posti
 root@posti:~# hostname -f posti.taleman.ovh
 root@posti:~#
Installing ISPConfig
I choose to install Apache as web server, so for Debian Buster I follow this Perfect Server Guide.
I installed openssh-server on the host and set up root login using ssh key, so I can ssh to the host as root directly. Passwordless logins with OpenSSH or Secure Passwordless Logins with SSH.
root@posti:/tmp# free -h
I prefer Emacs style editors to nano, so I install jed now to make editing files more pleasant.
I had /etc/host and /etc/hostname correctly set up after the operating system install, so I just verified they were correct following the Perfect Server Guide. Pay attention to the hostname and FQDN, if you mess those you will discover in the end that your e-mail server does not work. The damage can be repaired, but it is easier to get it correct from the beginning.
root@posti:/tmp# hostname
 posti
 root@posti:/tmp# hostname -f
 posti.taleman.ovh
For the rest, I just follow the Perfect Server Guide. Note that you can mostly cut and paste the commands from the guide to command line.
I did not install Mailman, I do not plan to use Mailman on this host. Likewise, I omitted installing BIND DNS Server, Webalizer, AWStats. I did install Roundcube Webmail since this hosts becomes an e-mail server.
In chapter 18 (Install PHPMyAdmin Database Administration Tool) I used command
/usr/bin/apg -m 32 -x 32
to generate the 32 character long blowfish secret.
Using system
Create E-mail domain and mailboxes
Now I log in as admin to ISPConfig and
- Add new client
- Add new Domain (Email Domain!), and fill in the form
- Add new Mailbox
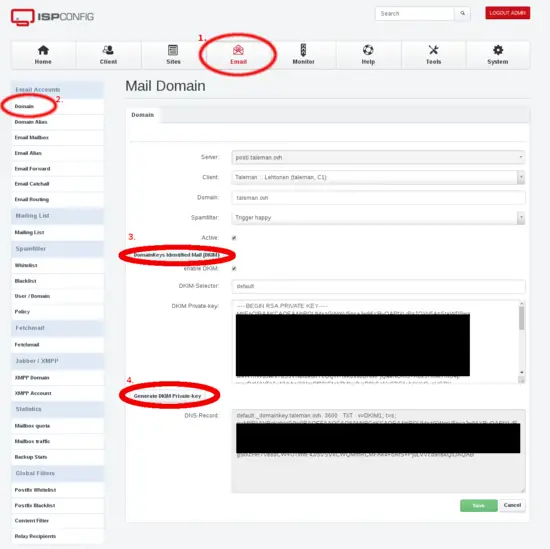
Create the DKIM keys and record by clicking the buttons in the order numbered in the image. You can read about DKIM in Wikipedia.
Then wait for two minutes or until the red ball with number in the upper part of ISPConfig Panel goes away.
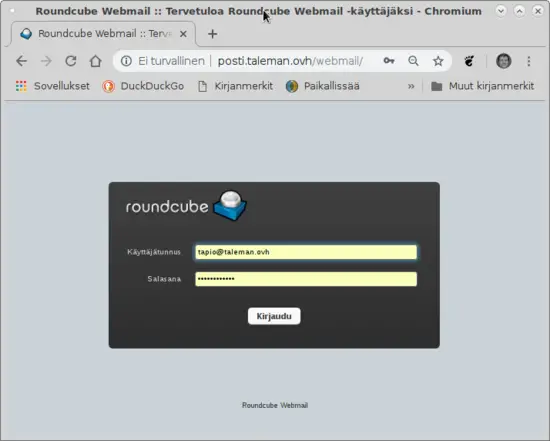
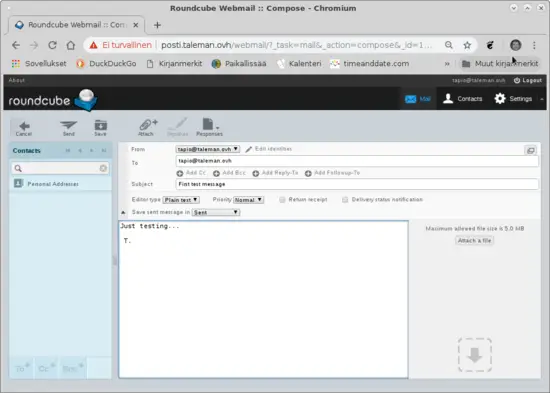
As first test, log in to Roundcube Webmail with the above-created mailbox and send an e-mail to that same address. ISPConfig sends a Welcome message to every created mailbox, so there should be one message there already. Use the Compose button and write a short test message.
The message should appear soon in the mailbox.
Then test sending an e-mail to some other mailbox you have and can check if the mail arrives there. Next test you can send from somewhere else to the above-created mailbox.
Do note, that if you enabled greylisting for the mailbox, the e-mail sent from outside your server does not arrive immediately to the mailbox. However, you should see in mail log entries of the attempted delivery right away so you see that mail can reach your server. The greylisting entry in file /var/log/mail.log looks something like this:
Aug 29 19:08:42 posti postfix/smtpd[16911]: NOQUEUE: reject:
  RCPT from mta-out1.inet.fi[62.71.2.194]: 450 4.2.0
  <[email protected]>: Recipient address rejected: Greylisted,
  see http://postgrey.schweikert.ch/help/taleman.ovh.html;
  from=<****@*****.***> to=<[email protected]> proto=ESMTP
  helo=<******.****.***>
You can monitor the mail log in a terminal window like this, for example:
tail -f /var/log/mail.log
Or using these commands, if you are only interested in the Greylisting entries:
tail -f /var/log/mail.log | grep Greylisted
or
grep Greylisted /var/log/mail.log
Greylisting delays only the first e-mail from the same sender to the same recipient. Once that first e-mail is received, the following e-mails arrive without an extra delay.
In my case, everything worked at first try. This shows that the ISPConfig Perfect Server Guide really does work.
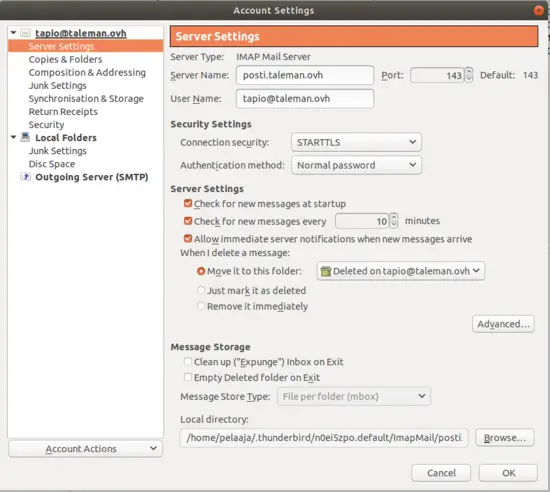
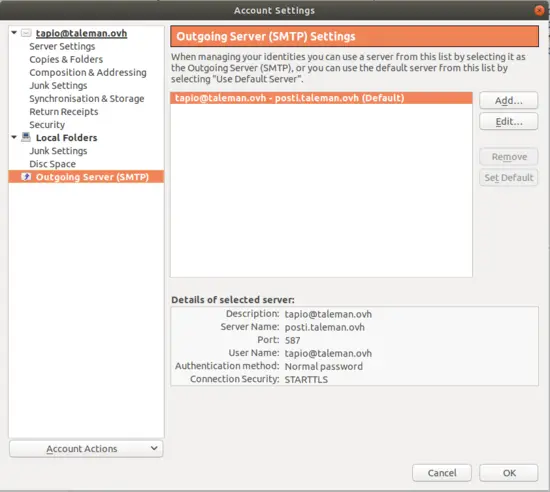
Connect e-mail client
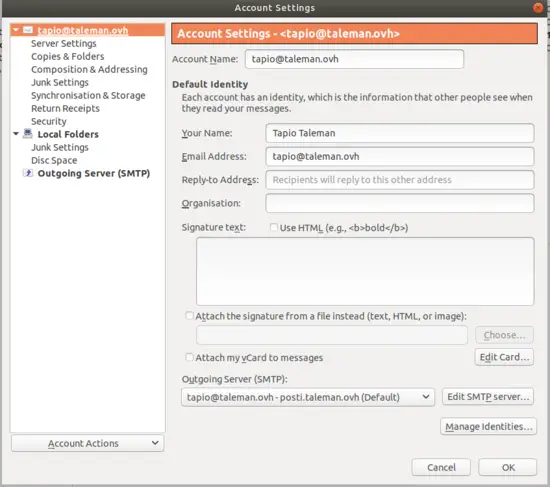
Using Thunderbird as example mail client. Other mail client applications work in a similar way.
ISPConfig makes the account name be the e-mail address.
Connection security STARTTLS means the connection starts unprotected and then switches to encrypted if both parties support the encryption. SSL/TSL means the session is encrypted from the beginning. SSL/TSL probably is slightly more secure, so try if your client works with that.
Using SPF
Read about Sender Policy Framework from Wikipedia. Originally SPF stood for Sender Permitted From, which is nice to remember what is means. After reading about SPF, you can create the record yourself, check if your name service provider can generate SPF record or using Internet Search Engines with
SPF wizard
find a website that creates the SPF name service record for you. Then cut and paste the record to your name service. Add a TXT record, or maybe on some DNS system add SPF record.
Check how the SPF looks like in name service, like this
$ dig taleman.ovh -t TXT | grep spf
 taleman.ovh. 3000 IN TXT "v=spf1 mx ~all"
Or like this:
$ dig +short taleman.ovh TXT
 "v=spf1 mx ~all"
 "1|www.taleman.ovh"
Using DKIM
Read about DomainKeys Identified Mail from Wikipedia. ISPConfig created the DKIM keys for you when creating e-mail domain (if you remembered to tick the DKIM box). Cut and paste the DNS-Record that is the public key to your name service as TXT record. You name service provider may offer a tool to make creating DKIM record easier. Keep the DKIM Private-key secret.
Check how the DKIM looks like in name service, like this:
$ host -t txt default._domainkey.taleman.ovh.
 default._domainkey.taleman.ovh descriptive text "v=DKIM1;h=sha256;s=*;p=MIIB(I cut long string shorter)0rp" "sTGLXyK(cut shorter)B;t=s;"
If it was ISPConfig that created the DKIM keys, the private key is copied to the right place in amavis settings.
There is website mail-tester.com that is useful to check SPF and DKIM are working. Go to that website, it gives an e-mail address and you send an e-mail there from your server. Then wait a minute and check the website again.
Creating certificates
ISPConfig can create self signed certificates, these are created during ISPConfig installation unless you chose not to create. Even if you created those self signed certificates, it is a good idea to create proper certificates that browsers, e-mail programs and other e-mail servers trust.
There is a fine tutorial: Securing ISPConfig with a free Let's Encrypt SSL Certificate
Following that tutorial, I noticed the created website showed Debian default webpage, until I created the LE certificate for the website. Also ISPConfig Panel was wonky, I believe because it had the self signed certificate and now this new certificate or no certificate at all. Refreshing pages in browser sorted this out.
When certificates are set up, enter https address of server in browser. Clicking icon at left of browser address bar with other mouse button shows information about the certificate.
Go to ISPConfig Panel System tab, Interface Main Config and Mail tab. There set
Use SSL/TLS encrypted connection for SMTP
to SSL.
Further testing of certificate is possible with tools on websites, use Internet Search Engines with
ssl testing
as search words. Those tools usually test the website, when testing certificates the e-mail server has, search with
ssl testing mail server
ISPConfig Roundcube Plugins
These plugins are useful for webmail users. They allow changing email password in Roundcube, for example. Some other settings can also be modified in Roundcube. They can all be modified in ISPConfig panel, but some e-mail users may not want to use the panel.
I installed ISPConfig Rouncube Plugins using Tutorial ISPConfig 3 Roundcube Plugin on Debian 9. Tutorial worked exactly on Debian 10 Buster, except that now ispconfig3_account/config/config.inc.php has one more line:
$config['soap_validate_cert'] = true;
This can stay at value true, since the certificate is properly set up and tested in previous chapter of this tutorial. If, however, host does not have a valid certificate, change this setting to false.
I had one problem. Some items in Account Section popped up error message
An error occurred.
Soap Error: The login is not allowed from <host ip-number>
I solved this by ticking on the Remote Access and writing posti.taleman.ovh for that rcmail-remote user I created following the Tutorial. Looks like tutorial is wrong about not needing "Remote Access" ticked. Now it seems to me it is needed both for single server setups and ISPConfig multiserver setup with a separate e-mail server.
Further usage
Now you can create another e-mail domain. Remember to create MX record for that domain, and point it to your e-mail server. You can use the same e-mail server for all e-mail domains you create. This is the way it is usually done, since it would be quite a waste to create a separate e-mail server for each e-mail domain.
Troubleshooting
Following this Tutorial my freshly set up e-mail server works. If yours does not work, check you have followed this tutorial and not skipped some steps.
Reading the Forum has shown common ways to have a not working e-mail server are wrong setting for hostname and hostname -f and/or mistakes in file /etc/postfix/main.cf.
If you suspect problems with DNS name service, check those with DNS with ISPConfig -tutorial. There are website tools that check DNS, like intodns.com, dnschecker.com, mxtoolbox.com.
If e-mails are not received or not sent, it is postfix that does those functions and they are logged to /var/log/mail.log. So do
tail -f /var/log/mail.log | grep postfix to see what happens when mail is being received or sent.
If you have problems connecting with e-mail client (Thunderbird, for example) use this to see what happens:
tail -f /var/log/mail.log | grep dovecot
In case a particular e-mail is problematic, you can find the mail log entries using the ID of that e-mail. For example:
Sep 23 14:19:34 posti postfix/smtps/smtpd[10260]: A9F2880C76:
client=dsl-tkubng21-58c1ce-191.dhcp.inet.fi[99.99.99.99],
sasl_method=PLAIN, [email protected]
The ID for that e-mail is A9F2880C76. You can find log entries for that e-mail using
# grep A9F2880C76 /var/log/mail.log
Command mailq shows e-mails that are in postfix deferred queue. That is, those e-mails that are not yet delivered. It is normal to have some recent entries there, e-mails can not always be delivered immediately. You can see contents of those emails using the Queue ID, like so:
# postcat /var/spool/postfix/deferred/A/A9F2880C76
Howtoforge has ISPConfig Forums, ask for advice there.


