Playing a game with others across the world is a common desire for the average video game user. In fact, there are some games that don’t even have a single player mode and opt to be multiplayer only. Creating games is already a complex process, so how does one create their game so it can be played by multiple people at once? For the Unity developer, there is a helpful plugin that makes the multiplayer game creation a much easier process. That plugin is PUN (Photon Unity Networking) created by Exit Games. This plug-in specializes in easing the multiplayer game creation process by handling aspects such as matchmaking, client to server architecture, and cracking down on issues such as latency.
Though PUN does simplify the process, creating any multiplayer game can still be a daunting task. Some projects have been created to help you get started using PUN. The first project is largely codeless, with only the player object’s movement being programmed ahead of time. All required assets have been created in advance with the only item missing is the plug-in itself. You’ll see how to add PUN to the project in a moment. The second project is the complete version of what this article covers with all code in their corresponding scripts and the plug-in already imported.
The article will assume that you’ve downloaded the codeless project. To load it into Unity simply open the Unity Hub application and click the Add button as shown in Figure 1.
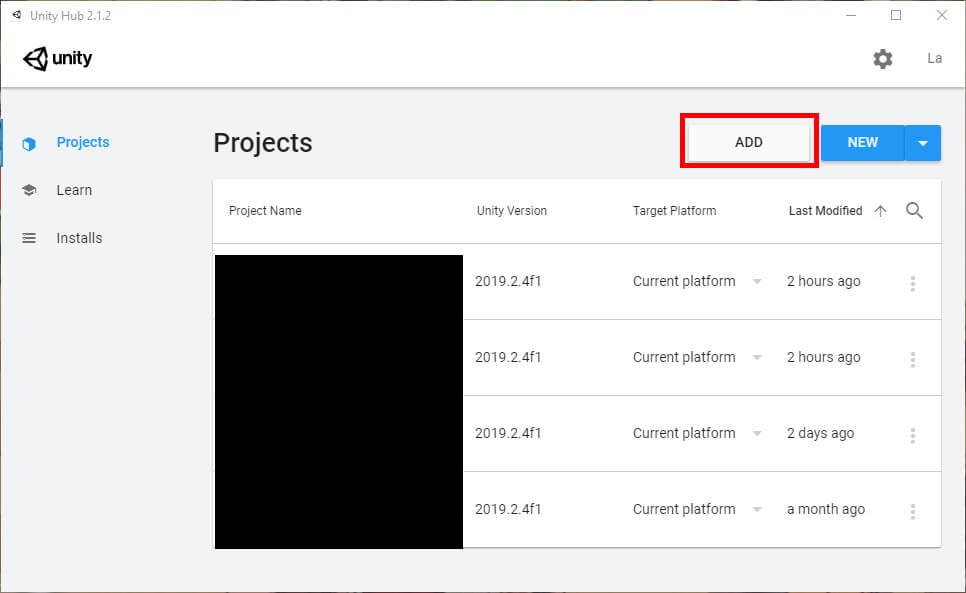
Figure 1: Adding a new project
Navigate to your project directory and choose Select Folder to add it to the list of projects in Unity Hub. Once done, you can open the project and begin.
Project Overview
First, it’s recommended to get familiar with the project. There are two scenes, one title screen and another multiplayer scene. (You can switch between scenes in the Asset window under Scenes.) As you may have guessed, the multiplayer scene is where players can move around and see each other. The title screen consists of a simple user interface that asks the player to join a multiplayer game. Under the hood, there are three controllers in the title screen: the network, room, and lobby controllers. A lobby is typically an area where players can socialize, change their settings, or view the results of the previous game. This project’s lobby will remain simplistic, with it just being in the title screen and simply handling room creation. Speaking of room creation, a room will be the place where the main multiplayer game takes place. Over in the multiplayer scene, there is only a GameSetup object which focuses on the creation of player objects.
There are a total of five scripts that will be worked on throughout the course of this project. Most of these scripts relate to objects in the two scenes such as the LobbyController script going to, you guessed it, the LobbyController object. You can also see the PhotonPlayer prefab placed within Resources PhotonPrefabs. This the path that PUN will take to find and spawn the player object. Once the PUN plug-in is added to the project, you’ll need to come back here and add a few components to PhotonPlayer.
Finally, the project is set up in advance to open a resolution dialog. In order to properly test the multiplayer functionality, you’ll need to run two copies of the game, one in the editor and one from an exe that will be built later. The resolution dialog will give you the option to open the game in windowed mode which will in turn makes the multiplayer functionality easier to view and test. If you want to see how this was put together, navigate to Edit Project Settings then select Player on the left hand side of the Project Settings window. From there make sure you’re looking at PC, Mac, and Linux Standalone settings and have a look at the Resolution and Presentation section. Note: according to the Unity editor itself, the resolution dialog will be phased out at some point in the future.
Photon PUN Setup
Before getting too deep into the project, you will need to create a Photon app id for the project to connect to the Photon servers. You get this by visiting the Photon website, photonengine.com, and either signing in to an existing account or creating a new one. Both options are found under Sign In on the website.
After you’ve logged in, you’ll be in the apps screen. You will naturally need to create a new app to get an app id, so go ahead and select the Create New App button. New accounts will have this button in the center of the screen as shown in Figure 2.
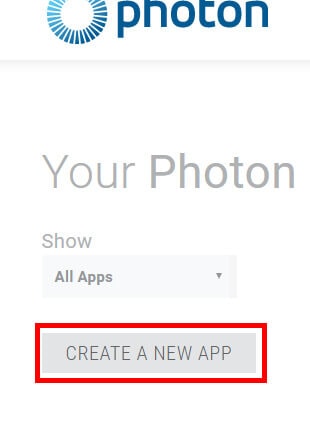
Figure 2: Creating a new Photon app.
Fill out the form, making sure that the Photon Type field has Photon PUN entered. The name of the project can be whatever you like, and description and url fields are optional. The screen should look something like Figure 3.
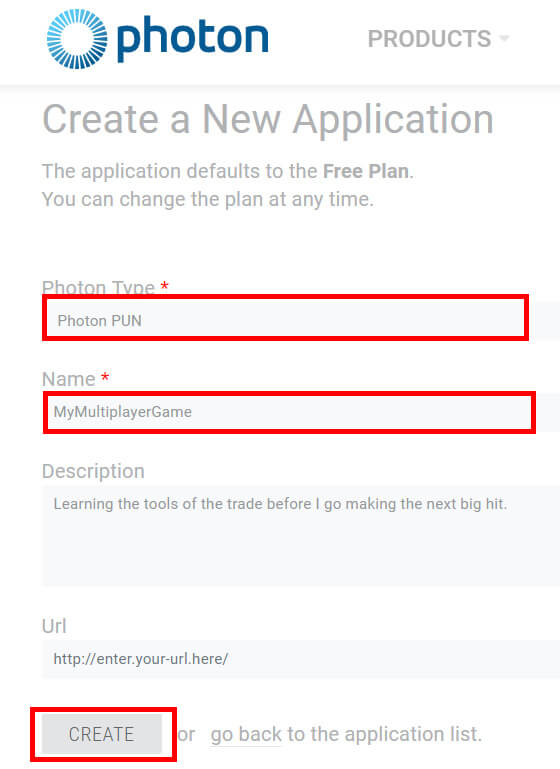
Figure 3: App creation screen
After creating the app you’ll see a new app on the app screen with your app name on it. In it lies the app id shown in Figure 4. Keep this handy, because you will need it shortly.
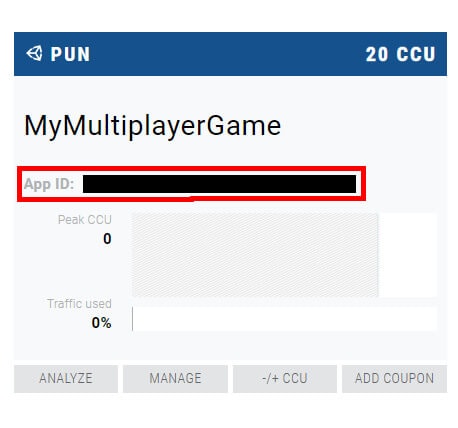
Figure 4: Getting your app id
With the app id created, you can move on to setting up PUN into Unity itself. To import PUN into Unity you will first need to open the Unity Asset Store, which can be accessed from the top menu by navigating to Window Asset Store as shown in Figure 5.
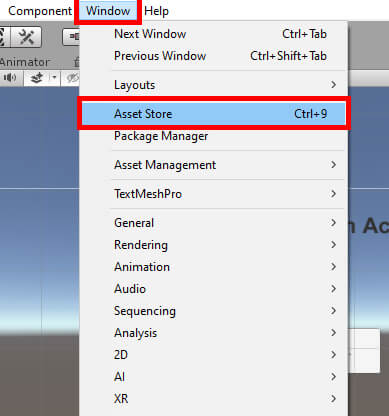
Figure 5: Opening the Asset Store
Once opened, search for PUN in the search bar, then select PUN 2 – Free.
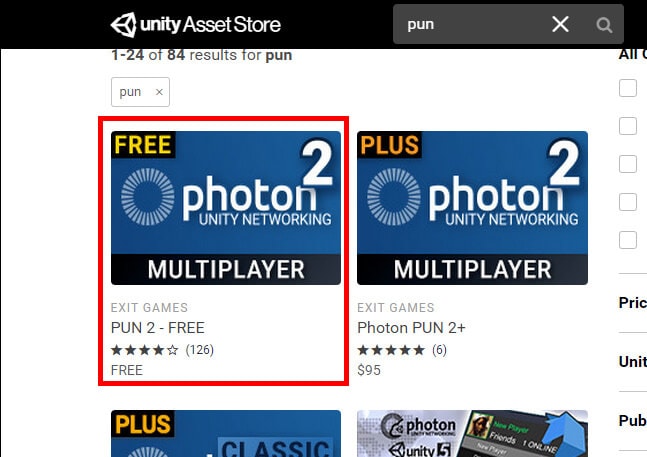
Figure 6: Accessing the PUN plug-in
Click the Download button to download the plug-in to your system. After the download is complete, the button will change to Import. Click this button and a new window appears showing all the different assets you’re about to import. If you want to, you can leave out the Demos folder, but otherwise be sure to import everything. The plug-in is imported but now a new window has appeared asking for an app id. Copy the app id you received earlier from the Photon website into the app id field in the Unity editor. Then click the Setup Project button shown in Figure 7.
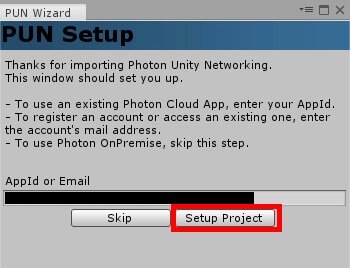
Figure 7: Completing the Photon setup
With the app id set up, you are now ready to begin the coding process, starting with the NetworkController script. Find the script in the Assets window and double-click it to open in Visual Studio.
NetworkController
To begin, you will need using Photon.Pun at the top of every script, including this one. From there, change NetworkController‘s inheritance from MonoBehaviour to MonoBehaviourPunCallbacks. Then you can either comment out or delete the Update method. This takes care of the setup portion of the script. In the Start method you enter the following code:
|
1 |
PhotonNetwork.ConnectUsingSettings(); |
This code is responsible for connecting the game to the Photon master server using whatever settings are defined in your project. Once the game connects to the server, a simple message will be printed to the Unity console stating which region server the game connected to.
|
1 2 3 4 5 |
public override void OnConnectedToMaster() { Debug.Log("Connection made to " + PhotonNetwork.CloudRegion + " server."); } |
The server you connect to is based on your location. For instance, in this example the connection is being made to the USA East server, signified by the “us” token. There’s also USA West (usw), Europe (eu), Canada East (cae), and many others. The full list of regions and corresponding tokens can be found here.
NetworkController is now complete. Now is a good time to double check your code using Figure 8 and save your work. When you’re ready the next script will be LobbyController.

Figure 8: The complete NetworkController script
LobbyController
In addition to Photon.Pun, you’ll also need using Photon.Realtime and using UnityEngine.UI to complete this script. Like in NetworkController you also must make sure the script is inheriting from MonoBehaviourPunCallbacks. As for Start and Update, you may delete or comment those out. Then declare the following variables:
|
1 2 3 4 5 6 |
[SerializeField] private Text buttonText; [SerializeField] private int roomSize; private bool connected; private bool starting; |
The buttonText and roomSize variables were given the SerializeField attribute to make them visible to the Unity editor without needing to make the variables public. Then two bools were declared that will help keep track of the game’s status such as connection to the master server and loading the game room. Speaking of connections, another OnConnectedToMaster function is needed in this script, but this one has more going on than in NetworkController.
|
1 2 3 4 5 6 |
public override void OnConnectedToMaster() { PhotonNetwork.AutomaticallySyncScene = true; connected = true; buttonText.text = "Begin Game"; } |
First the game synchronizes the current scene with the Photon network. Then we set connected to true and change the buttonText‘s text to Begin Game where before it would say Loading… as it was trying to connect. Now that the game is connected, the button in the title screen needs to be able to start the game. To do this, you enter the following:
|
1 2 3 4 5 6 7 8 9 10 11 12 13 14 15 16 17 18 19 20 |
public void GameButton() { if (connected) { if (!starting) { starting = true; buttonText.text = "Starting Game. Click Again to Cancel"; PhotonNetwork.JoinRandomRoom(); // attempt joining a room } else { starting = false; buttonText.text = "Begin Game"; PhotonNetwork.LeaveRoom(); // cancel the request } } else Debug.Log("Not connected to server!"); } |
At the start, the function checks to make sure the game has connected to the master server. If it isn’t, it’ll print a message to the debug console. So long as the game is connected it then checks if the game has been told to start. Assuming it hasn’t, it will begin the game. The button text will change to let the user know that they can cancel the request if desired. Finally, PhotonNetwork.JoinRandomRoom will attempt to connect the player to a pre-existing room. Currently, LobbyController should look something like Figure 9 below.
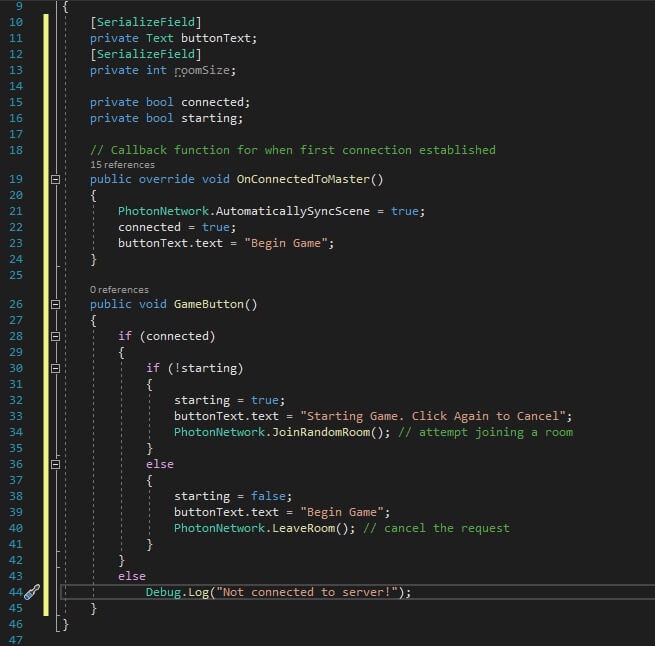
Figure 9: The LobbyController so far
Of course, you’re the only one that currently owns a copy of this game at this point. There shouldn’t be any rooms to join. What do you do then? At that point, you must create your own. First, print out a message letting you know that the game failed to join a room. Then, call a soon to be created method that will create a new room.
|
1 2 3 4 5 |
public override void OnJoinRandomFailed(short returnCode, string message) { Debug.Log("Failed to join a room... creating room"); CreateRoom(); } |
The room creation process involves getting a random room number. Then the game makes sure the room is visible to other copies of the game in the network, lets it know that the room is open and limits the number of players allowed in the room to the value of roomSize. After that’s set up, the game asks the Photon network to create the game room. In the event that the room number is already taken, a method similar to the one above will be called, and the room creation process will start again.
|
1 2 3 4 5 6 7 8 9 10 11 12 13 14 15 |
void CreateRoom() { Debug.Log("Creating room now"); int randomRoomNumber = Random.Range(0, 10000); RoomOptions roomOps = new RoomOptions() { IsVisible = true, IsOpen = true, MaxPlayers = (byte)roomSize }; PhotonNetwork.CreateRoom("Room" + randomRoomNumber, roomOps); Debug.Log(randomRoomNumber); } public override void OnCreateRoomFailed(short returnCode, string message) { Debug.Log("Failed to create room... trying again"); CreateRoom(); } |
LobbyController’s room creation portion of the script should look similar to Figure 10.

Figure 10: The room creation portion of LobbyController
Everything is now in place for lobby creation, but the game hasn’t quite started yet. Most of the pieces are in place, but the game won’t move on to the multiplayer scene from here. This is where RoomController will step in. It will help the game properly join the current room and load the scene where the real action takes place.
RoomController
Remember to include using Photon.Pun and inherit from MonoBehaviourPunCallbacks. In addition, you can also delete or comment out the Start and Update methods. Then declare a private int, serializing it so you can still edit the value in the Unity editor.
|
1 2 |
[SerializeField] private int multiplayerSceneIndex; |
Next, you’ll need to make the script a callback target. This is being done because a callback function in this script will be triggered in the LobbyController script. The code to get that setup looks like this:
|
1 2 3 4 5 6 7 8 |
public override void OnEnable() { PhotonNetwork.AddCallbackTarget(this); } public override void OnDisable() { PhotonNetwork.RemoveCallbackTarget(this); } |
Now with the setup portion out of the way, a new method will be needed for when a room is successfully created. This function will print a message stating that the player has joined a room before calling a StartGame method which, as the name implies, will start the game.
|
1 2 3 4 5 6 7 8 9 10 11 12 13 |
public override void OnJoinedRoom() { Debug.Log("Joined Room. Multiplayer game has begun."); StartGame(); } private void StartGame() { if (PhotonNetwork.IsMasterClient) { Debug.Log("Starting Game"); PhotonNetwork.LoadLevel(multiplayerSceneIndex); } } |
In StartGame, you can see that first the game checks if it is the master client (the one hosting the game). If it is, then a message will be printed to the Unity console and the multiplayer scene will be loaded. Scene loading in this instance is a little different from how you might normally load a scene in Unity. It calls LoadLevel from the PhotonNetwork class and is given the multiplayerSceneIndex variable as input. Over in the build settings of the project, there are the two game scenes, the title and multiplayer scene. This list of scenes is like an array, so the title scene is index 0 and the multiplayer scene is index 1. Eventually you’ll tell Unity what element in the list of scenes to load by giving the multiplayerSceneIndex variable a value of 1.
The full RoomController script can be seen below in Figure 11.

Figure 11: The complete RoomController script
GameSetupController
Congratulations! The hardest parts of this project are behind you. It’s all downhill from here. In the GameSetupController script you’ll want both using Photon.Pun and using System.IO. This time you do not need to inherit from MonobehaviourPunCallbacks, so leave the inheritance as is. You’ll also want to keep the Start method, but you can do whatever you want with Update. Start does only one thing, and that’s call a method named CreatePlayer. Right below the Start method you’ll create the CreatePlayer method proper:
|
1 2 3 4 5 6 |
private void CreatePlayer() { Debug.Log("Creating Player"); PhotonNetwork.Instantiate(Path.Combine("PhotonPrefabs", "PhotonPlayer"), Vector3.zero, Quaternion.identity); } |
All this script is doing in the end is creating the player object. The game is told to find this player object under a PhotonPrefabs folder and to look for the prefab named PhotonPlayer. Everything is setting the starting position and rotation values. The full script can be seen below in Figure 12.

Figure 12: The complete GameSetup script
PlayerMovement
While most of the PlayerMovement script has been setup in advance, there are some parts that are missing. If you were to try to play the game with other players now, you’d run into an issue where one player could control all the player objects at once. That is an obscene amount of power for one player to have, so some code will be entered in to prevent this issue. Once again, you’ll need using Photon.Pun but you do not need to inherit from MonobehaviourPunCallbacks. Next you need to declare a new variable:
|
1 |
private PhotonView PV; |
Over in the Start method you’ll set the value of PV to the player object’s PhotonView component.
|
1 2 3 4 |
void Start() { PV = GetComponent<PhotonView>(); } |
After that, head to the Update method. At the top you’ll add the following:
|
1 2 |
if (PV.IsMine) Movement(); |
What is a PhotonView and how does it help? PhotonView is a component that goes to an object. It’s responsible for identifying objects in the scene. When the component is attached to the player object later, you’ll effectively give it an id that the network will use to identify which player object goes to what player. In code, this works with the IsMine variable. In the above example, you’re simply checking if the current player belongs to this specific instance of the player object. If it does, then move the object like normal.
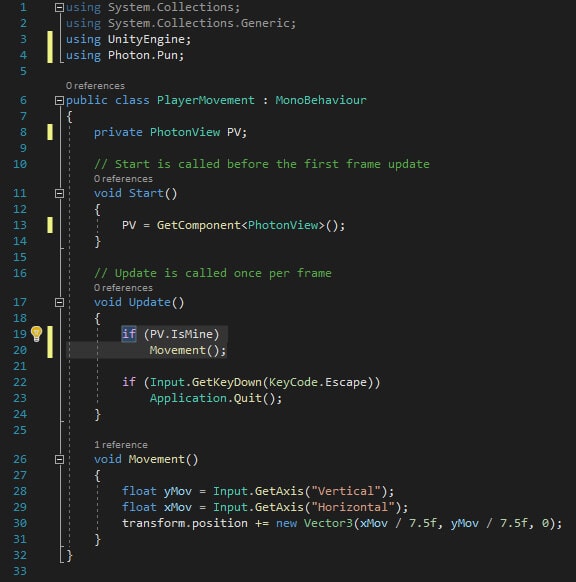
Figure 13: The complete PlayerMovement script
Finishing Touches
All the code for the project is now complete. The various scripts need to go to their corresponding objects, and some modifications need to be made to the PhotonPlayer prefab. Starting in the title screen, first add the NetworkController, RoomController, and LobbyController scripts to their respective objects. Figure 14 shows adding the NetworkController script to the NetworkController object.
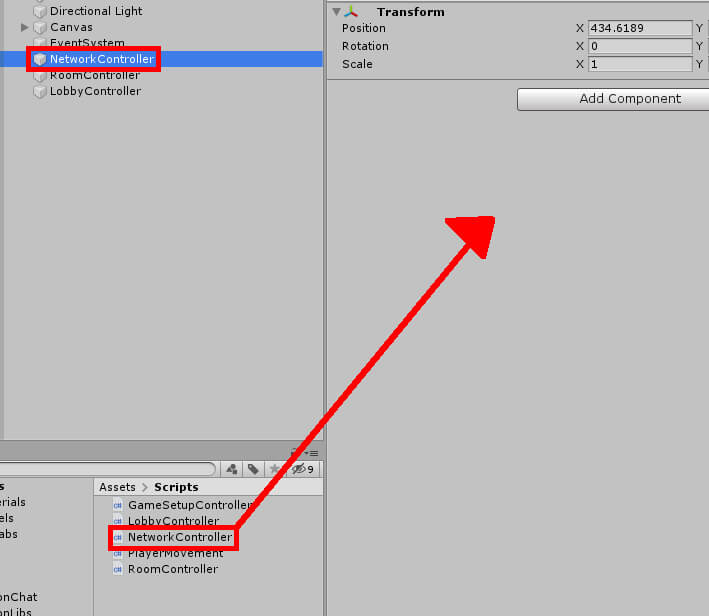
Figure 14: Attaching a script to an object
After adding the RoomController script to the RoomController object, edit the value of MultiplayerSceneIndex to 1 as shown in Figure 15.
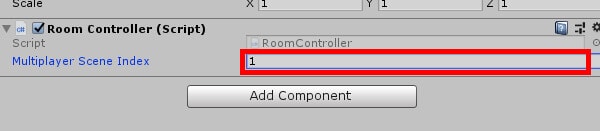
Figure 15: Changing the value of Multiplayer Scene Index
In the LobbyController assign a room size limit of your choosing. The example below sets it to four.
Next, fill in the Button Text field by expanding (clicking the small arrow) Canvas in the Hierarchy then expanding GameButton. Click and drag the Text object into the field as shown in Figure 16.
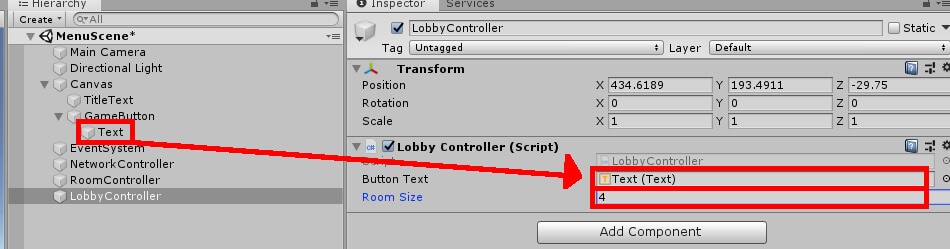
Figure 16: Editing the values of the Lobby Controller script component
Select GameButton from the Hierarchy and scroll down in the Inspector until you see the OnClick event. Click the plus button shown in Figure 17 to add a new event.
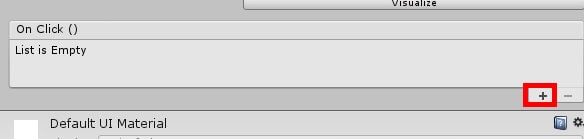
Figure 17: Creating a new OnClick event
Then click and drag the LobbyController object from the Hierarchy into the Object field in OnClick.
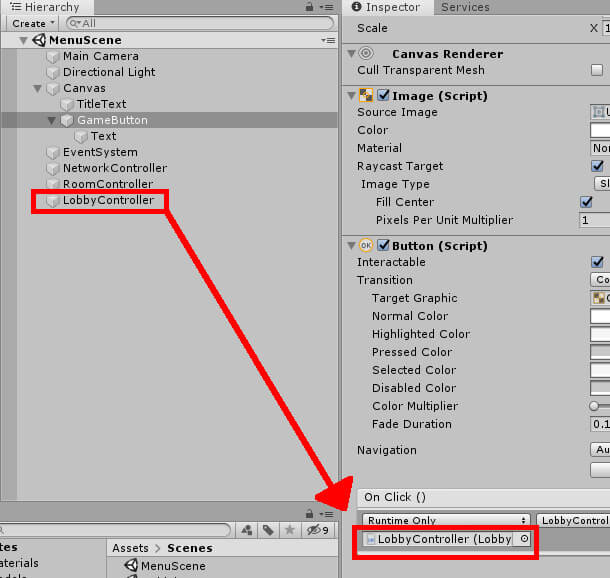
Figure 18: Specifying LobbyController
Finally, select the drop-down menu that currently says No Function. Navigate to LobbyController GameButton to assign the GameButton function to this button’s OnClick event. Now, whenever the button is clicked, any code in the GameButton function will be performed. Figure 19 shows how to set this up.
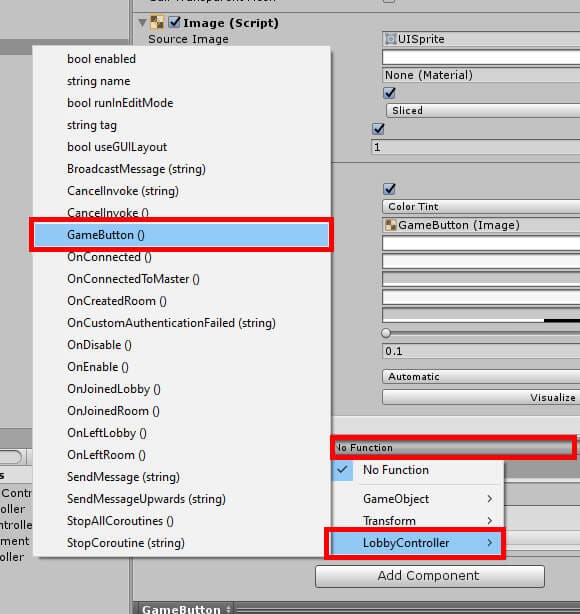
Figure 19: Setting the button’s function
Switch to the Multiplayer scene it by finding it in Assets Scenes. Double-click the Multiplayer scene to switch scenes. Select the GameSetup object and attach the GameSetupController script as shown in Figure 20.
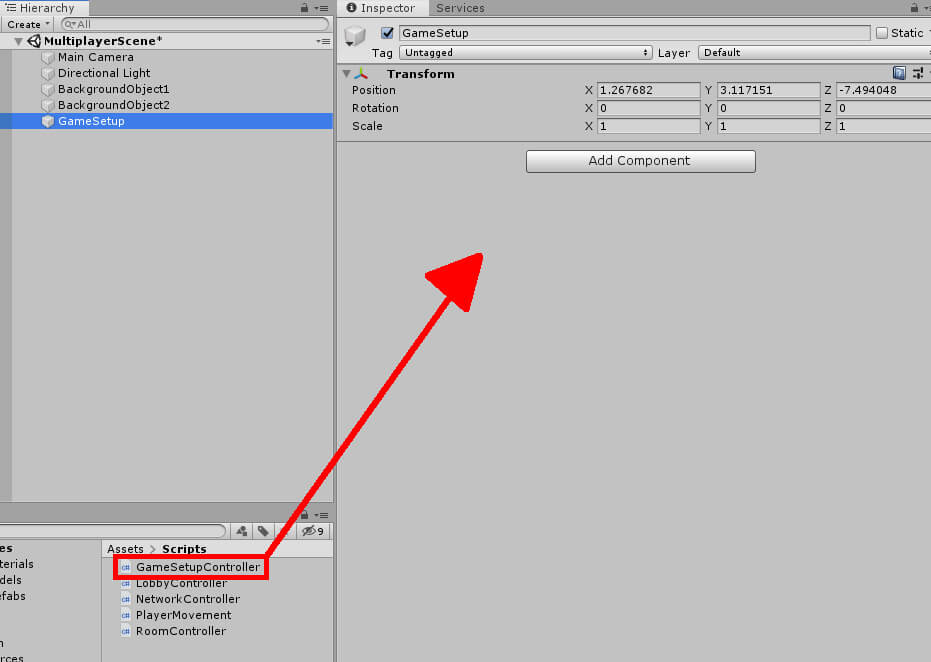
Figure 20: Setting up the GameSetup object
Finally, in the Assets folder navigate to Resources PhotonPrefabs and find the PhotonPlayer object. Click it and navigate to the Inspector window. Two more components will be added to complete the player object. Click the Add Component button shown in Figure 21.
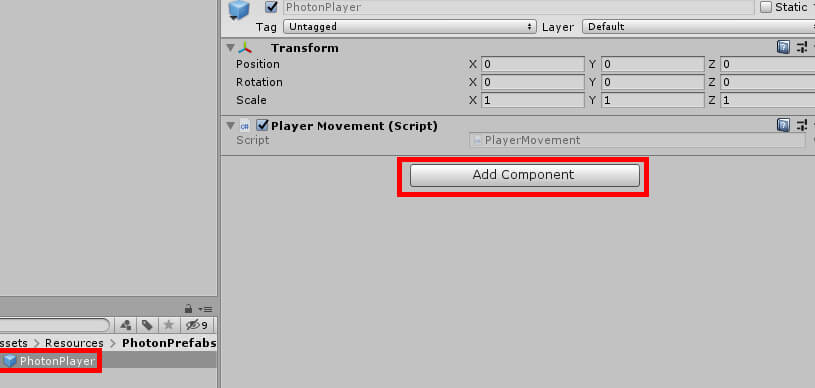
Figure 21: Adding new components
In the window that appears, search for Photon View and Photon Transform View as in Figure 22.
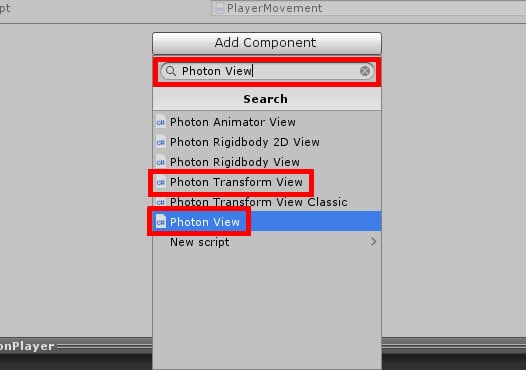
Figure 22: Adding the Photon View and Photon Transform View components
Click and drag the Photon Transform View component into the Observed Components box in the Photon View component as shown in Figure 23. Once you’ve finished that, the game is ready to play.
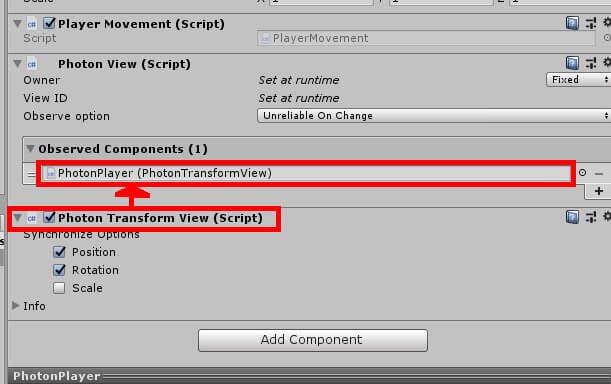
Figure 23: Setting PhotonPlayer’s Photon Transform View component as the observed component
Save your work, navigate to File Build and Run from the top menu, and choose where you want the exe file to be saved. Make sure that it is an empty folder. In order to properly test the multiplayer functionality, two copies of the game will need to be opened. One will be run from the editor and another will run from an exe. Make sure the editor version has the title screen opened before playing. As a reminder, you open different scenes in the Unity editor by navigating to the Scenes folder in the Assets window and double clicking your scene of choice. In this case, the scene you need to open is MenuScene. When the exe is finished building, the game will start. A configuration window will appear before the game begins properly. Tinker with the settings as you wish, but it is recommended to at least keep the game in windowed mode so you can easily go back and forth controlling the two games. If everything is correct, there will be two player objects loaded into the multiplayer scene, one being controlled from the editor and one from the exe. Move the player in one game by using the arrow keys and notice that the other game will update accordingly. Figure 24 shows the game in action.
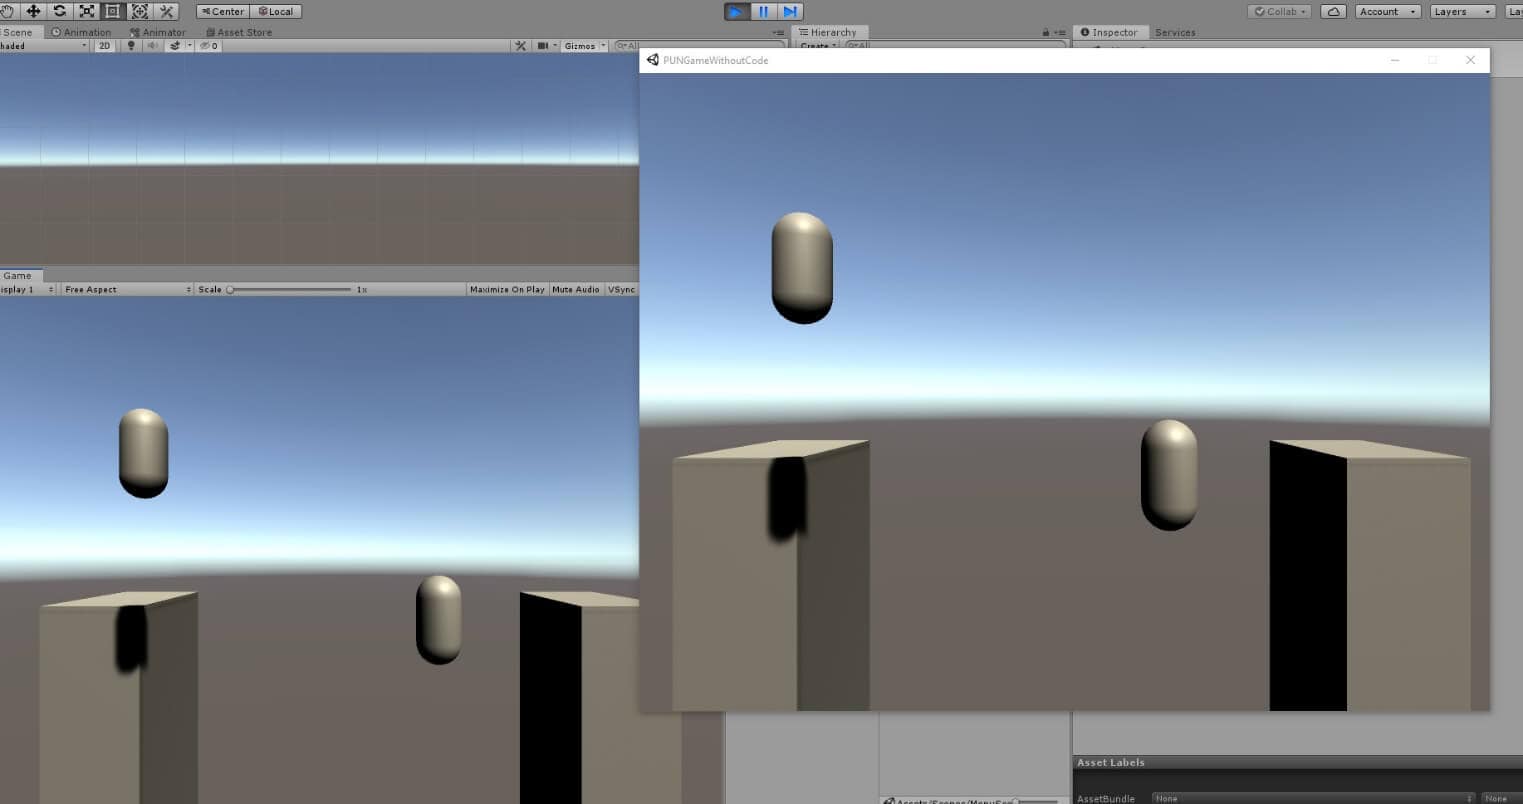 Figure 24: The multiplayer game in action
Conclusion
What’s normally a daunting, difficult to perform task has now been rendered simpler thanks to the PUN plug-in. For those with bigger ambitions for their multiplayer works, this is only the beginning. A simple room and lobby controller were put together with the ability to have multiple players in a game at once. Of course, the game is simplistic in its current state. All the players can do right now is move around the scene. Perhaps they’ll be fighting each other in some kind of combat situation, or maybe they’ll work together. At that point, it is up to the creator to decide. Regardless of what the game turns out to be, PUN makes it easier to create.

Load comments