How to Install GitScrum on Debian 10
GitScrum is a free and open-source Laravel task management application that helps you to manage your projects easily. It uses Git and the Scrum methodology that allows your team to manage their tasks more efficiently. With GitScrum, you can easily track the time consumed on tasks and sub-tasks you are working on. It allows you to create projects and assign users and their permission levels, and chat in real-time.
It comes with a rich set of features including, User Stories, Sprint, Flexible Workflow, Time Tracking, Roadmapping, KPI Monitoring, Backlog Management, Collaboration Board, Task Effort, Team Performance, Unlimited Storage, Collaboration and many more. GitScrum is one of the best tools for project management apart from other tools like Microsoft Project, Kanban, and Trello. It is a perfect solution for any startups, sales, marketing, agencies, developers and freelancers.
In this tutorial, we will show you how to install GitScrum project management software on Debian 10 server.
Prerequisites
- A server running Debian 10.
- A valid domain name is pointed with your server IP address. In this tutorial, we will use test.linuxbuz.com.
- A root password is configured on the server.
Getting Started
Before starting, it is a good idea to update your system with the latest version. You can update your system with the following command:
apt-get update -y
apt-get upgrade -y
After updating the system, restart it to implement the changes.
Install LAMP Server
First, you will need to install the Apache webserver, MariaDB server, PHP and other PHP extensions to your server. You can install all of them using the following command:
apt-get install apache2 mariadb-server libapache2-mod-php php php-cli php-common php-mailparse php-mysql php-gmp php-curl php-mbstring php-imap php-ldap php-gd php-xml php-cli php-zip php-yaml php-dev php-pear unzip curl git -y
Once all the packages are installed, open the php.ini file and tweak some settings:
nano /etc/php/7.3/apache2/php.ini
Change the following values:
memory_limit = 256M
upload_max_filesize = 100M
max_execution_time = 300
date.timezone = Asia/Kolkata
Save and close the file when you are finished. Then, start Apache and MariaDB service and enable them to start after system reboot with the following command:
systemctl start apache2
systemctl start mariadb
systemctl enable apache2
systemctl enable mariadb
Once you are finished, you can proceed to the next step.
Configure MariaDB Database
By default, the MariaDB root password is not configured in Debian 10. So, you will need to set it first.
To do so, log in to the MariaDB shell with the following command:
mysql
Once login, set your MariaDB root password with the following command:
MariaDB [(none)]> SET PASSWORD FOR 'root'@'localhost' = PASSWORD("rootpassword");
Next, create a database and user for GitScrum with the following command:
MariaDB [(none)]> CREATE DATABASE gitscrumdb;
MariaDB [(none)]> CREATE USER 'gitscrumuser'@'localhost' IDENTIFIED BY 'password';
Next, grant all the privileges on the GitScrum database with the following command:
MariaDB [(none)]> GRANT ALL ON gitscrumdb.* TO 'gitscrumuser'@'localhost' WITH GRANT OPTION;
Next, flush the privileges and exit from the MariaDB shell with the following command:
MariaDB [(none)]> FLUSH PRIVILEGES;
MariaDB [(none)]> EXIT;
At this point, the MariaDB database is configured for GitScrum. You can now proceed to the next step.
Install Composer
The Composer is a dependency manager for PHP. It is used to install PHP dependencies required to build your project.
First, download the Composer installer file with the following command:
php -r "copy('https://getcomposer.org/installer', 'composer-setup.php');"
Next, you will need to verify the data integrity of the downloaded file. You can verify it with the following command:
HASH="$(wget -q -O - https://composer.github.io/installer.sig)"
php -r "if (hash_file('SHA384', 'composer-setup.php') === '$HASH') { echo 'Installer verified'; } else { echo 'Installer corrupt'; unlink('composer-setup.php'); } echo PHP_EOL;"
If everything is fine, you should get the following output:
Installer verified
Finally, run the following command to install the Composer in your system:
php composer-setup.php --install-dir=/usr/local/bin --filename=composer
At this point, the Composer is installed in your system. You can now proceed to the next step.
Install GitScrum
Next, change the directory to the Apache root directory and download the GitScrum with the following command:
cd /var/www/html
composer create-project gitscrum-community-edition/laravel-gitscrum --stability=stable --keep-vcs
You should get the following output:
Generating autoload files
> Illuminate\Foundation\ComposerScripts::postInstall
> php artisan optimize
Generating optimized class loader
The compiled class file has been removed.
> php artisan key:generate
Application key [base64:yWIVSUl6uHXpIcSt5wxsplPwGJjSj9uWKYjy/4q2XY0=] set successfully.
Next, change the directory to the downloaded directory and update the GitScrum with the following command:
cd laravel-gitscrum
composer update
composer run-script post-root-package-install
Next, you will need to integrate GitScrum with Github. To do so, create a new app in Github using the following link:
https://github.com/settings/applications/new
You should see the following screen:
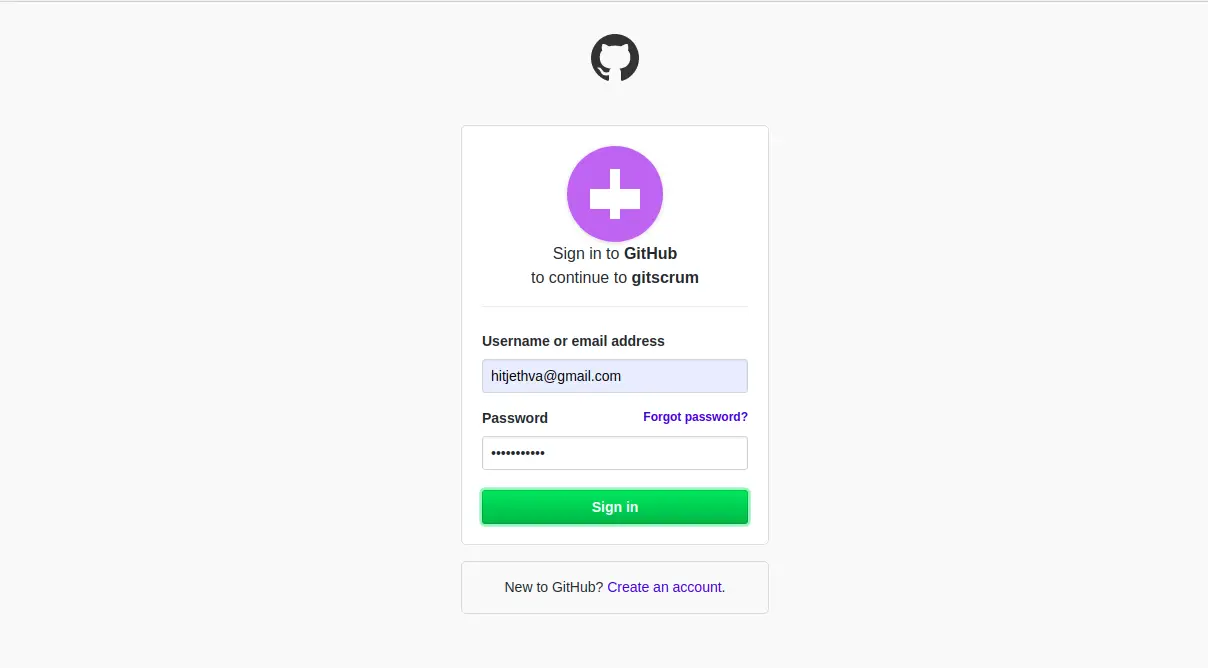
Provide your GitHub username, password and click on the Sign in button. You should see the following screen:
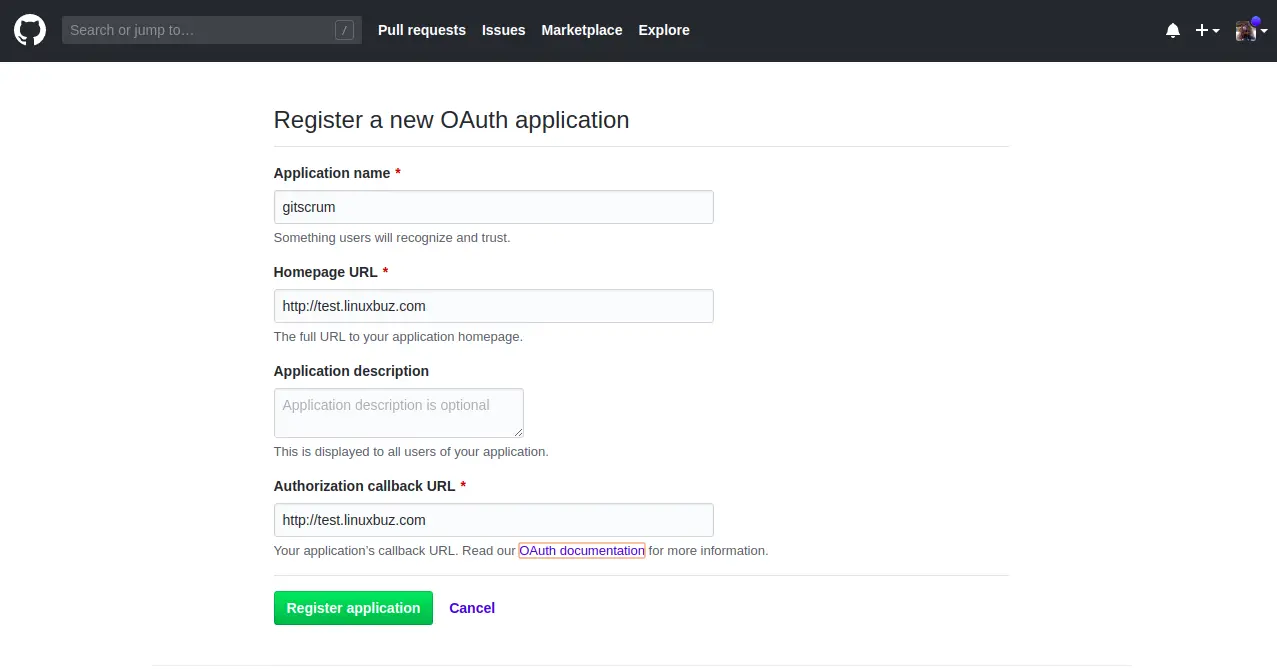
Provide your application name, Homepage URL and click on the Register application button. You should see the following screen:
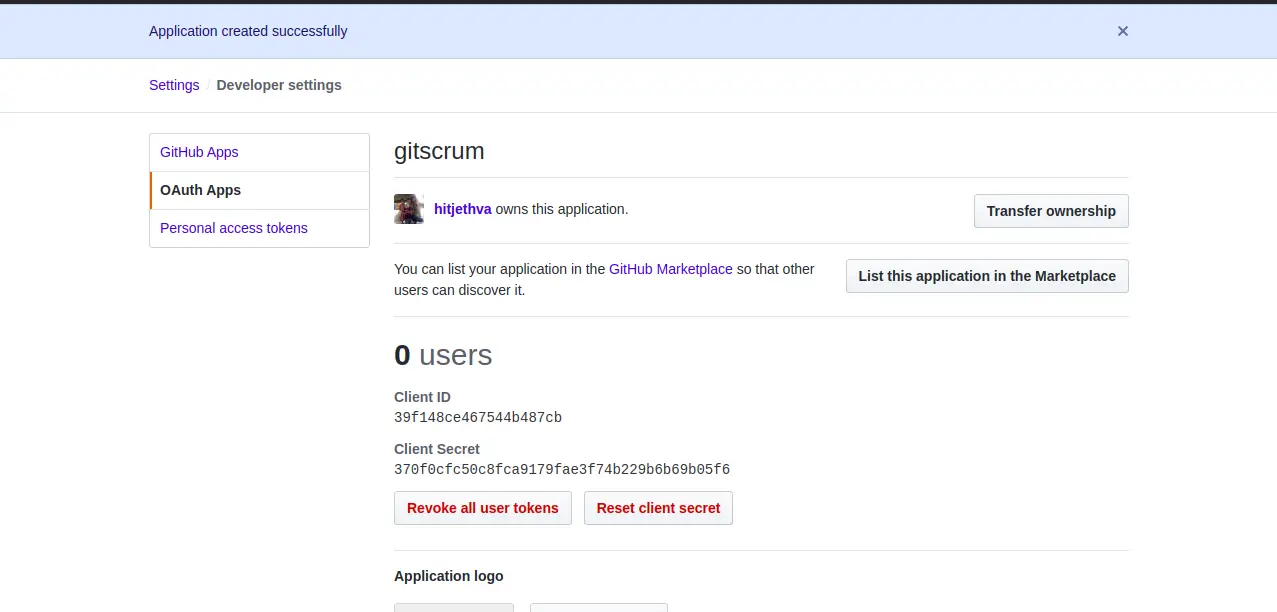
After registering the new app, copy the Client ID and Client Secret from the above page. Then, open the .env file as shown below:
nano /var/www/html/laravel-gitscrum/.env
Add the following lines with your Database name, Username, Password, Client ID and Client Secret:
APP_ENV=local
APP_KEY=base64:W2ToyfW8zHqtWfcZb1hp2kZgccbuy3XtERDyZywtVkE=
APP_DEBUG=true
APP_LOG_LEVEL=debug
APP_URL=http://test.linuxbuz.com
APP_TITLE=GitScrum

GITHUB_CLIENT_ID=39f148ce467544b487cb
GITHUB_CLIENT_SECRET=370f0cfc50c8fca9179fae3f74b229b6b69b05f6

GITLAB_KEY=
GITLAB_SECRET=
GITLAB_INSTANCE_URI=https://gitlab.com/

DB_CONNECTION=mysql
DB_HOST=localhost
DB_PORT=3306
DB_DATABASE=gitscrumdb
DB_USERNAME=gitscrumuser
DB_PASSWORD=password

APP_PAGINATE=10

PROXY_PORT=
PROXY_METHOD=
PROXY_SERVER=
PROXY_USER=
PROXY_PASS=
Save and close the file when you are finished. Then, run the following command to migrate the database:
php artisan migrate
php artisan db:seed
You should see the following output:
Seeded: ConfigIssueEffortsTableSeeder
Seeded: ConfigPrioritiesTableSeeder
Seeded: IssueTypesTableSeeder
Seeded: ConfigStatusesTableSeeder
Next, give proper permissions to the GitScrum directory with the following command:
chown -R www-data:www-data /var/www/html/laravel-gitscrum/
chmod -R 775 /var/www/html/laravel-gitscrum/
Once you are finished, you can proceed to the next step.
Configure Apache for GitScrum
Next, you will need to configure the Apache virtual host for GitScrum. You can configure it by creating the following file:
nano /etc/apache2/sites-available/gitscrum.conf
Add the following lines:
<VirtualHost *:80>
     ServerAdmin [email protected]
     DocumentRoot /var/www/html/laravel-gitscrum/public
     ServerName test.linuxbuz.com

     <Directory /var/www/html/laravel-gitscrum/public>
          Options FollowSymlinks
          AllowOverride All
          Require all granted
     </Directory>

     ErrorLog ${APACHE_LOG_DIR}/error.log
     CustomLog ${APACHE_LOG_DIR}/access.log combined
</VirtualHost>
Save and close the file when you are finished. Then, check the Apache configuration file for any syntax error with the following command:
apache2ctl configtest
If everything is fine, you should get the following output:
Syntax OK
Next, enable the virtual host and Apache rewrite module with the following command:
a2ensite gitscrum.conf
a2enmod rewrite
Finally, restart the Apache web service to implement the changes:
systemctl restart apache2
You can now check the status of the Apache service with the following command:
systemctl status apache2
You should get the following output:
? apache2.service - The Apache HTTP Server
   Loaded: loaded (/lib/systemd/system/apache2.service; enabled; vendor preset: enabled)
  Drop-In: /lib/systemd/system/apache2.service.d
           ??apache2-systemd.conf
   Active: active (running) since Sun 2020-02-02 12:41:30 UTC; 22min ago
  Process: 15407 ExecReload=/usr/sbin/apachectl graceful (code=exited, status=0/SUCCESS)
 Main PID: 14417 (apache2)
    Tasks: 11 (limit: 1114)
   CGroup: /system.slice/apache2.service
           ??14417 /usr/sbin/apache2 -k start
           ??15412 /usr/sbin/apache2 -k start
           ??15413 /usr/sbin/apache2 -k start
           ??15414 /usr/sbin/apache2 -k start
           ??15416 /usr/sbin/apache2 -k start
           ??15417 /usr/sbin/apache2 -k start
           ??15418 /usr/sbin/apache2 -k start
           ??15419 /usr/sbin/apache2 -k start
           ??15420 /usr/sbin/apache2 -k start
           ??15422 /usr/sbin/apache2 -k start
           ??15429 /usr/sbin/apache2 -k start

Feb 02 12:41:29 debian10 systemd[1]: Starting The Apache HTTP Server...
Once you are finished, you can proceed to the next step.
Access GitScrum
Now, open your web browser and type the URL http://test.linuxbuz.com. You will be redirected to the following page:
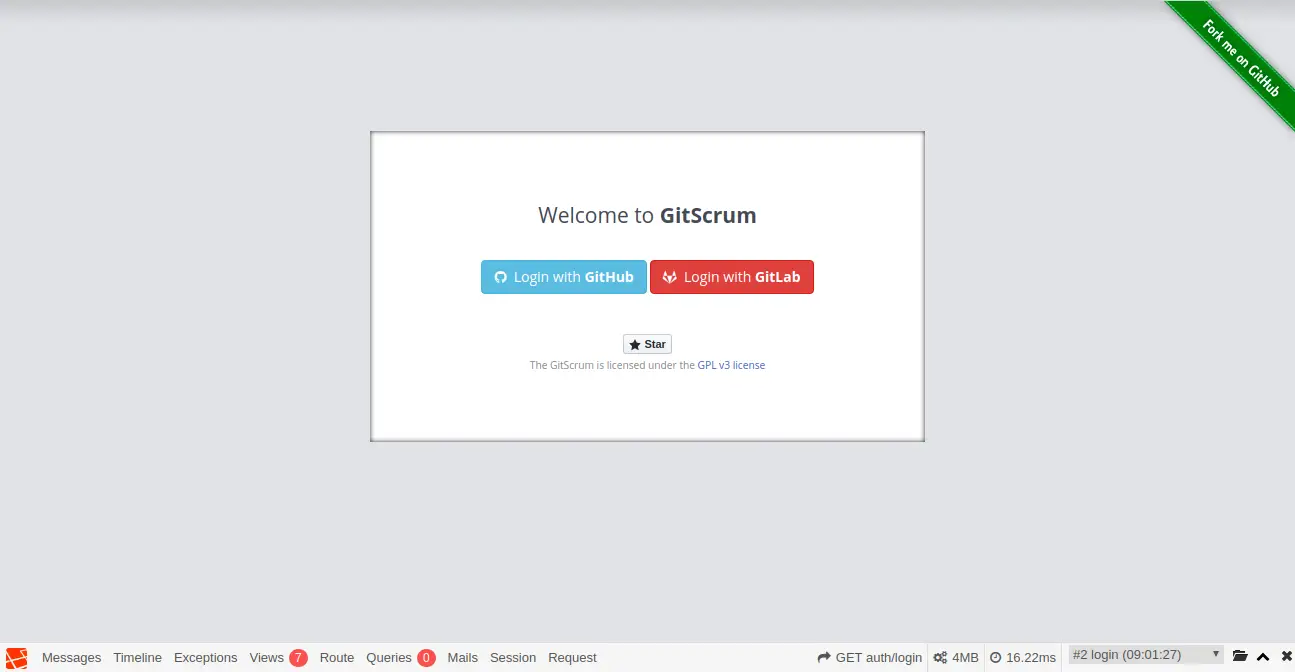
Click on Login with GitHub. You should see the following page:
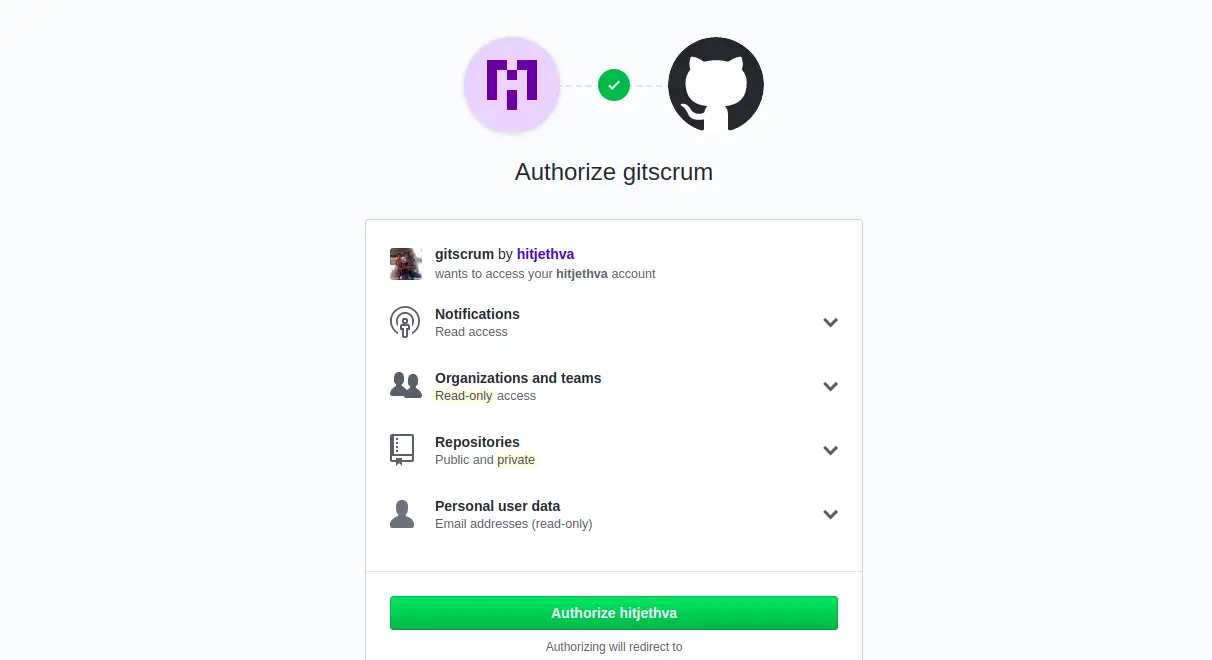
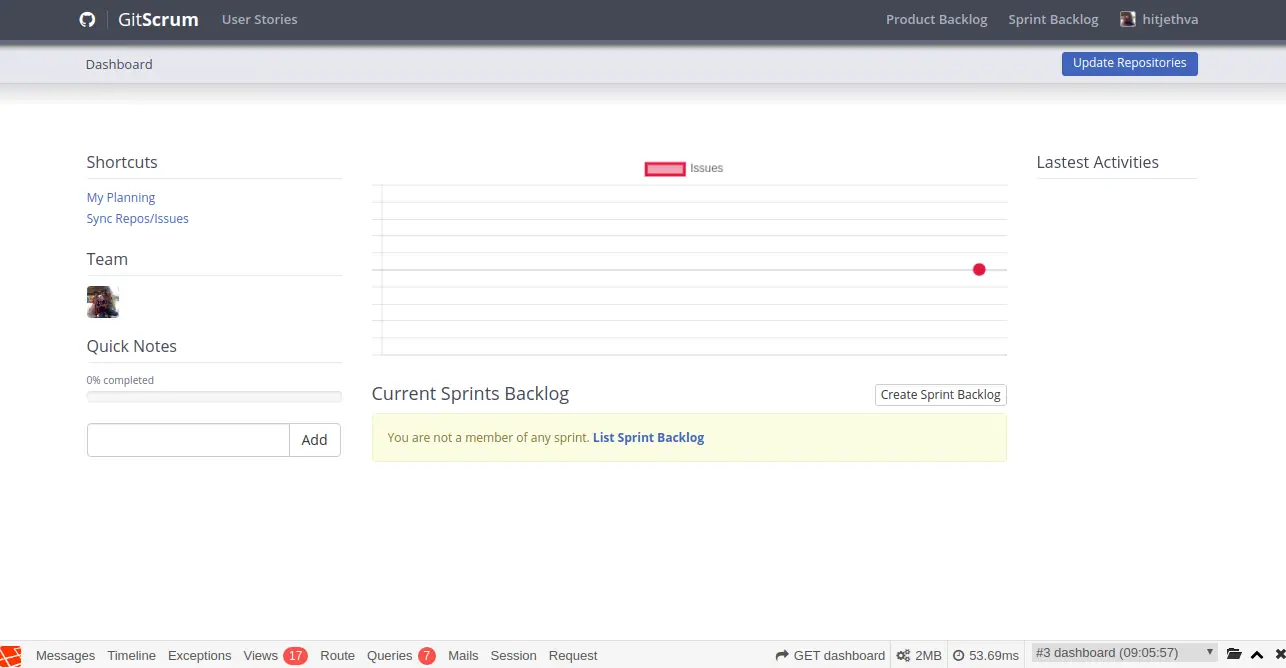
Now, authorize your account for GitScrum. You should see your GitScrum dashboard in the following page:
Conclusion
Congratulations! you have successfully installed GitScrum on Debian 10 server. You can now manage your project easily with GitScrum. Feel free to ask me if you have any questions.

