How to Install Jira Agile Project Management Tool on CentOS 8
Jira is an agile project management tool developed by Atlassian that can be used for issue tracking, project management and bug fixing. It provides a user-friendly web-interface that helps you to track issues. You can plan, track, and manage all your agile software development projects through a web browser. It can be easily integrated with Confluence, Bitbucket and other developer tools.
In this guide, I will explain how to install and configure Jira on CentOS 8.
Prerequisites
- A server running CentOS 8.
- A root password is configured on your server.
Install Java
Jira is written in Java. So you will need to install Java to your system. You can install it by just running the following command:
dnf install java-11-openjdk-devel -y
After installing Java, verify the installed version of Java with the following command:
java -version
openjdk version "11.0.5" 2019-10-15 LTS
OpenJDK Runtime Environment 18.9 (build 11.0.5+10-LTS)
OpenJDK 64-Bit Server VM 18.9 (build 11.0.5+10-LTS, mixed mode, sharing)
Install MySQL Server
At the time of writing this tutorial, Jira does not support MySQL version 8 and MariaDB server. So you will need to install MySQL 5.7 in your system.
First, you will need to disable MySQL default AppStream repository from your system. You can disable it with the following command:
dnf remove @mysql
 dnf module reset mysql
 dnf module disable mysql
Next, create a new repository file for MySQL 5.7 with the following command:
nano /etc/yum.repos.d/mysql-community.repo
Add the following lines:
[mysql57-community]
name=MySQL 5.7 Community Server
baseurl=http://repo.mysql.com/yum/mysql-5.7-community/el/7/$basearch/
enabled=1
gpgcheck=0

[mysql-connectors-community]
name=MySQL Connectors Community
baseurl=http://repo.mysql.com/yum/mysql-connectors-community/el/7/$basearch/
enabled=1
gpgcheck=0

[mysql-tools-community]
name=MySQL Tools Community
baseurl=http://repo.mysql.com/yum/mysql-tools-community/el/7/$basearch/
enabled=1
gpgcheck=0
Save and close the file when you are finished. Then, install MySQL 5.7 by running the following command:
dnf --enablerepo=mysql57-community install mysql-community-server
Once the installation is completed, start MySQL service and enable it to start after system reboot with the following command:
systemctl start mysqld
 systemctl enable mysqld
After the installation, a temporary MySQL root password has been generated. You can capture the password with the following command:
grep 'A temporary password' /var/log/mysqld.log |tail -1
You should get the following output:
2020-02-15T08:35:33.127395Z 1 [Note] A temporary password is generated for root@localhost: -)g2o+)feIw4
Please remember this password as you will need it during the MySQL root password resetting process.
Next, it is recommended to reset the default MySQL root password. You can reset it with the following command:
mysql_secure_installation
You will be asked to provide your default MySQL root password:
Enter password for user root:
Provide the default MySQL root password and hit Enter to set a new password as shown below:
New password:
Re-enter new password:
Estimated strength of the password: 100
Do you wish to continue with the password provided?(Press y|Y for Yes, any other key for No) : Y
Type Y and press Enter to continue and follow the instructions as shown below:
Remove anonymous users? (Press y|Y for Yes, any other key for No) : Y
Disallow root login remotely? (Press y|Y for Yes, any other key for No) : Y
Remove test database and access to it? (Press y|Y for Yes, any other key for No) : Y
Reload privilege tables now? (Press y|Y for Yes, any other key for No) : Y
Configure MySQL Database
Next, you will need to tweak some MySQL settings. You can do it by editing the my.cnf file:
nano /etc/my.cnf
Add the following lines in the [mysqld] section:
default-storage-engine=INNODB
character_set_server=utf8mb4
innodb_default_row_format=DYNAMIC
innodb_large_prefix=ON
innodb_file_format=Barracuda
innodb_log_file_size=2G
sql_mode = NO_AUTO_VALUE_ON_ZERO
Save and close the file. Then, restart the MySQL service to implement the changes:
systemctl restart mysqld
Next, log in to the MySQL shell:
mysql -u root -p
Provide your root password and create a database and user for Jira with the following command:
mysql> CREATE DATABASE jiradb CHARACTER SET utf8mb4 COLLATE utf8mb4_bin;
 mysql> CREATE USER 'jira'@'localhost' IDENTIFIED BY 'Jethva@1981Jethva';
Next, grant necessary privileges to the jiradb with the following command:
mysql> GRANT SELECT,INSERT,UPDATE,DELETE,CREATE,DROP,REFERENCES,ALTER,INDEX on jiradb.* TO 'jira'@'localhost' IDENTIFIED BY 'Jethva@1981Jethva';
Next, flush the privileges and exit from the MySQL shell with the following command:
mysql> FLUSH PRIVILEGES;
 mysql> EXIT;
Install and Configure Jira
First, download the latest version of Jira installation binary with the following command:
wget https://product-downloads.atlassian.com/software/jira/downloads/atlassian-jira-software-8.6.0-x64.bin -O atlassian-jira-software.bin
Once downloaded, provide the execution permission to the downloaded binary file:
chmod +x atlassian-jira-software.bin
Next, run the following command to start the installation:
./atlassian-jira-software.bin
You will be prompt for several questions as shown below:
Unpacking JRE ...
Starting Installer ...

This will install Jira Software 8.6.0 on your computer.
OK [o, Enter], Cancel [c]
Press Enter to start the installation:
Click Next to continue, or Cancel to exit Setup.

Choose the appropriate installation or upgrade option.
Please choose one of the following:
Express Install (use default settings) [1], Custom Install (recommended for advanced users) [2, Enter], Upgrade an existing Jira installation [3]
1
Type 1 and hit Enter to express installation:
Details on where Jira Software will be installed and the settings that will be used.
Installation Directory: /opt/atlassian/jira
Home Directory: /var/atlassian/application-data/jira
HTTP Port: 8080
RMI Port: 8005
Install as service: Yes
Install [i, Enter], Exit [e]
Hit Enter to start installation:
Extracting files ...

Please wait a few moments while Jira Software is configured.

Installation of Jira Software 8.6.0 is complete
Start Jira Software 8.6.0 now?
Yes [y, Enter], No [n]
Press Enter to start the Jira service. Once the installation has been completed, you should get the following output:
Please wait a few moments while Jira Software starts up.
Launching Jira Software ...

Installation of Jira Software 8.6.0 is complete
Your installation of Jira Software 8.6.0 is now ready and can be accessed
via your browser.
Jira Software 8.6.0 can be accessed at http://localhost:8080
Finishing installation ...
Next, you will need to download and install Java MySQL connector in Jira.
First, download the MySQL connector with the following command:
wget https://dev.mysql.com/get/Downloads/Connector-J/mysql-connector-java-8.0.18.zip
Next, unzip the downloaded file and copy it to the Jira installation directory with the following command:
unzip mysql-connector-java-8.0.18.zip
 cp mysql-connector-java-8.0.18/mysql-connector-java-8.0.18.jar /opt/atlassian/jira/lib
Next, restart the Jira service with the following command to implement the changes:
/etc/init.d/jira stop
 /etc/init.d/jira start
Next, you will need to configure the HTTP connector and define your proxy in Jira. You can configure it by editing the file /opt/atlassian/jira/conf/server.xml
nano /opt/atlassian/jira/conf/server.xml
Find the following lines:
<Connector port="8080" relaxedPathChars="[]|" relaxedQueryChars="[]|{}^\`"<>"
                   maxThreads="150" minSpareThreads="25" connectionTimeout="20000" enableLookups="false"
                   maxHttpHeaderSize="8192" protocol="HTTP/1.1" useBodyEncodingForURI="true" redirectPort="8443"
                   acceptCount="100" disableUploadTimeout="true" bindOnInit="false"/>
And replace it with the following lines:
        <Connector port="8080" relaxedPathChars="[]|" relaxedQueryChars="[]|{}^\`"<>"
                   maxThreads="150" minSpareThreads="25" connectionTimeout="20000" enableLookups="false"
                   maxHttpHeaderSize="8192" protocol="HTTP/1.1" useBodyEncodingForURI="true" redirectPort="8443"
                   acceptCount="100" disableUploadTimeout="true" bindOnInit="false" scheme="http"
                   proxyName="jira.example.com" proxyPort="80"/>
Save and close the file then restart Jira service to apply the changes:
/etc/init.d/jira stop
 /etc/init.d/jira start
Configure Nginx as a Reverse Proxy for Jira
By default, Jira runs on port 8080. It is a good idea to configure Nginx as a reverse proxy for Jira. So you can access the Jira using the port 80.
First, install the Nginx web server with the following command:
dnf install nginx -y
After installing the Nginx, start the Nginx service and enable it to start after system reboot:
systemctl start nginx
 systemctl enable --now nginx
Next, create a new virtual host configuration file for Jira:
nano /etc/nginx/conf.d/jira.conf
Add the following lines:
server {
    listen 80;
    server_name jira.example.com;
    location / {
        proxy_set_header X-Forwarded-Host $host;
        proxy_set_header X-Forwarded-Server $host;
        proxy_set_header X-Forwarded-For $proxy_add_x_forwarded_for;
        proxy_pass http://localhost:8080;
        client_max_body_size 10M;
    }
}
Save and close the file when you are finished. Then, test Nginx for any syntax error with the following command:
nginx -t
You should get the following output:
nginx: the configuration file /etc/nginx/nginx.conf syntax is ok
nginx: configuration file /etc/nginx/nginx.conf test is successful
Finally, restart Jira and Nginx service to apply the changes:
/etc/init.d/jira stop
 /etc/init.d/jira start
systemctl nginx restart
Configure SELinux and Firewall
Next, you will need to allow port 80 through firewall. You can configure it with the following command:
firewall-cmd --add-service=http --permanent
 firewall-cmd --reload
By default, SELinux is enabled in CentOS 8. It is recommended to disable it as it may cause Jira application to work properly.
You can disable the SELinux by editing /etc/selinux/config file:
nano /etc/selinux/config
Find the following line:
SELINUX=enforcing
And, replace it with the following line:
SELINUX=permissive
Save and close the file. Then, restart your system to apply the changes:
Access Jira Dashboard
Open your web browser and type the URL http://jira.example.com. You will be redirected to the following page:
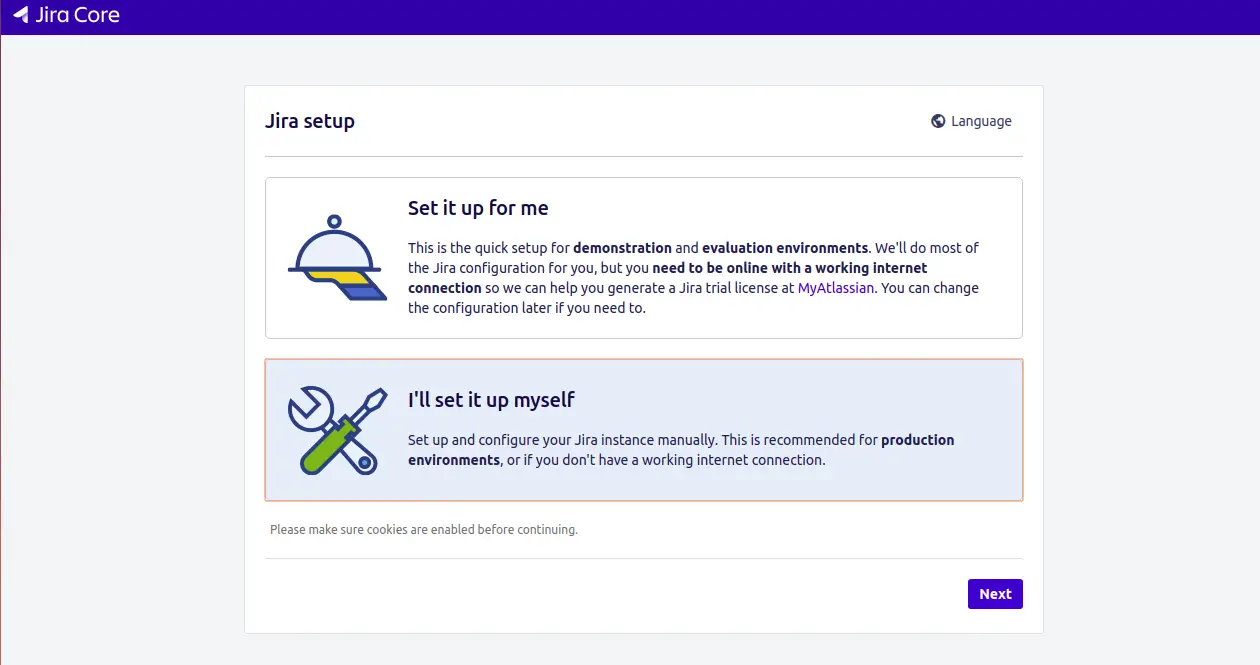
Select "i'will set it up myself" and click on the Next button. You should see the following page:
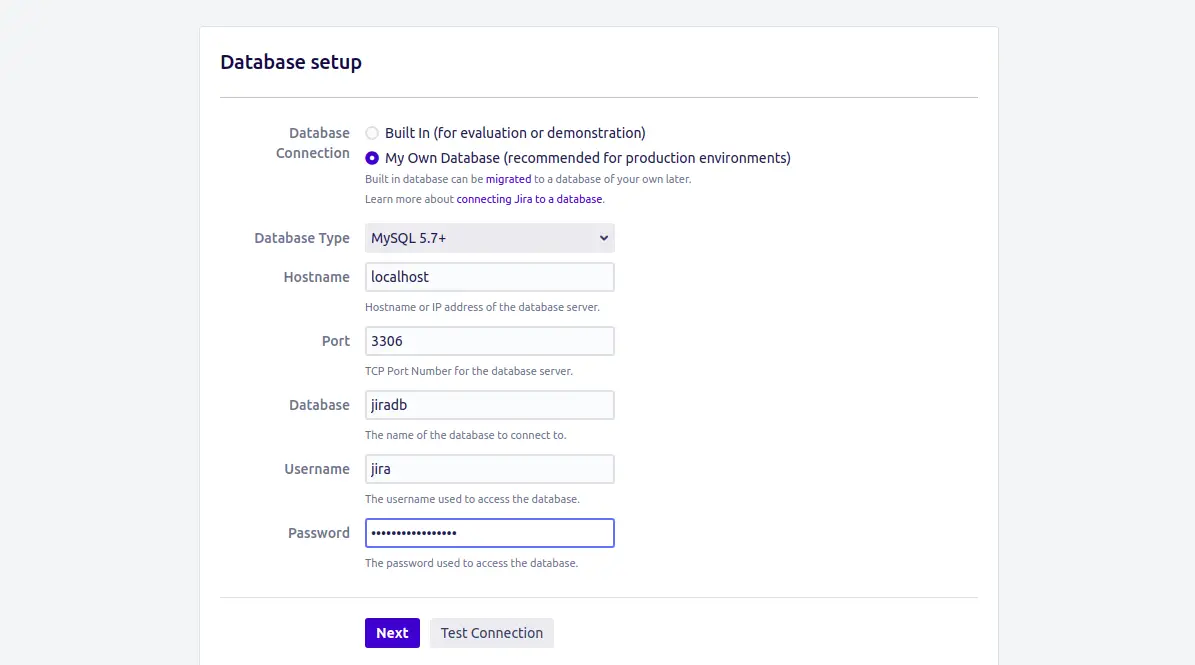
Select "My Own Database", provide your database details and click on the Next button. You should see the following page:
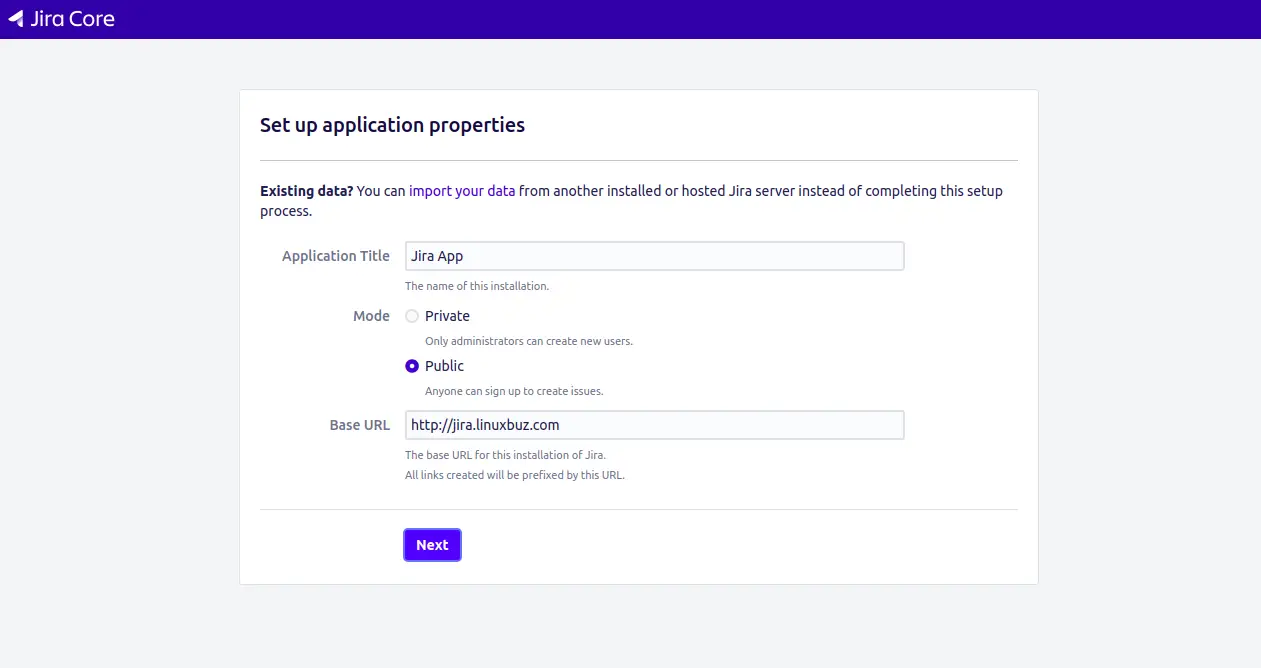
Provide your application title, URL and click on the Next button. You should see the following page:
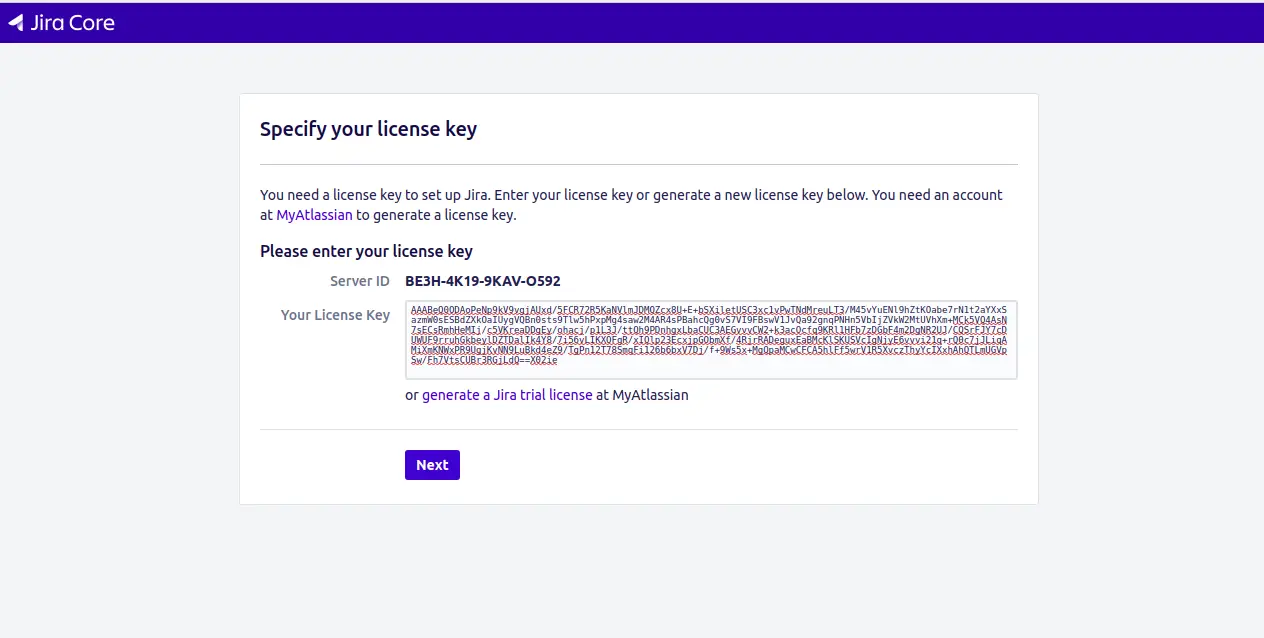
Provide your trial license key and click on the Next button. You should see the following page:
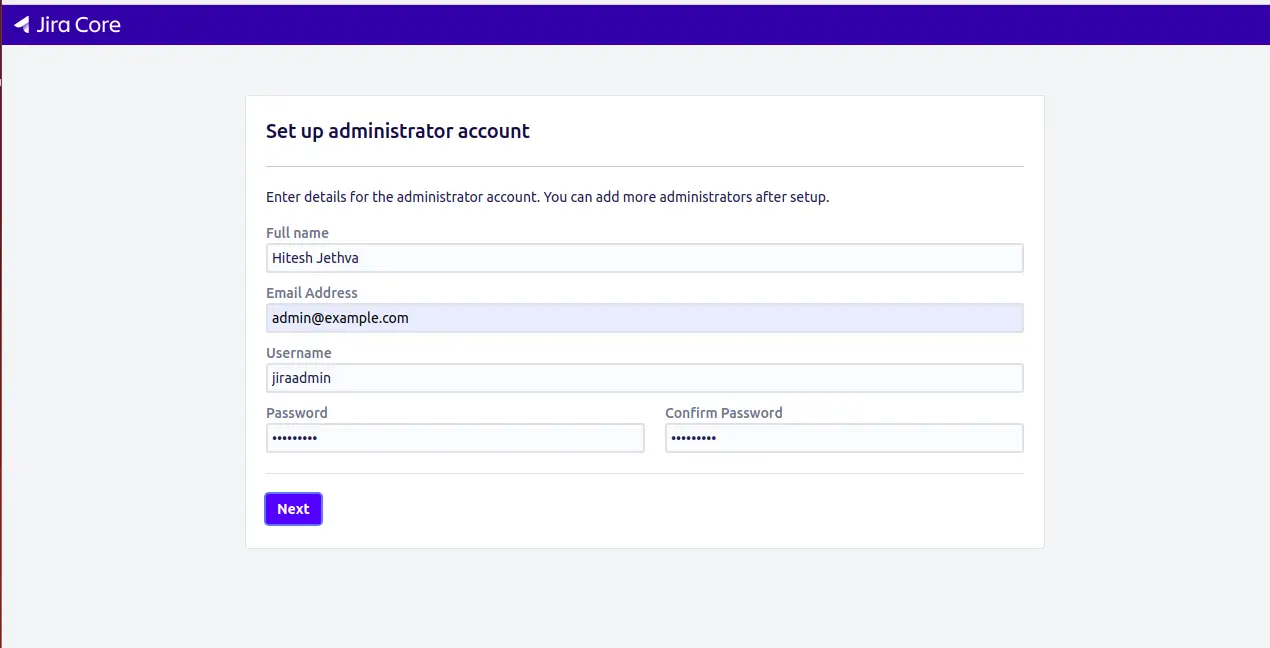
Provide your administrator account details and click on the Next button. You should see the following page:
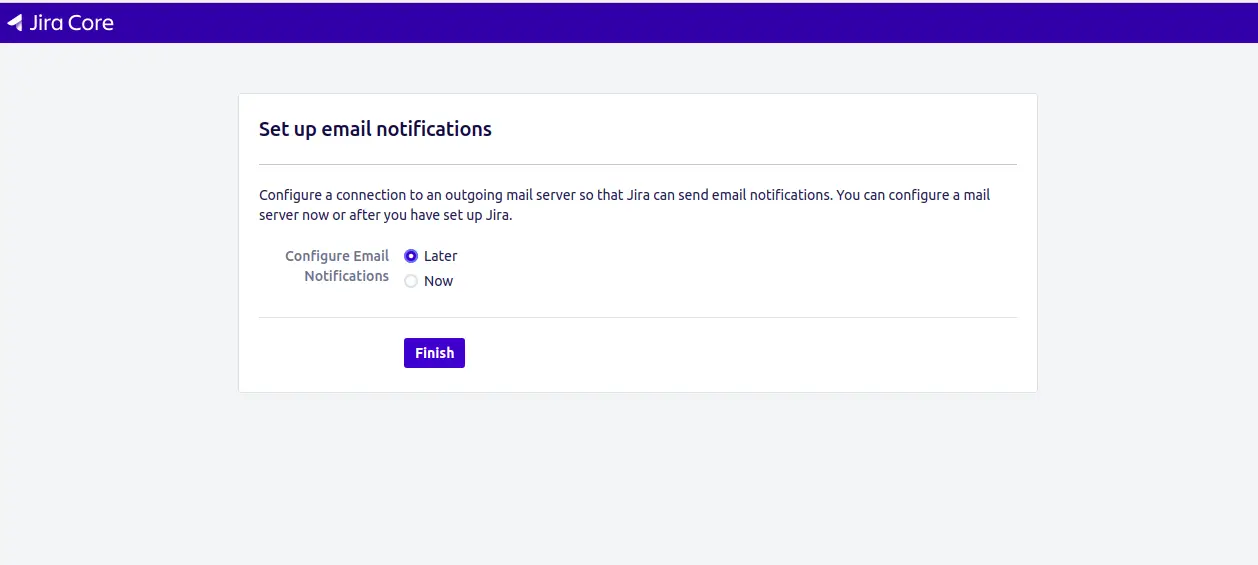
Click on the Finish button to complete the installation. You should see the language selection page:
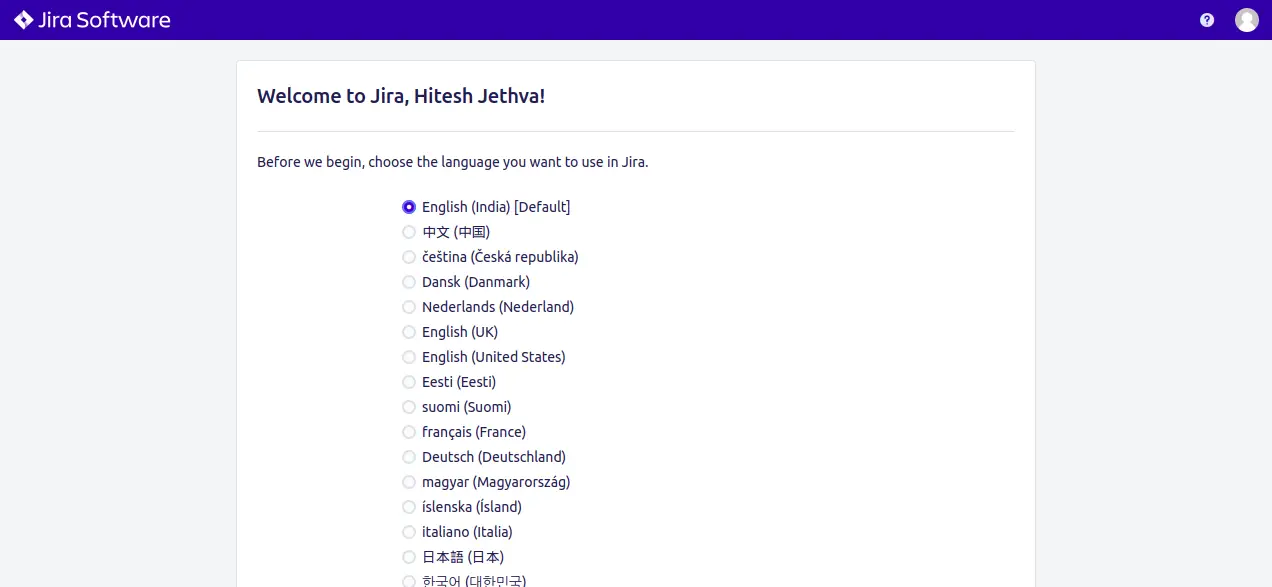
Select your desired language and click on the Continue button. You should see the following page:
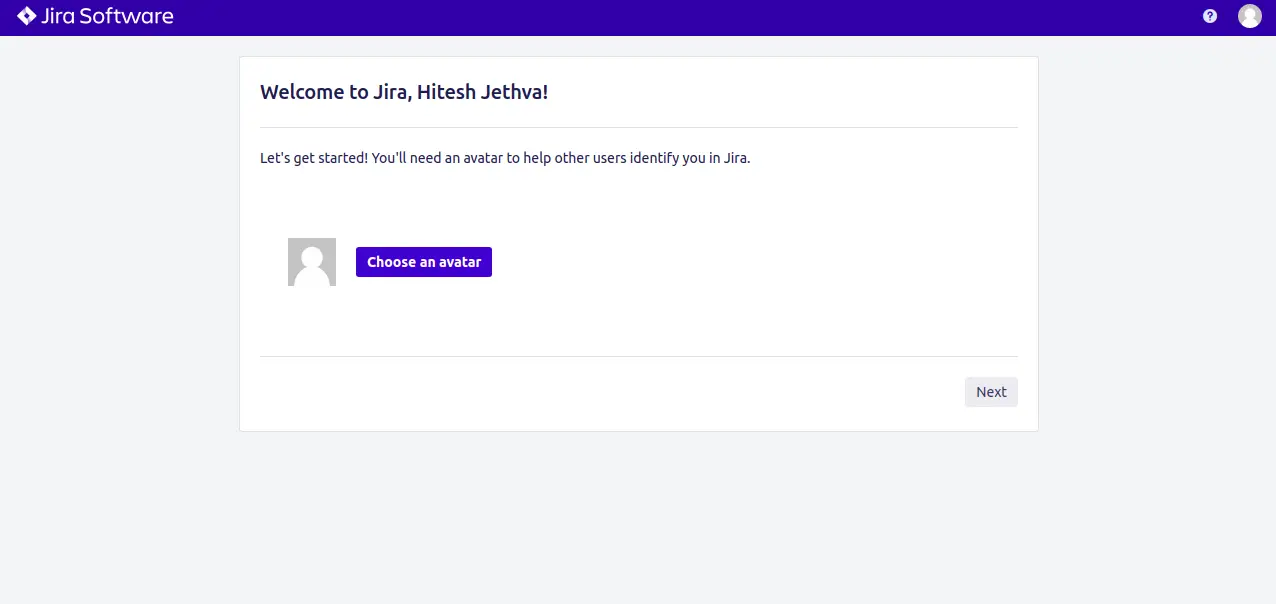
Choose your avatar and click on the Next button. You should see the following page:
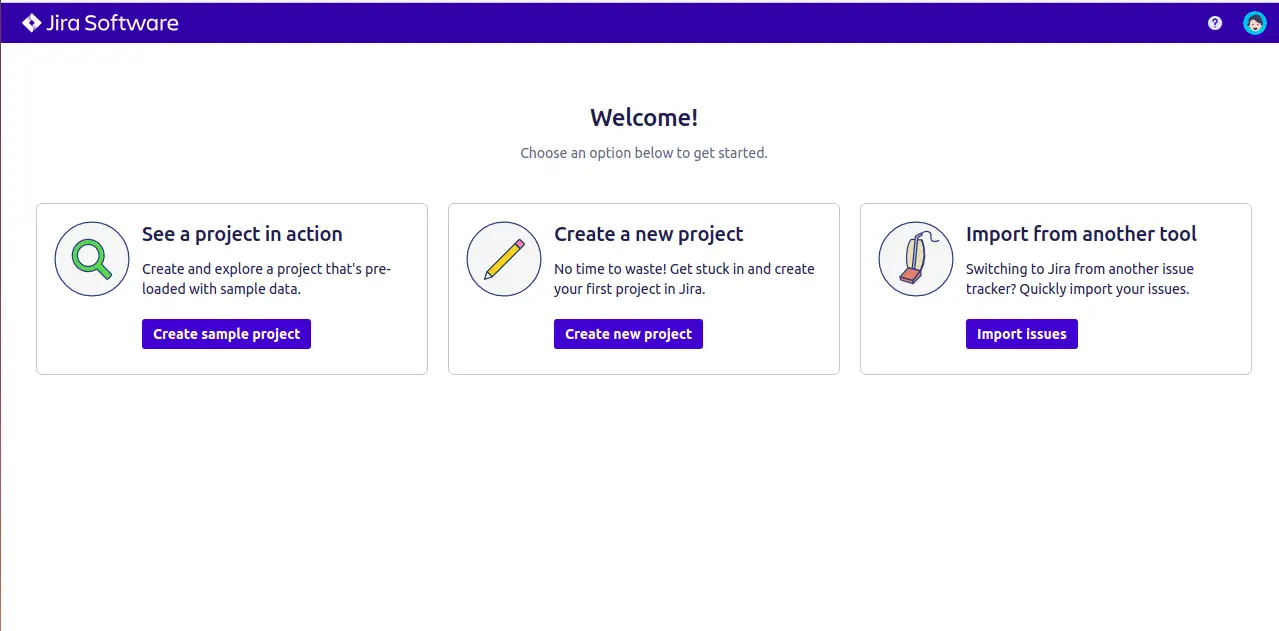
Click on "Create new project" to create your first project. You should see the following page:

Select "Scrum software development" and click on the Next button. You should see the following page:
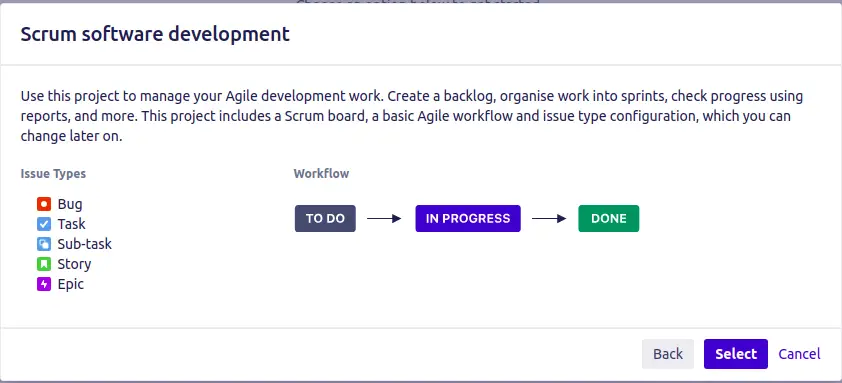
Click on the Select button to select your Workflow. You should see the following page:
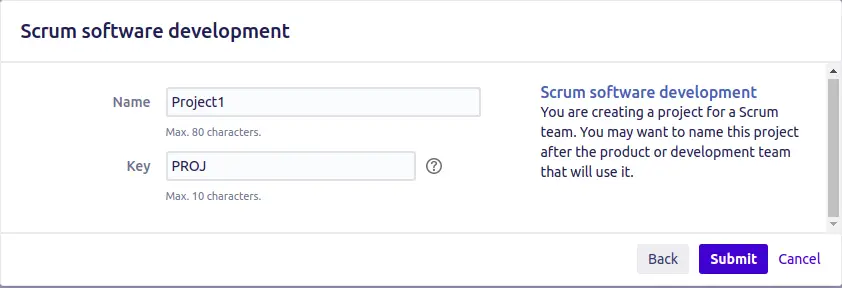
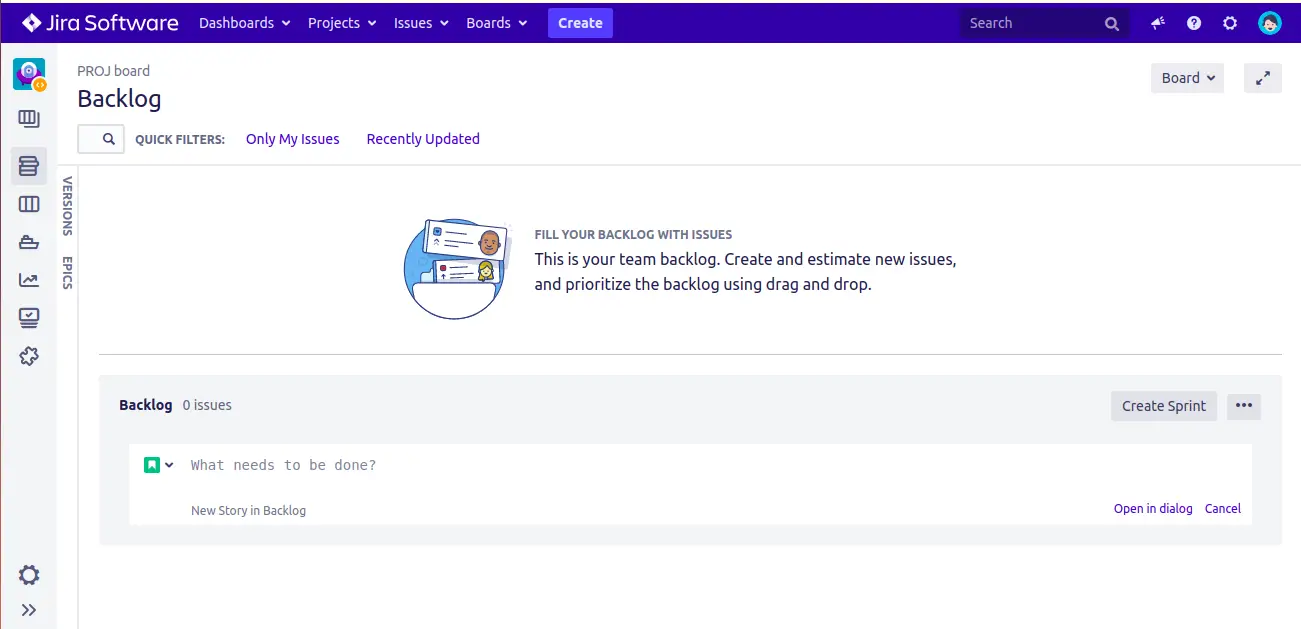
Provide your project name and key, then click on the Submit button. You should see the Jira dashboard in the following page:
Conclusion
Congratulations! you have successfully installed and configured Jira on CentoS 8. You can now start exploring Jira to know how it works. Feel free to ask me if you have any questions.

