
In this quick Ionic 5 tutorial, we will create an Ionic Calculator app (Angular) that run on Android or iOS device. We will use a dark theme for this Ionic calculator appearance, at least similar to a built-in iOS calculator app. The feature of this calculator app is a basic feature that only has basic calculation operators.
This tutorial divided into several steps:
- Step #1: Create a New Ionic 5 App
- Step #2: Create the Required Calculator Functions
- Step #3: Implementing the UI/UX of the Calculator
- Step #4: Run and Test the Ionic Calculator App to the Device
The following tools, frameworks, libraries, and modules are required for this tutorial:
- Node.js
- Ionic 5
- Ionic CLI
- Angular
- Cordova
- Terminal or Node Command Line
- Text Editor or IDE (we are using VSCode)
You can watch the video tutorial on our YouTube channel. Please like, share, comment, and subscribe to our channel.
Let's get started with the main steps!
Step #1: Create a New Ionic 5 App
We will use Ionic CLI to create or generate the Ionic 5 app. For that, we need to install or update the Ionic CLI to the latest version. Before that, make sure you have to install Node.js and NPM. To check the installed Node.js and NPM, type these commands from the Terminal or Node command line.
node -v
v12.16.1
npm -v
6.13.7
That's the version that we are currently using right now. To install or update Ionic CLI, type this command.
sudo npm install -g @ionic/cliSudo is optional is your Node.js/NPM requires administrator permission. Now, we have this version of Ionic CLI 6.
ionic -v
6.1.0
Next, create a new Ionic 5 app by type this command.
ionic start calculator blankSelect Angular as the framework for this Ionic app then skip the additional Capacitor by choosing "N" because we will use Cordova. Next, go to the newly created Ionic 5 app then run this new Ionic 5 app for the first time.
cd ./calculator
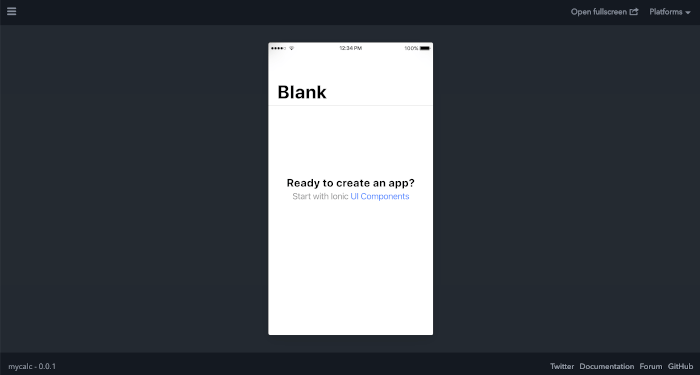
ionic serve -lIf there's a question to install @ionic/lab, just type "Y" to install it. If your browser opens this Ionic 5 app automatically and shows a blank Ionic app then your Ionic 5 app is ready to develop.
Step #2: Create the Required Calculator Functions
We will use an ugly way to build a calculator functionality. Start your IDE or Text Editor then open this Ionic 5 app project. In VSCode just type this command from the Terminal inside this Ionic 5 app project folder.
code .Next, open and edit "src/app/home/home.page.ts" then add these variables.
� display = '0';
� firstval: number = null;
� operator: any = null;
� newcursor = false;
� isc = false;
� iscomma = false;Which "display" is the initial or displayed numbers, "firstval" is a variable of result number or left operand, "operator" is a variable to hold calculation operation (:/X/-/+), "newcursor" is a variable that checks if the operand in the left or right, "isc" is a variable that checks if the clean button is "C" or "AC", and "iscomma" is a variable to check if the number contains comma or not by click "," button.
Add a function to handle click action of the different buttons.
click(val: any) {
� � switch (val) {
� � � case 'ac':
� � � � this.display = '0';
� � � � this.firstval = null;
� � � � this.operator = null;
� � � � this.newcursor = false;
� � � � break;
� � � case 'c':
� � � � this.display = '0';
� � � � this.isc = false;
� � � � break;
� � � case '+/-':
� � � � if (Math.sign(parseInt(this.display, 0)) === 1) {
� � � � � const sign = -Math.abs(parseInt(this.display, 0));
� � � � � this.display = sign.toString();
� � � � } else if (Math.sign(parseInt(this.display, 0)) === -1) {
� � � � � const sign = Math.abs(parseInt(this.display, 0));
� � � � � this.display = sign.toString();
� � � � } else {
� � � � � this.display = this.display;
� � � � }
� � � � break;
� � � case '%':
� � � � this.addpercent();
� � � � break;
� � � case ':':
� � � � this.addoperator(':');
� � � � break;
� � � case 'X':
� � � � this.addoperator('X');
� � � � break;
� � � case '-':
� � � � this.addoperator('-');
� � � � break;
� � � case '+':
� � � � this.addoperator('+');
� � � � break;
� � � case '=':
� � � � if (this.firstval !== null && this.operator !== null) {
� � � � � this.calclast();
� � � � }
� � � � this.operator = null;
� � � � break;
� � � case '0':
� � � � this.addnumber('0');
� � � � break;
� � � case '1':
� � � � this.addnumber('1');
� � � � break;
� � � case '2':
� � � � this.addnumber('2');
� � � � break;
� � � case '3':
� � � � this.addnumber('3');
� � � � break;
� � � case '4':
� � � � this.addnumber('4');
� � � � break;
� � � case '5':
� � � � this.addnumber('5');
� � � � break;
� � � case '6':
� � � � this.addnumber('6');
� � � � break;
� � � case '7':
� � � � this.addnumber('7');
� � � � break;
� � � case '8':
� � � � this.addnumber('8');
� � � � break;
� � � case '9':
� � � � this.addnumber('9');
� � � � break;
� � � case ',':
� � � � this.addcomma();
� � � � break;
� � }
� }As you see, there are some functions that handle different actions for each button. For operators use "addoperator" function, numbers use "addnumber" function, comma use "addcomma" function, for percent use "addpercent" function, and equals use a calculation function. Also, an action to change "+/-" sign of the number and action to clear variables that use by "AC" and "C". Next, add a function to add a comma to the displayed number.
� addcomma() {
� � if (this.iscomma === false) {
� � � this.iscomma = true;
� � } else {
� � � this.iscomma = false;
� � }
� }Next, add a function to add the number to display.
� addnumber(nbr: string) {
� � if (nbr === '0') {
� � � if (this.newcursor === true) {
� � � � this.display = nbr;
� � � � this.newcursor = false;
� � � } else if (this.display !== '0') {
� � � � if (this.iscomma === true) {
� � � � � this.display = `${this.display.toString()}.${nbr}`;
� � � � } else {
� � � � � this.display = this.display.toString() + nbr;
� � � � }
� � � } else if (this.display === '0') {
� � � � if (this.iscomma === true) {
� � � � � this.display = `${this.display.toString()}.${nbr}`;
� � � � }
� � � }
� � } else {
� � � if (this.newcursor === true) {
� � � � this.display = nbr;
� � � � this.newcursor = false;
� � � } else if (this.display === '0') {
� � � � if (this.iscomma === true) {
� � � � � if (this.display.toString().indexOf('.') > -1) {
� � � � � � this.display = this.display.toString() + nbr;
� � � � � } else {
� � � � � � this.display = `${this.display.toString()}.${nbr}`;
� � � � � }
� � � � } else {
� � � � � this.display = nbr;
� � � � }
� � � } else {
� � � � if (this.iscomma === true) {
� � � � � if (this.display.toString().indexOf('.') > -1) {
� � � � � � this.display = this.display.toString() + nbr;
� � � � � } else {
� � � � � � this.display = `${this.display.toString()}.${nbr}`;
� � � � � }
� � � � } else {
� � � � � this.display = this.display.toString() + nbr;
� � � � }
� � � }
� � }
� � this.isc = true;
� }Next, add a function to add a percent to the number.
� addpercent() {
� � this.iscomma = false;
� � const dispval = parseInt(this.display, 0) / 100;
� � this.display = dispval.toString();
� }Next, add a function to add a calculation operator.
� addoperator(op: string) {
� � if (this.newcursor === false) {
� � � if (this.firstval === null) {
� � � � if (this.iscomma === true) {
� � � � � this.firstval = parseFloat(this.display);
� � � � } else {
� � � � � this.firstval = parseInt(this.display, 0);
� � � � }
� � � }
� � � if (this.firstval !== null && this.operator !== null) {
� � � � this.calclast();
� � � }
� � }
� � this.iscomma = false;
� � this.operator = op;
� � this.newcursor = true;
� }Next, add a function to do a calculation.
� calclast() {
� � switch (this.operator) {
� � � case ':':
� � � � if (this.iscomma === true) {
� � � � � this.firstval = (this.firstval / parseFloat(this.display));
� � � � } else {
� � � � � this.firstval = (this.firstval / parseInt(this.display, 0));
� � � � }
� � � � break;
� � � case 'X':
� � � � if (this.iscomma === true) {
� � � � � this.firstval = (this.firstval * parseFloat(this.display));
� � � � } else {
� � � � � this.firstval = (this.firstval * parseInt(this.display, 0));
� � � � }
� � � � break;
� � � case '-':
� � � � if (this.iscomma === true) {
� � � � � this.firstval = (this.firstval - parseFloat(this.display));
� � � � } else {
� � � � � this.firstval = (this.firstval - parseInt(this.display, 0));
� � � � }
� � � � break;
� � � case '+':
� � � � if (this.iscomma === true) {
� � � � � this.firstval = (this.firstval + parseFloat(this.display));
� � � � } else {
� � � � � this.firstval = (this.firstval + parseInt(this.display, 0));
� � � � }
� � � � break;
� � }
� � this.display = this.firstval.toString();
� }
Step #3: Implementing the UI/UX of the Calculator
Now, is the time to implementing the previous functions to the view or UI/UX of the Calculator app. Open and edit "src/app/home/home.page.html" then replace all HTML tags with this.
<ion-content [fullscreen]="true">
� <div class="calc-main">
� � <div class="calc-display">
� � � <ion-input type="number" [(ngModel)]="display" class="ion-text-end"></ion-input>
� � </div>
� � <ion-grid>
� � � <ion-row>
� � � � <ion-col>
� � � � � <ion-button shape="round" color="light" *ngIf="!isc" (click)="click('ac')">AC</ion-button>
� � � � � <ion-button shape="round" color="light" *ngIf="isc" (click)="click('c')">C</ion-button>
� � � � </ion-col>
� � � � <ion-col>
� � � � � <ion-button shape="round" color="light" (click)="click('+/-')">+/-</ion-button>
� � � � </ion-col>
� � � � <ion-col>
� � � � � <ion-button shape="round" color="light" (click)="click('%')">%</ion-button>
� � � � </ion-col>
� � � � <ion-col>
� � � � � <ion-button shape="round" color="warning" (click)="click(':')">:</ion-button>
� � � � </ion-col>
� � � </ion-row>
� � � <ion-row>
� � � � <ion-col>
� � � � � <ion-button shape="round" color="dark" (click)="click('7')">7</ion-button>
� � � � </ion-col>
� � � � <ion-col>
� � � � � <ion-button shape="round" color="dark" (click)="click('8')">8</ion-button>
� � � � </ion-col>
� � � � <ion-col>
� � � � � <ion-button shape="round" color="dark" (click)="click('9')">9</ion-button>
� � � � </ion-col>
� � � � <ion-col>
� � � � � <ion-button shape="round" color="warning" (click)="click('X')">X</ion-button>
� � � � </ion-col>
� � � </ion-row>
� � � <ion-row>
� � � � <ion-col>
� � � � � <ion-button shape="round" color="dark" (click)="click('4')">4</ion-button>
� � � � </ion-col>
� � � � <ion-col>
� � � � � <ion-button shape="round" color="dark" (click)="click('5')">5</ion-button>
� � � � </ion-col>
� � � � <ion-col>
� � � � � <ion-button shape="round" color="dark" (click)="click('6')">6</ion-button>
� � � � </ion-col>
� � � � <ion-col>
� � � � � <ion-button shape="round" color="warning" (click)="click('-')">-</ion-button>
� � � � </ion-col>
� � � </ion-row>
� � � <ion-row>
� � � � <ion-col>
� � � � � <ion-button shape="round" color="dark" (click)="click('1')">1</ion-button>
� � � � </ion-col>
� � � � <ion-col>
� � � � � <ion-button shape="round" color="dark" (click)="click('2')">2</ion-button>
� � � � </ion-col>
� � � � <ion-col>
� � � � � <ion-button shape="round" color="dark" (click)="click('3')">3</ion-button>
� � � � </ion-col>
� � � � <ion-col>
� � � � � <ion-button shape="round" color="warning" (click)="click('+')">+</ion-button>
� � � � </ion-col>
� � � </ion-row>
� � � <ion-row>
� � � � <ion-col size="6">
� � � � � <ion-button shape="round" color="dark" (click)="click('0')" class="double-width">0</ion-button>
� � � � </ion-col>
� � � � <ion-col>
� � � � � <ion-button shape="round" color="dark" (click)="click(',')">,</ion-button>
� � � � </ion-col>
� � � � <ion-col>
� � � � � <ion-button shape="round" color="warning" (click)="click('=')">=</ion-button>
� � � � </ion-col>
� � � </ion-row>
� � </ion-grid>
� </div>
</ion-content>Next, make the UI/UX look better by open and edit "src/app/home/home.page.scss" then replace all SCSS codes with this.
.calc-main {
� background-color: #000000;
� height: 100%;
}
.calc-display {
� background-color: #000000;
� padding: 60px 15px 20px;
}
ion-input {
� color: #ffffff;
� font-size: 48px;
}
ion-col {
� padding: 0;
� margin: 0;
� text-align: center;
}
ion-button {
� height: 50px;
� width: 50px;
� border-radius: 50;
� font-size: 20px;
}
.double-width {
� width: 86%;
}
Step #4: Run and Test the Ionic Calculator App to the Device
To run this Ionic 5 app to the iOS device, first, add the Cordova iOS platform by type this command.
ionic cordova platform add iosChange the widget id in the config.xml to your bundle or package id (we are using "com.djamware.calculator").
<widget id="com.djamware.calculator" .../>Next, remove and add again the iOS platform.
ionic cordova platform rm ios
ionic cordova platform add ios
Next, build this Ionic 5 app to the iOS app.
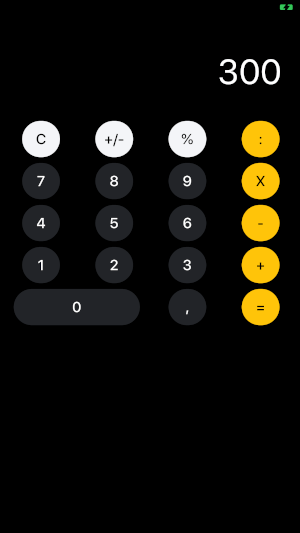
ionic cordova build iosOpen the "platforms/ios/MyApp.xcworkspace" using XCode then go to the build settings. Change the Development Team to your Apple Development team account. Make sure your iPhone or iOS device connected then click the play button to run this Ionic 5 app to the iOS device. And here the final calculator app looks like.
For Android, add the platform first.
ionic cordova platform add androidThen run to the connected Android device.
ionic cordova run androidThat it's, the Ionic 5 Tutorial: Create Ionic Calculator App (Angular). You can get the full source code from our GitHub.
We know that building beautifully designed Ionic apps from scratch can be frustrating and very time-consuming. Check Ionic 4 - Full Starter App and save development and design time. Android, iOS, and PWA, 100+ Screens and Components, the most complete and advance Ionic Template.
That just the basic. If you need more deep learning about Ionic, Angular, and Typescript, you can take the following cheap course:
- IONIC 4 Design Hybrid Mobile Applications IOS & Android
- Wordpress Rest API and Ionic 4 (Angular) App With Auth
- Mobile App from Development to Deployment - IONIC 4
- Ionic 4 Crash Course with Heartstone API & Angular
- Ionic 4 Mega Course: Build 10 Real World Apps
Thanks!