Creating Server-side Rendered Vue.js Apps Using Nuxt.js
When using a JavaScript framework, your browser doesn’t receive a complete page to display. Instead it gets a bunch of pieces and instructions of how to put them all together. It takes a substantial amount of time to put all this information together before your browser actually has something to display.
In this article, Toptal Freelance Front-end Engineer Ben Jones introduces us to Nuxt.js, a server-side rendering library for Vue.js, inspired by the popular Next.js for React.js.

Ben is a skilled developer focused on user outcomes, with experience in everything from CAD to VBA to web tech to neural networks.
Expertise
JavaScript frameworks/libraries such as Vue can offer a fantastic user experience when browsing your site. Most offer a way of dynamically changing page content without having to send a request to the server each time.
However, there is an issue with this approach. When initially loading your website, your browser doesn’t receive a complete page to display. Instead, it gets sent a bunch of pieces to construct the page (HTML, CSS, other files) and instructions for how to put them all together (a JavaScript framework/library) It takes a measurable amount of time to put all this information together before your browser actually has something to display. It’s like being sent a bunch of books along with a flat-pack bookcase. You’d have to build the bookcase first and then fill it with the books.
The solution to this is clever: Have a version of the framework/library on the server that can build a ready-to-display page. Then send this complete page to the browser along with the ability to make further changes and still have dynamic page content (the framework/library), just like being sent a ready-made bookcase along with some books. Sure, you still have to put the books in the bookcase, but you’ve got something usable immediately.
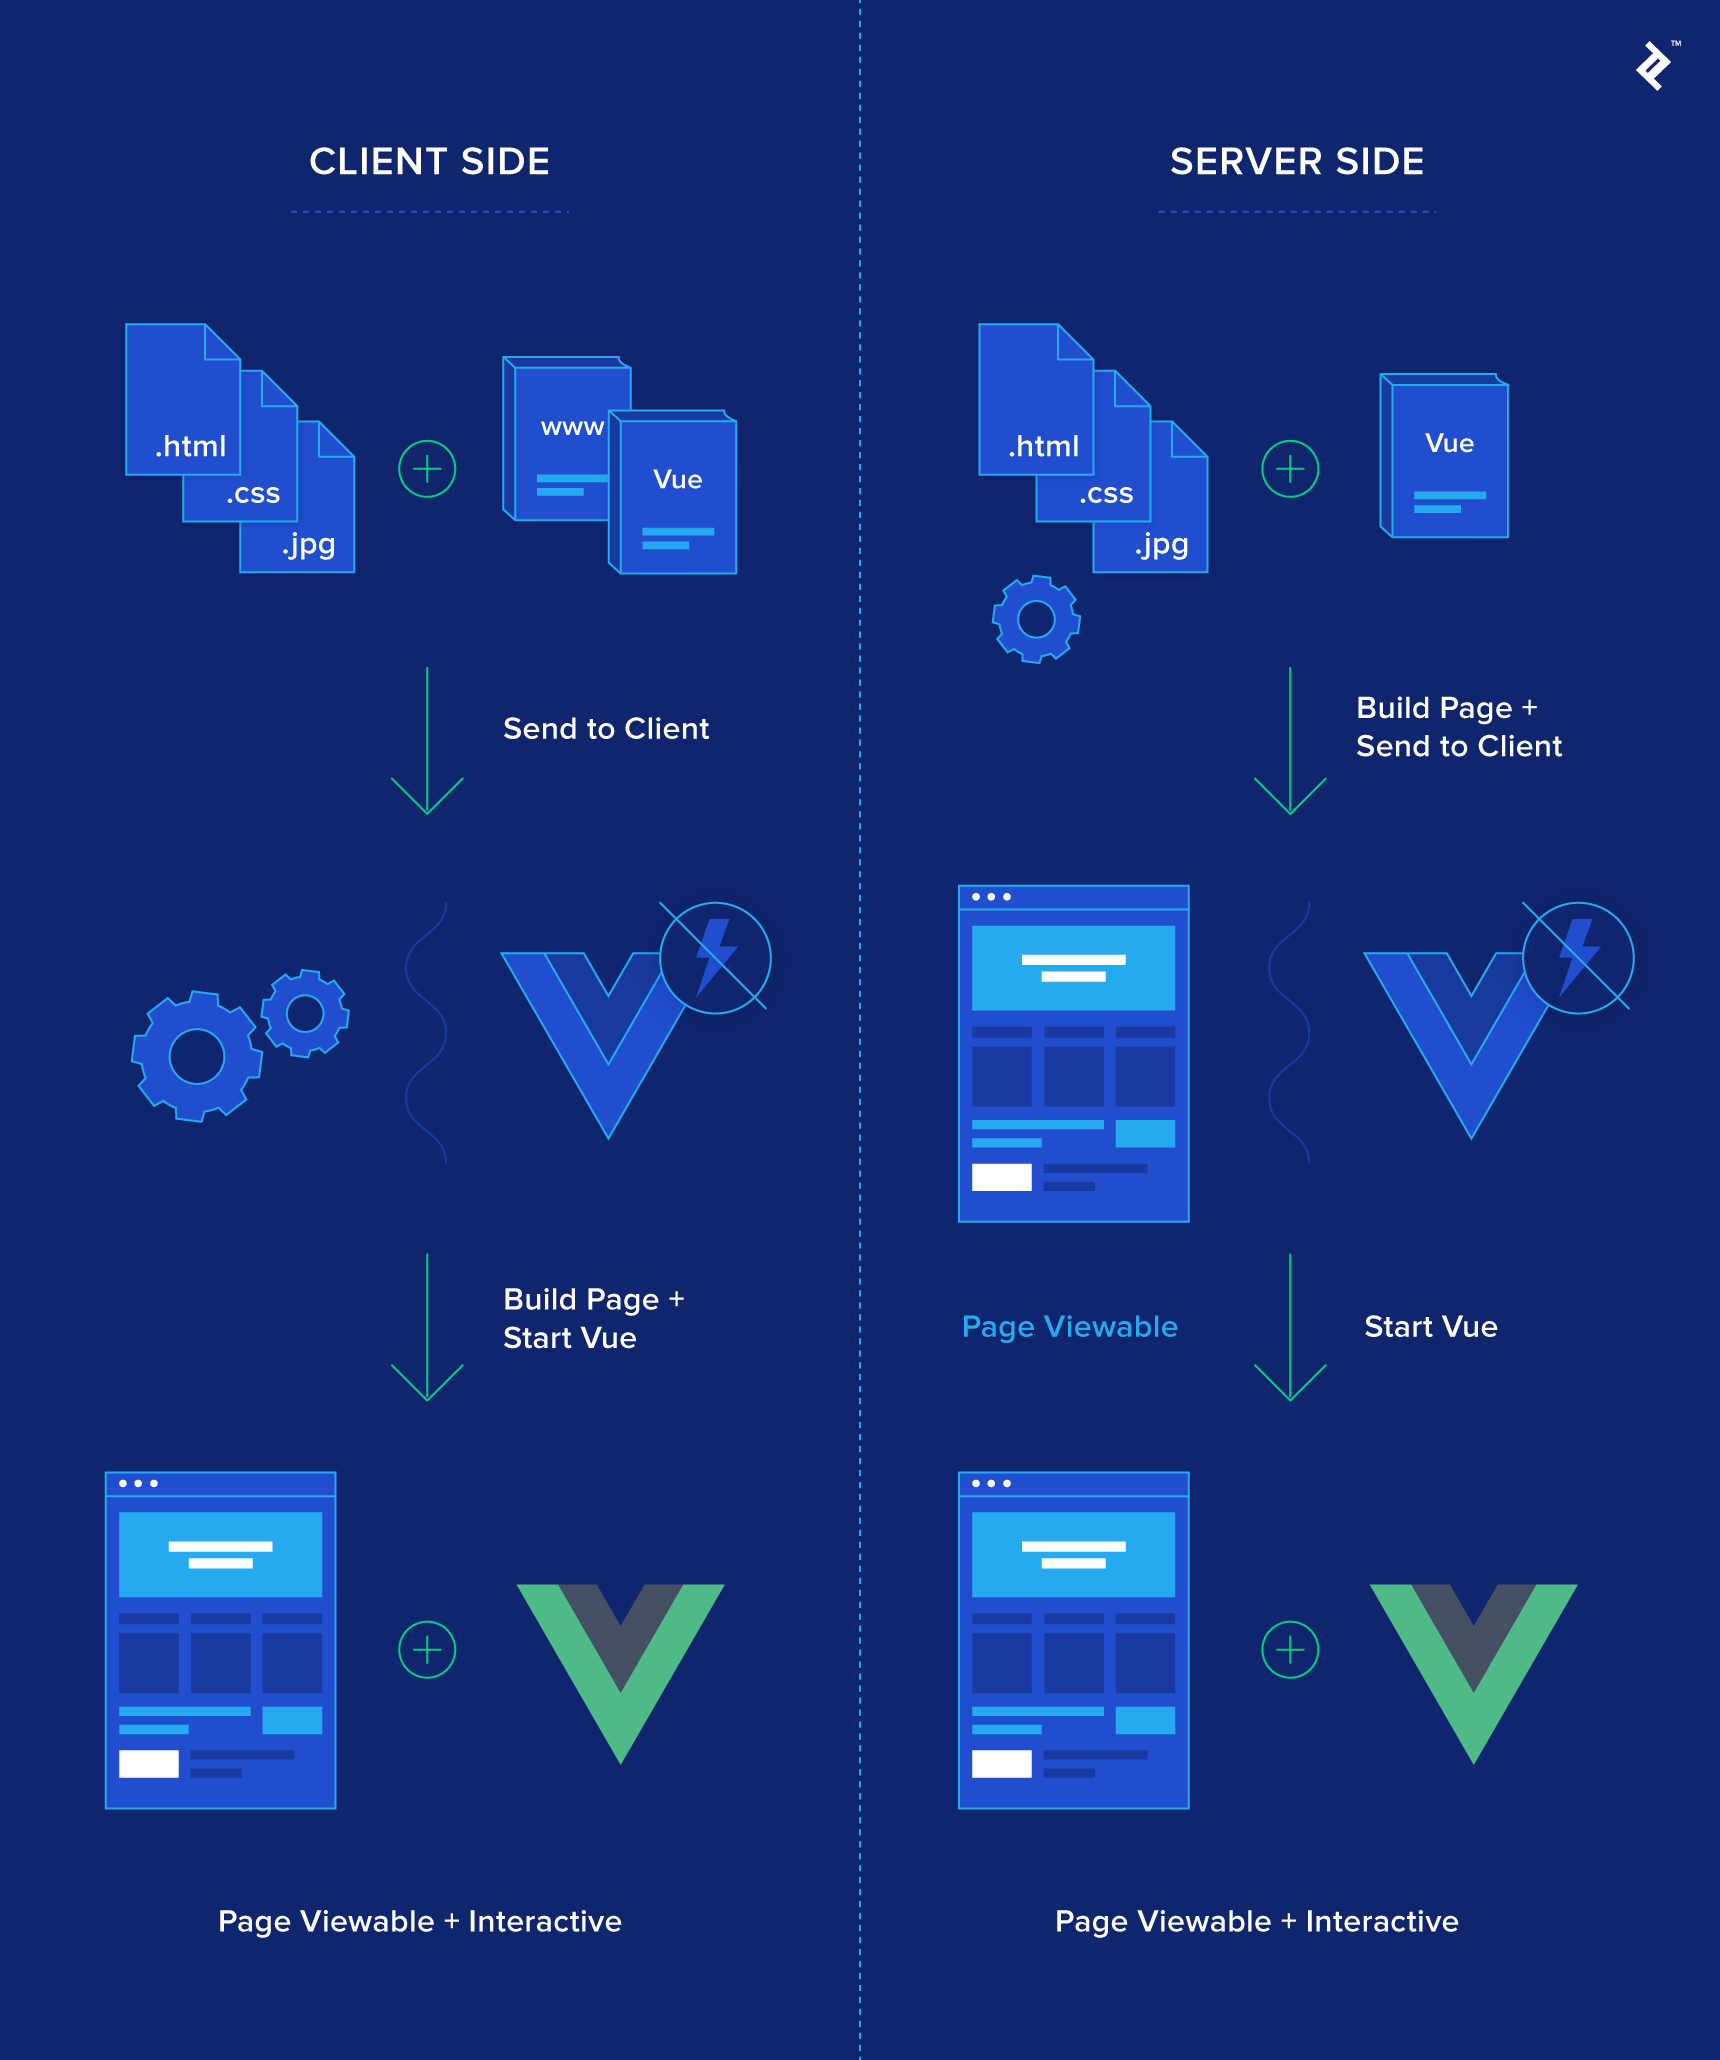
Beyond the silly analogy, there are also a bunch of other advantages. For example, a page that rarely changes, such as an About Us page, doesn’t need to be recreated every single time a user asks for it. So a server can create it once and then cache it or store it somewhere for future use. These kinds of speed improvements may seem tiny, but in an environment where time until responsiveness is measured in milliseconds (or less), every little bit counts.
If you’d like more information on the advantages of SSR in a Vue environment, you should check out Vue’s own article on SSR. There is a variety of options to achieve these results, but the most popular one, which is also recommended by the Vue team, is Nuxt.
Why Nuxt.js
Nuxt.js is based off an implementation of SSR for the popular React library called Next. After seeing the advantages of this design, a similar implementation was designed for Vue called Nuxt. Those familiar with the React+Next combination will spot a bunch of similarities in design and layout of the application. However, Nuxt offers Vue-specific features to create a powerful yet flexible SSR solution for Vue.
Nuxt was updated to a production-ready 1.0 version in January 2018 and is part of an active and well-supported community. One of the great things is that building a project using Nuxt isn’t that different from building any other Vue project. In fact, it provides a bunch of features that allow you to create well-structured codebases in a reduced amount of time.
Another important thing to note is Nuxt doesn’t have to be used for SSR. It’s promoted as a framework for creating universal Vue.js applications and includes a command (nuxt generate) for creating static generated Vue applications using the same codebase. So if you’re apprehensive about diving deep into SSR, don’t panic. You can always create a static site instead while still taking advantage of Nuxt’s features.
In order to grasp the potential of Nuxt, let’s create a simple project. The final source code for this project is hosted on GitHub if you want to see it, or you can view a live version created using nuxt generate and hosted on Netlify.
Creating a Nuxt Project
To start off, let’s use a Vue project generator called vue-cli to quickly create a sample project:
# install vue-cli globally
npm install -g vue-cli

# create a project using a nuxt template
vue init nuxt-community/starter-template my-nuxt-project
After going through a couple options, this will create a project inside the folder my-nuxt-project or whatever you specified. Then we just need to install dependencies and run the server:
cd my-nuxt-project
npm install # Or yarn
npm run dev
There we go. Open your browser to localhost:3000 and your project should be running. Not much different from creating a Vue Webpack project. However, when we look at the actual structure of the app, there’s not much there, especially when compared to something like the Vue Webpack template.
Looking in the package.json also shows that we only have one dependency, Nuxt itself. This is because each version of Nuxt is tailored to work with specific versions of Vue, Vue-router, and Vuex and bundles them all together for you.
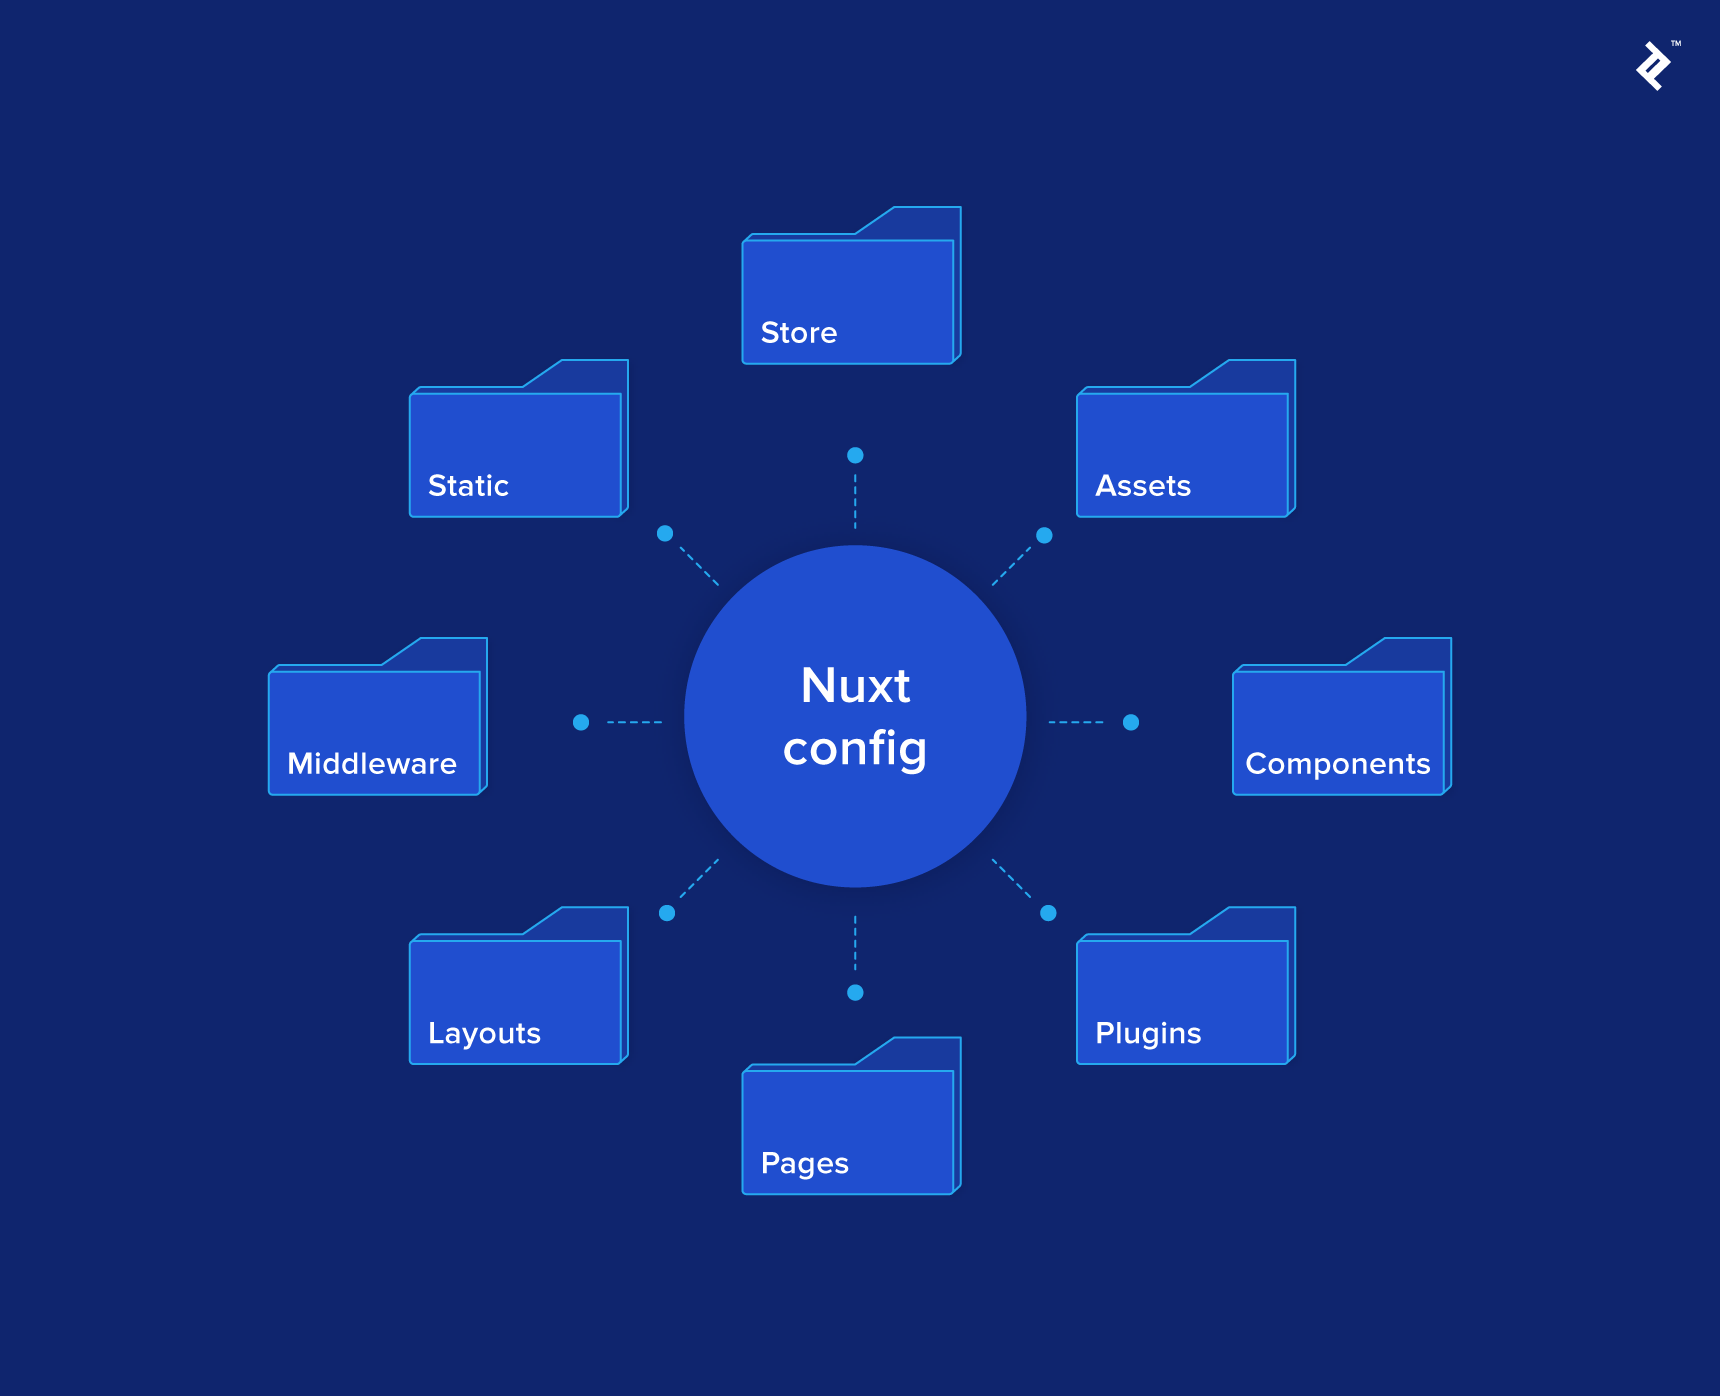
There is also a nuxt.config.js file at the project root. This allows you to customize a bunch of features that Nuxt provides. By default, it sets the header tags, loading bar color, and ESLint rules for you. If you’re eager to see what you can configure, here’s the documentation; we will be covering some options in this article.
So what’s so special about those directories?
Project Layout
If you browse through the directories created, all of them have an accompanying Readme stating a brief summary of what goes in that directory and often a link to the docs.
This is one benefit of using Nuxt: a default structure for your application. Any good front-end developer will structure an application similar to this, but there are many different ideas about structures, and when working on a team, some time will inevitably go into discussing or choosing this structure. Nuxt provides one for you.
Nuxt will look for certain directories and build your application for you depending on what it finds. Let’s examine these directories one by one.
Pages
This is the only required directory. Any Vue components in this directory are automatically added to vue-router based on their filenames and the directory structure. This is extremely convenient. Normally I would have a separate Pages directory anyway and have to manually register each of those components in another router file. This router file can become complex for larger projects and may need splitting to maintain readability. Instead, Nuxt will handle all of this logic for you.
To demonstrate, we can create a Vue component called about.vue inside the Pages directory. Let’s just add a simple template such as:
<template>
 <h1>About Page</h1>
</template>
When you save, Nuxt will re-generate the routes for you. Seeing as we called our component about.vue, if you navigate to /about, you should see that component. Simple.
There is one filename which is special. Naming a file index.vue will create a root route for that directory. When the project is generated, there’s already an index.vue component in the pages directory which correlates to the homepage or landing page of your site. (In the development example, this would simply be localhost:3000.)

What about deeper routes? Sub-directories in the Pages directory help to structure your routes. So if we wanted a View Product page, we could structure our Pages directory something like this:
/pages
--| /products
----| index.vue
----| view.vue
Now, if we navigate to /products/view, we will see the view.vue component inside the products directory. If we navigate instead to /products, we will see the index.vue component inside the products directory.
You may be asking why we didn’t just create a products.vue component in the pages directory instead like we did for the /about page. You may think the result would be the same, but there is a difference between the two structures. Let’s demonstrate this by adding another new page.
Say we wanted a seperate About page for each employee. For example, let’s create an About page for me. It should be located at /about/ben-jones. Initially, we may try structuring the Pages directory like this:
/pages
--| about.vue
--| /about
----| ben-jones.vue
When we try to access /about/ben-jones, we instead get the about.vue component, the same as /about. What’s going on here?
Interestingly, what Nuxt is doing here is generating a nested route. This structure suggests that you want a permanent /about route and anything inside that route should be nested in its own view area. In vue-router, this would be signified by specifying a <router-view /> component inside the about.vue component. In Nuxt, this is the same concept except, instead of <router-view />, we simply use <nuxt />. So let’s update our about.vue component to allow for nested routes:
<template>
 <div>
   <h1>About Page</h1>
   <nuxt />
 </div>
</template>
Now, when we navigate to /about, we get the about.vue component we had before, with just a title. However, when we navigate to /about/ben-jones, we instead have the title and the ben-jones.vue component rendered where the <nuxt/> placeholder was.
This wasn’t what we initially wanted, but the idea of having an About page with a list of people that, when clicked on, fill a section on the page with their information is an interesting concept, so let’s leave it as is for now. If you did want the other option, then all we would do is restructure our directories. We’d just have to move the about.vue component inside the /about directory and rename it index.vue, so the resulting structure would be:
/pages
--| /about
----| index.vue
----| ben-jones.vue
Finally, say we wanted to use route params to retrieve a specific product. For example, we want to be able to edit a product by navigating to /products/edit/64 where 64 is the product_id. We can do this the following way:
/pages
--| /products
----| /edit
------| _product_id.vue
Note the underscore at the beginning of the _product_id.vue component—this signifies a route param which is then accessible on the $route.params object or on the params object in Nuxt’s Context (more on that later). Note that the key for the param will be the component name without the initial underscore—in this case, product_id—so try to keep them unique within the project. As a result, in _product_id.vue, we may have something like:
<template>
 <h1>Editing Product {{ $route.params.product_id }}</h1>
</template>
You can start to imagine more complex layouts, which would be a pain to set up using vue-router. For example, we can combine all of the above into a route such as:
/pages
--| /categories
----| /_category_id
------| products.vue
------| /products
--------| _product_id.vue
It’s not too difficult to reason on what /categories/2/products/3 would display. We would have the products.vue component with a nested _product_id.vue component, with two route params: category_id and product_id. This is much simpler to reason on than an equivalent router config.
While we’re on the topic, one thing I tend to do in the router config is set up router guards. As Nuxt is building the router for us, this can be done instead on the component itself with beforeRouteEnter. If you want to validate route params, Nuxt provides a component method called validate. So if you wanted to check if the product_id was a number before trying to render the component, you would add the following to the script tag of _product_id.vue:
export default {
 validate ({ params }) {
   // Must be a number
   return /^\d+$/.test(params.product_id)
 }
}
Now, navigating to /categories/2/products/someproduct results in a 404 because someproduct isn’t a valid number.
That’s it for the Pages directory. Learning how to structure your routes properly in this directory is essential, so spending a little time initially is important to getting the most out of Nuxt. If you’re looking for a brief overview, it is always helpful to refer to the docs for routing.
If you’re worried about not being in control of the router, don’t be. This default setup works great for a wide variety of projects, provided they are well structured. However, there are some cases where you may need to add more routes to the router than Nuxt automatically generates for you or restructure them. Nuxt provides a way to customize the router instance in the config, allowing you to add new routes and customize generated routes. You can also edit the core functionality of the router instance, including extra options added by Nuxt. So if you do encounter an edge case, you still have the flexibility to find the appropriate solution.
Store
Nuxt can build your Vuex store based on the structure of the store directory, similar to the Pages directory. If you don’t need a store, just remove the directory. There are two modes for the store, Classic and Modules.
Classic requires you to have an index.js file in the store directory. There you need to export a function that returns a Vuex instance:
import Vuex from 'vuex'

const createStore = () => {
 return new Vuex.Store({
   state: ...,
   mutations: ...,
   actions: ...
 })
}

export default createStore
This allows you to create the store however you wish, much like using Vuex in a normal Vue project.
Modules mode also requires you to create an index.js file in the store directory. However, this file only needs to export the root state/mutations/actions for your Vuex store. The example below specifies a blank root state:
export const state = () => ({})
Then, each file in the store directory will be added to the store in its own namespace or module. For example, let’s create somewhere to store the current product. If we create a file called product.js in the store directory, then a namespaced section of the store will be available at $store.product. Here’s a simple example of what that file may look like:
export const state = () => ({
 _id: 0,
 title: 'Unknown',
 price: 0
})

export const actions = {
 load ({ commit }) {
   setTimeout(
     commit,
     1000,
     'update',
     { _id: 1, title: 'Product', price: 99.99 }
   )
 }
}

export const mutations = {
 update (state, product) {
   Object.assign(state, product)
 }
}
The setTimeout in the load action simulates some sort of API call, which will update the store with the response; in this case, it takes one second. Now, let’s use it in the products/view page:
<template>
 <div>
   <h1>View Product {{ product._id }}</h1>
   <p>{{ product.title }}</p>
   <p>Price: {{ product.price }}</p>
 </div>
</template>

<script>
import { mapState } from 'vuex'
export default {
 created () {
   this.$store.dispatch('product/load')
 },
 computed: {
   ...mapState(['product'])
 }
}
</script>
A few things to note: Here, we are calling our fake API when the component is created. You can see that the product/load action we are dispatching is namespaced under Product. This makes it clear exactly what section of the store we are dealing with. Then, by mapping the state to a local computed property, we can easily use it in our template.
There is a problem: We see the original state for a second while the API runs. Later, we will use a solution provided by Nuxt to fix this (known as fetch).
Just to stress this again, we never had to npm install vuex, as it is already included in the Nuxt package. When you add an index.js file to the store directory, all those methods are then opened up to you automatically.
That’s the main two directories explained; the rest are much simpler.
Components
The Components directory is there to contain your reusable components such as a navigation bar, image gallery, pagination, data tables, etc. Seeing as components in the Pages directory are converted into routes, you need somewhere else to store these types of components. These components are accessible in pages or other components by importing them:
import ComponentName from ~/components/ComponentName.vue
Assets
This contains uncompiled assets and has more to do with how Webpack loads and processes files, rather than with how Nuxt works. If you’re interested, I suggest reading the guide in the Readme.
Static
This contains static files which are mapped to the root directory of your site. For example, putting an image called logo.png in this directory would make it available at /logo.png. This is good for meta files like robots.txt, favicon.ico, and other files you need available.
Layouts
Normally, in a Vue project, you have some sort of root component, normally called App.vue. Here is where you can set up your (normally static) app layout, which may include a navbar, footer, and then a content area for your vue-router. The default layout does exactly that and is provided for you in the layouts folder. Initially, all it has is a div with a <nuxt /> component (which is equivalent to <router-view />) but it can be styled however you wish. For example, I’ve added a simple navbar to the example project for navigation around the various demonstration pages.
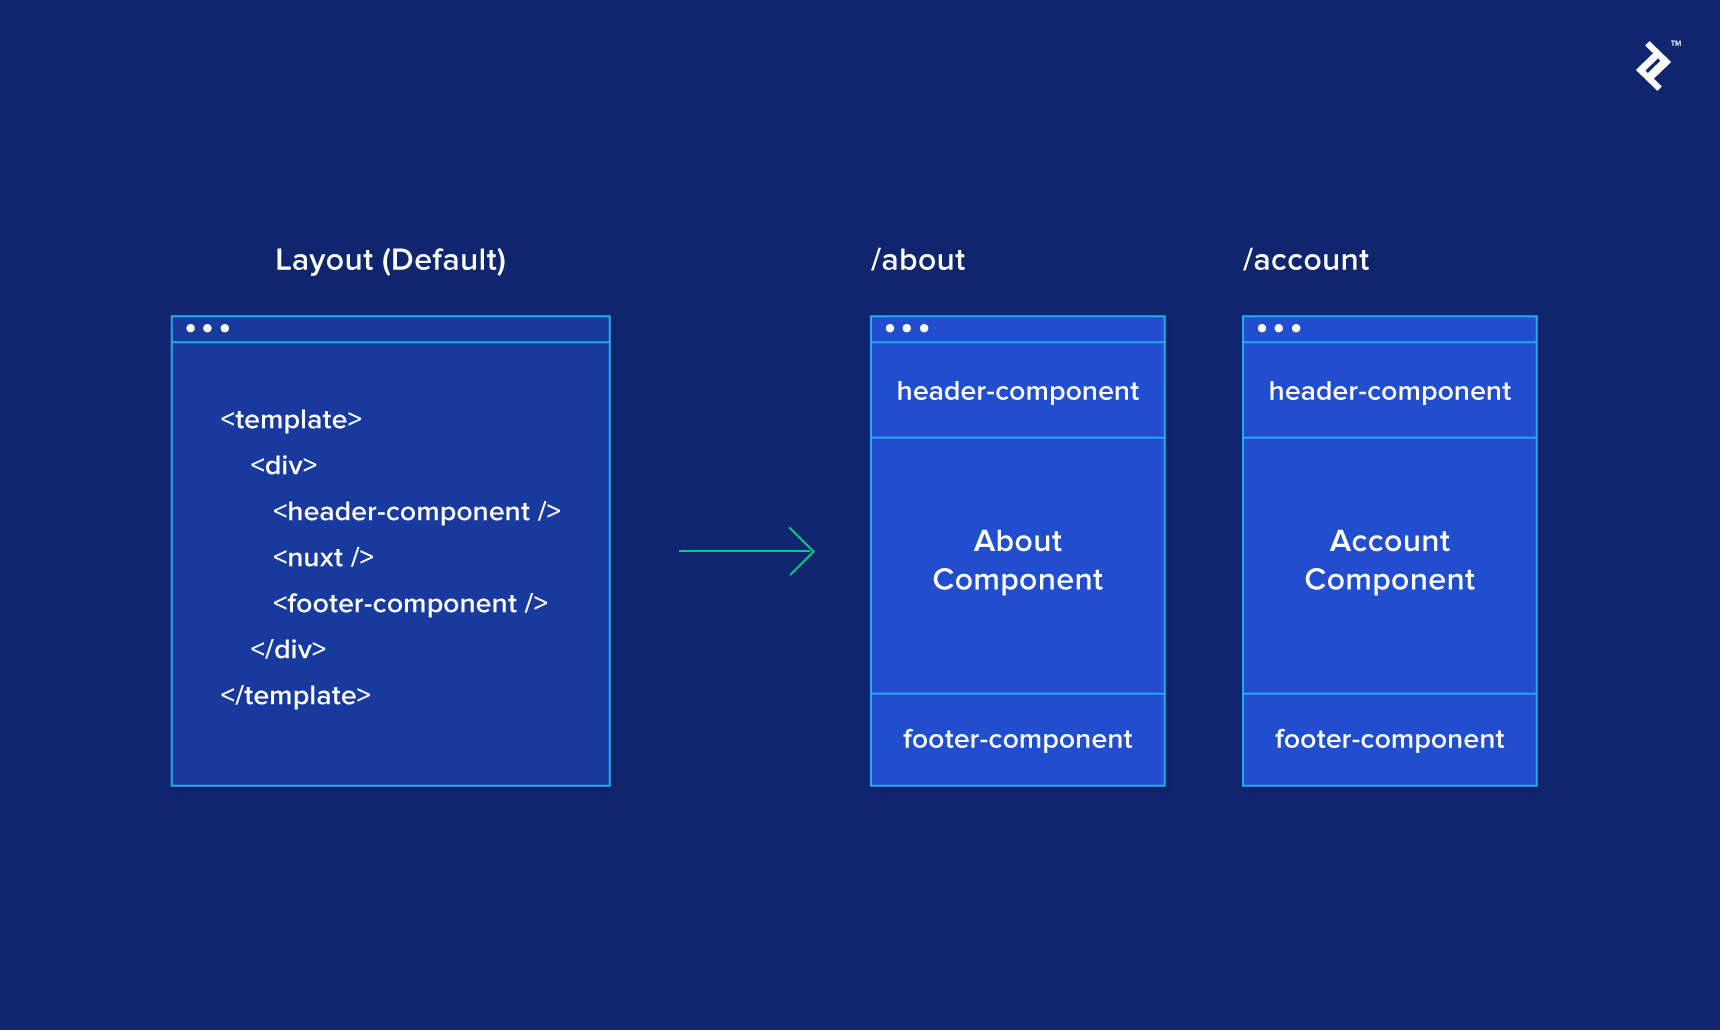
You may want to have a different layout for a certain section of your app. Maybe you have some sort of CMS or admin panel that looks different. To solve this, create a new layout in the Layouts directory. As an example, let’s create an admin-layout.vue layout which just has an extra header tag and no navbar:
<template>
 <div>
   <h1>Admin Layout</h1>
   <nuxt />
 </div>
</template>
Then, we can create an admin.vue page in the Pages directory and use a property provided by Nuxt called layout to specify the name (as a string) of the layout we want to use for that component:
<template>
 <h1>Admin Page</h1>
</template>

<script>
export default {
 layout: 'admin-layout'
}
</script>
That’s all there is to it. Page components will use the default layout unless specified, but when you navigate to /admin, it now uses the admin-layout.vue layout. Of course, this layout could be shared across several admin screens if you wish. The one important thing to remember is layouts must contain a <nuxt /> element.
There’s one final thing to note about layouts. You may have noticed while experimenting that if you type an invalid URL, you are shown an error page. This error page is, in fact, another layout. Nuxt has its own error layout (source code here), but if you wanted to edit it, just create an error.vue layout and that will be used instead. The caveat here is that the error layout must not have a <nuxt /> element. You will also have access to an error object on the component with some basic information to display. (This is printed out in the terminal running Nuxt if you want to examine it.)
Middleware
Middleware are functions that can be executed before rendering a page or layout. There is a variety of reasons you may want to do so. Route guarding is a popular use where you could check the Vuex store for a valid login or validate some params (instead of using the validate method on the component itself). One project I worked on recently used middleware to generate dynamic breadcrumbs based on the route and params.
These functions can be asynchronous; just be careful, as nothing will be shown to the user until the middleware is resolved. They also have access to Nuxt’s Context, which I will explain later.
Plugins
This directory allows you to register Vue plugins before the application is created. This allows the plugin to be shared throughout your app on the Vue instance and be accessible in any component.
Most major plugins have a Nuxt version that can be easily registered to the Vue instance by following their docs. However, there will be circumstances when you will be developing a plugin or need to adapt an existing plugin for this purpose. An example I’m borrowing from the docs shows how to do this for vue-notifications. First, we need to install the package:
npm install vue-notifications --save
Then create a file in the plugins directory called vue-notifications.js and include the following:
import Vue from 'vue'
import VueNotifications from 'vue-notifications'

Vue.use(VueNotifications)
Very similar to how you would register a plugin in a normal Vue environment. Then edit the nuxt.config.js file at your project root and add the following entry to the module.exports object:
plugins: ['~/plugins/vue-notifications']
That’s it. Now you can use vue-notifications throughout your app. An example of this is at /plugin in the example project.
So that completes a rundown of the directory structure. It may seem a lot to learn, but if you’re developing a Vue app, you’re already setting up the same kind of logic. Nuxt helps to abstract away the setup and help you focus on building.
Nuxt does more than assist in development though. It supercharges your components by providing extra functionality.
Nuxt’s Supercharged Components
When I first started researching Nuxt, I kept reading about how Page components are supercharged. It sounded great, but it wasn’t immediately obvious what exactly that meant and what benefits it brings.
What it means is that all Page components have extra methods attached to them that Nuxt can use to provide additional functionality. In fact, we’ve already seen one of these earlier when we used the validate method to check params and redirect a user if they are invalid.
The two main ones used in a Nuxt project will be the asyncData and fetch methods. Both are very similar in concept, they are run asynchronously before the component is generated, and they can be used to populate the data of a component and the store. They also enable the page to be fully rendered on the server before sending it to the client even when we have to wait for some database or API call.
What’s the difference between asyncData and fetch?
-
asyncDatais used to populate the data of the Page component. When you return an object, it is then merged with the output ofdatabefore rendering. -
fetchis used to populate the Vuex Store. If you return a promise, Nuxt will wait until it is resolved before rendering.
So let’s put these to good use. Remember earlier on the /products/view page we had a problem where the initial state of the store was being displayed briefly while our fake API call was being made? One way of fixing this is having a boolean stored on the component or in the Store such as loading = true and then displaying a loading component while the API call finishes. Afterward, we would set loading = false and display the data.
Instead, let’s use fetch to populate the Store before rendering. In a new page called /products/view-async, let’s change the created method to fetch; that should work, right?
export default {
 fetch () {
   // Unfortunately the below line throws an error
   // because 'this.$store' is undefined...
   this.$store.dispatch('product/load')
 },
 computed: {...}
}
Here’s the catch: These “supercharged” methods run before the component is created, so this doesn’t point to the component and nothing on it can be accessed. So how do we access the Store here?
The Context API
Of course, there is a solution. On all of Nuxt’s methods, you are provided with an argument (normally the first) containing an extremely useful object called the Context. In this is everything you will need reference to across the app, meaning we don’t need to wait for Vue to create those references on the component first.
I would highly recommend checking out the Context docs to see what is available. Some handy ones are app, where you can access all your plugins, redirect, which can be used to change routes, error to display the error page, and some self-explanatory ones such as route, query, and store.
So, to access the Store, we can destructure the Context and extract the Store from it. We also need to make sure we return a promise so that Nuxt can wait for it to resolve before rendering the component, so we need to make a small adjustment to our Store action too.
// Component
export default {
 fetch ({ store }) {
   return store.dispatch('product/load')
 },
 computed: {...}
}

// Store Action
load ({ commit }) {
 return new Promise(resolve => {
   setTimeout(() => {
     commit('update', { _id: 1, title: 'Product', price: 99.99 })
     resolve()
   }, 1000)
 })
}
You could use async/await or other methods depending on your coding style, but the concept is the same—we’re telling Nuxt to make sure the API call finishes and the Store is updated with the result before trying the render the component. If you try navigating to /products/view-async, you will not see the flash of content where the product is in its initial state.
You can imagine how useful this can be in any Vue app even without SSR. The Context is also available to all middlewares as well as to other Nuxt methods such as NuxtServerInit which is a special store action that runs before the Store is initialized (an example of this is in the next section)
Considerations When Using SSR
I’m sure many (myself included) who start using a technology such as Nuxt while treating it like any other Vue project eventually hit a wall where something we know would normally work seems impossible in Nuxt. As more of these caveats are documented, it will be easier to overcome, but the main thing to consider when starting to debug is that the client and server are two separate entities.
When you access a page initially, a request is sent to Nuxt, the server builds as much as possible of that page and the rest of the app, and then the server sends it to you. Then the responsibility is on the client to continue with navigation and load chunks as it needs them.
We want the server to do as much as possible first, but sometimes it doesn’t have access to the information it needs, which results in the work being done client-side instead. Or worse, when the final content presented by the client is different from what the server expected, the client is told to rebuild it from scratch. This is a big indication that something is wrong with the application logic. Thankfully, an error will be generated in your browser’s console (in development mode) if this starts to happen.
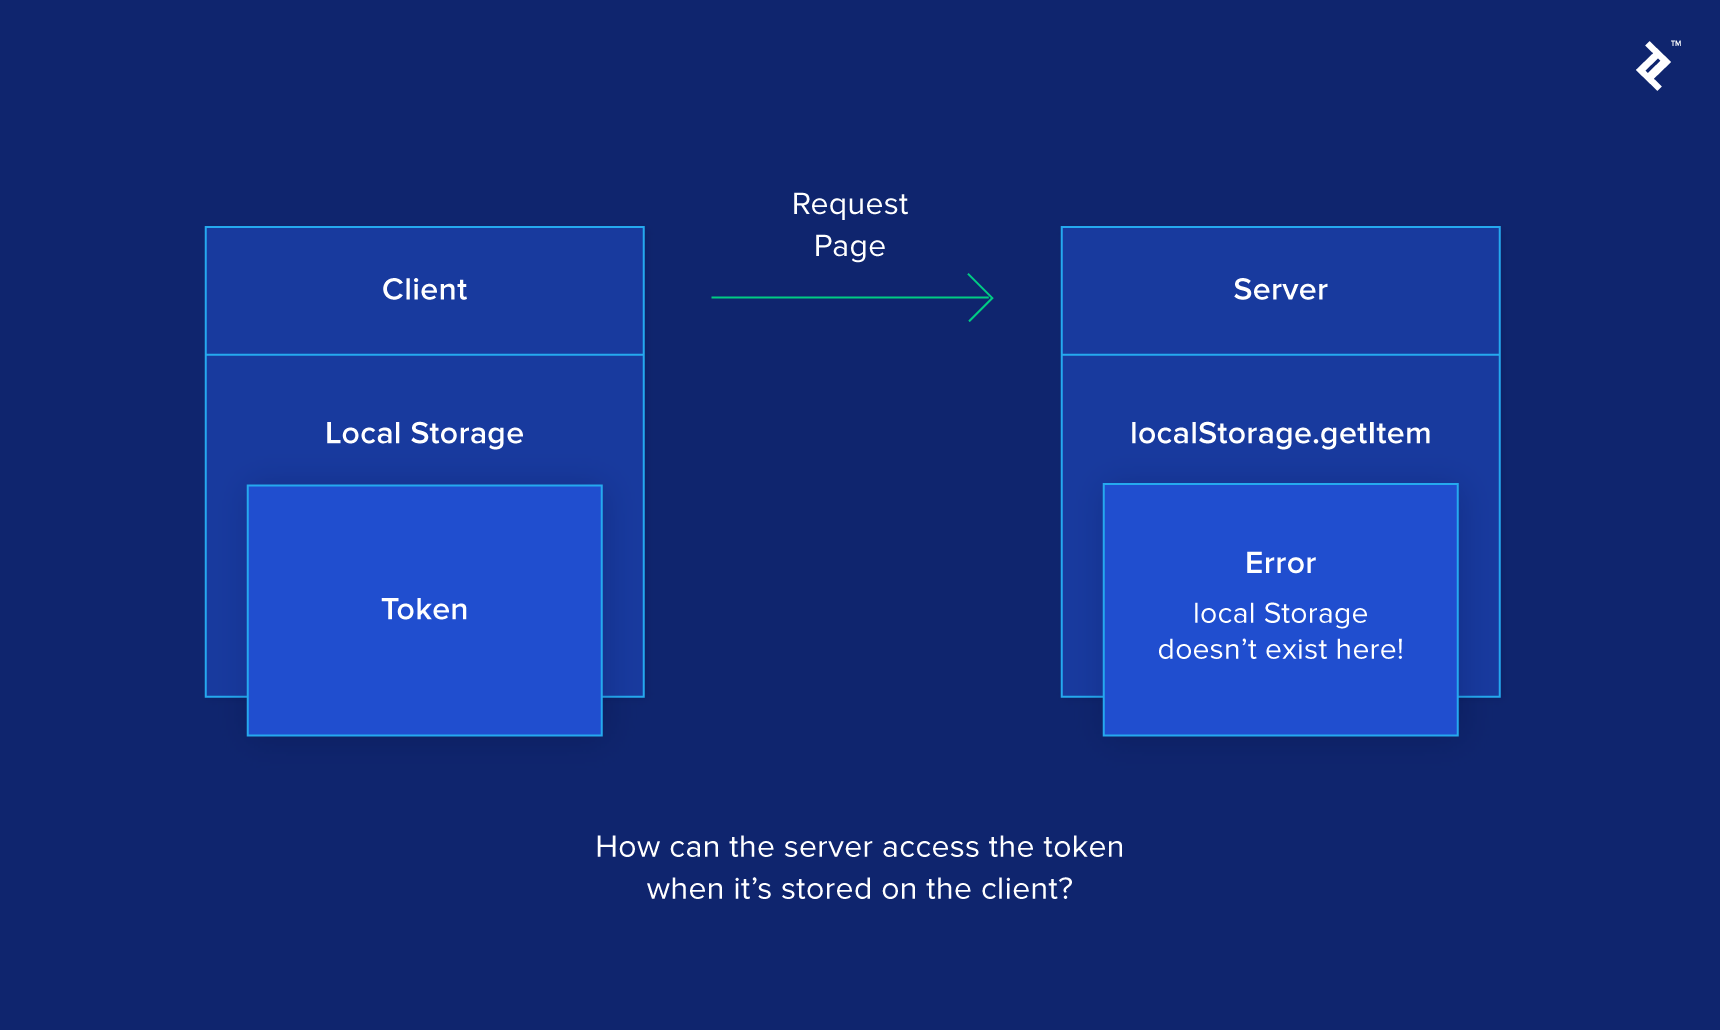
Let’s take an example of how to solve a common issue, session management. Imagine you have a Vue app where you can log in to an account, and your session is stored using a token (JWT, for example) which you decide to keep in localStorage. When you initially access the site, you want to authenticate that token against an API, which returns some basic user info if valid and puts that information in the Store.
After reading through Nuxt’s docs, you see that there’s a handy method called NuxtServerInit which allows you to asynchronously populate the Store once on initial load. That sounds perfect! So you create your user module in the Store and add the appropriate action in the index.js file in the Store directory:
export const actions = {
 nuxtServerInit ({ dispatch }) {
   // localStorage should work, right?
   const token = localStorage.getItem('token')
   if (token) return dispatch('user/load', token)
 }
}
When you refresh the page, you get an error, localStorage is not defined. Thinking about where this is happening, it makes sense. This method is run on the server, it has no idea what is stored in localStorage on the client; in fact, it doesn’t even know what “localStorage” is! So that’s not an option.
So what’s the solution? There are a few, actually. You can get the client to initialize the Store instead but end up losing the benefits of SSR because the client ends up doing all the work. You can set up sessions on the server and then use that to authenticate the user, but that’s another layer to set up. What’s most similar to the localStorage method is using cookies instead.
Nuxt has access to cookies because they are sent with the request from the client to the server. As with other Nuxt methods, nuxtServerInit has access to the Context, this time as the second argument because the first is reserved for the store. On the Context, we can access the req object, which stores all the headers and other information from the client request. (This will be especially familiar if you’ve used Node.js.)
So after storing the token in a cookie instead (called “token,” in this case), let’s access it on the server.
import Cookie from 'cookie'

export const actions = {
 nuxtServerInit ({ dispatch }, { req }) {
   const cookies = Cookie.parse(req.headers.cookie || '')
   const token = cookies['token'] || ''
   if (token) return dispatch('user/load', token)
 }
}
A simple solution, but one that might not be immediately obvious. Learning to think about where certain actions are happening (client, server, or both) and what they have access to takes some time but the benefits are worth it.
Deployment
Deployment with Nuxt is extremely simple. Using the same codebase, you can create an SSR app, single-page application, or static page.
Server-side Rendered App (SSR App)
This is probably what you were aiming for when using Nuxt. The basic concept for deployment here is to run the build process on whatever platform you choose and set a few configurations. I’ll use the Heroku example from the docs:
First, set up scripts for Heroku in package.json:
"scripts": {
 "dev": "nuxt",
 "build": "nuxt build",
 "start": "nuxt start",
 "heroku-postbuild": "npm run build"
}
Then set up the Heroku environment using the heroku-cli (setup instructions here:
# set Heroku variables
heroku config:set NPM_CONFIG_PRODUCTION=false
heroku config:set HOST=0.0.0.0
heroku config:set NODE_ENV=production

# deploy
git push heroku master
That’s it. Now your SSR Vue app is live ready for the world to see. Other platforms have different setups, but the process is similar. The official deployment methods currently listed are:
Single-page Application (SPA)
If you wanted to take advantage of some of the extra features Nuxt provides but avoid the server trying to render pages, then you can deploy as an SPA instead.
First, it’s best to test your application without the SSR as by default npm run dev runs with SSR on. To change that, edit the nuxt.config.js file and add the following option:
mode: 'spa',
Now, when you run npm run dev, SSR will be turned off and the application will run as an SPA for you to test. This setting also makes sure no future builds will include SSR.
If everything looks fine, then deployment is exactly the same as for an SSR app. Just remember you need to set mode: 'spa' first to let the build process know you want an SPA.
Static Pages
If you don’t want to deal with a server at all and instead want to generate pages for use with static hosting services such as Surge or Netlify, then this is the option to choose. Just bear in mind that, without a server, you won’t be able to access the req and res in the Context, so if your code relies on that, be sure to accommodate it. For example, when generating the example project, the nuxtServerInit function throws an error because it’s trying to fetch a token from the cookies in the request headers. In this project, it doesn’t matter, as that data isn’t being used anywhere, but in a real application, there would need to be an alternative way to access that data.
Once that’s sorted, deployment is easy. One thing you will probably need to change first is adding an option so that the nuxt generate command will also create a fallback file. This file will prompt the hosting service to let Nuxt handle the routing rather than the hosting service, throwing a 404 error. To do so, add the following line to nuxt.config.js:
generate: { fallback: true },
Here’s an example using Netlify, which isn’t currently in the Nuxt docs. Just bear in mind that if this is your first time using netlify-cli, you will be prompted to authenticate:
# install netlify-cli globally
npm install netlify-cli -g

# generate the application (outputs to dist/ folder)
npm run generate

# deploy
netlify deploy dist
It’s as simple as that! As mentioned at the beginning of the article, there’s a version of this project here. There’s also official deployment documentation for the following services below:
Learn More
Nuxt is updating rapidly, and this is only a small selection of the features it offers. I hope this article encourages you to try it out and see if it could help improve the capabilities of your Vue applications, allowing you to develop faster and take advantage of its powerful features.
If you’re looking for more information, then look no further than Nuxt’s official links:
Looking to up your JavaScript game? Try reading The Comprehensive Guide to JavaScript Design Patterns by fellow Toptaler Marko Mišura.
Understanding the basics
What is Vue.js?
Vue.js (or simply Vue) is a JavaScript framework designed to be light and easy to learn yet powerful enough to handle large applications. It allows you to develop richly interactive web apps that can provide a superior user experience.
What is Nuxt?
Nuxt is a framework for creating universal Vue applications. This means that it provides a structure for your project, it handles the more complicated server configuration for you, and it allows the same codebase to be deployed in various environments.
Are Vue and Nuxt open source?
Yes, both of their codebases are publicly viewable on GitHub and are under continual development. Both have core teams and are supported by their communities. Issues are tracked there, and anyone is welcome to suggest improvements or submit a pull request.
What does client side and server side mean?
Client side refers to the device that is used to request and ultimately display the web page, e.g., the browser on your computer/tablet/phone when you browse to a website. Server side refers to the server that receives the request for a web page and sends the appropriate files to display it.
What are the benefits of server-side rendering?
SSR provides better SEO, a faster initial load, and the ability to cache pages but generally means more server requests and full page reloads. Combining SSR with the benefits of a framework on the client side (such as Vue) offers rich user interaction and in-place DOM updates too, making Nuxt a great solution.
What is meant by a virtual DOM?
Frameworks like Vue.js allow partial updates to a webpage’s Document Object Model (DOM). However, direct DOM updates are time-expensive, so instead, since Vue.js 2.0, a virtual copy of the DOM is kept in-memory, changes are made there first, and an efficient update periodically adds those changes to the real DOM.
Cardiff, United Kingdom
Member since March 27, 2017
About the author
Ben is a skilled developer focused on user outcomes, with experience in everything from CAD to VBA to web tech to neural networks.