
It's been roughly a decade since I first became romantically involved with Python. This particular romantic comedy somehow missed the "love at first sight" trope entirely - I found the process of learning Python infuriating. My apprehensions weren't with the language itself, but rather with every living software developer on the face of the earth.
From my standpoint, it seemed like people in "software" consisted of only two archetypes, neither of which were particularly savory. One end of the spectrum was occupied by my fellow noobs, who seemed happily constrained to programming in cutesy REPL environments provided by whichever bootcamp provided them the blue pill which kept them from asking questions. On the opposite end of the spectrum was everybody else: competent engineers who may as well had been geniuses in my eyes. I knew these people had the knowledge to answer every question I could muster but somehow proved to be utterly incapable of being useful in any capacity. It wasn't clear to me at the time whether seasoned engineers were intentionally elitist assholes, or if newcomers were genuinely helpless. The only clarity I had was that neither demographic was going to provide value to my immediate goals. In retrospect, that frustration is likely what propelled this blog into existence).
I was convinced there was nothing worth building unless it were running on a Linux server, behind a real domain, accessible to the world. That might sound like a reasonable viewpoint in 2020, but this was 2010: there was no Docker, no Heroku, no DigitalOcean. Nginx was mostly a fringe webserver created by "some dude in Russia" powering 10% of sites on the internet compared to Apache's 90%. Web-based Python had previously relied on an Apache module called mod-python. Mod-python was suddenly (and arbitrarily?) deemed "dead" in favor of an undocumented Apache module by the name of mod-wsgi. It was the brainchild of Graham Dumpleton, who may as well have been the only person in the world besides myself attempting to run a god damn Python web app. It's a wonder I ever managed to succeed in doing that at all.
Enter uWSGI
The acronym "WSGI" stands for Web Server Gateway Interface, which is an esoteric way of saying "how a webserver communicates with Python." uWSGI and its predecessors are a form of middleware for webservers like Nginx to serve Python apps.
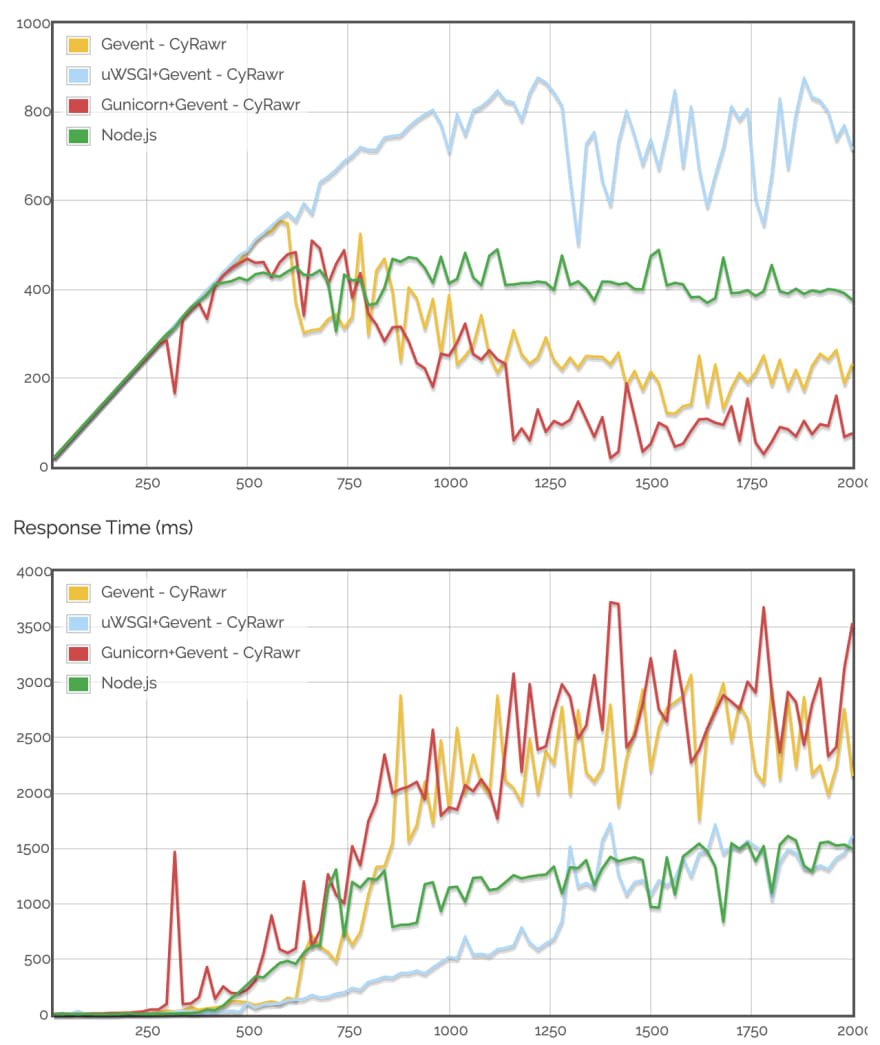
There are plenty of options for serving Python web apps in 2020, but uWSGI is objectively better than alternatives like Gunicorn. If you have any doubts about why we're rolling with uWSGI, these cherry-picked charts I stole from this guy's blog will surely clear things up:
Before we get started, I'm going to be real with you: this stuff can feel obnoxiously esoteric at times. It's tempting to look at this process and say "fuck it" when there are one-click solutions to avoid all of this altogether, but I'll let you in on a secret: those solutions suck. Heroku is a shitty AWS reseller that sells trash EC2 instances with a friendlier interface. Docker is a cop-out for developers to dodge the nuances of Linux, to the point where we'd instead install entire VMs worth of overhead over learning. I'm prepared to be shat on for those remarks, but my point remains: if you're interested in rising above vendor-lock and building apps that run faster, you've come to the right place.
Getting Set Up
We need to install a bunch of Python dev packages on Ubuntu (or whatever) for uWSGI to work. Even if this line looks familiar, do not skip this part (like I did). There's almost certainly at least one package below you're missing:
$ apt update
$ apt upgrade -y
$ sudo apt install python3.8 python3.8-dev python3-distutils uwsgi uwsgi-src uuid-dev libcap-dev libpcre3-dev python3-pip python3.8-venv
Installing uwsgi-plugin-python3 is an important step that deserves some extra attention. uWSGI is traditionally a Python package, thus you might expect us to run pip install uWSGI. If we were to install uWSGI via pip, uWSGI would be a Python package belonging to whichever system default version of Python3 happens to be installed on our machine. Our project is likely going to use a version of Python other than Python 3.6.9 (The Ubuntu 18.04 default), thus we need a version of uWSGI that transcends Python versions. This is where uwsgi-plugin-python3 comes in:
Installing uwsgi-plugin-python3 is an important step that deserves some extra attention. uWSGI is traditionally a Python package, so you'd possibly expect us to run pip install uWSGI at some point. On the contrary, if we were to install uWSGI via pip, uWSGI would be a Python package belonging to whichever system default version of Python3 happens to be installed on our machine. Our project is likely going to use a version of Python other than Python 3.6.9 (The Ubuntu 18.04 default). Thus we need a version of uWSGI that transcends Python versions. This is where uwsgi-plugin-python3 comes in:
$ apt-get install uwsgi-plugin-python3
Our last bit of Ubuntu configuration is to open port 5000:
$ ufw allow 5000
Prep Your Project
Next, we just need to make sure your Flask app is on your remote server and ready for action. Clone your project onto your VPS and make sure your project has a proper wsgi.py file to serve as the app's entry point:
from myapp import create_app

app = create_app()

if __name__ == " __main__":
    app.run(host='0.0.0.0')
You already know to use virtual environments without me telling you, but we need to specifically use virtualenv here - NOT Pipenv or any other alternative. uWSGI is picky about this for some reason. Save yourself the trouble and use virtualenv, even though it kinda sucks on principle:
$ python3.8 -m venv myenv
$ source myenv/bin/activate
$ pip install -r requirements.txt
We've installed all dependencies, installed uWSGI, and our project is looking good... we should be ready to test this thing out, right?
uwsgi --http-socket :5000 --plugin python3 --module wsgi:app
Surprise, surprise!
Python version: 3.6.9 (default, Nov 7 2019, 10:44:02) [GCC 8.3.0] ***Python threads support is disabled. You can enable it with --enable-threads*** Python main interpreter initialized at 0x55721b8125c0dropping root privileges after plugin initializationuWSGI running as root, you can use --uid/--gid/--chroot options***WARNING: you are running uWSGI as root !!! (use the --uid flag)*** your server socket listen backlog is limited to 100 connectionsyour mercy for graceful operations on workers is 60 secondsmapped 72768 bytes (71 KB) for 1 cores ***Operational MODE: single process*** Traceback (most recent call last): File "wsgi.py", line 1, in <module> from pythonmyadmin import create_app File "./pythonmyadmin/ __init__.py", line 1, in <module> from flask import FlaskModuleNotFoundError: No module named 'flask'unable to load app 0 (mountpoint='') (callable not found or import error) ***no app loaded. going in full dynamic mode***
You may be able to discern what's happening above; the output of uWSGI states we're using Python 3.6.9 (not what we want) and can't find the packages associated with our activated virtual environment. When we specified --plugin python3 in the line before, we were too general: we need a uWSGI plugin specifically for our version, which is called python38.
Install uWSGI Python 3.8 Plugin
Thanks to the uwsgi-plugin-python3 library we installed earlier, installing version-specific uWSGI plugins is easy:
$ export PYTHON=python3.8
$ uwsgi --build-plugin "/usr/src/uwsgi/plugins/python python38"
You should see output like this:
***uWSGI building and linking plugin from /usr/src/uwsgi/plugins/python*** [x86_64-linux-gnu-gcc -pthread] python38_plugin.so/usr/src/uwsgi/plugins/python/python_plugin.c: In function ‘uwsgi_python_post_fork’:/usr/src/uwsgi/plugins/python/python_plugin.c:394:3: warning: ‘PyOS_AfterFork’ is deprecated [-Wdeprecated-declarations] PyOS_AfterFork(); ^~~~~~~~~~~~~~In file included from /usr/include/python3.8/Python.h:144:0, from /usr/src/uwsgi/plugins/python/uwsgi_python.h:2, from /usr/src/uwsgi/plugins/python/python_plugin.c:1:/usr/include/python3.8/intrcheck.h:18:37: note: declared here Py_DEPRECATED(3.7) PyAPI_FUNC(void) PyOS_AfterFork(void); ^~~~~~~~~~~~~~/usr/src/uwsgi/plugins/python/python_plugin.c: In function ‘uwsgi_python_worker’:/usr/src/uwsgi/plugins/python/python_plugin.c:1957:3: warning: ‘PyOS_AfterFork’ is deprecated [-Wdeprecated-declarations] PyOS_AfterFork(); ^~~~~~~~~~~~~~In file included from /usr/include/python3.8/Python.h:144:0, from /usr/src/uwsgi/plugins/python/uwsgi_python.h:2, from /usr/src/uwsgi/plugins/python/python_plugin.c:1:/usr/include/python3.8/intrcheck.h:18:37: note: declared here Py_DEPRECATED(3.7) PyAPI_FUNC(void) PyOS_AfterFork(void); ^~~~~~~~~~~~~~build time: 6 seconds ***python38 plugin built and available in python38_plugin.so***
This downloads a file called python38_plugin.so to your current folder. We need to move this to where it belongs, and set some permissions:
$ sudo mv python38_plugin.so /usr/lib/uwsgi/plugins/python38_plugin.so
$ sudo chmod 666 /usr/lib/uwsgi/plugins/python38_plugin.so
Let's Try That Again
This time around we're going to specify --plugin python38 to specifically run uWSGI with Python 3.8. We're also going to add another flag called --virtualenv, which defines the path at which our Python libraries are installed. Kill the previous uWSGI process and give it another go:
$ pkill -9 uwsgi
$ uwsgi --http-socket :5000 --plugin python38 --module wsgi:app --virtualenv /var/www/pythonmyadmin/myenv/
Here we go...
***Python threads support is disabled. You can enable it with --enable-threads*** Python main interpreter initialized at 0x55daa18a3e40dropping root privileges after plugin initializationuWSGI running as root, you can use --uid/--gid/--chroot options***WARNING: you are running uWSGI as root !!! (use the --uid flag)*** your server socket listen backlog is limited to 100 connectionsyour mercy for graceful operations on workers is 60 secondsmapped 72768 bytes (71 KB) for 1 cores ***Operational MODE: single process*** WSGI app 0 (mountpoint='') ready in 1 seconds on interpreter 0x55daa18a3e40 pid: 28434 (default app)dropping root privileges after application loadinguWSGI running as root, you can use --uid/--gid/--chroot options***WARNING: you are running uWSGI as root !!! (use the --uid flag)*** ***uWSGI is running in multiple interpreter mode*** spawned uWSGI worker 1 (and the only) (pid: 28434, cores: 1)
This is good news! Visit your server's IP address at port 5000 and report back. Is it working? IT'S WORKING! NICE!!!
Something awesome about uWSGI is how easy it is to utilize multiple cores in our machine by specifying how many threads and processes we want to use. If your machine is equipped with multiple CPU cores, here's how easy it is to utilize them:
$ pkill -9 uwsgi
$ uwsgi --http-socket :5000 --plugin python38 --module wsgi:app --virtualenv /var/www/pythonmyadmin/myenv/ --processes 2 --threads 4
This will output each worker created as well as the cores utilized:
***uWSGI is running in multiple interpreter mode*** spawned uWSGI worker 1 (pid: 28688, cores: 2)spawned uWSGI worker 2 (pid: 28690, cores: 2)spawned uWSGI worker 3 (pid: 28691, cores: 2)spawned uWSGI worker 4 (pid: 28692, cores: 2)
Keep in mind that uWSGI processes don't get killed by simply Control+Ci ng in the terminal. Remember to kill unwanted uWSGI processes by using pkill -9 uwsgi.
Running uWSGI via Config File
We've proven that we can serve our app via the uWSGI CLI, but we want our app to persist forever behind a registered domain name. We need a way for Nginx to hook into our uWSGI process with all the flags we passed via the CLI (such as the uWSGI plugin to use, our virtual environment location, etc.). Luckily, we can save the flags/values we passed into the CLI to an .ini file with the same naming convention:
[uwsgi]
chdir = /var/www/myapp/
module = wsgi:app

processes = 4
threads = 2
plugin = python38
virtualenv = /var/www/myapp/myappenv

master = true
socket = myapp.sock
chmod-socket = 666
vacuum = true

die-on-term = true
Instead of specifying http-socket here, we set socket to myapp.sock. Nginx is going to handle our HTTP requests, but it needs a way to associate incoming requests to our running application. We handle this by creating a socket: every time we run uWSGI with this configuration, a file is created in our project directory called myapp.sock. All Nginx needs to worry about is pointing to this socket for incoming traffic.
Now we can run our app with the proper configuration efficiently:
$ uwsgi myapp.ini
That's much better. As an added bonus, the presence of die-on-term = true in our config means that our uWSGI process will end when we Control+C, for convenience's sake.
uWSGI & Nginx 4 Eva
Assuming you have Nginx installed, create a config for our app in sites-available :
$ sudo vim /etc/nginx/sites-available/myapp.conf
This might be one of the simplest Nginx configs you'll ever have to create. Listen for your domain on port 80 and forward this traffic (with parameters) to the location of the socket file we specified in myapp.ini :
server {
    listen 80;
    server_name example.com www.example.com;

    location / {
        include uwsgi_params;
        uwsgi_pass unix:///var/www/myapp/myconf.sock;
    }
}
Note the triple slashes in the uwsgi_pass URI.
Let's symlink this config to sites-enabled :
$ ln -s /etc/nginx/sites-available/myapp.conf /etc/nginx/sites-enabled/myapp.conf
Restart Nginx to take effect:
$ sudo service nginx restart
Hold up
You're one command away from exposing deploying your app to the world forever. Before you pull the trigger, take pride in the fact that you've made it here. The entire cloud computing industry has profited massively from the paradigm of "serverless" microservices because most people are not like you. Most people would rather pay fees for shared resources at the expense of performance to dodge reading a tutorial like this one. You are liberated. You are beautiful. You are Batman.
$ cd /var/www/myapp$ nohup uwsgi myapp.ini &
Go now and be free. The world is your oyster.
PS: Having run through this, setting up uWSGI suddenly doesn't seem so convoluted after all. It all seems obvious now, but in reality, it took me multiple failed starts over the course of a year to get uWSGI working. Try reading any other uWSGI tutorial and you'll quickly see why: engineers are still apparently god awful at explaining these concepts. I don't make these generalizations lightly, but hey, more traffic for me.
Rant over, tutorial over. Until next time.


Top comments (2)
Typo:
"""
Installing uwsgi-plugin-python3 is an important step that deserves some extra attention. uWSGI is traditionally a Python package, so you'd possibly expect us to run pip install uWSGI at some point. On the contrary, if we were to install uWSGI via pip, uWSGI would be a Python package belonging to whichever system default version of Python3 happens to be installed on our machine. Our project is likely going to use a version of Python other than Python 3.6.9 (The Ubuntu 18.04 default). Thus we need a version of uWSGI that transcends Python versions. This is where uwsgi-plugin-python3 comes in:
"""
this paragraph is repeated
OMG, or this is a clever way to get the "extra attention"? :mind-blown: