Skip to content

Insight and analysis of technology and business strategy

PART 4: Implementing Oracle Database Single Sign-on Using Kerberos, Active Directory, and Oracle CMU

eempty string credentials. If the application throws an error if a NULL username or password is provided, then this will present a problem. For testing, we'll use SQLPlus so this won't be an issue for this proof of concept.

Active Directory One-time Configuration Steps

In this test environment, Active Directory is the Kerberos Authentication server. And generally, Active Directory and most Windows and Linux servers (including the Oracle Linux 7.7 images used in this testbed) should have Kerberos Version 5 already installed - if not, it needs to be added.

In Kerberos, users are known as or referred to as "principals". The "service principal" is named in the format:

kservice/kinstance@REALM

For Oracle and CMU it is typically:

oracle/<DB Server FQDN>@<domain>

And therefore, for this example, the actual principal name will be:

oracle/dbserv1.ad1.cmuvnc.oraclevcn.com@STAGECOACH.NET

For the CMU setup, we could make service principals in Active Directory for each Oracle database server (typically) or one common one if preferred.

To add the necessary principal (aka "user") to Active Directory we could use the "Active Directory Users and Computers" GUI or, once again, just use a simple PowerShell command run from the Domain Controller DC1 such as:

New-ADUser `
-Name "dbserv1" `
-UserPrincipalName "dbserv1.ad1.cmuvnc.oraclevcn.com@stagecoach.net" `
-DisplayName "dbserv1.ad1.cmuvnc.oraclevcn.com" `
-Description "ServiceOracle Kerberos Service Principal." `
-Path "CN=Managed Service Accounts,DC=stagecoach,DC=net" `
-ChangePasswordAtLogon $false `
-PasswordNeverExpires $true `
-CannotChangePassword $true `
-Enabled $true `
-AccountPassword(Read-Host -AsSecureString "Initial Password:")

Again, putting the service account user in the "Managed Service Accounts" folder in Active Directory is a preference to reduce clutter - it is in no way mandatory.

And again we can do a simple PowerShell query to confirm that the user was created successfully:

dsquery user -name dbserv1

Sample output:

PS C:\Users\Administrator> dsquery user -name dbserv1
"CN=dbserv1,CN=Managed Service Accounts,DC=STAGECOACH,DC=NET"
PS C:\Users\Administrator>

Or via "Active Directory Users and Computers" if preferable:

download (2)

Before we're done with the prerequisite AD setup, we need to extract and copy the "service key table" for the Kerberos Principal we just added.

Still running commands from the Windows Domain Controller DC1, extract the service key table for Kerberos using the Windows ktpass utility. For example:

ktpass.exe -princ oracle/<DB Server FQDN>@<domain> `
-mapuser <DB Server FQDN>@<domain> `
-crypto all `
-pass * `
-out .\$Env:COMPUTERNAME.keytab

The "*" is used to prompt for the Service Principal's password instead of hard coding it in the command.

Sample output:

PS C:\Users\Administrator> ktpass.exe -princ oracle/dbserv1.ad1.cmuvnc.oraclevcn.com@STAGECOACH.NET `
>> -mapuser dbserv1.ad1.cmuvnc.oraclevcn.com `
>> -crypto all `
>> -pass * `
>> -out .\$Env:COMPUTERNAME.keytab
Targeting domain controller: DC1.STAGECOACH.NET
Successfully mapped oracle/dbserv1.ad1.cmuvnc.oraclevcn.com to dbserv1.
Type the password for oracle/dbserv1.ad1.cmuvnc.oraclevcn.com:
Type the password again to confirm:
Password successfully set!
WARNING: pType and account type do not match. This might cause problems.
Key created.
Key created.
Key created.
Key created.
Key created.
Output keytab to .\DC1.keytab:
Keytab version: 0x502
keysize 81 oracle/dbserv1.ad1.cmuvnc.oraclevcn.com@STAGECOACH.NET ptype 0 (KRB5_NT_UNKNOWN) vno 3 etype 0x1 (DES-CBC-CRC) keylength 8 (0x7f0ecde9d02397a2)
keysize 81 oracle/dbserv1.ad1.cmuvnc.oraclevcn.com@STAGECOACH.NET ptype 0 (KRB5_NT_UNKNOWN) vno 3 etype 0x3 (DES-CBC-MD5) keylength 8 (0x7f0ecde9d02397a2)
keysize 89 oracle/dbserv1.ad1.cmuvnc.oraclevcn.com@STAGECOACH.NET ptype 0 (KRB5_NT_UNKNOWN) vno 3 etype 0x17 (RC4-HMAC)
keylength 16 (0x8b2318524d2e3e2e31885afc21024cf5)
keysize 105 oracle/dbserv1.ad1.cmuvnc.oraclevcn.com@STAGECOACH.NET ptype 0 (KRB5_NT_UNKNOWN) vno 3 etype 0x12 (AES256-SHA1) keylength 32 (0x536fa1677dd224d7510d81b86d74a602ee7fc25902a7969ed3a98ac546a88cb8)
keysize 89 oracle/dbserv1.ad1.cmuvnc.oraclevcn.com@STAGECOACH.NET ptype 0 (KRB5_NT_UNKNOWN) vno 3 etype 0x11 (AES128-SHA1) keylength 16 (0x7d8600b56ca085d86e933888aea389ae)
PS C:\Users\Administrator>

Lastly, copy the exported keytable file to the Database Server (DBSERV1). For example, using scp from the Active Directory domain controller:

scp .\$Env:computername.keytab opc@10.0.1.101:/tmp/

Sample output:

PS C:\Users\Administrator> scp .\$Env:computername.keytab opc@10.0.1.101:/tmp/
DC1.keytab 100% 467 0.5KB/s 00:00
PS C:\Users\Administrator>

That should conclude the required prerequisite setup on the Active Directory domain controller. Unlike with password-authenticated CMU implementations, this time we did not need to extend the Active Directory schema, install any additional software, or reboot our domain controllers.

Database Home One-time Configuration Steps

Like with password-based authentication and directory synchronization, some one-time setup in the database and the database home is required (as the "oracle" OS user).

First, we need to ensure that a few relevant database parameters are not set:

. oraenv <<< XE

echo "
show parameter os_authent_prefix
show parameter remote_os_authent
" | sqlplus -s / as sysdba

Likely, at least OS_AUTHENT_PREFIX is set to a default value of "ops$", and, hence, needs to be adjusted. Since it is not a dynamic parameter, a database restart must be included for parameter changes to come into effect:

. oraenv <<< XE

echo "
alter system set os_authent_prefix='' scope=spfile;
alter system reset remote_os_authent;
shutdown immediate
startup
" | sqlplus -s / as sysdba

Next, the SQLNET.ORA file on the database server must be adjusted to provide the relevant Kerberos settings including where to access the copied key table file.

The SQLNET.AUTHENTICATION_KERBEROS5_SERVICE parameter refers to the ‘oracle/' part added to the server principal name when ktpass.exe was run.

The SQLNET.KERBEROS5_CONF points to a location for a configuration file while SQLNET.KERBEROS5_KEYTAB is the key table file copied from the domain controller.

Hence, the required SQLNET.ORA file updates becomes:

. oraenv <<< XE

mkdir -p ${ORACLE_HOME}/network/admin/kerberos
cp /tmp/*.keytab ${ORACLE_HOME}/network/admin/kerberos/keytab
oklist -k -t -old ${ORACLE_HOME}/network/admin/kerberos/keytab

echo "
SQLNET.KERBEROS5_KEYTAB=${ORACLE_HOME}/network/admin/kerberos/keytab
SQLNET.KERBEROS5_CONF=${ORACLE_HOME}/network/admin/kerberos/krb5.conf
SQLNET.KERBEROS5_CONF_MIT=TRUE
SQLNET.AUTHENTICATION_KERBEROS5_SERVICE=oracle
SQLNET.AUTHENTICATION_SERVICES=(BEQ,KERBEROS5)
" >> ${ORACLE_HOME}/network/admin/sqlnet.ora

Other optional and related parameters (including a backup authentication method) can be included if required - refer to the Oracle CMU documentation.

The last part of the setup is to configure the aforementioned configuration file (still using the sample domain "STAGECOACH.NET" - update as required):

cat <<EOT >> ${ORACLE_HOME}/network/admin/kerberos/krb5.conf
[libdefaults]
default_realm = STAGECOACH.NET

[realms]
STAGECOACH.NET = {
kdc = DC1.STAGECOACH.NET:88
}

[domain_realm]
.`dnsdomainname` = STAGECOACH.NET
`dnsdomainname` = STAGECOACH.NET
EOT

cat ${ORACLE_HOME}/network/admin/kerberos/krb5.conf

And when testing from the local database server, we need to ensure that SQLNET.WALLET_OVERRIDE=TRUE is not set or is commented out:

sed -i.bak '/^SQLNET.WALLET_OVERRIDE/ s/^SQLNET.WALLET_OVERRIDE/\#SQLNET.WALLET_OVERRIDE/' ${ORACLE_HOME}/network/admin/sqlnet.ora

grep SQLNET.WALLET_OVERRIDE ${ORACLE_HOME}/network/admin/sqlnet.ora

Creating Database Users to use Kerberos Authentication

Again, using the "Simon" test Active Directory user created previously, we can create an IDENTIFIED EXTERNALLY database user. For example:

echo "
alter session set container=XEPDB1;
create user \"SIMON@STAGECOACH.NET\" identified externally;
grant create session to \"SIMON@STAGECOACH.NET\";
grant select on v_\$database to \"SIMON@STAGECOACH.NET\";
" | sqlplus -s / as sysdba

IMPORTANT: When creating the user IDENTIFIED EXTERNALLY, we are not yet using CMU - EXTERNAL identification is for pre-CMU Kerberos authentication. To enable the CMU part, change to IDENTIFIED GLOBALLY AS 'distinguished_name'. This is required for CMU authentication and authorization. But to start, it's best to first implement pre-CMU Kerberos authentication, and then when that is working properly, switch into CMU Kerberos authentication and test the benefits that CMU brings via "shared schemas" and "global roles".

To perform an initial test, from the database server DBSERV1, we need to manually obtain the TGT since we did log into the server with an Active Directory session to automatically obtain the TGT. To obtain tickets manually, we can use the okinit and oklist utilities (Oracle-specific versions of standard Kerberos utilities kinit and klist) which are provided in the Oracle Home:

okinit <Active Directory User>
oklist

Sample output:

[oracle@dbserv1 ~]$ okinit simon

Kerberos Utilities for Linux: Version 18.0.0.0.0 - Production on 26-NOV-2019 18:52:34

Copyright (c) 1996, 2018 Oracle. All rights reserved.

Configuration file : /opt/oracle/product/18c/dbhomeXE/network/admin/kerberos/krb5.conf.
Password for simon@STAGECOACH.NET:
[oracle@dbserv1 ~]$ oklist

Kerberos Utilities for Linux: Version 18.0.0.0.0 - Production on 26-NOV-2019 18:52:45

Copyright (c) 1996, 2018 Oracle. All rights reserved.

Configuration file : /opt/oracle/product/18c/dbhomeXE/network/admin/kerberos/krb5.conf.
Ticket cache: FILE:/tmp/krb5cc_54321
Default principal: simon@STAGECOACH.NET

Valid starting Expires Service principal
11/26/19 18:52:39 11/27/19 04:52:39 krbtgt/STAGECOACH.NET@STAGECOACH.NET
renew until 11/27/19 18:52:34
[oracle@dbserv1 ~]$

By running those commands manually, we obtained the Kerberos TGT for the "simon@strategicdbs.com" user without logging into the OS as that user.

Of course, this is a temporary measure since we are, at this point, testing from the database server while logged in using a different OS user than the one we want to use to connect to the database. When we test from the Windows and Linux application servers, the experience should be seamless, meaning not needing to manually run these commands to obtain the required ticket.

If the okinit command fails, it may be because of a firewall or DNS resolution issue. In lieu of configuring a separate DNS environment, for testing purposes, it's easiest to simply update /etc/hosts file as the "root" user:

echo "10.0.1.100 DC1.STAGECOACH.net DC1" >> /etc/hosts

Once the TGT is obtained, we can test the full connection and authentication. In this example we provide no username and password in the connection string - instead the Oracle client is relying on the Kerberos ticket:

echo "
set heading off
select 'DB_NAME (from v\$database) : '||name,
'SESSION_USER : '||sys_context('USERENV','SESSION_USER'),
'AUTHENTICATED_IDENTITY : '||sys_context('USERENV','AUTHENTICATED_IDENTITY'),
'AUTHENTICATION_METHOD : '||sys_context('USERENV','AUTHENTICATION_METHOD'),
'AUTHENTICATION_TYPE : '||sys_context('USERENV','AUTHENTICATION_TYPE'),
'LDAP_SERVER_TYPE : '||sys_context('USERENV','LDAP_SERVER_TYPE'),
'ENTERPRISE_IDENTITY : '||sys_context('USERENV','ENTERPRISE_IDENTITY')
from v\$database;
" | sqlplus -s /@ORCL

Sample output:

[oracle@dbserv1 ~]$ echo "
> set heading off
> select 'DB_NAME (from v\$database) : '||name,
> 'SESSION_USER : '||sys_context('USERENV','SESSION_USER'),
> 'AUTHENTICATED_IDENTITY : '||sys_context('USERENV','AUTHENTICATED_IDENTITY'),
> 'AUTHENTICATION_METHOD : '||sys_context('USERENV','AUTHENTICATION_METHOD'),
> 'AUTHENTICATION_TYPE : '||sys_context('USERENV','AUTHENTICATION_TYPE'),
> 'LDAP_SERVER_TYPE : '||sys_context('USERENV','LDAP_SERVER_TYPE'),
> 'ENTERPRISE_IDENTITY : '||sys_context('USERENV','ENTERPRISE_IDENTITY')
> from v\$database;
> " | sqlplus -s /@ORCL

DB_NAME (from v$database) : XE
SESSION_USER : SIMON@STAGECOACH.NET
AUTHENTICATED_IDENTITY : simon@STAGECOACH.NET
AUTHENTICATION_METHOD : KERBEROS
AUTHENTICATION_TYPE : NETWORK
LDAP_SERVER_TYPE :
ENTERPRISE_IDENTITY : simon@STAGECOACH.NET


[oracle@dbserv1 ~]$

From the above we can see that everything worked as expected as the authentication type was "NETWORK" and the authentication method "KERBEROS". But this test was from the actual database server. A more realistic scenario requires testing from the Linux and Windows application servers.

Client Setup on Linux and Testing with a Domain User

Unfortunately, when testing with Kerberos authentication, additional Oracle client software setup is required:

  1. The Oracle Instant Client will no longer suffice - we must now do a proper Oracle Client installation though we can minimize the installed components.
  2. The client software's SQLNET.ORA file must be adjusted to include Kerberos-related parameters.
  3. A Kerberos configuration file must be created.

These are all additional setup steps required on the client software end which were not required for CMU password-based authentication.

And like with the XE database software, the full Oracle Client media requires an authenticated download and, hence, cannot be done in an elegant programmatic command. Therefore, manually download the Oracle Client software and transfer to the application servers.

On the Linux, application server, first prepare the server for the Oracle software. As "root":

# Quick shortcut: use the DB pre-install RPM as a quick method to install required dependencies:
yum install -y oracle-database-preinstall-19c

mkdir -p /u01/app/oracle/product/19.0.0/client_1
mkdir -p /u01/app/oraInventory
mkdir -p /u01/app/oracle_software
chown -R oracle:oinstall /u01
chmod -R 775 /u01

cat <<EOT >> /home/oracle/.bash_profile

# Oracle RDBMS Settings:
export ORACLE_BASE=/u01/app/oracle
export ORACLE_HOME=\${ORACLE_BASE}/product/19.0.0/client_1
export PATH=\${ORACLE_HOME}/bin:\${PATH}
EOT

Then as the "oracle" user install the full client using a customized response file for reusability (if required):

# Assumes that the client ZIP file has been installed into the current working directory:
unzip LINUX.X64_193000_client.zip -d /u01/app/oracle_software/

cp /u01/app/oracle_software/client/response/client_install.rsp ~/client_install.rsp

sed -i '/^oracle.install.client.installType/ s~oracle.install.client.installType=$~oracle.install.client.installType=Custom~' ~/client_install.rsp
sed -i '/^oracle.install.client.customComponents/ s~oracle.install.client.customComponents=$~oracle.install.client.customComponents="oracle.sqlplus:19.0.0.0.0","oracle.rdbms.oci:19.0.0.0.0","oracle.network.aso:19.0.0.0.0","oracle.network.client:19.0.0.0.0"~' ~/client_install.rsp
sed -i '/^UNIX_GROUP_NAME/ s~UNIX_GROUP_NAME=$~UNIX_GROUP_NAME=oinstall~' ~/client_install.rsp
sed -i '/^INVENTORY_LOCATION/ s~INVENTORY_LOCATION=$~INVENTORY_LOCATION=/u01/app/oraInventory~' ~/client_install.rsp
sed -i '/^ORACLE_HOME/ s~ORACLE_HOME=$~ORACLE_HOME='${ORACLE_HOME}'~' ~/client_install.rsp
sed -i '/^ORACLE_BASE/ s~ORACLE_BASE=$~ORACLE_BASE='${ORACLE_BASE}'~' ~/client_install.rsp

diff /u01/app/oracle_software/client/response/client_install.rsp ~/client_install.rsp

/u01/app/oracle_software/client/runInstaller -silent -waitforcompletion -responseFile ~/client_install.rsp

Once the client installation is complete, run the required root script as "root":

/u01/app/oraInventory/orainstRoot.sh

Reverting back to the "oracle" user, again the required Kerberos parameters must be added to the SQLNET.ORA file:

mkdir -p ${ORACLE_HOME}/network/admin/kerberos

echo "
SQLNET.KERBEROS5_CONF=${ORACLE_HOME}/network/admin/kerberos/krb5.conf
SQLNET.KERBEROS5_CONF_MIT=TRUE
SQLNET.AUTHENTICATION_SERVICES=(BEQ,KERBEROS5)
" >> ${ORACLE_HOME}/network/admin/sqlnet.ora

cat ${ORACLE_HOME}/network/admin/sqlnet.ora

And of course the Kerberos configuration file must be created:

cat <<EOT >> ${ORACLE_HOME}/network/admin/kerberos/krb5.conf
[libdefaults]
default_realm = STAGECOACH.NET

[realms]
STAGECOACH.NET = {
kdc = DC1.STAGECOACH.NET:88
}

[domain_realm]
.`dnsdomainname` = STAGECOACH.NET
`dnsdomainname` = STAGECOACH.NET
EOT

cat ${ORACLE_HOME}/network/admin/kerberos/krb5.conf

That should be all of the required Linux Client setup completed. And this point, we can test using the Active Directory "Simon" user.

From any machine, log into the Linux Application server as the test AD domain user. For example:

ssh "simon@stagecoach.net"@10.0.1.102

To truly achieve single sign-on, we don't want to have to manually run additional commands such as okinit used earlier. Instead we want to simply log into the OS and that's all. Consequently, it is essential to validate that we have a Kerberos ticket stored in a FILE credential cache that the Oracle Client software can use using the Linux klist command. We can easily confirm by just running the Linux klist command.

Example output:

[simon@STAGECOACH.NET@applinux1 ~]$ klist
Ticket cache: FILE:/tmp/krb5cc_747601111
Default principal: simon@STAGECOACH.NET

Valid starting Expires Service principal
11/27/2019 01:09:41 11/27/2019 11:09:41 krbtgt/STAGECOACH.NET@STAGECOACH.NET
renew until 12/04/2019 01:09:41
[simon@STAGECOACH.NET@applinux1 ~]$

If the output from klist shows "KEYRING", we need to adjust /etc/krb5.conf and restart the sssd service as per the steps described in Part 2 of this article series.

To use SQLPlus for an actual connection test, we might need to manually set our ORACLE_HOME variable and adjust our PATH variable for the test user since we never configured .bash_profile or any other environment configuration files:

export ORACLE_HOME=/u01/app/oracle/product/19.0.0/client_1
export PATH=${ORACLE_HOME}/bin:${PATH}

Then we can perform a simple test:

echo "show user" | sqlplus -s -L /@dbserv1.ad1.cmuvnc.oraclevcn.com:1521/XEPDB1

And the connection should succeed. For example:

[simon@STAGECOACH.NET@applinux1 ~]$ echo "show user" | sqlplus -s -L /@dbserv1.ad1.cmuvnc.oraclevcn.com:1521/XEPDB1
USER is "SIMON@STAGECOACH.NET"
[simon@STAGECOACH.NET@applinux1 ~]$

Going a step further with a more elaborate test showing additional connection property details:

echo "
set heading off
select 'DB_NAME (from v\$database) : '||name,
'SESSION_USER : '||sys_context('USERENV','SESSION_USER'),
'AUTHENTICATED_IDENTITY : '||sys_context('USERENV','AUTHENTICATED_IDENTITY'),
'AUTHENTICATION_METHOD : '||sys_context('USERENV','AUTHENTICATION_METHOD'),
'AUTHENTICATION_TYPE : '||sys_context('USERENV','AUTHENTICATION_TYPE'),
'LDAP_SERVER_TYPE : '||sys_context('USERENV','LDAP_SERVER_TYPE'),
'ENTERPRISE_IDENTITY : '||sys_context('USERENV','ENTERPRISE_IDENTITY')
from v\$database;
" | sqlplus -s -L /@//dbserv1.ad1.cmuvnc.oraclevcn.com:1521/XEPDB1

Sample output:

[simon@STAGECOACH.NET@applinux1 ~]$ echo "
> set heading off
> select 'DB_NAME (from v\$database) : '||name,
> 'SESSION_USER : '||sys_context('USERENV','SESSION_USER'),
> 'AUTHENTICATED_IDENTITY : '||sys_context('USERENV','AUTHENTICATED_IDENTITY'),
> 'AUTHENTICATION_METHOD : '||sys_context('USERENV','AUTHENTICATION_METHOD'),
> 'AUTHENTICATION_TYPE : '||sys_context('USERENV','AUTHENTICATION_TYPE'),
> 'LDAP_SERVER_TYPE : '||sys_context('USERENV','LDAP_SERVER_TYPE'),
> 'ENTERPRISE_IDENTITY : '||sys_context('USERENV','ENTERPRISE_IDENTITY')
> from v\$database;
> " | sqlplus -s -L /@//dbserv1.ad1.cmuvnc.oraclevcn.com:1521/XEPDB1

DB_NAME (from v$database) : XE
SESSION_USER : SIMON@STAGECOACH.NET
AUTHENTICATED_IDENTITY : simon@STAGECOACH.NET
AUTHENTICATION_METHOD : KERBEROS
AUTHENTICATION_TYPE : NETWORK
LDAP_SERVER_TYPE :
ENTERPRISE_IDENTITY : simon@STAGECOACH.NET


[simon@STAGECOACH.NET@applinux1 ~]$

Client Setup on Windows and Testing with a Domain User

Similarly, on the Windows application server APPWIN1, the Oracle Instant Client will no longer suffice and we must instead install the full Oracle Client. Assuming that the required media has been manually downloaded and transferred to the APPWIN1 server, it can be installed from a PowerShell window (logged in as the Administrator user) using commands such as:

# Assumes that the client ZIP file has been installed into the current working directory:
expand-archive -path '.\WINDOWS.X64_193000_client.zip' -destinationpath $Env:TEMP

cp $Env:TEMP\client\response\client_install.rsp $HOME\Desktop\client_install.txt

cat $HOME\Desktop\client_install.txt | %{$_ -replace "oracle.install.client.installType=$","oracle.install.client.installType=Custom"} > $HOME\Desktop\client_install.tmp
mv -force $HOME\Desktop\client_install.tmp $HOME\Desktop\client_install.txt

cat $HOME\Desktop\client_install.txt | %{$_ -replace "oracle.install.client.customComponents=$","oracle.install.client.customComponents=oracle.sqlplus:19.0.0.0.0,oracle.rdbms.oci:19.0.0.0.0,oracle.network.aso:19.0.0.0.0,oracle.network.client:19.0.0.0.0"} > $HOME\Desktop\client_install.tmp
mv -force $HOME\Desktop\client_install.tmp $HOME\Desktop\client_install.txt

cat $HOME\Desktop\client_install.txt | %{$_ -replace "ORACLE_HOME=$","ORACLE_HOME=C:\Oracle\product\19.0.0\client_1"} > $HOME\Desktop\client_install.tmp
mv -force $HOME\Desktop\client_install.tmp $HOME\Desktop\client_install.txt

cat $HOME\Desktop\client_install.txt | %{$_ -replace "ORACLE_BASE=$","ORACLE_BASE=C:\Oracle"} > $HOME\Desktop\client_install.tmp
mv -force $HOME\Desktop\client_install.tmp $HOME\Desktop\client_install.txt

cat $HOME\Desktop\client_install.txt | %{$_ -replace "oracle.install.IsBuiltInAccount=$","oracle.install.IsBuiltInAccount=true"} > $HOME\Desktop\client_install.tmp
mv -force $HOME\Desktop\client_install.tmp $HOME\Desktop\client_install.txt

Get-Content .\client_install.txt | out-file -encoding ASCII .\client_install.rsp
diff (cat $Env:TEMP\client\response\client_install.rsp) (cat $HOME\Desktop\client_install.rsp)

# Run installer using response file:
& "$Env:TEMP\client\setup.exe" -silent -waitforcompletion -responseFile $HOME\Desktop\client_install.rsp

After installation completes, add the necessary Kerberos parameters to the SQLNET.ORA file:

$ORACLE_HOME="C:\Oracle\product\19.0.0\client_1"
mkdir "$ORACLE_HOME\network\admin\kerberos"

echo @"
SQLNET.KERBEROS5_CC_NAME=MSLSA:
SQLNET.KERBEROS5_CONF=$ORACLE_HOME\network\admin\kerberos\krb5.conf
SQLNET.KERBEROS5_CONF_MIT=TRUE
SQLNET.AUTHENTICATION_SERVICES=(BEQ,KERBEROS5)
"@ | Add-Content "$ORACLE_HOME\network\admin\sqlnet.ora" -Encoding ASCII

cat "$ORACLE_HOME\network\admin\sqlnet.ora"

IMPORTANT: Note that the trailing ":" after the word MSLSA is required and is sometimes missing from Oracle documentation.

Then build the required Kerberos configuration file (note the hardcoded environment-specific values in the command - adjust as required):

echo @"
[libdefaults]
default_realm = STAGECOACH.NET

[realms]
STAGECOACH.NET = {
kdc = DC1.STAGECOACH.NET:88
}

[domain_realm]
.ad1.cmuvnc.oraclevcn.com = STAGECOACH.NET
ad1.cmuvnc.oraclevcn.com = STAGECOACH.NET
"@ | Out-File "$ORACLE_HOME\network\admin\kerberos\krb5.conf" -Encoding ASCII

cat $ORACLE_HOME\network\admin\kerberos\krb5.conf

At this point, log out and back into the APPWIN1 server as the test user. In this case, logging into the APPWIN1 server as STAGECOACH\simon.

Then on a new PowerShell window and try connecting using a simple test command:

echo "show user" | sqlplus -s -L /@dbserv1.ad1.cmuvnc.oraclevcn.com:1521/XEPDB1

At this point, you might be presented with a common error:

PS C:\Users\Simon> echo "show user" | sqlplus -s -L /@dbserv1.ad1.cmuvnc.oraclevcn.com:1521/XEPDB1
ERROR:
ORA-12638: Credential retrieval failed


SP2-0751: Unable to connect to Oracle. Exiting SQL*Plus
PS C:\Users\Simon>

ORA-12638 is a non-specific "catch-all" error message. For troubleshooting and tracing Kerberos connection problems see: Kerberos Troubleshooting Guide (Doc ID 185897.1)

In this case, the error is due to an Oracle bug related to the Kerberos ticket being issued with the "forwardable" flag enabled as evident by running oklist with the -f argument:

PS C:\Users\Simon> oklist -f

Kerberos Utilities for 64-bit Windows: Version 19.0.0.0.0 - Production on 26-NOV-2019 23:51:54

Copyright (c) 1996, 2019 Oracle. All rights reserved.

Configuration file : C:\Oracle\product\19.0.0\client_1\network\admin\kerberos\krb5.conf.
Ticket cache: MSLSA:
Default principal: simon@STAGECOACH.NET

Valid starting Expires Service principal
11/26/19 23:42:51 11/27/19 09:42:38 oracle/dbserv1.ad1.cmuvnc.oraclevcn.com@STAGECOACH.NET
renew until 12/03/19 23:42:38, Flags: FRA
11/26/19 23:42:38 11/27/19 09:42:38 LDAP/DC1.STAGECOACH.NET/STAGECOACH.NET@STAGECOACH.NET
renew until 12/03/19 23:42:38, Flags: FRAO
PS C:\Users\Simon>

Notice: "Flags: FRA".

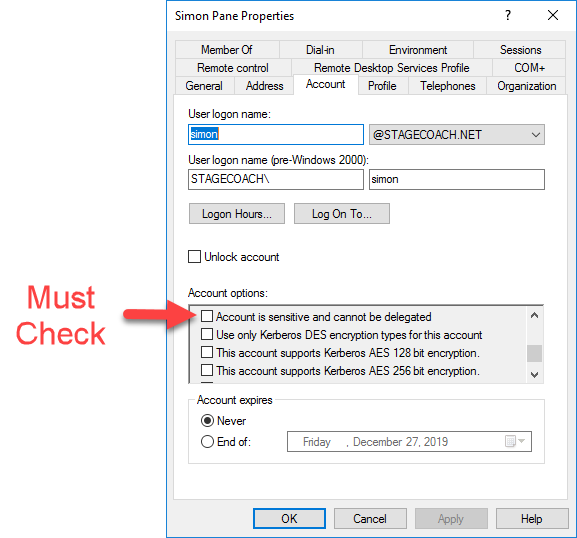
This can be resolved by logging in as the domain Administrator on the Active Directory domain controller DC1. If adjusting using the GUI utility "Active Directory Users and Computers", check the "Account is sensitive and cannot be delegated" checkbox - it is unchecked by default:

Active Directory Users Simon Pane

Or use a PowerShell window and the following commands to verify the setting and adjust it:

# Check setting - default value is "False":
Get-ADUser -Identity <Domain User> -Properties AccountNotDelegated

# Adjust setting:
Set-ADAccountControl -AccountNotDelegated $True -Identity <Domain User>

# Validate that the change was made:
Get-ADUser -Identity <Domain User> -Properties AccountNotDelegated

Sample output:

PS C:\Users\Administrator> Get-ADUser -Identity simon -Properties AccountNotDelegated


AccountNotDelegated : False
DistinguishedName : CN=Simon Pane,CN=Users,DC=STAGECOACH,DC=NET
Enabled : True
GivenName : Simon
Name : Simon Pane
ObjectClass : user
ObjectGUID : 7d925663-3d81-46be-be78-95618550f2dc
SamAccountName : simon
SID : S-1-5-21-4278349699-2454951225-2679278977-1113
Surname : Pane
UserPrincipalName : simon@STAGECOACH.NET


PS C:\Users\Administrator> Set-ADAccountControl -AccountNotDelegated $True -Identity simon
PS C:\Users\Administrator>
PS C:\Users\Administrator> Get-ADUser -Identity simon -Properties AccountNotDelegated


AccountNotDelegated : True
DistinguishedName : CN=Simon Pane,CN=Users,DC=STAGECOACH,DC=NET
Enabled : True
GivenName : Simon
Name : Simon Pane
ObjectClass : user
ObjectGUID : 7d925663-3d81-46be-be78-95618550f2dc
SamAccountName : simon
SID : S-1-5-21-4278349699-2454951225-2679278977-1113
Surname : Pane
UserPrincipalName : simon@STAGECOACH.NET


PS C:\Users\Administrator>

Credit for identifying and resolving this specific issue goes to: https://www.spotonoracle.com/?p=451 . For additional details on this option and the meaning and implications see: https://blogs.technet.microsoft.com/poshchap/2015/05/01/security-focus-analysing-account-is-sensitive-and-cannot-be-delegated-for-privileged-accounts/

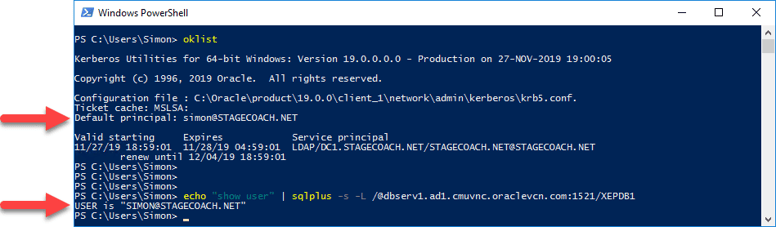
After logging out and back in again (still as the STAGECOACH\simon domain user), the "FRA" flag should no longer be present:

PS C:\Users\Simon> oklist -f

Kerberos Utilities for 64-bit Windows: Version 19.0.0.0.0 - Production on 26-NOV-2019 23:54:11

Copyright (c) 1996, 2019 Oracle. All rights reserved.

Configuration file : C:\Oracle\product\19.0.0\client_1\network\admin\kerberos\krb5.conf.
Ticket cache: MSLSA:
Default principal: simon@STAGECOACH.NET

Valid starting Expires Service principal
11/26/19 23:54:00 11/27/19 09:54:00 LDAP/DC1.STAGECOACH.NET/STAGECOACH.NET@STAGECOACH.NET
renew until 12/03/19 23:54:00, Flags: RAO
PS C:\Users\Simon>

Though, notice that the ticket cache is MSLSA: meaning we can connect using the Kerberos ticket cached automatically by Windows without having to manually obtain (which is exactly what we want).

At the point, the connection can be re-tested and should work:

echo "show user" | sqlplus -s -L /@dbserv1.ad1.cmuvnc.oraclevcn.com:1521/XEPDB1

Sample output:

PS C:\Users\Simon> echo "show user" | sqlplus -s -L /@dbserv1.ad1.cmuvnc.oraclevcn.com:1521/XEPDB1
USER is "SIMON@STAGECOACH.NET"
PS C:\Users\Simon>

If you're still receiving the ORA-12638 error it may be due to username case sensitivity. The authenticated identity and the Kerberos ticket must match exactly, meaning that logging into Windows as STAGECOACH\Simon and STAGECOACH\SIMON might fail while logging in a STAGECOACH\simon works.

To validate the case details of the Active Directory domain user, from the Domain Controller DC1 either validate in the "Active Directory Users and Computers":
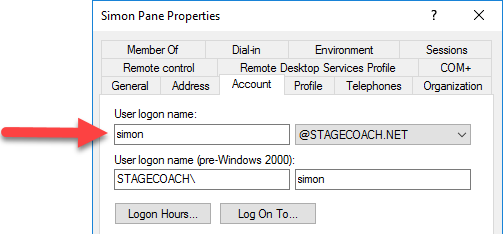
Active Directory Users 1

Or from PowerShell:

Power Shell 01

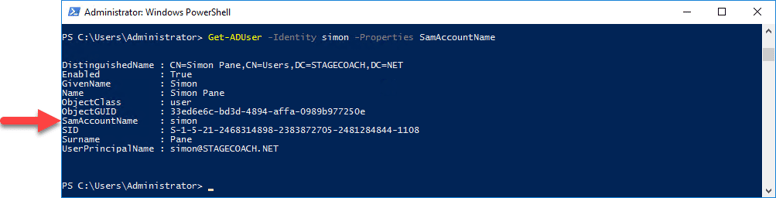
After logging in to the APPWIN1 server using the proper case username, the connection test should succeed. The TGT (and username case) can be validated using the Oracle provided oklist utility:

Power Shell 02

Notice it's only the database that reports the user in all upper case as it was created that way.

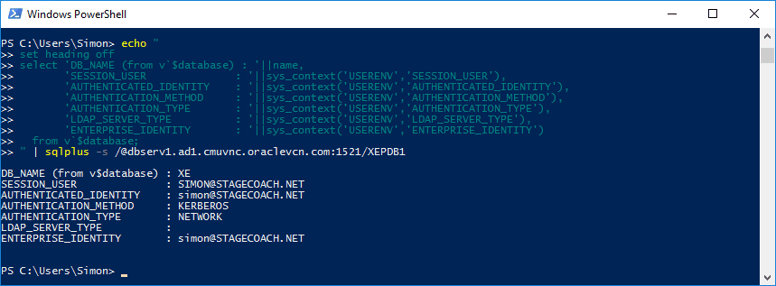
Repeating with the more elaborate options to show additional connection properties:

echo "
set heading off
select 'DB_NAME (from v`$database) : '||name,
'SESSION_USER : '||sys_context('USERENV','SESSION_USER'),
'AUTHENTICATED_IDENTITY : '||sys_context('USERENV','AUTHENTICATED_IDENTITY'),
'AUTHENTICATION_METHOD : '||sys_context('USERENV','AUTHENTICATION_METHOD'),
'AUTHENTICATION_TYPE : '||sys_context('USERENV','AUTHENTICATION_TYPE'),
'LDAP_SERVER_TYPE : '||sys_context('USERENV','LDAP_SERVER_TYPE'),
'ENTERPRISE_IDENTITY : '||sys_context('USERENV','ENTERPRISE_IDENTITY')
from v`$database;
" | sqlplus -s /@dbserv1.ad1.cmuvnc.oraclevcn.com:1521/XEPDB1

Sample output:

Power Shell 03

Next Steps

Now that CMU is configured for Kerberos-based authentication, more advanced mappings can be tested:

  • Authentication via Active Directory security groups and Oracle database "shared schemas".
  • Authorization via database "global roles" mapping to AD security groups.

If you’ve enjoyed this deep dive, you may be interested in learning about the benefits of CMU to discover whether this simplified user management is right for you and your business

Top Categories

  • There are no suggestions because the search field is empty.

Tell us how we can help!

dba-cloud-services
Upcoming-Events-banner