


Yet another tutorial for developers. This is the complete guide to setup Kubernetes for development for anyone, who wants to get started with Docker and Kubernetes.
Article Contents
The Complete Guide to Setup Kubernetes for Development
Since I own a MacBook Pro and use it for my development, so the guide is for MacOS specifically. However, you can find similar commands for Windows and Linux as I mentioned in each step.
1. Pre-requisites
First thing first, make sure you have following tools:
2. Install kubectl
This is the CLI for Kubernetes, you use it to manage Kubernetes clusters. On Mac, issue following command:
$ brew install kubectlIt then will install the latest version of kubectl and register into PATH environment variable. Verify it by this:
$ kubectl version
Client Version: version.Info{Major:"1", Minor:"17", GitVersion:"v1.17.3", GitCommit:"06ad960bfd03b39c8310aaf92d1e7c12ce618213", GitTreeState:"clean", BuildDate:"2020-02-13T18:06:54Z", GoVersion:"go1.13.8", Compiler:"gc", Platform:"darwin/amd64"}
Server Version: version.Info{Major:"1", Minor:"15", GitVersion:"v1.15.5", GitCommit:"20c265fef0741dd71a66480e35bd69f18351daea", GitTreeState:"clean", BuildDate:"2019-10-15T19:07:57Z", GoVersion:"go1.12.10", Compiler:"gc", Platform:"linux/amd64"}
Make sure to have Docker started and be running.
3. (Optional) Install minikube
minikube is an utility to setup a virtual machine (VM) on your computer, and help you interact with it. It’s good for local development. However, this is very optional if you have installed Docker for Mac or Docker for Windows, which provides virtual cluster directly using your OS environment.
Also, if you’re new to Kubernetes, and a lot of Kubernets tutorials and guides (even the official Kubernetes guide) use minikube, you want to follow them, then minikube is a good one to start with.
On command line, type following command:
$ brew install minikubeVerify it by:
$ minikube version
minikube version: v1.7.3
commit: 436667c819c324e35d7e839f8116b968a2d0a3ff
If you want to use minikube for local cluster, then issue following command to setup your cluster.
$ minikube start
It will then install and config a local cluster, and you can manage it via kubectl.
?  minikube v1.7.3 on Darwin 10.14.6
✨  Automatically selected the hyperkit driver
?  Downloading driver docker-machine-driver-hyperkit:
    > docker-machine-driver-hyperkit.sha256: 65 B / 65 B [---] 100.00% ? p/s 0s
    > docker-machine-driver-hyperkit: 10.88 MiB / 10.88 MiB  100.00% 13.49 MiB
?  The 'hyperkit' driver requires elevated permissions. The following commands will be executed:

    $ sudo chown root:wheel /Users/petehouston/.minikube/bin/docker-machine-driver-hyperkit
    $ sudo chmod u+s /Users/petehouston/.minikube/bin/docker-machine-driver-hyperkit

Password:
?  Downloading VM boot image ...
    > minikube-v1.7.3.iso.sha256: 65 B / 65 B [--------------] 100.00% ? p/s 0s
    > minikube-v1.7.3.iso: 167.39 MiB / 167.39 MiB [-] 100.00% 27.88 MiB p/s 6s
?  Creating hyperkit VM (CPUs=2, Memory=2000MB, Disk=20000MB) ...
?  Preparing Kubernetes v1.17.3 on Docker 19.03.6 ...
?  Downloading kubeadm v1.17.3
?  Downloading kubelet v1.17.3
?  Downloading kubectl v1.17.3
?  Launching Kubernetes ...
?  Enabling addons: default-storageclass, storage-provisioner
⌛  Waiting for cluster to come online ...
?  Done! kubectl is now configured to use "minikube"
4. Verify installation
First is to make sure kubectl can connect to local cluster, which can be either docker-desktop or minikube.
$ kubectl cluster-info
Kubernetes master is running at https://kubernetes.docker.internal:6443
KubeDNS is running at https://kubernetes.docker.internal:6443/api/v1/namespaces/kube-system/services/kube-dns:dns/proxy

To further debug and diagnose cluster problems, use 'kubectl cluster-info dump'.
If it shows something similar like above, then it works.
5. (Optional) Integrate into shell and iTerm
There are so much commands and flags to remember, along with various names of pods, services, statefulset… so make your shell smarter by reducing unnecessary typing will improve a lot of productivity.
I personally use zsh through oh-my-zsh, so following instructions is for oh-my-zsh only. Additionally, on Mac, iTerm has become the defactor terminal for developers, so yeah, integrate with it, too.
5.1. Add plugins
To have completion via zsh, you need to add docker, kubernetes plugin to the plugin list by adding it in .zshrc file, which can be located at ~/.zshrc.
plugins=(git git-flow docker kubectl)5.2. Aliases
Typing kubectl or minikube all the time seems unnecessary, make aliases to reduce typing.
alias k=kubectl
alias m=minikube
5.3. Setup kubectx and kubens
These are too popular utilities to help switching context quickly without typing the full kubectl commands.
Install it via:
$ brew install kubectxNow you can just type, kubectx or kubens you can quickly switch contexts and namespaces.
5.4. Show current Kubernetes context on iTerm status bar.
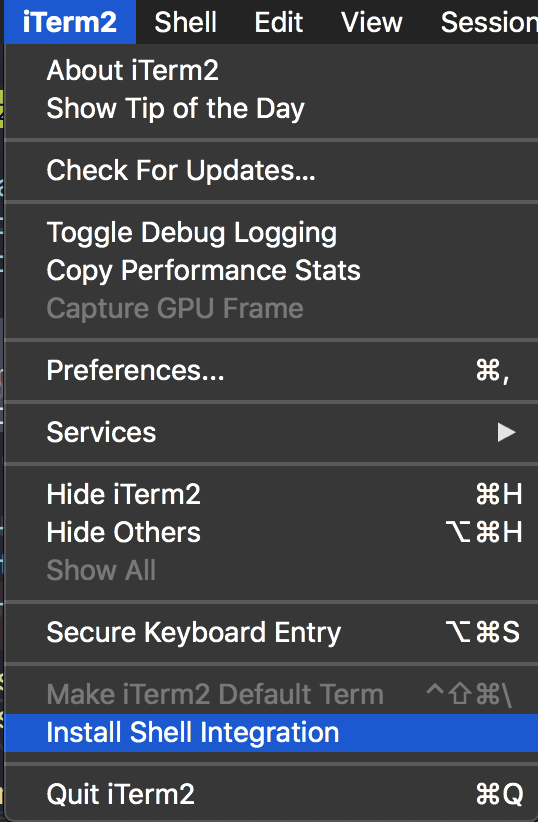
Status bar is a new feature on iTerm 3.3+. It can display useful information per need like RAM, CPU usage, Date/Time, … or whatever you want by providing a script. In this case, I want to display current Kubernetes context. So, first start by adding following part into .zshrc.
test -e "${HOME}/.iterm2_shell_integration.zsh" && source "${HOME}/.iterm2_shell_integration.zsh"
iterm2_print_user_vars() {
    iterm2_set_user_var kubecontext $(kubectl config current-context)
}
On iTerm, select menu iTerm, then select Install Shell Integration.
Restart iTerm again, you will see the current Kubernetes context display on iTerm status bar and it will update whenever you switch to different contexts.

Conclusion
Well, basically, up to this point everything is setup nicely. Even though this complete guide to setup Kubernetes for Development on Mac environment, it should work similar for Windows and Linux.
This is based on m personal setup, you can customize your own.


