
Hello 💁♂️, this is my second post on this platform and my first post written in english. Excuse me if I make mistakes with the language

⚠️ Warning: this post have many gifs⚠️
Today We´re going to do it a Typescript Twitter Bot that retweet tweets that contains the hastag #100DaysOfCode. 100DaysOfCode it´s a coding challenge. It has two main rules: Code minimum an hour every day for the next 100 days and tweet your progress every day with the #100DaysOfCode hashtag. You can visit his website for more information: 100DaysOfCode
Before start, we need 3️⃣ important things:
Nodejs and yarn: to download click here Node and install it. Then, install yarn: npm i yarn. For more informationl, click here Yarn.
Your favourite code editor. My favourite and my recommendation is Visual Studio Code. You can download it here: VsCode
Twitter Developer Account. First, you must have a working twitter acount. Now go to Twitter Developers. In my case, I am going to use my personal account

You have to click on apply for a developer account and select "Making a bot". Then, complete with your personal data. In the next step, you have to explain in english how you plan to use Twitter data and/or API. It´s easy. With respect to the following options, select these like the picture:
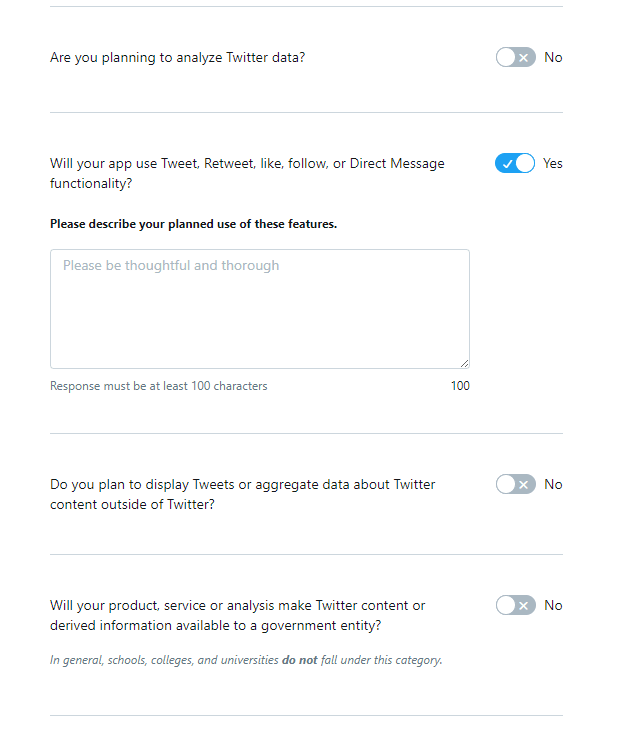

In this area, explain what are you going to rt, mg or whatever you want. Read (or not🙄, as you prefer🤣) and accept the conditions. Next, you have to confirm your email.
⚠️ WARNING: look at the spam folder❗️❗️❗️⚠️
AND...... YES!!!! 🤗🤗🤗
At this moment, We have a development account

At this moment, we have to create an app. Write your personal information in the fields. When you finish, you have to see a screen like this. If not, but you have created the app succesfully, click in your profile name and go to apps.

Click on details and go to Keys and tokens. Take a txt 📝 and copy Api key, Api secret key, access token and access token secret. We will use it later.
When you finish these steps, Congratulations We configure our developer twitter account.

We are going to start with the main reason for this post: creating a twitter bot. In this case, we are going to use a node/typescript starter that one friend did it some days ago: Node/Typescript starter and her post about the starter: Post Starter
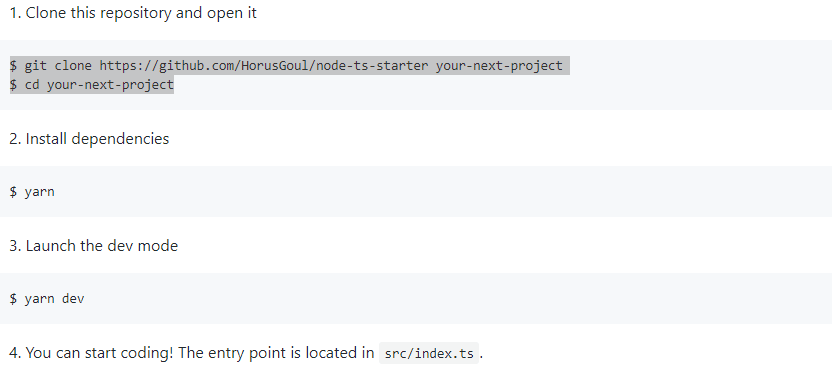
Assuming we have git installed (if not Install Git), we are going to follow the steps that appears in the readme of my friend post.
Open the project in your IDE and you have to see something like this:

We are going to create two files in src folder: bot.ts and config.ts. You can delete index.ts. When you created it, select the file who is named package.json. In this file, node administrate our dependencies. You have to change it and it should be like this (your name, license and personal data can be changed):

We are lucky because things like babel o eslint are preconfigured by Horus, the creator of the starter.
The next step consist on modify the file config.ts. In this file, we have to put our Twitter developers keys that we saved some minutes ago. This keys are the "passwords" for the Twitter API and without them, it´s impossible to make a Twitter bot. The config.ts should be as follows:
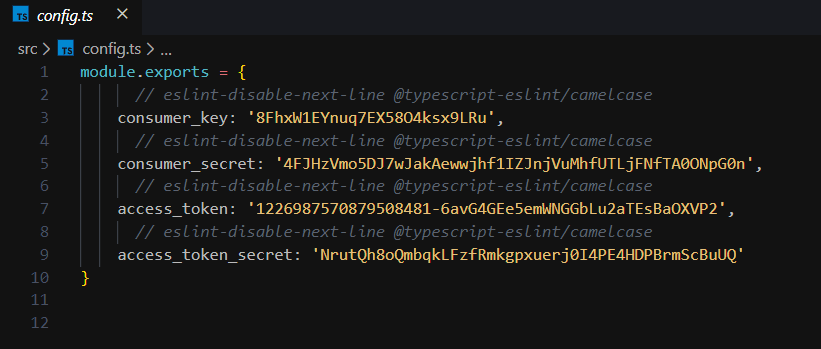
Maybe you are at home or in a café and you are asking yourself what is the commented lines, and it´s normal.

This is because EsLint is a static code analysis tool for identyfing problematic patterns and warnings in Javascript code. Basically, ESLint ask us to use camel case, but for Twitter API, these names have to be like that.
For the next steps, I recommend you to enable terminal inside VsCode.
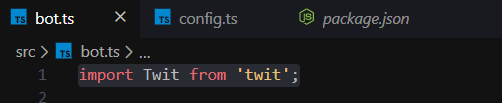
The First and the more important step, we have to import a twitter package for nodejs. His name is Twit and you must install like that:
yarn add twit
When you import install and code the import in bot.ts, will be appear a type error. We have to install the types module for twit:
yarn add @types/twit
Next, we have to create a new instance of twit. In this case, his name are going to be twitter and it´s required to import the config.ts
const Twitter = new twit(require('./config'));
We are going to create an object named twitterOptions, for example. In this object, we have to indicate to twitter some parameters that are essential. Again, add a comment line to skip EsLint. This object is Twit.Params type:
const twitterOptions: twit.Params = {
  q: '#100DaysOfCode',
  count: 100,
  // eslint-disable-next-line @typescript-eslint/camelcase
  result_type: 'recent',
};
The parameter "q" indicate the hastag we want to retweet. You can change it for another hastag.
If you want to know more about these parameters, click here: Parameters Twitter API

Create an arrow function with a name, in my case, retweetLatest.
Inside this function, we are going to make a Get request. This request GET any of the REST API endpoints. There are three parameters.
T.get(path, [params], callback).
path is the endpoint to hit, params (Optional) parameters for the request and callback: function (err, data, response) data is the parsed data received from Twitter and response is the message received from Twitter.
Twitter.get('search/tweets', twitterOptions, (error: Error, data: any) => {});
Inside, we are to put an if structure to discrminate if there is an error or not:
if (!error) {
} else {
console.log('There was an error with your hashtag search:', error);
}
Inside the if , we have to pick the id of the tweet we picked.
With the id saved in a const, we are going to make a post request. Same usage as Twitter.post(
    'statuses/retweet/' + retweetId,
    {},
    (error: Error, response:Response) => {

    },
);
Import the Response type in the Twit initial import as you can see in the picture:

To finish the retweet bot, you have to put two if structures discriminating by response and error and bot.ts is like that:

To finish, call the function and add one setInterval to call the same function every so often:
retweetLatest();
setInterval(retweetLatest, 1000 * 20);
To run the bot, put this command in the terminal:
yarn dev
When you run this command in your terminal, see your Bot account in Twitter. You have to see a retweet (if there are any) in your feed.

First, thanks you for reading this post. Comment if you liked it 😁, or if not😢.
To say goodbye, I put my repo of this bot on github. The repo of the starter that we use in this tutorial and last but not least, FOLLOW ME ON TWITTER Alvaro Torres Carrasco


Top comments (2)
I understood everything. Great post. Keep it up!
Thanks it works well on my local machine. Any tips on where can I deploy this?