Written by Daniel Phiri✏️
One of the best things about Vue.js is the relative simplicity it brings to modern web development. With Vue, building Single Page Applications (SPAs) has never been easier.
JavaScript frameworks like Vue come with component-based design patterns.
Whole web applications are just a collection of individual pieces (components) sharing data. The bigger the application gets, the harder it is for data to remain consistent and managable in each individual component.
This data is commonly referred to as application state.
For Vue.js, Vuex is the most widely used state management library. Today we’ll go into adding and integrating Vuex into Vue.js applications.
Not only does Vuex work as a central store for your application state, but it also sets rules to ensure data is changed in a way that is expected.
Vuex ensures your views remain consistent with your application data. Don’t worry if this doesn’t make sense now — it’ll all come together as we go on and build something.
As a semi-regular conference and event-goer, I tend to meet people and agree to do certain things in the future that I frequently forget about when the times comes. So we’re going to build something literally no one else but me will use — a reminder (or a glorified to-do list) app.

Before we dive into it, here’s a few things you’ll need:
- Basic knowledge of Vue.js
- Node.js and Yarn installed
We’ve already covered what Vuex does and why it’s important.
Now we need to set up our project. Open your terminal and type vue create <project-name>.
To do so, you’d need the Vue CLI installed.
If you don’t have that installed, you can get it here.
Select the default project setup. Once everything is done and we have our project initialized, run cd <project-name> and yarn serve.
You should see your usual Vue starter page.

After getting this running, we need to add Vuex to our project.
In your terminal, type vue add vuex. After that, you should see your directory structure change quite a bit.
As with most state management tools, Vuex has a central store/single state tree to store application state.
Ours is in the src folder. You’ll get a store.js file or a store folder with an index.js file. If not, you can create them and paste in the following code:
import Vue from 'vue'
import Vuex from 'vuex'
Vue.use(Vuex)
export default new Vuex.Store({
  state: {
  },
  mutations: {
  },
  actions: {
  }
})
You will also see a change in src/main.js as we import the store. If not, paste in the following code:
import Vue from 'vue'
import App from './App.vue'
import store from './store'
Vue.config.productionTip = false
new Vue({
  store,
  render: h => h(App)
}).$mount('#app')
At this point, looking at your store, you’re probably wondering what all the sections are for. We’ll briefly go over them before we dive deeper into our project.
State : Application state is the data your application uses.
Mutations : Synchronous method of changing store state and directly commit to change state.
Actions : Commit mutations and give way for for asynchronous operations.
Bonus
Getters : Computed properties derived from store state.
We’ve just added Vuex to our project — now we have to test it.
We’ll start by defining some data for our store.
In your store, you’ll define a new data property called username by pasting username: "danielphiri" into the state portion of your store.
We want to make this show on our webpage, HelloWorld.vue. Clear the <template> tag and paste in the following:
<template>
  <div>
    <h1> {{ username }} </h1>
  </div>
</template>
In the <script> section of the same file, we need to add import mapState from 'vuex' and paste in the following:
computed: {
    ...mapState(["username"])
  }
We should then see the value we kept in our store displayed on the screen.
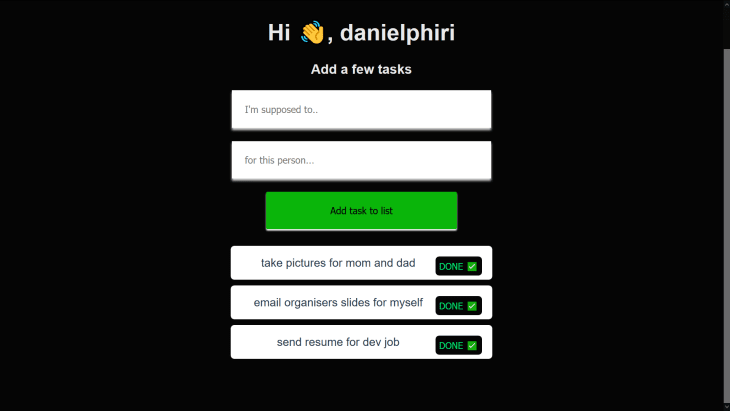
Now we’re getting into the core of the reminder app we want to build. We will need to be able to input task details, as well as details about who we need to perform each task for.
We should also be able to dismiss all tasks or individual tasks.
We need to conceptualize a data model for the state so we know what data we’re using up in the HTML portion of our application. In your store, paste the following code:
state: {
    username: "danielphiri",
    tasks: [
      { taskName: "take pictures", taskReciever: "mom and dad" },
      { taskName: "email organisers slides", taskReciever: "myself" },
      { taskName: "send resume", taskReciever: "dev job" },
    ]
  },
  mutations: {
    ADD_TASK: (state, task) => {

      state.tasks.push(task);
    },
    REMOVE_TASK: (state, task) => {
      state.tasks.splice(task, 1);
    },
  actions: {
    removeTask: (context, task) => {
      context.commit("REMOVE_TASK", task);
    },
  }
In our state, we define a username and an array that holds our tasks and related data.
We define two mutations: ADD_TASK , which changes the state by adding a task to the tasks array, and REMOVE_TASK, which removes a task from the tasks array.
Lastly, we define an action: removeTask gives us the option to remove tasks asynchronously with some custom logic.
You will notice the context object as the first argument in removeTask. Actions in Vuex use context, which gives them access to store properties and methods like context.commit(), which is used to commit a mutation.
To get started, we’ll create a component that allows us to input tasks and display them, as well as remove them.
Let’s call this Main.vue. We’ll paste the following code in the <script> section:
Don’t forget to add your
Maincomponent to yourApp.vuefile.
<script>
import { mapState, mapMutations, mapActions } from "vuex";
export default {
  name: "Main",
  data() {
    return {
      taskName: "",
      taskReciever: "",
    };
  },
  computed: {
    ...mapState(["tasks", "username"])
  },
  methods: {
    ...mapMutations(["ADD_TASK"]),
    ...mapActions(["removeTask"]),
    addTask: function() {
      let newTask = Object.create(null);
      newTask["taskName"] = this.taskName;
      newTask["taskReciever"] = this.taskReciever;
      this.ADD_TASK(newTask);
      this.taskReciever = "";
      this.taskName = "";
    },
    removeTasks: function(task) {
      this.removeTask(task);
    }
  }
};
</script>
At the top of the file, you’ll notice that we imported a couple of helper functions.
They’re all pretty similar in functionality — mapState for example helps us map store state to local (component) computed properties.
So mapMutations does the same for store mutations and mapActions for store Actions.
We’ll also use mapState to enable us to display “username” and “tasks” in our component.
We also use mapMutations in the methods property so we can call store mutations as functions with parameters as we did when we defined addTask(), which we use to perform mutations while passing the newTask object as a parameter.
In the <template> section of our Main.vue, we’ll paste the following code:
<template>
  <div class="home">
    <div class="hello center">
      <div >
        <h1 class="header-text"> Hi 👋, {{ username }}</h1>
        <h3 class="header-text"> Add a few tasks</h3>
        <form @submit.prevent="addTask">
          <input class="input" type="text" placeholder="I'm supposed to.." v-model="taskName" />
          <input class="input" type="text" placeholder="for this person..." v-model="taskReciever" />
          <button class="add-button" type="submit" placeholder="Add task to list">Add task to list</button>
        </form>
        <ul>
          <li v-for="(task, index) in tasks" v-bind:key="index">
            {{ task.taskName }} for {{task.taskReciever}}
            <button
              v-on:click="removeTasks(index)"class="remove">Done ✅</button>
          </li>
        </ul>
      </div>
      <div class></div>
    </div>
  </div>
</template>
We can directly interpolate our username from store because we mapped it as a computed property using mapState.
The same goes for the tasks: we use v-for to loop over the tasks array from our store and display all our task’s properties, i.e taskName and taskReciever .
We also use a form to mutate tasks to our store.
On submit (@submit), a.k.a, when we press the button after filling in tasks, we call the addTask method, which then changes our state by adding whatever we input to the tasks array.
Optionally, you can add a style section by pasting this:
<style>
html,
#app,
.home {
  height: 100%;
}
body {
  background-color: #050505;
  margin: 0;
  height: 100%;
}
input {
  border: none;
  padding: 5%;
  width: calc(100% - 40px);
  box-shadow: 0 3px 3px lightgrey;
  margin-bottom: 5%;
  outline: none;
}
.header-text {
  color: #e9e9e9;
}
.add-button {
  border: none;
  border-radius: 2px;
  padding: 5%;
  background-color: #0cf50cbb;
  box-shadow: 0 2px 2px #fff;
  width: calc(100% - 100px);
  margin-bottom: 2%;
  outline: none;
}
.main {
  display: grid;
  grid-template-columns: repeat(2, 50%);
  grid-template-rows: 100%;
  height: 100%;
}
.center {
  display: flex;
  justify-content: center;
}
.left,
.right {
  padding: 30px;
}
ul {
  list-style-type: none;
  padding: 0;
}
ul li {
  padding: 4%;
  background: white;
  margin-bottom: 8px;
  border-radius: 5px;
}
.right {
  grid-area: right;
  background-color: #e9e9e9;
}
.remove {
  float: right;
  text-transform: uppercase;
  font-size: 0.8em;
  background: #050505;
  border: none;
    border-radius: 5px;
  padding: 5px;
  color: #00ff88de;
  cursor: pointer;
}
</style>
Save your work, run it, and you should see this:
Right now we have some basic Vuex operations working, but you can’t really tell why we use Vuex. We’re only using a single component.
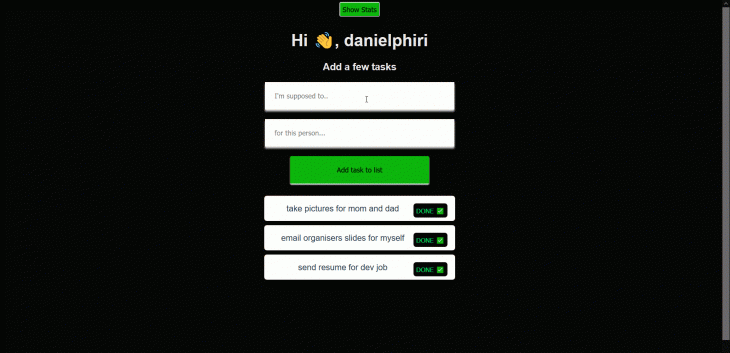
Let’s create another component called Stats.vue. We’ll use this to display a few stats and show how Vuex actions can be properly put to use.
For starters, we want to be able to display the number of pending tasks we have.
In our store, we can define a getter to do this by pasting the following text below the state object:
getters: {
    taskCount: state => {
      return state.tasks.length;
    }
  },
We then add another mutation to the store:
REMOVE_ALL: state => {
      state.tasks = [];
    },
This lets us clear every task in our list.
Finally, in our state, we add another action to the store right below removeTask by adding the following code:
removeAll({ commit }) {
      return new Promise((resolve) => {
        setTimeout(() => {
          commit("REMOVE_ALL");
          resolve();
        }, 2000);
      });
    }
You’ll notice we define a promise and use a setTimeout function to add a bit of a delay (2 seconds) before we commit our REMOVE_ALL mutation.
Thus the asynchronous nature of Vuex actions.
We’re free to play around with the logic that dictates how we perform actions. This could be used in a shopping cart, trading website, or chat application — it has so many uses.
Back to our Stats.vue file, we paste the following in the <scripts> section:
<script>
import { mapGetters, mapActions, mapMutations, mapState } from 'vuex'
export default {
  name: 'Stats',
  computed: {
    ...mapGetters(['taskCount']),
    ...mapState(["username"])
  },
  data() {
    return {
      message: ""
    }
  },
  methods: {
    ...mapMutations(['REMOVE_ALL']),
    ...mapActions(['removeAll']),
    removeAllTasks() {
      this.removeAll().then(() => {
        this.message = 'Self care - tasks are gone'
      });
    }
  }
}
</script>
In Stats.vue , like we said, we want to be able to count how many tasks we have pending.
We use the mapGetters helper to display that computed property.
In methods, we initialize our removeAll action and REMOVE_ALL mutations, as well as define removeAllTasks, which has a promise and lets us use the then() prototype to display text once the promise is fulfilled.
In the <template> section of Stats.vue , paste the following code:
<template>
  <div class="stats">
    <h3 class="header-text">Here are your numbers, {{username}} 😬 </h3>
    <p class="header-text">You need to perform {{ taskCount }} tasks fam</p>
    <button class="" v-on:click="removeAllTasks">Nope, can't even..</button>
    <p class="header-text">{{ message }}</p>
  </div>
</template>
Here we have a button to remove all the tasks and a message that gets displayed when our promise is fulfilled.
Run your app and you should have a pretty nifty web app like this:
Conclusion
We covered why we need Vuex, Vuex operations, and helpers. We also successfully built an app using it.
We have a functional web app that you can test out. We saw how we can use Vuex to manipulate a single data source and avoid inconsistencies. We also built a multi-component app and shared data between them.
Should you want to dive deeper in the topic, I recommend the following resources:
- Vuex Documentation
- WTF is Vuex? A Beginner’s Guide To Vue’s Application Data Store
- Architecting Vuex store for large-scale Vue.js applications
- Managing State with Vuex – the Guide I Wish I’d Had
Check out the full version of this on GitHub or CodeSandbox.
I hope you enjoyed this and if you have any questions or want to say hi, feel free to tweet at me.
Experience your Vue apps exactly how a user does
Debugging Vue.js applications can be difficult, especially when there are dozens, if not hundreds of mutations during a user session. If you’re interested in monitoring and tracking Vue mutations for all of your users in production, try LogRocket.
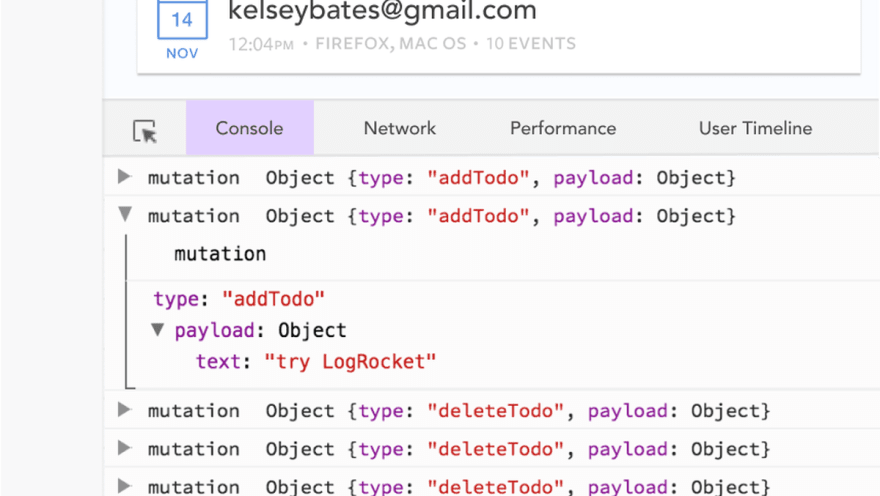
LogRocket is like a DVR for web apps, recording literally everything that happens in your Vue apps including network requests, JavaScript errors, performance problems, and much more. Instead of guessing why problems happen, you can aggregate and report on what state your application was in when an issue occurred.
The LogRocket Vuex plugin logs Vuex mutations to the LogRocket console, giving you context around what led to an error, and what state the application was in when an issue occurred.
Modernize how you debug your Vue apps - Start monitoring for free.
The post Vuex: why we need SPA state management appeared first on LogRocket Blog.


Top comments (0)