In this post i will show you how to create a modern reactive application using:
- PHP 7.4
- Symfony 5
- Api Platform 2.5
- Mercure
- Angular
- Akita
The work of this post is inspired by Stefano ALLETTI post
Server-Sent Events (SSE) is a standard that enabled Web servers to push data in real time to clients.
The idea is simple: a browser can subscribe to a stream of events generated by a server, receiving updates whenever a new event occurs. This led to the birth of the popular EventSource interface, which accepts an HTTP stream connection and keeps the connection open while retrieving available data from it. The connection is kept open until closed by calling EventSource.close().
Like a good self-respecting Frenchman, I love wine. That's why I decided to make an application allowing me to know in real time the availability of my favorite wine.
In this post, we will learn how to use SSE by building a live winestore product availability demo application with Symfony, Angular and Mercure. You can find the final code of the application in this GitHub repository.
Building a Real-Time App with Server-Sent Events
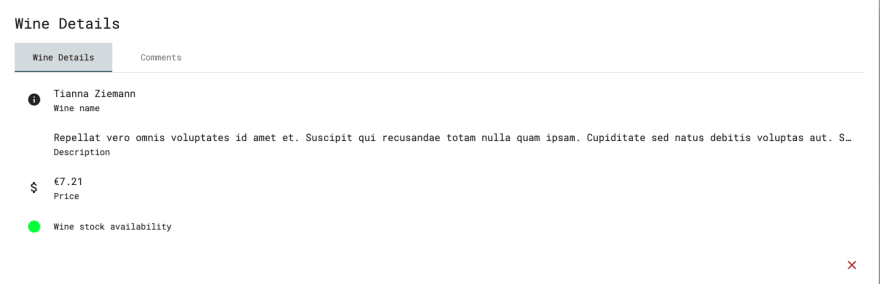
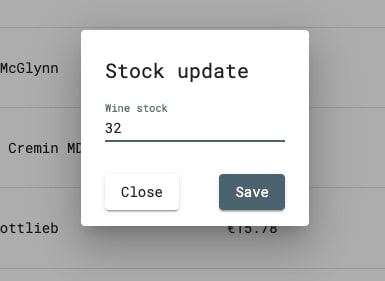
In order to learn how to use SSE, we are going to develop a live wine stock availability application. The application will consist of a simple web page showing a list of wines and two modals, one showing wine details and another one for editing the wine quantity.
| List | Details | Update |
|---|---|---|
 |
 |
 |
Through this real-time app, we can find wine status availability and after implementing Server-Sent Events, we will see automagically updates when the status changes.
Building Real-Time Backends with Server-Sent Events
Create a folder called winestore
For simplicity, i cloned the latest stable version of API Platform (2.5.4) into this folder. You can find inspiration from the project Github repository above.
$ mkdir winestore
Install Symfony and Api Platform
Firstly, make sure you have installed PHP 7.2.5 or a higher version and the Composer package manager to create a new Symfony application. after that, create a new project by executing the following command in the terminal:
$ composer create-project symfony/skeleton api
Now let's install some necessary bundles with composer
- Api Platform
$ composer req api
Make sure your database configurations are set in the .env file
###> doctrine/doctrine-bundle ###
# Format described at https://www.doctrine-project.org/projects/doctrine-dbal/en/latest/reference/configuration.html#connecting-using-a-url
# For an SQLite database, use: "sqlite:///%kernel.project_dir%/var/data.db"
# For a PostgreSQL database, use: "postgresql://db_user:db_password@127.0.0.1:5432/db_name?serverVersion=11&charset=utf8"
# IMPORTANT: You MUST configure your server version, either here or in config/packages/doctrine.yaml
DATABASE_URL=postgres://api-platform:!ChangeMe!@db/api?server_version=12
###< doctrine/doctrine-bundle ###
- Maker bundle to quickly build entities
$ composer require symfony/maker-bundle --dev
Let's create three entities : Wine, Comment and MediaObject and we define them as ApiResource
- Hautelook/alice bundle for managing fixtures with Alice and Faker
$ composer require --dev hautelook/alice-bundle
Create a fixture file wines.yaml
After this create and update the database
$ bin/console doctrine:schema:drop --force --no-interaction
$ bin/console doctrine:schema:create --no-interaction
And load your fixtures with this following command
$ bin/console hautelook:fixtures:load --no-interaction --purge-with-truncate -vvv
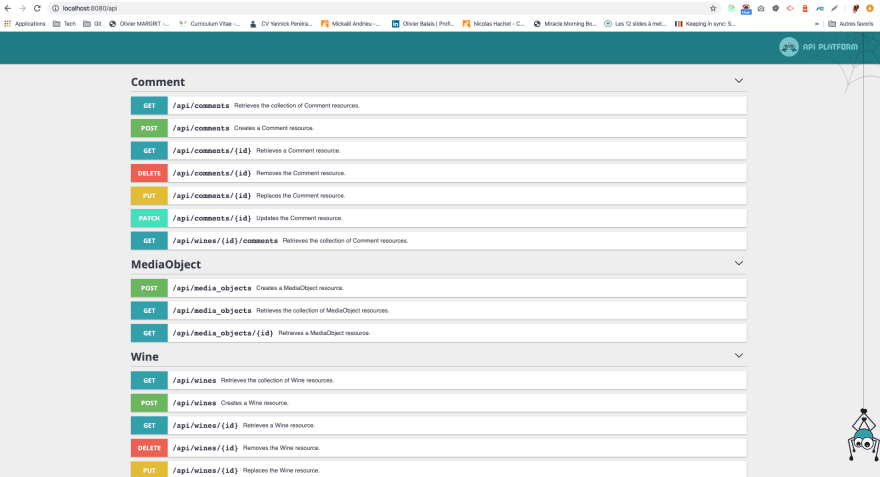
Opening the Swagger-Frontend you can now play around adding, deleting and viewing wines.
If you are using the symfony server, you need to open http://localhost:8000/api. If you use docker, the url is http://localhost:8080/api
Mercure : Real-time made easy😛
Mercure is an open protocol allowing to push data updates to web browsers and other HTTP clients in a convenient, fast, reliable and battery-friendly way. It is especially useful to publish real-time updates of resources served through web APIs, to reactive web and mobile applications.
If you're following along using the API Platform distribution, you don't need to install mercure as it is already installed and configured.
If you installed from scratch using symfony flex you must:
1) Install mercure
$ composer require mercure
2) Download and run a Mercure hub
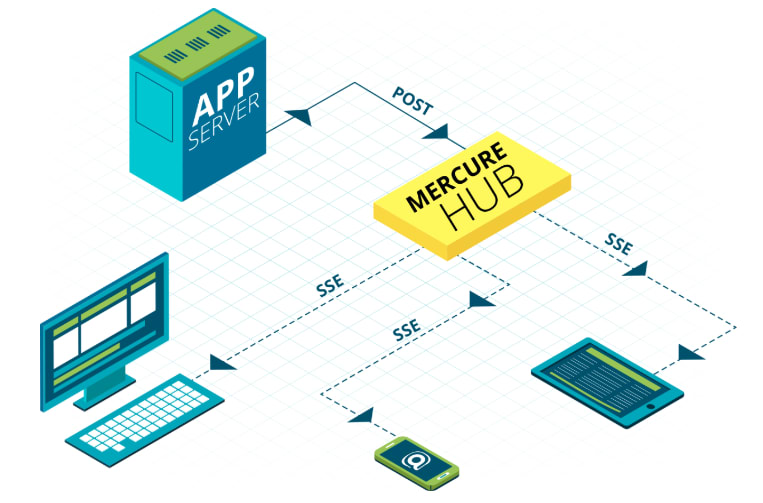
To manage persistent connections, Mercure relies on a Hub: a dedicated server that handles persistent SSE connections with the clients. The Symfony app publishes the updates to the hub, that will broadcast them to clients.
An official and open source (AGPL) implementation of a Hub can be downloaded as a static binary from Mercure.rocks. Put the downloaded hub at the root of the project.
Run the following command to start it:
$ ./mercure --jwt-key='!changeMe!' --addr='localhost:3000' --allow-anonymous --cors-allowed-origins='*'
Configuration
The preferred way to configure the Mercure is by using environment variables.
Set the URL of your hub as the value of the MERCURE_PUBLISH_URL env var. The .env file of your project has been updated by the Flex recipe to provide example values. Set it to the URL of the Mercure Hub (http://localhost:3000/.well-known/mercure by default).
In addition, the Symfony application must bear a JSON Web Token (JWT) to the Mercure Hub to be authorized to publish updates.
This JWT should be stored in the MERCURE_JWT_TOKEN environment variable.
To create your token got to jwt.io. There you need to fill out two things, the payload and the secret.
The JWT must be signed with the same secret key as the one used by the Hub to verify the JWT (!changeMe! in our example). Its payload must contain at least the following structure to be allowed to publish:
{
    "mercure": {
        "publish": []
    }
}
Now that you're ready to use Mercure, you must add the Mercure option to the Wine ApiResource entity:
/**
 * @ApiResource(mercure=true,normalizationContext={"groups"={"read"}},denormalizationContext={"groups"={"write"}})
 * @ORM\Entity(repositoryClass="App\Repository\WineRepository")
 */
class Wine
{
...
In this way API Platform will dispatch the updates to the Mercure hub every time a Wine is created, updated or deleted.
Building Angular with Server-Sent Events
First thing, we need to generate an angular application. This is made very easy using the angular cli
Go in the winestore folder and execute following commands:
# if you don't already have the cli installed
$ npm install -g @angular/cli
# generate new app
$ ng new api
# cd into the app
$ cd api
# Start it up
$ ng serve
Open your web-browser of choice and navigate to http://localhost:4200 (4200 is the default port for angular apps, but you can specify whatever port your heart desires). If all went well, you should see the angular default landing page.
In this post i will focus on Angular and SSE. A full example of the client application can be found here
SSE and Angular
On the client side, we use the EventSource to receive the stream events. This object has 3 eventHandler methods:
-
EventSource.onerrorcalled when an error occurs, -
EventSource.onmessagecalled when a message event is received -
EventSource.onopencalled when an open event is received
EventSource Observable Wrapper
To make it reactive and fit in an Angular application, it’s better to wrap it in an RxJS Observable.
Here is the sse.service.ts file
import { Injectable, NgZone } from '@angular/core';
import { Observable } from 'rxjs';

@Injectable({
    providedIn: 'root',
})
export class SseService {
    constructor(private zone: NgZone) {}
    private getEventSource(url: string): EventSource {
        return new EventSource(url);
    }

    getServerSentEvent(url: string): Observable<MessageEvent> {
        return new Observable(observer => {
            const eventSource = this.getEventSource(url);

            eventSource.onmessage = event => {
                this.zone.run(() => observer.next(event));
            };
        });
    }
}
The service method getServerSentEventcan then be subscribed like any other observable:
this.sseService.getServerSentEvent('url/parameters').subscribe(data => console.log(data));
State Management with Akita
In order to keep track of what has been updated, we are going to use akita as a state management.
Akita is a state management pattern, built on top of RxJS. It is based on objected-oriented design so developers with OOP experience should feel right at home.
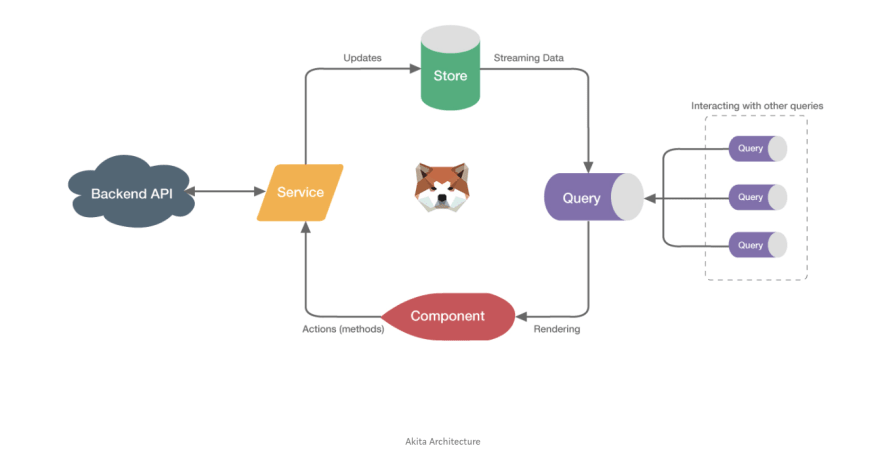
👉🏾 10 Reasons Why You Should Start Using Akita as Your State Management Solution
Akita has an API runStoreAction that simplify and improve the experience of working with event-based APIs such as Mercure in our example.
Setting Up Akita
Adding Akita to our project is easy. We can use the NG add schematic by running the following command:
ng add @datorama/akita
The above command adds Akita, Akita's dev-tools, and Akita's schematics into our project. The next step is to create a store. We need to maintain a collection of wines, so we scaffold a new entity feature:
ng g af wines
This command generates a wines store, a wines query, a wines service, and a wine model for us. Those files can be found here
Using runStoreActionin our service
...
import { runStoreAction, StoreActions } from '@datorama/akita';

@Injectable({ providedIn: 'root' })
export class WinesService extends NgEntityService<WinesState> {
...
sync() {
        const url = new URL(APP_CONFIG.merculeHubUrl);
        url.searchParams.append('topic', `${APP_CONFIG.apiWineUrl}/{id}`);

        return this.sseService.getServerSentEvent(`${url}`).pipe(
            tap(event => {
                const data = JSON.parse(event.data);
                const stock = data.stock;
                this.notificationService.add();
                runStoreAction('wines', StoreActions.UpdateEntities, {
                    payload: {
                        data: { stock },
                        entityIds: data.id,
                    },
                });
            }),
        );
    }
...
}
In our service sync method we subscribe to server-sent events and update our store by running store action UpdateEntities
Summary
In this post, we used Server-Sent Events to develop a real-time application that simulates product availability in a winestore. During the development, we had the opportunity to explore Symfony, Api Platform, Mercure, Angular and Akita.
There is a lot more to develop such modern reactive applications. This post provides a good starting point but i highly recommend going through the docs and trying out different tools.
📢 An example project containing all of the above can be found here
Have you enjoyed the post? Please share🤘🏾.


Top comments (0)