blog
Migrating PostgreSQL to the Cloud – Comparing Solutions from Amazon, Google & Microsoft

From a bird’s eye view, it would appear that when it comes to migrating the PostgreSQL workloads into the cloud, the choice of cloud provider should make no difference. Out of the box, PostgreSQL makes it easy to replicate data, with no downtime, via Logical Replication, although with some restrictions. In order to make their service offering more attractive cloud providers may work out some of those restrictions. As we start thinking about differences in the available PostgreSQL versions, compatibility, limits, limitations, and performance, it becomes clear that the migration services are key factors in the overall service offering. It isn’t any longer a case of “we offer it, we migrate it”. It’s become more like “we offer it, we migrate it, with the least limitations”.
Migration is important to small and large organizations alike. It is not as much about the size of the PostgreSQL cluster, as it is about the acceptable downtime and post-migration effort.
Selecting a Strategy
The migration strategy should take into consideration the size of the database, the network link between the source and the target, as well as the migration tools offered by the cloud provider.
Hardware or Software?
Just as mailing USB keys, and DVDs back in the early days of Internet, in cases where the network bandwidth isn’t enough for transferring data at the desired speed, cloud providers are offering hardware solutions, able to carry up to hundreds of petabytes of data. Below are the current solutions from each of the big three:
A handy table provided by Google showing the available options:
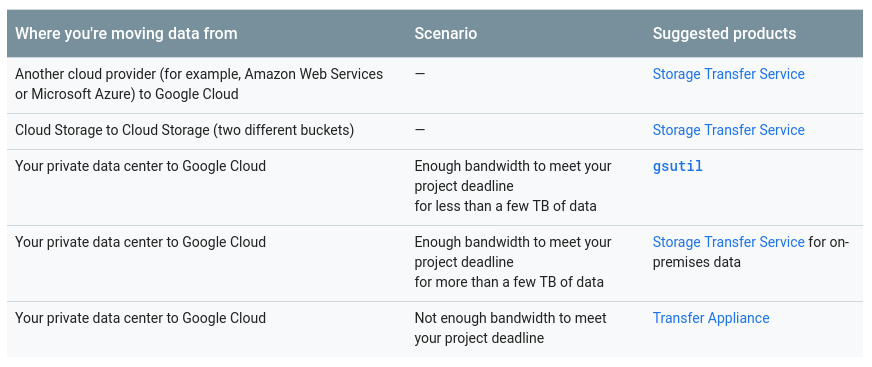
GCP appliance is Transfer Appliance
A similar recommendation from Azure based on the data size vs network bandwidth:
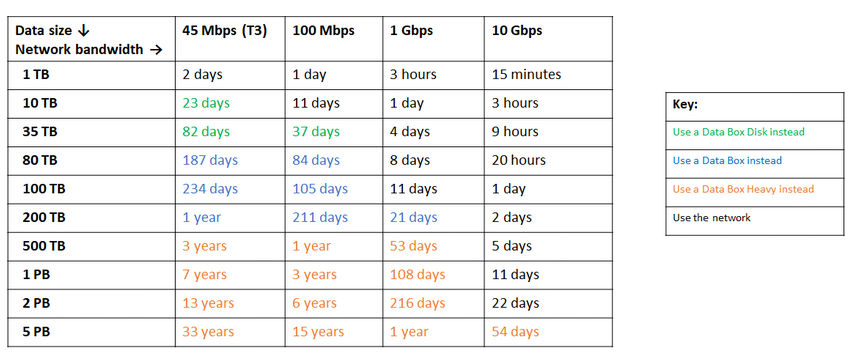
Azure appliance is Data box
Towards the end of its data migrations page, AWS provides a glimpse of what we can expect, along with their recommendation of the solution:

In cases where the database sizes exceed 100GB and limited network bandwidth AWS suggest a hardware solution.
AWS appliance is Snowball Edge
Data Export/Import
Organizations that tolerate downtime, can benefit from the simplicity of common tools provided by PostgreSQL out of the box. However, when migrating data from one cloud (or hosting) provider to another cloud provider, beware of the egress cost.
AWS
For testing the migrations I used a local installation of my Nextcloud database running on one of my home network servers:
postgres=# select pg_size_pretty(pg_database_size('nextcloud_prod'));

pg_size_pretty

----------------

58 MB

(1 row)


nextcloud_prod=# dt

                     List of relations

Schema |             Name | Type  | Owner

--------+-------------------------------+-------+-----------

public | awsdms_ddl_audit              | table | s9sdemo

public | oc_accounts                   | table | nextcloud

public | oc_activity                   | table | nextcloud

public | oc_activity_mq                | table | nextcloud

public | oc_addressbookchanges         | table | nextcloud

public | oc_addressbooks               | table | nextcloud

public | oc_appconfig                  | table | nextcloud

public | oc_authtoken                  | table | nextcloud

public | oc_bruteforce_attempts        | table | nextcloud

public | oc_calendar_invitations       | table | nextcloud

public | oc_calendar_reminders         | table | nextcloud

public | oc_calendar_resources         | table | nextcloud

public | oc_calendar_resources_md      | table | nextcloud

public | oc_calendar_rooms             | table | nextcloud

public | oc_calendar_rooms_md          | table | nextcloud

...

public | oc_termsofservice_terms       | table | nextcloud

public | oc_text_documents             | table | nextcloud

public | oc_text_sessions              | table | nextcloud

public | oc_text_steps                 | table | nextcloud

public | oc_trusted_servers            | table | nextcloud

public | oc_twofactor_backupcodes      | table | nextcloud

public | oc_twofactor_providers        | table | nextcloud

public | oc_users                      | table | nextcloud

public | oc_vcategory                  | table | nextcloud

public | oc_vcategory_to_object        | table | nextcloud

public | oc_whats_new                  | table | nextcloud

(84 rows)

The database is running PostgreSQL version 11.5:

postgres=# select version();

                                                version

------------------------------------------------------------------------------------------------------------

PostgreSQL 11.5 on x86_64-redhat-linux-gnu, compiled by gcc (GCC) 9.1.1 20190503 (Red Hat 9.1.1-1), 64-bit

(1 row)
I have also created a PostgreSQL user to be used by AWS DMS which is Amazon’s service for importing PostgreSQL into Amazon RDS:
postgres=# du s9sdemo

            List of roles

Role name | Attributes |  Member of

-----------+------------+-------------

s9sdemo   |   | {nextcloud}
AWS DMS provides many advantages, just as we’d expect from a managed solution in the cloud:
- auto-scaling (storage only, as compute instance must be right sized)
- automatic provisioning
- pay-as-you-go model
- automatic failover
However, maintaining data consistency for a live database is a best effort. A 100% consistency is achieved only when the database is in read-only mode — that is a consequence of how table changes are captured.
In other words, tables have a different point-in-time cutover:

Just as with everything in the cloud, there is a cost associated with the migration service.
In order to create the migration environment, follow the Getting Started guide to setup a replication instance, a source, a target endpoint, and one or more tasks.
Replication Instance
Creating the replication instance is straightforward to anyone familiar with EC2 instances on AWS:
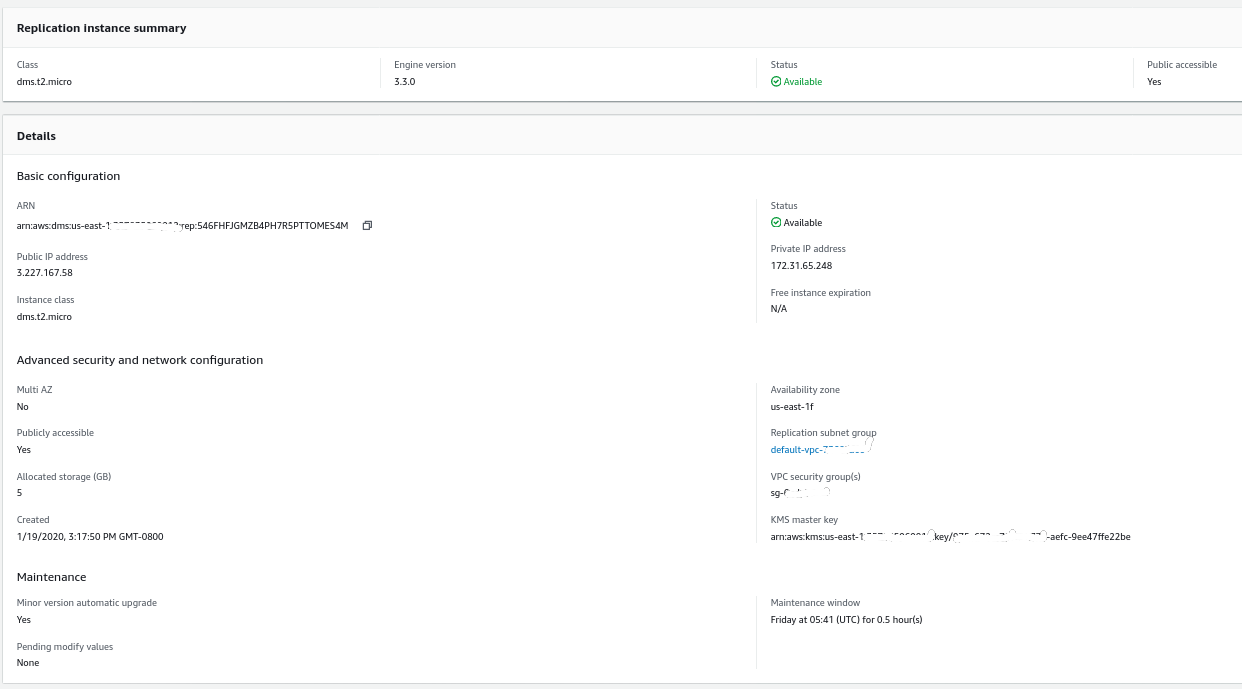
The only change from the defaults was in selecting AWS DMS 3.3.0 or later due to my local PostgreSQL engine being 11.5:

And here’s the list of currently available AWS DMS versions:

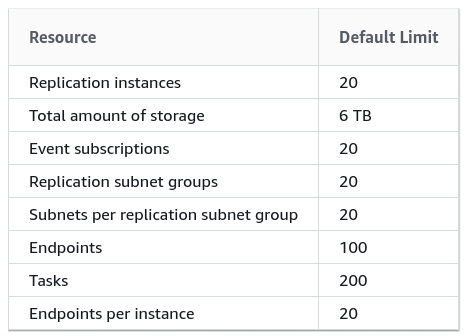
Large installations should also take note of the AWS DMS Limits:
There is also a set of limitations that are a consequence of PostgreSQL logical replication restrictions. For example, AWS DMS will not migrate secondary objects:
It is worth mentioning that in PostgreSQL all indexes are secondary indexes, and that is not a bad thing, as noted in this more detailed discussion.
Source Endpoint
Follow the wizard to create the Source Endpoint:
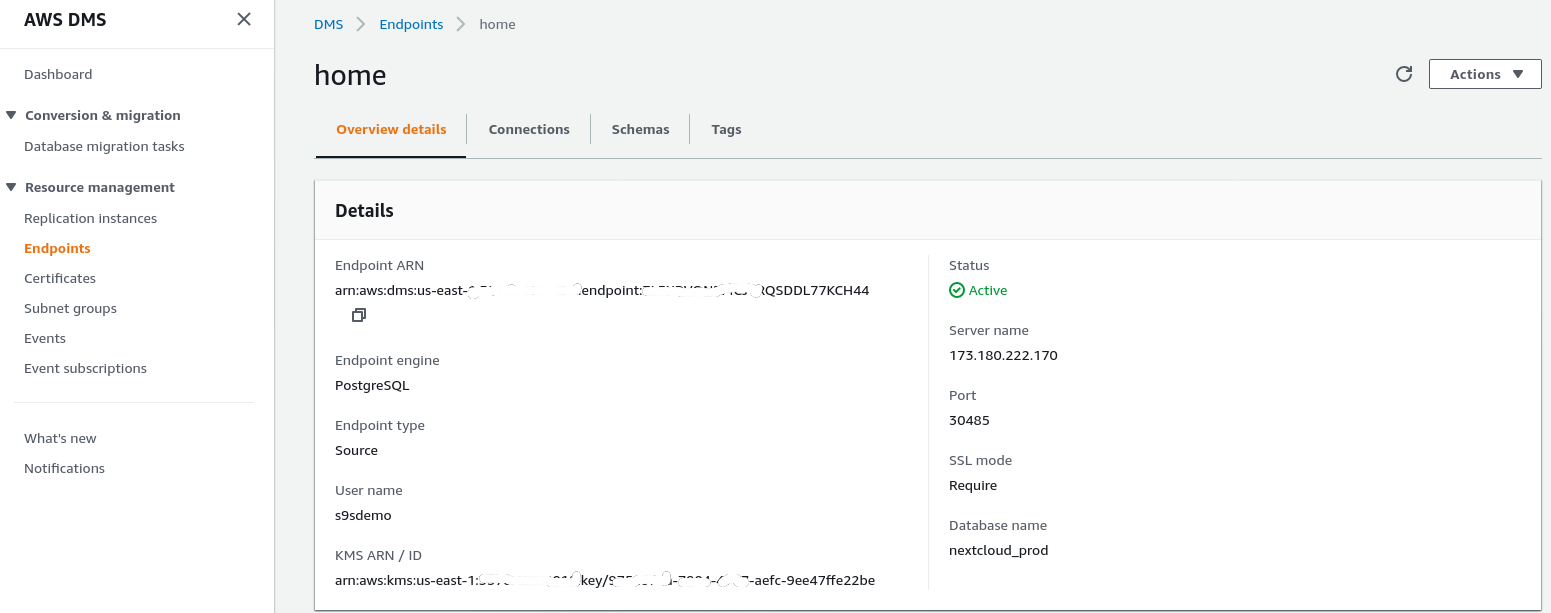
In the setup scenario Configuration for a Network to a VPC Using the Internet my home network required a few tweaks in order to allow the source endpoint IP address to access my internal server. First, I created a port forwarding on the edge router (173.180.222.170) to sent traffic on port 30485 to my internal gateway (10.11.11.241) on port 5432 where I can fine tune access based on the source IP address via iptables rules. From there, network traffic flows through an SSH tunnel to the web server running the PostgreSQL database. With the described configuration the client_addr in the output of pg_stat_activity will show up as 127.0.0.1.
Before allowing incoming traffic, iptables logs show 12 attempts from replication instance at ip=3.227.167.58):
Jan 19 17:35:28 mha.can.local kernel: filter/INPUT: IN=enp0s29f7u2 OUT= MAC=00:24:9b:17:3a:fa:9c:1e:95:e5:ad:b0:08:00 SRC=3.227.167.58 DST=10.11.11.241 LEN=60 TOS=0x00 PREC=0x00 TTL=39 ID=23973 DF PROTO=TCP SPT=54662 DPT=5432 WINDOW=26880 RES=0x00 SYN URGP=0
Jan 19 17:35:29 mha.can.local kernel: filter/INPUT: IN=enp0s29f7u2 OUT= MAC=00:24:9b:17:3a:fa:9c:1e:95:e5:ad:b0:08:00 SRC=3.227.167.58 DST=10.11.11.241 LEN=60 TOS=0x00 PREC=0x00 TTL=39 ID=23974 DF PROTO=TCP SPT=54662 DPT=5432 WINDOW=26880 RES=0x00 SYN URGP=0
Jan 19 17:35:31 mha.can.local kernel: filter/INPUT: IN=enp0s29f7u2 OUT= MAC=00:24:9b:17:3a:fa:9c:1e:95:e5:ad:b0:08:00 SRC=3.227.167.58 DST=10.11.11.241 LEN=60 TOS=0x00 PREC=0x00 TTL=39 ID=23975 DF PROTO=TCP SPT=54662 DPT=5432 WINDOW=26880 RES=0x00 SYN URGP=0
Jan 19 17:35:35 mha.can.local kernel: filter/INPUT: IN=enp0s29f7u2 OUT= MAC=00:24:9b:17:3a:fa:9c:1e:95:e5:ad:b0:08:00 SRC=3.227.167.58 DST=10.11.11.241 LEN=60 TOS=0x00 PREC=0x00 TTL=39 ID=23976 DF PROTO=TCP SPT=54662 DPT=5432 WINDOW=26880 RES=0x00 SYN URGP=0
Jan 19 17:35:48 mha.can.local kernel: filter/INPUT: IN=enp0s29f7u2 OUT= MAC=00:24:9b:17:3a:fa:9c:1e:95:e5:ad:b0:08:00 SRC=3.227.167.58 DST=10.11.11.241 LEN=60 TOS=0x00 PREC=0x00 TTL=39 ID=4328 DF PROTO=TCP SPT=54667 DPT=5432 WINDOW=26880 RES=0x00 SYN URGP=0
Jan 19 17:35:49 mha.can.local kernel: filter/INPUT: IN=enp0s29f7u2 OUT= MAC=00:24:9b:17:3a:fa:9c:1e:95:e5:ad:b0:08:00 SRC=3.227.167.58 DST=10.11.11.241 LEN=60 TOS=0x00 PREC=0x00 TTL=39 ID=4329 DF PROTO=TCP SPT=54667 DPT=5432 WINDOW=26880 RES=0x00 SYN URGP=0
Jan 19 17:35:51 mha.can.local kernel: filter/INPUT: IN=enp0s29f7u2 OUT= MAC=00:24:9b:17:3a:fa:9c:1e:95:e5:ad:b0:08:00 SRC=3.227.167.58 DST=10.11.11.241 LEN=60 TOS=0x00 PREC=0x00 TTL=39 ID=4330 DF PROTO=TCP SPT=54667 DPT=5432 WINDOW=26880 RES=0x00 SYN URGP=0
Jan 19 17:35:55 mha.can.local kernel: filter/INPUT: IN=enp0s29f7u2 OUT= MAC=00:24:9b:17:3a:fa:9c:1e:95:e5:ad:b0:08:00 SRC=3.227.167.58 DST=10.11.11.241 LEN=60 TOS=0x00 PREC=0x00 TTL=39 ID=4331 DF PROTO=TCP SPT=54667 DPT=5432 WINDOW=26880 RES=0x00 SYN URGP=0
Jan 19 17:36:08 mha.can.local kernel: filter/INPUT: IN=enp0s29f7u2 OUT= MAC=00:24:9b:17:3a:fa:9c:1e:95:e5:ad:b0:08:00 SRC=3.227.167.58 DST=10.11.11.241 LEN=60 TOS=0x00 PREC=0x00 TTL=39 ID=8298 DF PROTO=TCP SPT=54670 DPT=5432 WINDOW=26880 RES=0x00 SYN URGP=0
Jan 19 17:36:09 mha.can.local kernel: filter/INPUT: IN=enp0s29f7u2 OUT= MAC=00:24:9b:17:3a:fa:9c:1e:95:e5:ad:b0:08:00 SRC=3.227.167.58 DST=10.11.11.241 LEN=60 TOS=0x00 PREC=0x00 TTL=39 ID=8299 DF PROTO=TCP SPT=54670 DPT=5432 WINDOW=26880 RES=0x00 SYN URGP=0
Jan 19 17:36:11 mha.can.local kernel: filter/INPUT: IN=enp0s29f7u2 OUT= MAC=00:24:9b:17:3a:fa:9c:1e:95:e5:ad:b0:08:00 SRC=3.227.167.58 DST=10.11.11.241 LEN=60 TOS=0x00 PREC=0x00 TTL=39 ID=8300 DF PROTO=TCP SPT=54670 DPT=5432 WINDOW=26880 RES=0x00 SYN URGP=0
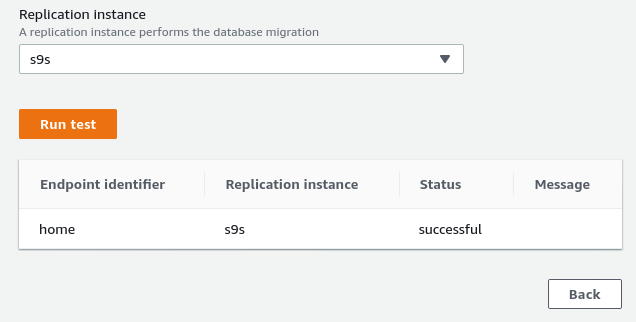
Jan 19 17:36:16 mha.can.local kernel: filter/INPUT: IN=enp0s29f7u2 OUT= MAC=00:24:9b:17:3a:fa:9c:1e:95:e5:ad:b0:08:00 SRC=3.227.167.58 DST=10.11.11.241 LEN=60 TOS=0x00 PREC=0x00 TTL=39 ID=8301 DF PROTO=TCP SPT=54670 DPT=5432 WINDOW=26880 RES=0x00 SYN URGP=0Once allowing the source endpoint IP address (3.227.167.58) the connection test succeed and the source endpoint configuration is complete. We also have an SSL connection in order to encrypt the traffic through public networks. This can be confirmed on the PostgreSQL server using the query below as well as in the AWS console:
postgres=# SELECT datname, usename, client_addr, ssl, cipher, query, query_start FROM pg_stat_activity a, pg_stat_ssl s where a.pid=s.pid and usename = 's9sdemo';
datname | usename | client_addr | ssl | cipher | query | query_start
---------+---------+-------------+-----+--------+-------+-------------
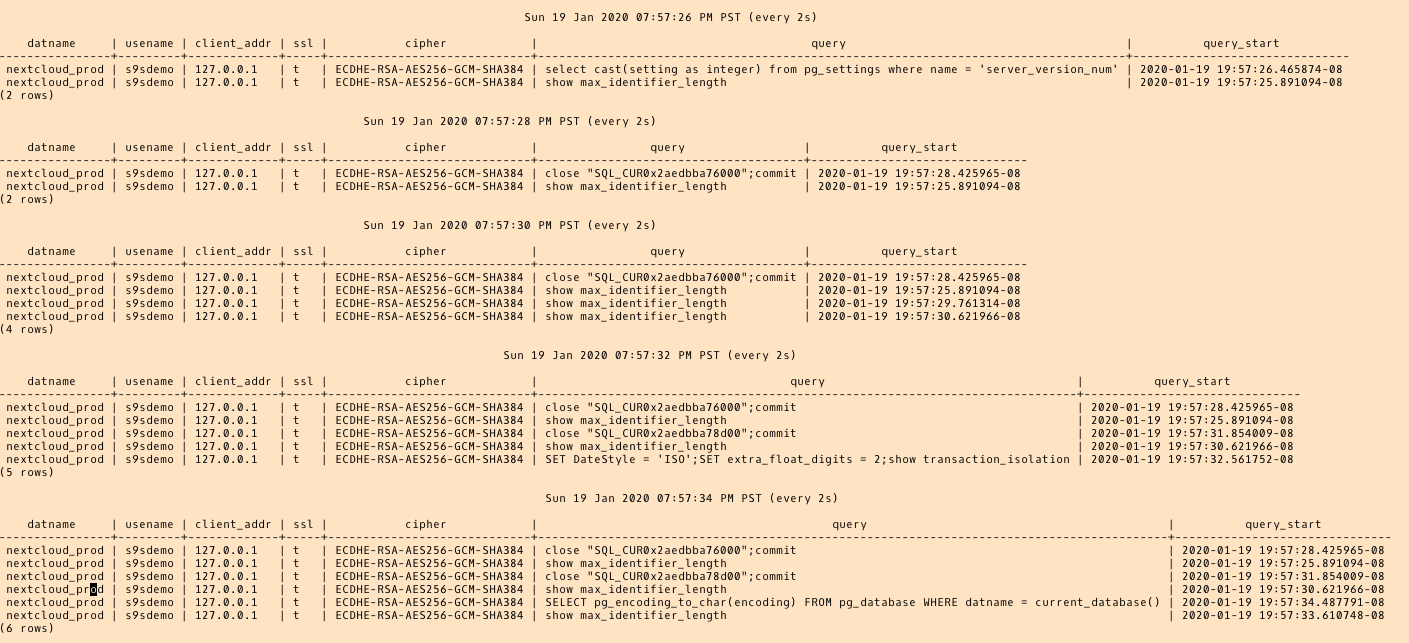
(0 rows)…and then watch while running the connection from the AWS console. The results should looks similar to the following:
postgres=# watch


                                                                           Sun 19 Jan 2020 06:50:51 PM PST (every 2s)


    datname     | usename | client_addr | ssl |           cipher |                 query | query_start

----------------+---------+-------------+-----+-----------------------------+------------------------------------------------------------------------------------+-------------------------------

 nextcloud_prod | s9sdemo | 127.0.0.1   | t | ECDHE-RSA-AES256-GCM-SHA384 | select cast(setting as integer) from pg_settings where name = 'server_version_num' | 2020-01-19 18:50:51.463496-08

(1 row)
…while AWS console should report a success:
As indicated in the prerequisites section, if we choose the migration option Full load, ongoing replication, we will need to alter the permissions for the PostgreSQL user. This migration option requires superuser privileges, therefore I adjusted the settings for the PostgreSQL user created earlier:
nextcloud_prod=# du s9sdemo

         List of roles

Role name | Attributes | Member of

-----------+------------+-----------

s9sdemo   | Superuser  | {}
The same document contains instructions for modifying postgresql.conf. Here’s a diff from the original one:
--- a/var/lib/pgsql/data/postgresql.conf

+++ b/var/lib/pgsql/data/postgresql.conf

@@ -95,7 +95,7 @@ max_connections = 100                 # (change requires restart)


# - SSL -


-#ssl = off

+ssl = on

#ssl_ca_file = ''

#ssl_cert_file = 'server.crt'

#ssl_crl_file = ''

@@ -181,6 +181,7 @@ dynamic_shared_memory_type = posix  # the default is the first option


# - Settings -


+wal_level = logical

#wal_level = replica                   # minimal, replica, or logical

                                       # (change requires restart)

#fsync = on                            # flush data to disk for crash safety

@@ -239,6 +240,7 @@ min_wal_size = 80MB

#max_wal_senders = 10          # max number of walsender processes

                              # (change requires restart)

#wal_keep_segments = 0         # in logfile segments; 0 disables

+wal_sender_timeout = 0

#wal_sender_timeout = 60s      # in milliseconds; 0 disables


#max_replication_slots = 10    # max number of replication slots

@@ -451,6 +453,7 @@ log_rotation_size = 0                       # Automatic rotation of logfiles will

#log_duration = off

#log_error_verbosity = default         # terse, default, or verbose messages
Lastly, don’t forget to adjust the pg_hba.conf settings in order to allow SSL connection from the replication instance IP address.
We are now ready for the next step.
Target Endpoint
Follow the wizard to create the Target Endpoint:
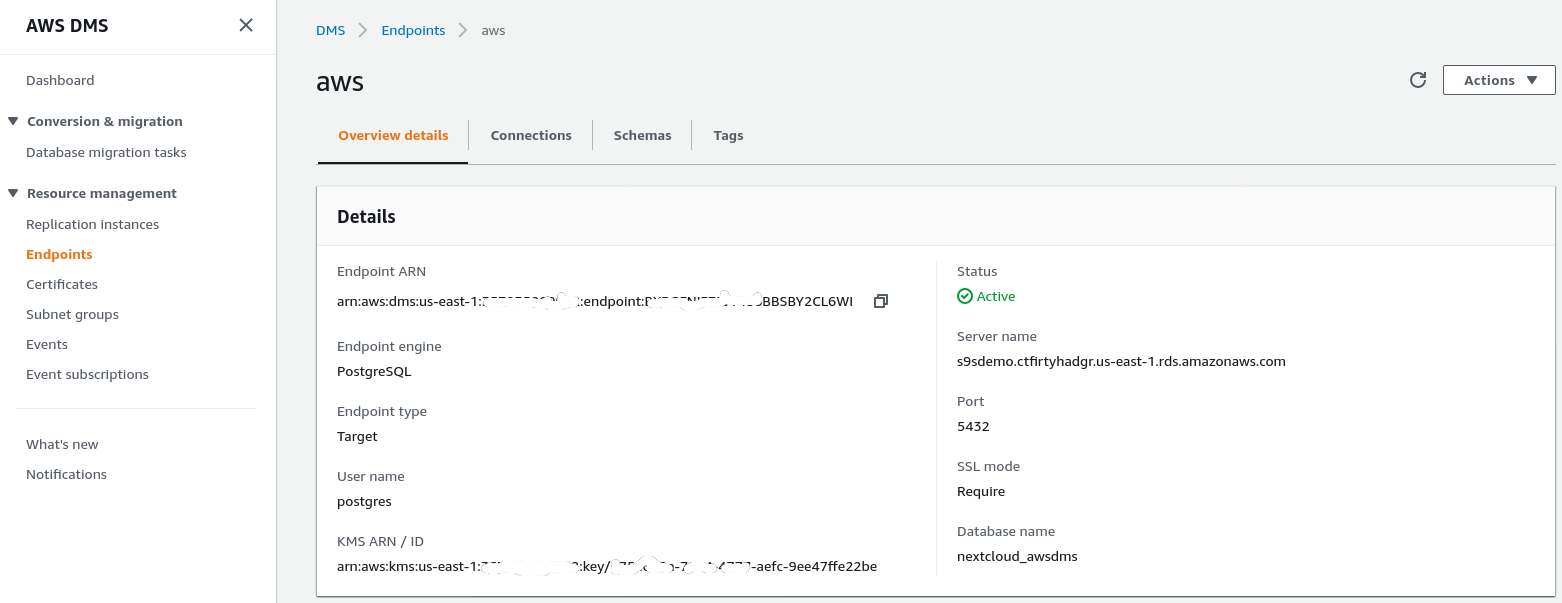
This step assumes that the RDS instance with the specified endpoint already exists along with the empty database nextcloud_awsdms. The database can be created during the RDS instance setup.
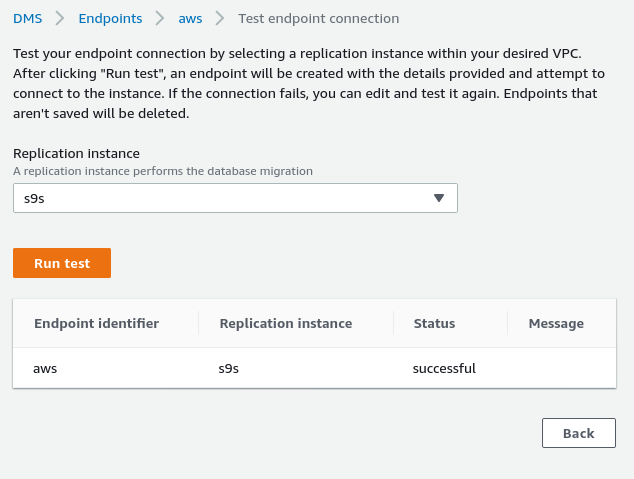
At this point, if the AWS networking is correctly setup, we should be ready to run the connection test:
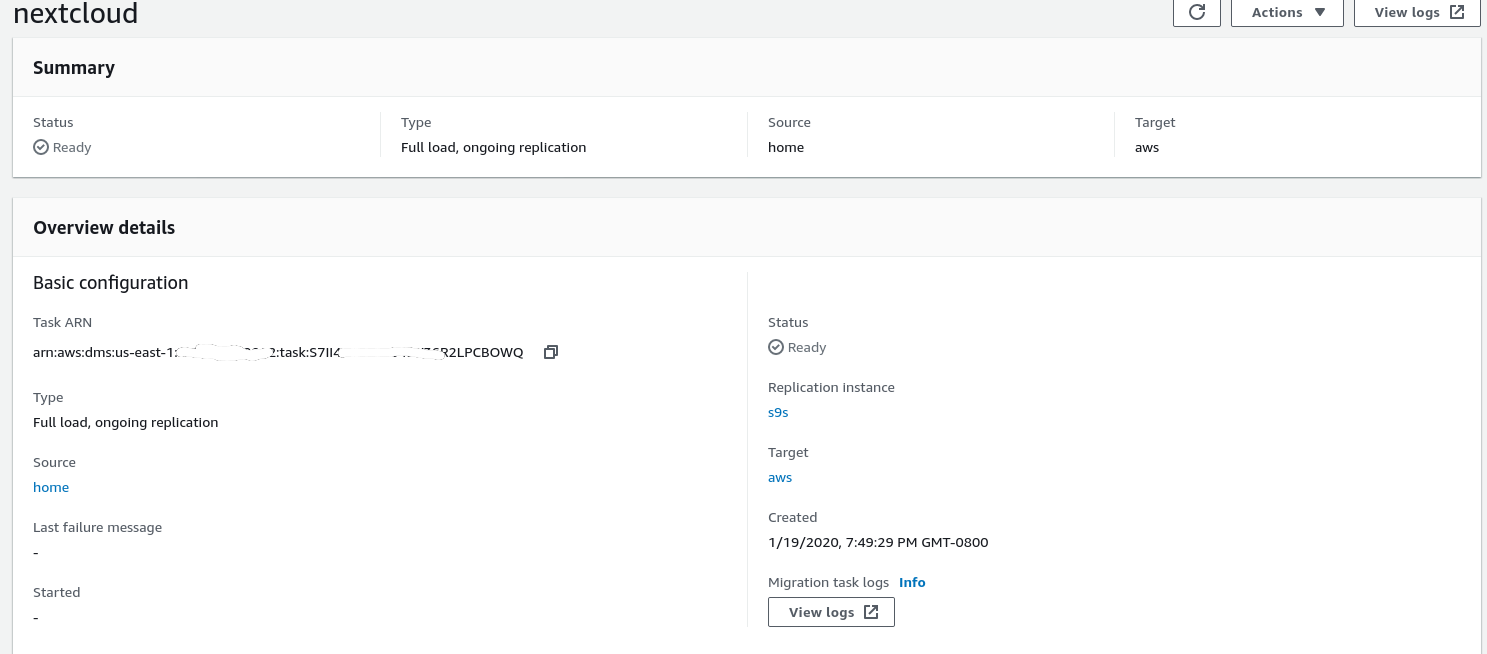
With the environment in place, it is now time to create the migration task:
Migration Task
Once the wizard completed the configuration looks like this:
…and the second part of the same view:

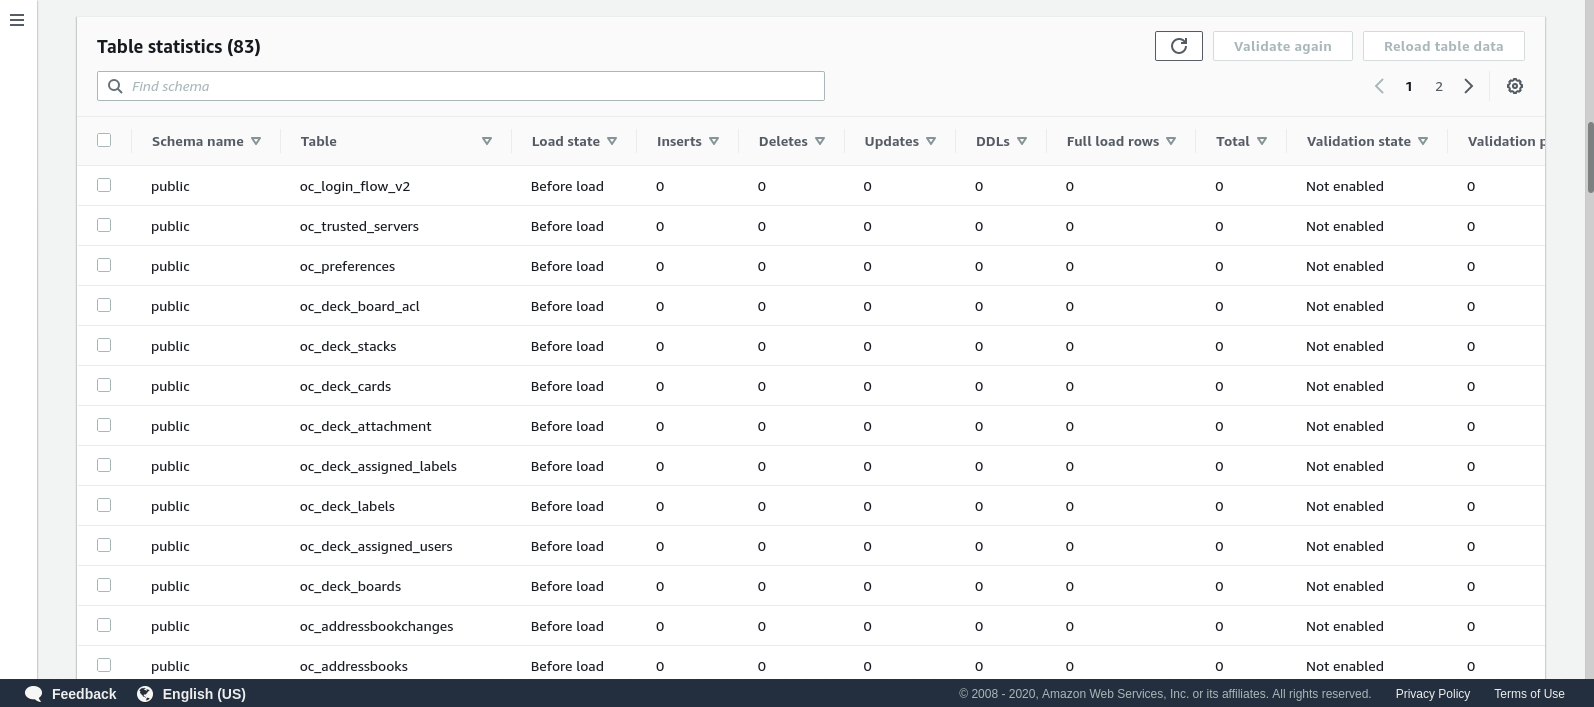
Once the task is started we can monitor the progress —open up the task details and scroll down to Table Statistics:
AWS DMS is using the cached schema in order to migrate the database tables. While migration progresses, we can continue “watching” the queries on the source database, and the PostgreSQL error log, in addition to the AWS console:
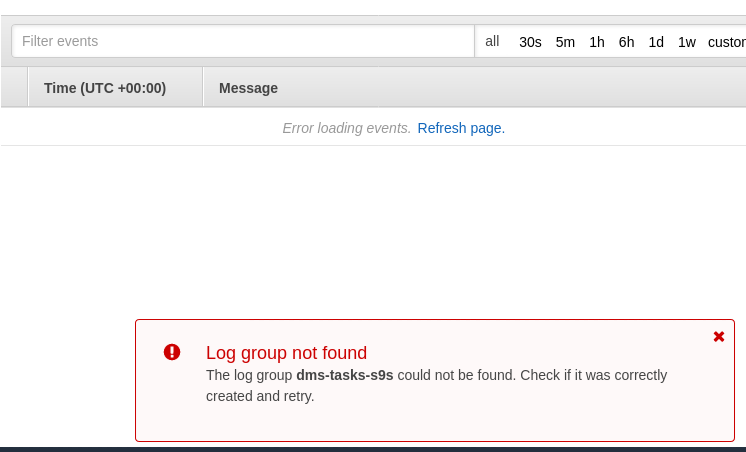
In case of errors, the failure state is displayed in the console:
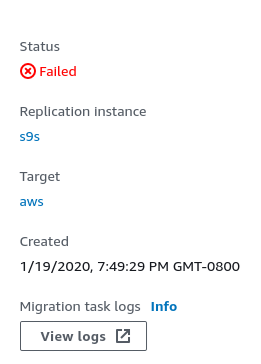
One place to look for clues is CloudWatch, although during my tests the logs didn’t end up being published, which could likely be just another glitch in the beta version of the AWS DMS 3.3.0 as it turned out to be towards the end of this exercise:
The migration progress is nicely displayed in the AWS DMS console:

Once the migration is complete, reviewing one more time, the PostgreSQL error log, reveals a surprising message:

What seems to happen, is that in PostgreSQL 9.6, 10 the pg_class table contains the named column relhaspkey, but that’s not the case in 11. And that’s the glitch in beta version of AWS DMS 3.3.0 that I was referring to earlier.
GCP
Google’s approach is based on the open source tool PgBouncer. The excitement was short lived, as the official documentation talks about migrating PostgreSQL into a compute engine environment.
Further attempts to find a migration solution to Cloud SQL that resembles AWS DMS failed. The Database migration strategies contain no reference to PostgreSQL:

On-prem PostgreSQL installations can be migrated to Cloud SQL by using the services of one of the Google Cloud partners.
A potential solution may be PgBouncer to Cloud SQL, but that is not within the scope of this blog.
Microsoft Cloud Services (Azure)
In order to facilitate the migration of PostgreSQL workloads from on-prem to the managed Azure Database for PostgreSQL Microsoft provides Azure DMS which according to documentation can be used to migrate with minimal downtime. The tutorial Migrate PostgreSQL to Azure Database for PostgreSQL online using DMS describes these steps in detail.
The Azure DMS documentation discusses in great detail the issues and limitations associated with migrating the PostgreSQL workloads into Azure.
One notable difference from AWS DMS is the requirement to manually create the schema:

A demo of this will be the topic of a future blog. Stay tuned.