
Written by Austin Roy Omondi✏️
Introduction
GraphQL is a fantastic solution for communicating with server-side data, it allows developers to create fast and reliable API’s that solve the problem of over-fetching and under-fetching of data by allowing those interacting with the server to specify the precise structure of the data needed from the server. This means both a better developer experience for those building applications consuming GraphQL APIs and faster applications for the end user.
PostGraphile, previously known as PostGraphQL, does a great job at pairing these two technologies to allow developers to quickly put together a full-featured GraphQL server storing data on a PostgreSQL database. PostGraphile harnesses Database-Driven Development to generate and update your Graphql server from your Postgres database schema, automatically detecting changes you make to your schema and updating your server accordingly.
In their own words:
PostgreSQL already has amazing authorization and relationship infrastructure, why duplicate that logic in a custom API?
PostGraphile handles the creation of a performant and standards-compliant GraphQL API layer allowing the developer to focus on the product. This also significantly cuts down on development time.
PostGraphile also boasts a powerful plugin system with several community developed plugins that can help expand on its functionality in a variety of ways.
In this article, we’ll take a look at how you can get a full-featured server up and running in minutes with PostGraphile.

PostGraphile usage
PostGraphile can be used in three main ways:
- Using the PostGraphile CLI — this is the easiest and quickest way to spin up your PostGraphile API straight from the terminal. Which we will be covering today
- As middleware — this way mounts an instance of PostGraphile imported from the
postgraphilepackage onto a NodeJS server - Through Docker — this happens by pulling PostGraphile as a docker image and passing it as a CLI option to the Docker container
Getting started
In order to use PostGraphile, you need to have Node.js v8.6 or higher installed, you can find that on the Node website if you don’t have it set up yet.
You also need PostgreSQL v9.6.0 or higher which can be found on the PostgreSQL download page.
Database setup
Once you have these two installed, you need to create your database. First, ensure Postgres is running. To do this run the following command in the terminal:
psql
If you encounter the error below, that probably means Postgres is not running yet:
psql: could not connect to server: No such file or directory
        Is the server running locally and accepting
        connections on Unix domain socket "/tmp/.s.PGSQL.5432"?
To fix this, start up. For mac users with homebrew, run:
brew services start postgres
For windows users:
- Open the Run Window by
Winkey + R - Type
services.msc - Search Postgres service based on the version installed
- Click stop, start, or restart the service option
For Linux users, run:
sudo service postgresql start
Once Postgres is running, create a database for your application by running:
createdb testdb
This creates a database called “testdb” which we will be using to create our sample API. You can now run psql with the database name or URL to access it and run SQL queries on it, for us this will look something like this:
psql testdb
or
psql postgres:///testdb
Install PostGraphile
PostGraphile can be easily installed globally with npm by running this command:
npm install -g postgraphile
Now that you have Postgraphile installed, you can view the CLI flags by running:
postgraphile --help
To run PostGraphile, you’ll use the same URL that you used for psql with the database name added:
postgraphile -c "postgres:///testdb"
Where -c is the connection string (defaults to postgres:///), -s is the schema name (defaults to “public”), -a enables relay support and -j enables dynamic JSON.
When PostGraphile runs, it gives two endpoints:
- GraphQL API: http://localhost:5000/graphql
- GraphiQL GUI/IDE: http://localhost:5000/graphiql
The first endpoint is for your application to talk to and the second endpoint can be opened in a web browser to give you access to your database through GraphiQL (a visual GraphQL explorer).
Great! Now we have PostGraphile set up, we can get into defining the structure of our database which will, in turn, allow PostGraphile to update our API.
Schemas and tables
As described in the postgres documentation, a database contains one or more named schemas or namespaces , which contain the tables in which we store our data. Schemas also contain other kinds of named objects, including data types, functions, and operators. The same object name can be used in different schemas without conflict. For example, both schema1 and myschema can contain tables named mytable. Unlike databases, schemas are not rigidly separated. A user can access objects in any of the schemas in the database they are connected to if they have privileges to do so.
The default schema that is created alongside a database is public, most users only deal with this one. In PostGraphile, it is advisable to use schemas to help organize your application – you can use one schema for the tables that will be exposed to GraphQL, another for the tables that should be completely private (e.g. where you store the hashed user passwords), and you can use other schemas too depending on what makes sense for your application.
An example of schemas provided on the Postgraphile docs can be the following:
-
app_public– tables and functions to be exposed to GraphQL -
app_hidden– the same privileges asapp_public, but simply not exposed to GraphQL -
app_private– secrets that require elevated privileges to access
For our application, we’ll keep it simple and just create our own schema which we’ll call test_schema by running this command from the Postgres CLI:
CREATE SCHEMA test_schema;
A schema can contain several tables, for our example, let us create two tables in test_schema one containing authors and another containing the posts made by these authors. We will do this by giving it the structure of each of the tables.
The authors table will have an id that acts as a primary key, a username that uniquely identifies them as well as a first name, last name, and bio.
The posts table on the other hand, will have an id that is the primary key, a headline field that is its title, and a body as well as created_at. There’s one more field, this is author_id which references the authors table by creating a foreign key linking to it, this creates a one-to-many relationship where one author can have several posts:
CREATE TABLE test_schema.authors (
  id serial PRIMARY KEY,
  username text NOT NULL unique,
  firstname text NOT NULL,
  lastname text NOT NULL,
  bio text
);

create table test_schema.posts (
  id serial primary key,
  headline text not null,
  body text,
  -- `references` 👇  sets up the foreign key relation
  author_id int4 references test_schema.authors(id),
  created_at timestamptz NOT NULL DEFAULT now()
);
Now let’s insert some data in our database. Let’s create two users:
INSERT INTO test_schema.authors (username, firstname, lastname, bio) VALUES
('austinroy', 'Austin', 'Roy', 'Gamer, developer, blogger'),
('darthvader', 'Anakin', 'Skywalker', 'Former Jedi, Dark Lord of the Sith trying to save Padme');
Let’s verify that the data has been entered into the database as expected:
SELECT * FROM test_schema.authors;
The result should show two entries created as shown below.

GraphQL interaction
You can query the above data on GraphiQL (a visual explorer for GraphQL provided by the server) with the query shown below and it should return the data as expected. This can be done by sending the query declared below to the server on http://localhost:5000/graphiql to return certain details saved.
You may have noticed, that some variables declared using snake_case in Postgres have been converted to camelCase in the GraphQL API, which is the standard for such APIs. This is down to PostGraphile applying the concept of inflection to map things onto more natural names while avoiding conflicts. It also helps name target types and referencing columns such as postsByAuthorId.
query {
  allAuthors{
    nodes {
      username
      firstname
      lastname
      bio
    }
  }
}

And just like that we have a whole GraphQL server up and running on a Postgres DB. To utilize our server let’s use GraphiQL to create our first post. We will do this by executing the createPost Mutation that PostGraphile generated for us.
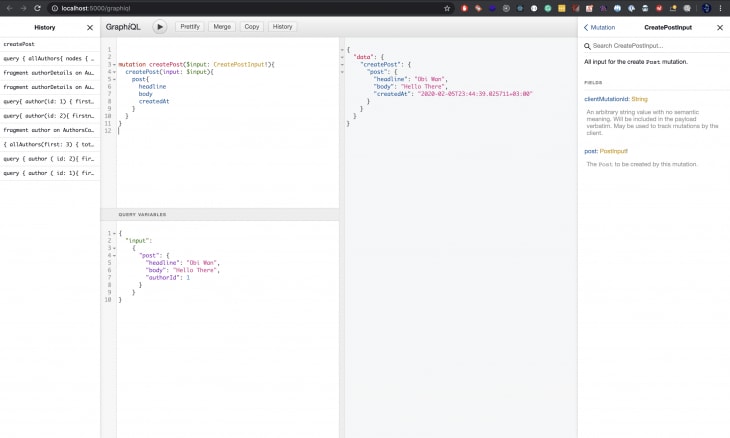
First, we’ll need to define our query in GraphiQL, it will look like something like this:
mutation createPost($input: CreatePostInput!){
  createPost(input: $input){
    post{
      headline
      body
      createdAt
    }
  }
}
This utilizes the input provided to create a new post and returns selected fields from the post. I chose to return the post headline, body, and time created, leaving out the ID. You can choose which values you’d like returned by including them in the mutation.
You are probably wondering where the input is being passed to the mutation above. We will declare them separately in the QUERY VARIABLES section which is currently hidden. To bring it up, just click on the QUERY VARIABLES panel at the bottom of your screen and pass the following code into it:
{
  "input":
          {
      "post": {
        "headline": "Obi Wan",
        "body": "Hello There",
        "authorId": 1
      }
    }
}
The object with the variables being passed as input should be declared in JSON format without any trailing comma so as to avoid having it invalidated by GraphiQL which caries out its own checks.
Here’s what it will look like in your browser.
These are just two of several Queries and Mutations that PostGraphile has generated for us just from the database schema we provided. These include:
-
allAuthors– Reads and enables pagination through a set ofAuthor(the GraphQL Object Type that gets all the data on all authors) -
allPosts– Reads and enables pagination through a set ofPosts(the GraphQL Object Type that gets all the data on all authors) -
authorByUsername– Returns anAuthorthat matches a given username -
author– returns anAuthorthat matches a givenid -
post– returns anPostthat matches a givenid -
createAuthor– creates anAuthorfrom a given payload -
updateAuthor– updates anAuthorfrom a given payload if there is a matchingid -
deleteAuthor– deletes anAuthorfrom a given payload if there is a matchingid -
createPost– creates anPostfrom a given payload -
updatePost– updates anPostfrom a given payload if there is a matchingid -
deletePost– deletes anPostfrom a given payload if there is a matchingid
On top of handling most of the CRUD functionality you may need, PostGraphile also documents the usage of most of these GraphQL Types (Queries and Mutations), making the API generated extremely easy to consume for anyone looking to make use of it.
Documentation with smart comments
You may have noticed the data types, i.e. author and post are yet to be documented. This can quickly be fixed by making use of smart comments. To show this let us add some documentation explaining our authors table.
To add a comment to our authors table run this command in Postgres:
COMMENT ON TABLE test_schema.authors IS 'Author on the platform';
When you check the Author Type in GraphiQL, it changed from “No Description” to “Author on the platform” as seen in this screenshot.

Conclusion
PostGraphile is a powerful tool that can help developers quickly and very easily set up fully featured and robust GraphQL APIs running on PostgreSQL databases. This allows them to build fast and reliable APIs running on a secure and stable database with several powerful features. It is also an incredibly easy tool to use and can greatly speed up development time on these APIs allowing the developers to focus on solving the problem rather than setting up the application. This article only covers a subset of the many capabilities PostGraphile has to offer and you can learn more about them by checking out the complete documentation.
200's only ✅: Monitor failed and show GraphQL requests in production
While GraphQL has some features for debugging requests and responses, making sure GraphQL reliably serves resources to your production app is where things get tougher. If you’re interested in ensuring network requests to the backend or third party services are successful, try LogRocket.

LogRocket is like a DVR for web apps, recording literally everything that happens on your site. Instead of guessing why problems happen, you can aggregate and report on problematic GraphQL requests to quickly understand the root cause. In addition, you can track Apollo client state and inspect GraphQL queries' key-value pairs.
LogRocket instruments your app to record baseline performance timings such as page load time, time to first byte, slow network requests, and also logs Redux, NgRx, and Vuex actions/state. Start monitoring for free.
The post Intro to Postgres + GraphQL with PostGraphile appeared first on LogRocket Blog.


Top comments (2)
Nice article!
I have a question, why do you choose postgraphile instead of hasura for graphql with postgres?
Maybe because you could simply add it to your regular express app as a middleware?