What is Test-Driven Development (TDD)?
It is a software development process where the development of your code is moved forward by the tests you write. It may seem counter-intuitive but with TDD you write tests that will fail and then you write code that will pass those tests.
In Kent Beck's book "Test-Drive Development By Example" he states these two rules.
- Don't write a line of new code unless you first have a failing automated test
- Eliminate Duplication
These rules bring us to Red/green/refactor method of TDD. The first test that you create will fail and then you write the necessary code to pass the test. Red indicates a fail and green means you passed. However, getting to green does not mean you are done. After you have passed the test, you will need to refactor what you have written.
Why test first?
Testing first can minimize bugs and the need to refactor as your codebase increases in size and complexity. Starting off with well written and tested code can also save cost and time.
Tests can also serve as documentation for your feature in an application. Other developers on the team can read your tests and easily figure out what your code is looking to achieve.
By creating the tests first, you can ensure that the function that you are testing works the way it is intended to work and avoid any surprises further down the line.
What is Rspec?
It is a domain-specific language written in Ruby and specifically designed for test writing. It is used for testing ruby applications. However, there is also a gem for testing ruby on rails applications called RSpec-rails.
In this tutorial, we will be using the rails testing version of Rspec.
The setup
To get this tutorial started let create a rails application. Let's open up the terminal and run this command in the directory in which you would like to create the app.
rails new [name-of-your-app] -T
The reason we are using the -T flag is to prevent the rails Mini-test from being installed since we will be using Rspec in this tutorial.
Make sure you add the gem to the development and test section fo the gem file. Your gem rpsec-rails version may differ. At the time of writing this tutorial, 3.9 was the latest stable release.
#gemfile
group :development, :test do
  gem 'byebug', platforms: [:mri, :mingw, :x64_mingw]
  gem 'rspec-rails', '~> 3.9'
end
After that, you'll need to type run this command in the terminal.
bundle install
Then you'll need to run this command
rails generate rspec:install
Now that we are set up for testing let's go over some of the RSpec syntaxes.
Important keywords
- describe
- context
- it
- expect
What is describe?
The describe keyword contains a group of tests called examples in Rspec.
The keyword takes a class name or a string argument.
The examples will be enclosed in a ruby do/end block.
describe Pet do

end
In the above example, we are passing a class name as an argument.
What is context?
The context keyword is similar to describe in that it can take a class name or string as an argument and it also encloses examples in a ruby do/end block. It is optional to use but it can help add more information to your test.
describe Pet do
 context "validations" do
 end
end
What is "it" and expect?
The Rspec keyword "it" is used to introduce a test or example.
describe Pet do
 context "validations" do
  it "ensure the presence of a name" do
  end
 end
end
The expect keyword outlines an expectation from the test results.
expect("value").to eq("actual value")
Let's see how this works as an example. Were going to create a Pet model
rails generate model name:string
This command will also create the file needed to run the RSpec tests. It will be located in this location in your app
spec/models/pet_spec.rb
Now were are ready to start with TDD. Our Pet model requires a name. We want to validate the name before it is saved to the database.
require 'rails_helper'

RSpec.describe Pet, type: :model do
  context 'validations' do
    it "ensures the presence of name" do
      pet = Pet.new(name: "").save
      expect(pet).to eq(false)
    end
  end
end
The test above expects that the initialized pet object will return false because we passed in an empty string to the name attribute but we do not have any validations in place so we will get true when our expectation is false.
Since we only have one test that we are running, we can type in RSpec into the command line.
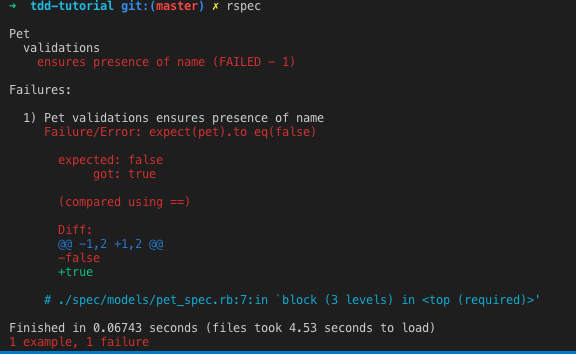
- To get your test results to look like the above, you'll need to add --format documentation to your .rspec file which is located at the root level of your application.
The test has failed and we have our first red in the red/green/refactor of TDD. We need to prevent empty strings from been saved to the name attribute and turn this test green.
We'll need to head to our the Pet model in our application add a name validation.
class Pet < ApplicationRecord
  validates :name, presence: true
end
Now we run the test, we should expect it to pass and give us the green that we are looking for.

For this test, I specified the location of the RSpec file that I wanted to test. This will come in handy when you are testing a large application and you don't want to test every test that has been written.
Our test has now passed and for this example, we won't need to conduct a refactor for the pet model validations.
The next test we will write will ensure that the name of the pet has at least two characters.
So let's start by writing a test that will fail.
   it "ensures that name has two or more characters" do
      pet = Pet.new(name: "j").save
      expect(pet).to eq(false)
    end
Here is the output from the command line.

We have our failing test now so now we need to create the validation that will put us in the green.
In our pet.rb file, we'll include this
validates :name, length: {minimum: 2}
Using the length Active Record helper we can make sure that only names with 2 or more characters can get saved.
Let's run the test again and see if we get the passed.

We have passed the test and this example will not require a refactor.
For this tutorial, we will create one more test to ensure that valid names will be accepted.
  it "ensures that valid name will be saved" do
      pet = Pet.new(name: "Stella")
      expect(pet).to be_valid
    end
In this scenario, I don't expect it to fail but I'm going to add just to demonstrate what you can test for.
Here is the output of the final test.
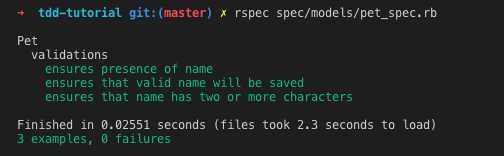
I hope after this tutorial you have a better understanding of TDD and Rspec. There will be another TDD and Rspec tutorial that will encompass refactoring and other Active Record validation helpers.


Top comments (0)