When I finished my first Django app, I found it hard to publish it on the web, because there seemed to be no end-to-end tutorial explaining all the different components. As a result, I decided to create the tutorial I wish I could have accessed at the time. It's going to be very beginner friendly, taking you through each process step by step and explaining everything in detail along the way! By the end, you should not only have a running website or app, but also understand what is going on to make it run. I'm assuming that you know Django, are a GitHub/GitLab user and have a good grasp of some basic software development concepts. Commandline knowledge is a nice-to-have! Also note that the hosting option I will be explaining in this tutorial is cheap, but not free, meaning you will get charged at the end of the month.
The basic Components of deploying a Website/Webapp
I'm sure you heard of a server before, but perhaps are not fully aware of what it actually is. The concept is quite simple - it is a computer who's primary (and sometimes sole) task is to listen for requests sent out by other computers and send back a response based on that request. Every part of the web runs on servers and to deploy our Django app, we will need a server of our own.
You might be thinking that having your own computer running all the time seems like a lot of maintenance and hassle - this is where the concept of the "cloud" comes in. A cloud is really just a collection of servers managed by a larger corporation, that has the necessary resources and means to keep the servers running all the time. This is why most new companies opt to deploy their web apps on a cloud provider, rather than running their own servers.
Finally, we also need an application server. This is where things can get confusing - unlike a regular server, an application server is NOT a physical computer. It is a piece of software that is constantly running and listening on a specified port for any requests coming in from the users. When a request comes in, our application server communicates with the application (Django), which figures out how the server should respond. After our application has created a response, the application server will serve that response back to the user in the form of some files (HTML, an image, a JSON payload, etc.).
What is Render?
Render is going to be our cloud host for this tutorial. I chose it because it makes deploying and updating a web app very simple (we will get into how it does that later on in the post). This makes it great for new developers! Render is often compared to its closest competitor Heroku, which is a lot more established, renowned and mature. I have used both platforms and find Render to match up a bit better with my personal preference, as I find the user interface to be more intuitive than that of Heroku. The main benefit of Heroku is that it has a free tier, but gets very expensive quickly, while Render remains comparatively cheap as your web app grows in users. If you want to use Heroku for this tutorial because of its free tier, you still can since it is very similar to Render. I definitely don't think Heroku is a bad choice and you can host serious apps on either of these platforms!
Development Environment Setup
I'm going to start with the default Django project, but I hope my explanations will help you adjust your own project as well (if there are issues, please leave a comment!). For reference, I'm setting up my project by following the official tutorial and my current file structure looks like this:
├── db.sqlite3
├── manage.py
└── mysite
├── asgi.py
├── init.py
├── settings.py
├── urls.py
└── wsgi.py
Setting up the Application Server (Gunicorn)
As you are probably aware, Django ships with an application server of its own, that you can use while you are developing your app. This is not suitable for deploying your app, because it is not designed to be secure and handle large traffic. Instead, we are going to be using Gunicorn, an application server built for Python apps. Run the following command to install it:
pip install gunicornWe can now run our app using the application server, which has it's own command line interface. The good thing about application servers is that they often come with a lot of configuration options, but this can often confuse beginners. I am going to share the basic configurations for Gunicorn that are going to help you get started.
If you navigate into your projects main folder, you will see a file called wsgi.py. If you haven't made any changes to it, you should see something like this:
import os
from django.core.wsgi import get_wsgi_application

os.environ.setdefault('DJANGO_SETTINGS_MODULE', 'mysite.settings')
application = get_wsgi_application()
In the last line, we can see an application variable being assigned - you can imagine this like your built Django app. We now need to hook it up with Gunicorn, so that we can start taking and responding to requests. Navigate, to your projects root folder and run the following command:
gunicorn -w 4 mysite.wsgi:applicationLets go through it step by step - we have two arguments. The first is marked with the w flag and is assigned the value 4. This is simply telling Gunicorn that we want to have four workers running in parallel. A worker is an instance of the application server, so the more workers we have running the more requests we can theoretically handle at the same time. The optimal value for this depends on how many threads you can run and how much RAM your computer has available, but I find 4 to be a good default.
The second argument is the path from our current directory to the Django application variable that we talked about just before. As mentioned, this is just telling Gunicorn what it needs to be running. After hitting enter, you should see that we have our app running at port 8000, just like with the normal development server!
Adding Support for Static Files
While our application server is already working fine, it does have a major limitation - Django does not support serving static files (images, CSS, JavaScript) in production! Fortunately, there is a really simple fix using a library called WhiteNoise. Let's install it:
pip install WhiteNoiseTo make it work in our application is also really easy - simply extend your settings.py file in your main project directory with this code:
MIDDLEWARE = [
    'whitenoise.middleware.WhiteNoiseMiddleware',
    # ... all your other middleware
]
STATICFILES_STORAGE = 'whitenoise.storage.CompressedManifestStaticFilesStorage'
How we are going to deploy our App - a quick Overview
At this point, I think its good to get a quick overview of what we are trying to do, so the next steps make sense. I will be covering how you can use Render to synchronize your app over the web by simply committing to your master branch! This is why knowledge of Git, as well as having a GitHub or GitLab account, are mandatory for this tutorial. This is how it works:
- We push our code to the remote repository
- Render will recognize that we have made a change and download all the latest updates from GitHub/GitLab to the server
- Render will execute the Gunicorn command just like we did before on our local machine
As you can see, working with Render is really simple! But we still need to do a few more things. If you haven't already, please create a new repository for your application.
"Freezing" our Libraries/Dependencies
When we push our code to a server on Render, we are limited by the files in our repository. You don't want to have your entire development environment and libraries in the repository, but a good alternative is to simply have Render install all of these for us on the fly. The way we can do this is by using pip to write all our dependencies into a file (which is a best practice anyway, when working with Git and Django). We can then use this file to install all of these dependencies on the server. Execute the following command:
pip freeze > requirements.txtYou should know see a new file that was created in your directory. For me, this file has the following contents:
asgiref==3.2.3
Django==3.0.3
gunicorn==20.0.4
pytz==2019.3
sqlparse==0.3.0
whitenoise==5.0.1
As you can see, it has all the different libraries that are being used and their versions. This file is formatted in a way that pip will be able to read this file and install them again, with the exact versions of each library.
Getting Started on Render
Go to https://render.com/ and hit Sign Up. Create a new account and go to the Dashboard. You should see a few options - click on New Web Service.

Render will ask you to connect with your Git provider of choice, if you haven't already. Once that is done, pick out the repo that you have been working on for this tutorial.

Now, you are being taken to a configuration menu. In this menu, we are declaring how the render server should initialize the application, when a change is made to the git repository. Important is that we tell Render to install all of our dependencies that we stored in the requirements.txt file we created earlier and start the application with gunicorn.
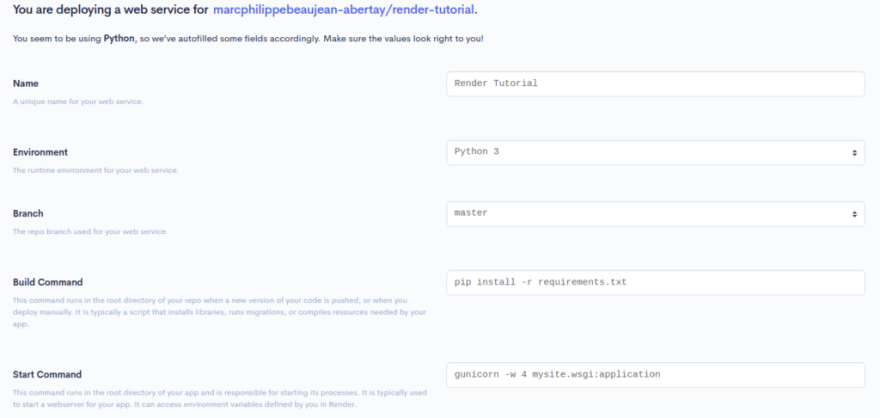
Choose the cheapest plan. Then, hit the build button and watch how render goes through the process of installing the app. You'll notice that after the build process, Render created a subdomain for us where we can view the application. This is where we run into a problem:

If you are seeing this error, there are two problems:
- You didn't add the Render domain to your allowed hosts (obviously)
- You have debug mode enabled in production
This is fixed easily by going to back to your settings.py and making the following changes:
DEBUG = True
ALLOWED_HOSTS = ['render-tutorial.onrender.com']
Now, push this new version via Git and notice how Render automatically updates the server! You can also use a manual deploy if that does not work.

Voila! The app is running. I hope you enjoyed this quick introduction to deployments with Django and Render. Obviously, there are still quite a few ways we can improve upon this, like using environment variables to dynamically toggle Debug mode in our settings.py based on whether we are in production mode or not. If you want me to cover these as well, please leave a comment!


Top comments (2)
Can't login via github
Hi Sudipta, can you iterate on this further? Are you struggling to log into Render with GitHub or connect your existing account with it? I believe both are possible.