Wondering how to push your iOS app to appstore automatically? Originally written by my friend Vigneswaran - the step-by-step tutorial detailing about the process of setting up CI/CD pipeline for iOS mobile apps using Gitlab CI and fastlane.
In summary, these are the steps you have to follow.
1. Steps for Manual Gitlab Runner Installation:

You need specific runners instead of shared runners provided by Gitlab, for the case iOS Deployments. You can install them in local Mac machines/Mac servers(MacStadium). Below are the steps to configure runners in macOS and OS X.
1. Download the binary for your system:
sudo curl --output /usr/local/bin/gitlab-runner
https://gitlab-runner-downloads.s3.amazonaws.com/latest/binaries/gitlab-runner-darwin-amd64
2. Give it permissions to execute:
sudo chmod +x /usr/local/bin/gitlab-runner
Note: The rest of commands to be executed as the user who will run the Runner.(This is a limitation on macOS).
3. Install the Runner as service and start it:
cd ~
gitlab-runner install
gitlab-runner start
2. Steps for Registering a Runner:
1. To register a Runner under macOS, run the below command first.
gitlab-runner register
2. Enter your GitLab instance URL when prompted in the next step.
Please enter the gitlab-ci coordinator URL (e.g. https://gitlab.com )
https://gitlab.com
3. Enter the token you obtained to register the Runner:
Please enter the gitlab-ci token for this runner
xxx

4. Enter a description for the Runner, you can change this later in GitLab’s UI:
Please enter the gitlab-ci description for this runner
Local Runner
5. Enter the tags associated with the Runner,you can change this later in GitLab’s UI:
Please enter the gitlab-ci tags for this runner (comma separated):
ios,another-tag
6. Enter the tags associated with the Runner,you can change this later in GitLab’s UI:
Please enter the executor: ssh, docker+machine, docker-ssh+machine, kubernetes, docker, parallels, virtualbox, docker-ssh, shell:
shell
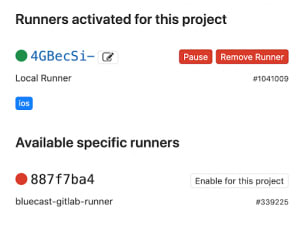
If everything goes well, you should see activated runners for your project like in the below image.
3. Adding Our .gitlab.yml:
Now, it’s time to add a sort of config file for running jobs in the GitLab pipelines that triggers on every commit to a particular repo.
The best practices for git-branching model can be referred from this article. For the sake of simplicity, let us consider only our “master” branch. We assume that any commit to master repo need to trigger a job in the CI pipeline.
Let us configure the gitlab.yml file which needs to be placed in the root of the repo.
stages:
  - test_flight

variables:
  LC_ALL: "en_US.UTF-8"
  LANG: "en_US.UTF-8"

before_script:
  - gem install bundler
  - pod install

test_flight_build:
  dependencies: []
  stage: test_flight
  artifacts:
     paths:
       - fastlane/logs
  script:
     - fastlane beta
  tags:
     - ios
  only:
     - master
This configuration fires a job in the CI pipeline of “master” branch alone that executes the job with a stage ”test_flight” which in turn runs the script “fastlane beta” with the given environment variables on the runner “tagged as ios”.
The specified “before script” as the name suggests is executed before the job and the artifacts available in the specified path once the job is completed successfully.
4. Installing Fastlane in Mac:
Fastlane setup is the crucial step in the whole process since it is the backbone of the deployment process. To install Fastlane in your system, please go through the below steps: Install the latest Xcode command line tools:
sudo gem install fastlane -NV
Install fastlane using
# Using RubyGems
sudo gem install fastlane -NV
# Alternatively using Homebrew
brew cask install fastlane
To start using fastlane in your project, you’ll need to run fastlane init from your project directory in command line.
fastlane will ask you for some basic configuration and then create a folder called fastlane in your project which will contain mainly two files:
1. fastlane/Appfile
This file is straightforward, so you just want to check to make sure that the Apple ID and app ID that you set up earlier are correct.
app_identifier("APP IDENTIFIER") # The bundle identifier of your app
apple_id("APPLE ID") # Your Apple email address
2. fastlane/Fastfile
The Fastfile defines the build steps. Since we’re using a lot of the built-in capability of fastlane this is really straightforward. We create a single lane which increments build number,gets certificates, builds, and uploads the new build to TestFlight. Of course, you may want to split these out into different jobs depending on your use case. Each of these steps, get_certificates, get_provisioning_profile,match, gym, and upload_to_testflight are pre-bundled actions already included with fastlane.
get_certificates and get_provisioning_profile are actions associated with the cert and sigh approach to codesigning; if you’re using match,you may need to update this by commenting get_certificates and get_provisioning_profile.
default_platform(:ios)

platform :ios do
  desc "Build the application"
  lane :beta do
    increment_build_number(
    build_number: latest_testflight_build_number + 1,
    xcodeproj: "${PROJECT_NAME}.xcodeproj"
  )
    get_certificates
    get_provisioning_profile
    # match(type: "appstore",read_only: true)
    gym
    upload_to_testflight
  end
end
3. fastlane/Gymfile
This file is optional, but created manually in order to override the default output directory and place the output in the current folder. This makes things a bit easier for CI. You can read more about gym and its options in the gym documentation.
output_directory("./")

clean(true)

scheme("${PROJECT_NAME}")

workspace("${PROJECT_NAME}.xcworkspace")

include_bitcode(true)
5. Connecting the Dots for Code signing using fastlane match
Code Signing is the most important aspect of iOS app deployment, we as iOS developers know the pain of handling code signing issues.
“match” creates all required certificates & provisioning profiles and stores them in a separate git repository. Every team member with access to the repo can use those credentials for code signing. match also automatically repairs broken and expired credentials. It’s the easiest way to share signing credentials across team.
fastlane match improves drastically the code signing process,even for small teams as it is the implementation of code signing concept.
For initialising match afresh in your project, follow these steps. One caveat, is that we need to generate fresh provisioning profiles and certificates.
But it is a show stop for anyone trying to use it on existing projects. But there is a way to trick fastlane match to use your existing certificates. Try to go through the steps in this article.
And it’s finally ready
There are some special environment variables we need to set to avoid the jobs failing due to 2FA from Apple that were made mandatory recently.
FASTLANE_APPLE_APPLICATION_SPECIFIC_PASSWORD and FASTLANE_SESSION
In order to authenticate against the App Store for the TestFlight upload, fastlane must be able to authenticate. In order to do this, you need to create an app-specific password to be used by CI. You can read more about this process in this documentation.
FASTLANE_USER and FASTLANE_PASSWORD
In order for cert and sigh to be able to fetch the provisioning profile and certificates on demand, the FASTLANE_USER and FASTLANE_PASSWORD variables must be set. You can read more about this here. You may not need these if you are using some other approach to signing.
Conclusion
Ah!! Kudos to you!!! We have finally configured our own CI/CD workflow with GitLab CI/CD and Fastlane as our primary tools.
Thanks for reading this article. Hope it proves to be helpful for you for configuring a robust CI/CD workflow for automating your iOS app deployment process.
Let me know if you face any difficulties in setting up the same.


Top comments (0)