
The AWS Lambdas represent one of the most common solutions when deploying serverless applications. In this post, I try to cover how to develop, package, deploy and configure a single function, that runs in somebody else's computer.
Este post también está disponible en español, da click aquí para leerlo
Developing
As we will be using Python, it is highly recommended that we create a virtual environment and enter it before continuing:
python -m venv env
source env/bin/activate
Then we can install the libraries we will use in our lambda, in our case the only libraries we are going to use are requests and twython:
pip install requests twython
Once we have done this, we can proceed to develop our function. It is as simple as this:
def lambda_handler(event, context):
pokemon_id = event["pokemon_id"]
response = requests.get(f"https://pokeapi.co/api/v2/pokemon/{pokemon_id}/")
pokemon = json.loads(response.text)
tweeted = tweet(pokemon)
return {
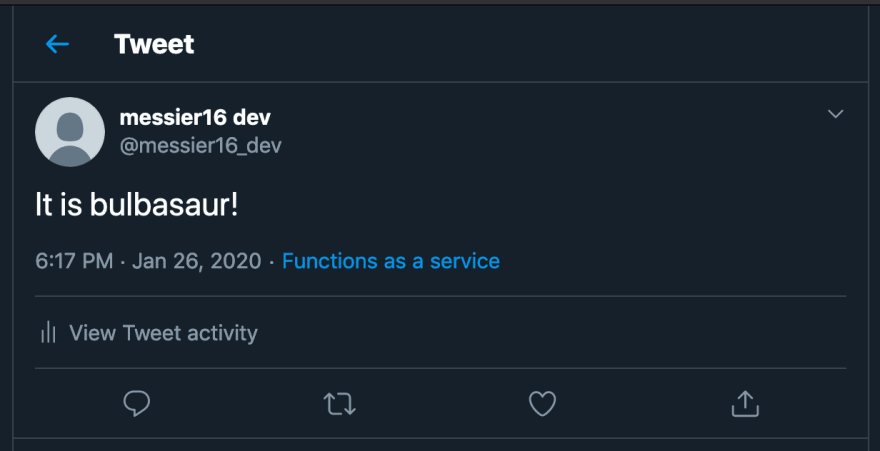
"message": f"It is {pokemon['species']['name']}!",
"tweeted": tweeted
}
The critical piece of our lambda code is the function lambda_handler along with its two parameters event and context; we care about the first one: it is a dictionary that contains information that we want to pass to our lambda when it gets triggered. In our case we are expecting an int, under the key pokemon_id, it uses this number to fetch a pokemon from the Pokéapi. Then it returns another dictionary with some "useful" information. Of course, this is a silly example, and your lambdas could do more valuable stuff.
Though our code is running on a server that we do not manage, we still have access to the environment variables of the system it is running, the function tweet takes some secrets from the env vars that allow our lambda to tweet about the selected pokemon:
def  tweet(pokemon):
    variables = [
        "API_KEY",
        "API_SECRET_KEY",
        "ACCESS_TOKEN",
        "ACCESS_TOKEN_SECRET"
    ]

    if  all(var in os.environ for var in variables):
        twitter = Twython(
            os.environ["API_KEY"],
            os.environ["API_SECRET_KEY"],
            os.environ["ACCESS_TOKEN"],
            os.environ["ACCESS_TOKEN_SECRET"]
        )
        twitter.update_status(status=f"It is {pokemon['species']['name']}!")
        return  True
    return  False
Check here to learn more about access tokens and secrets, though it is not necessary to continue with the rest of the tutorial.
Both functions, along with their imports, can be placed in a single (or multiple files), in my case, I opted for a single file.
Packaging
The next step is to prepare our code for upload. Now, if we had not used any other external library, we could have just pasted our code into an Amazon-provided UI; but that is not our case, we have to package our code along with our dependencies in a compressed file.
There is one thing to consider before packaging our lambda: it is very likely that the operating system our lambda is going to be running, does not match the one we developed it on. The lambda runs Amazon's version of Linux, which means that some packages may not work when executed in the lambda environment.
But not so fast, there is an easy solution: Docker! We can run a container with an image somewhat similar to the one Amazon uses. If we install our packages there, they should work without issues in AWS... and then we can zip what we installed. To enact our plan, we execute the following commands:
mkdir build
pip freeze > ./build/requirements.txt
cp *.py build
docker run --rm -v ${PWD}/build:/var/task \
    -u 0 lambci/lambda\:build-python3.7 \
    python3.7 -m pip install -t /var/task/ -r /var/task/requirements.txt
cd build && zip -r ../lambda.zip *
As a quick explanation:
- mkdir build: we create a folder called build
-
pip freeze > ./build/requirements.txt: generate a
requirements.txtinside our newly created folder, this file comes from our environment -
cp *.py build: copy our lambda files inside build
docker run ...: run the command
python3.7 -m pip install -t /var/task/ -r /var/task/requirements.txtinside a container created withlambci/lambda\:build-python3.7as image, this container has the folderbuildattached as a volume under the path/var/task/. -
cd build && zip -r ../lambda.zip *: as a last step, compress both the environment files and our python files into the file
lambda.zip
Uploading
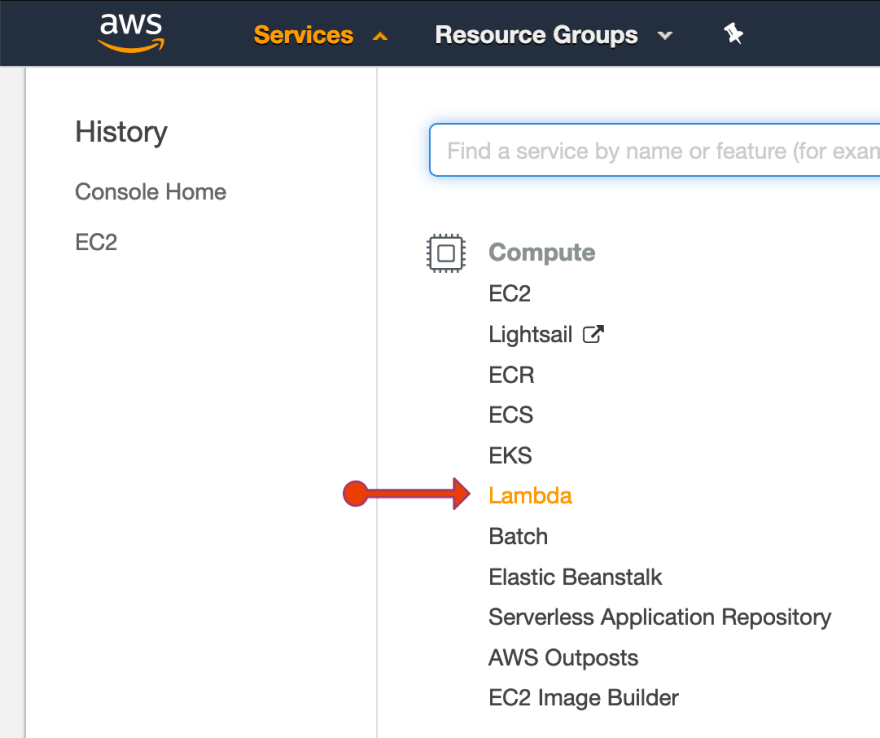
Once we have our zip, all that is left is to configure the lambda in AWS, so login into your console and head over to the lambda section, what follows is a guide using images on how to navigate the console:
From there, you will see a very bright button that says "Create a function", from there, fill in the name of your lambda, and as runtime choose Python 3.7, remember, we are authoring from scratch too.

The following screen shows the configuration for our lambda, what we need to do now is to navigate to the Function code section, where we must choose Upload a .zip file as Code entry type, and set Handler to the location of our lambda_handler function defined above, this value is something like lambda_function.lambda_handler, and then select the zip file our script created to be uploaded:

Finally, click Save. Once saved the Function code section will change to an editor that you can then use to modify the code of your lambda. But we won't do that.
Configuring
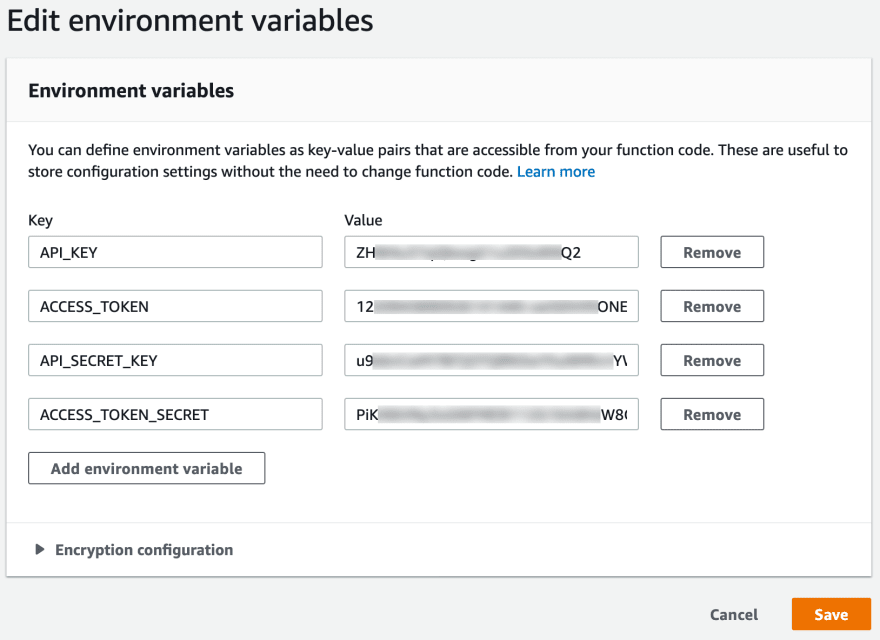
If you remember correctly, our lambda can make use of environment variables, to modify them, it is necessary to navigate to the Environment variables section, where we need to add the variables we'll use:
Do not forget to save your work at every section change you make!
Testing
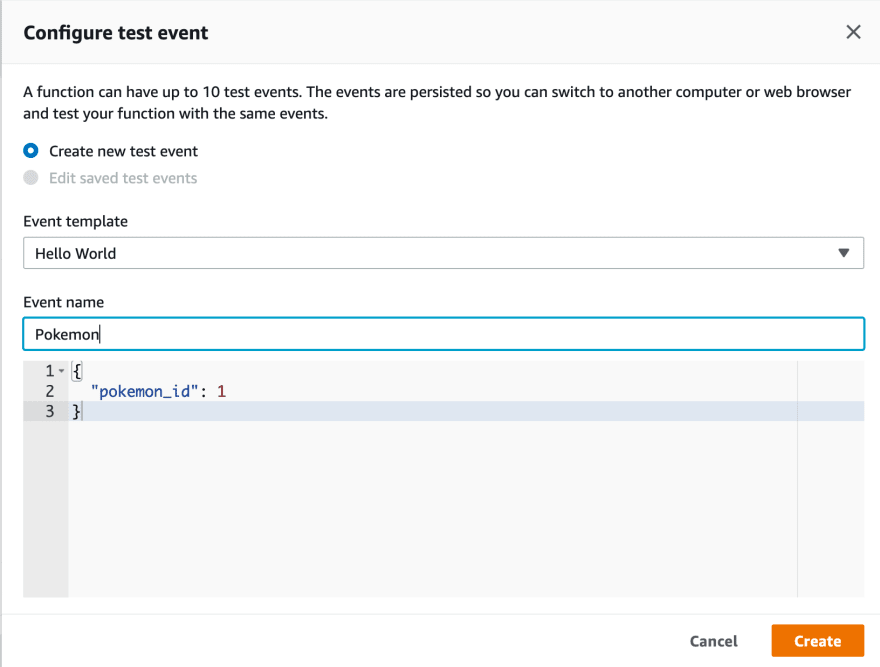
Lastly, if you scroll all the way back to the top, you can see that next to the Save button there is one that we can use to create test events, after pressing it, it will give you the option of crafting the message that your lambda will receive:
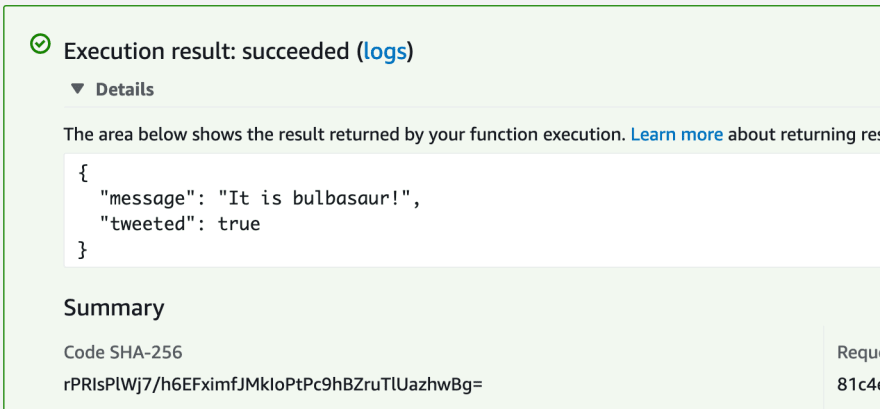
After this step, you can save and then click test again, this time our lambda should work and execute, we can see the output of it in the panel being shown after clicking, or, if you set up the tweeting part of the lambda, by now you should be able to see a tweet from that account:
And that is it, now you have a functioning lambda that is built in the same environment it will be run on. I hope you were able to follow this tutorial if you have any comments or questions, do not forget to leave them down below or to contact me on @io_exception on twitter.


Top comments (4)
You might want to read up on pipenv, its creator, the controversy behind it, and whether you should consider using something else instead.
In fact, you didn't need pipenv at all in this tutorial. Everything you did can be done with vanilla python and
python -m venvfor instance. So, actually, why DID you focus the article on pipenv when you didn't actually use anything particularly special about it.Also, for your own ease, I suggest you look at using zappa when deploying python to AWS lambda:
github.com/Miserlou/Zappa
Please Anthony, would you like to share with me what I "might want to read up on pipenv..."? rather than just coming across as patronizing.
And true, I did not need to use pipenv, however it is a tool, like many, many others; I don't see the issue with doing so... I know Zappa, but is rather convoluted for the simple example I was trying to show here.
I'm not sure how that came across as patronizing, but I apologize. I was a big fan of pipenv when it was announced, but it didn't take long to show its rough edges and then when I found out that it was "pretending" to be the official package manager of pypi.org I decided to stop using it. There are other reasons to avoid it as well; for instance, now with
-m venvbuilt into python3, you can really do your entire article almost entirely pure python.Which is what I was trying to get to. Your article is titled "with pipenv" but really my suggestion is to rewrite it to "with python". You call attention to pipenv in the title as if the article hinges on that one tool, yet you barely use it or talk about it in the article. As a friendly suggestion of course -- it's your article, but that's what comments are for right? Simply by posting it you're soliciting feedback, yeah? Don't take feedback negatively just because things are pointed out.
And lastly, I don't know what you find convoluted about Zappa but that's not why I mentioned it to you. It was a handy piece of advice for you or for someone who reads this article.
Once again no patronizing was intended. Just discussion and pointing out to future readers pipenv was not key to your example, and that Zappa is an alternative to a lot of the manual steps shown here.
Fair criticism and suggestion. I'll update the title and the code itself to use pure python.