
Social login integration
Logging in is an important aspect of any application. An application uses login details to segregate the users’ data. Making the login process easier for users has become an important goal for all developers, especially in mobile applications.
A good way to make logins easier is to use social media login integration in mobile applications. Nowadays, most people have an account in one (or all) of the social websites like Google, Facebook, Twitter, or LinkedIn. Therefore, we can make use of these to authenticate the users in our app, which will make it easy for users to remember their credentials since they do not have to create new ones for every web or mobile application they use.
In this blog, we are going to learn about integrating the Google login into a Xamarin.Forms application using the Xamarin Auth package.
Prerequisites for Google login integration
- Install the latest stable package of Xamarin Auth in PCL and target platform (Android and iOS) projects. You can find the NuGet package link for Xamarin Auth below. https://www.nuget.org/packages/Xamarin.Auth
- Create applications in the Google developer console for Android and iOS separately to get the client IDs necessary to authenticate the Google login. The steps to create the applications are explained in the following.
Google project creation for Xamarin.Forms applications
To integrate Google login in your Xamarin.Forms application, you need to create a project for your application in the Google developer console. This is to get the respective client credentials to access the Google login API and get the user details.
- Open this Google developer console link and login using your Gmail account:
https://console.developers.google.com/apis/credentials.
- Click the button in the top-left corner beside the Google API logo. You will be shown a list of projects that can be created in your Google developer console account. Clicking on it will show the following drop-down box and the **NEW PROJECT** button.  
- Clicking the **NEW PROJECT** button will take you to the page where you can specify the name of your project and click **CREATE **
- After creating the project for your mobile application, create the credentials of the Google login individually. This is to make Google login work in both Android and iOS platforms in the Xamarin.Forms application.
Credentials for Google login for Xamarin.Android
- After creating the project for your application, go to this Google page and select the project name you have created in the drop-down box in the top-left column. Here I have named the project as XamarinLogin. Then, select the User Type in the right pane, either it is for Internal or External. Refer to the following screenshot.
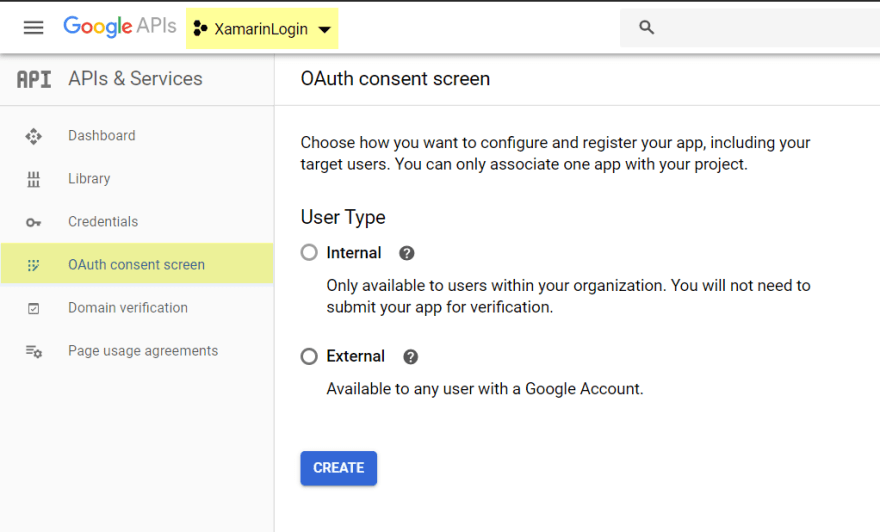
- Click the OAuth consent screen as shown in the previous screenshot. Fill in the details you see in the following image, which are necessary for your mobile application.
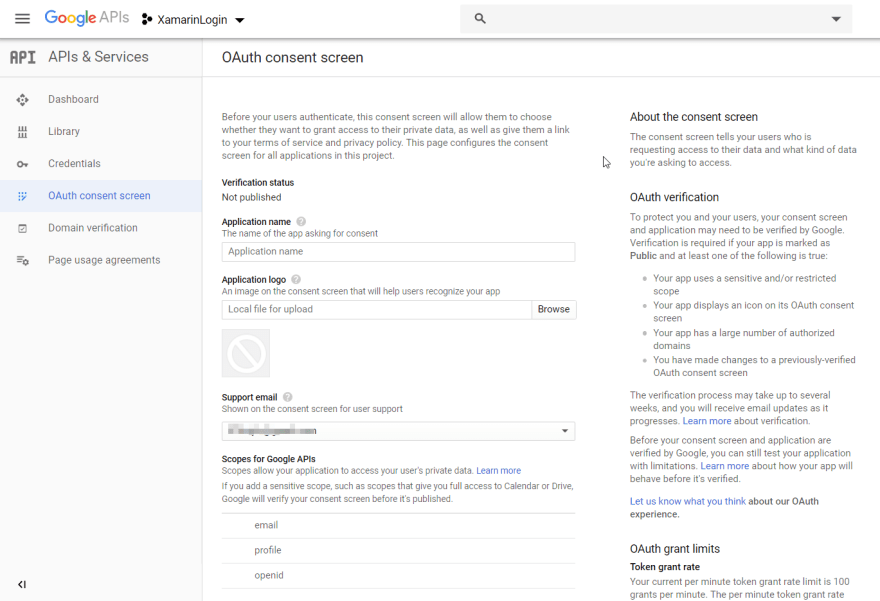
- The details provided here will be shown to users as the authentication page to your application for those who use their Gmail account to log in.
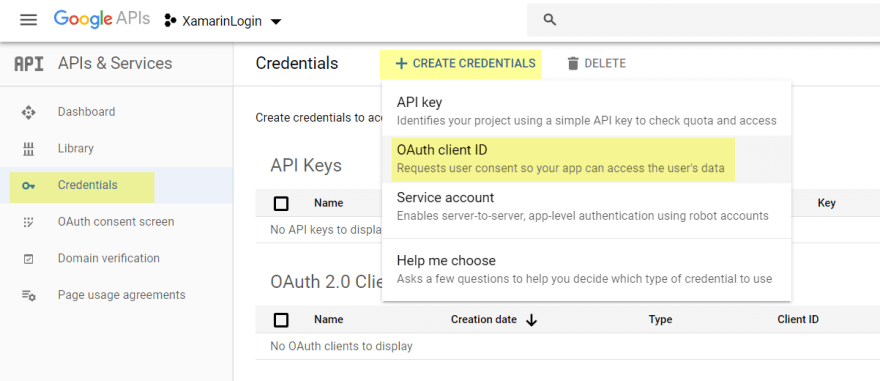
- Go to the Credentials tab and in the CREATE CREDENTIALS drop-down, select OAuth Client ID.
- On the next page, select Android in the radio button provided. Other options related to Android will then be shown.

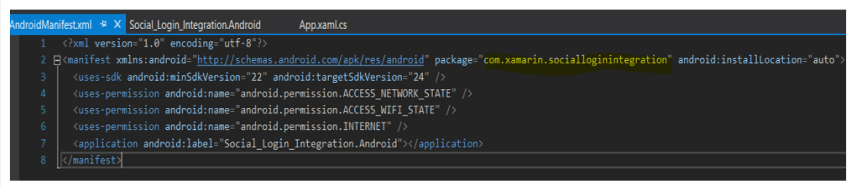
- On this page, provide any value in the Name field. Then provide the package name of your Android project manifest file from your Xamarin.Forms solution. The highlighted value in the following screenshot should be provided in the Package name field.
- Regarding the SHA-1 fingerprint, you can get the fingerprint code using the steps in the following link.
https://docs.microsoft.com/en-us/xamarin/android/deploy-test/signing/keystore-signature?tabs=vswin
- After providing these values, click **Create** and the Client ID for the Android application will be created. 
Credentials for Google login for Xamarin.iOS
We have created the Client ID for the Android platform. Now, we need to create one for the iOS application:
- In the Credentials tab, click the CREATE CREDENTIALS drop-down and select OAuth Client ID.

- Select iOS in the application type and provide the relevant details in the subsequent fields.
- Provide the bundle identifier used in the Info.Plist file in the Xamarin.iOS project in this link.
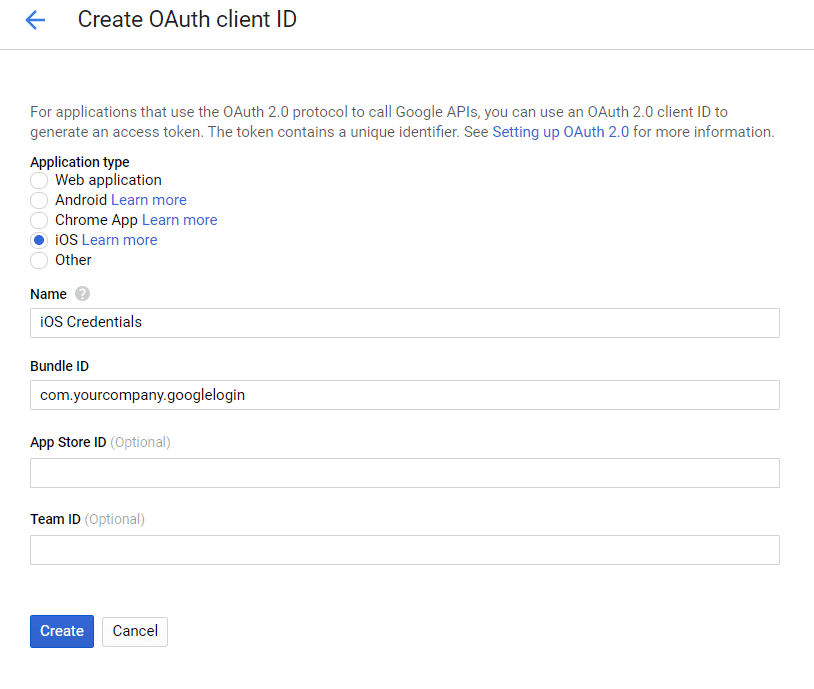
- Click Create after providing all the details, and the Client ID for the iOS platform will be shown in the Credentials tab with the name you have provided here.

Code snippets for the Google login integration
We need to provide the following code in the click event of any control using OAuth2 authenticator. 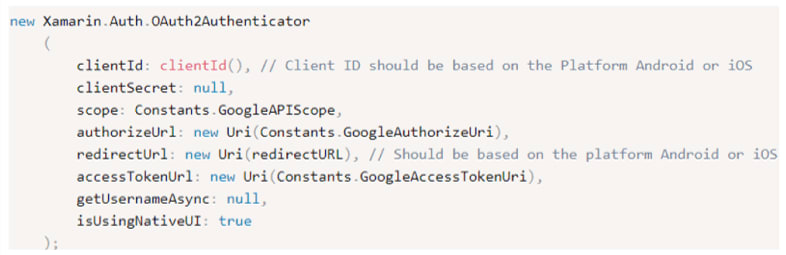
Google has deprecated the use of WebViews for security reasons, so we should use the device-native browser authentication for the Gmail account and get the details back.
So, in order to get the redirection from the device browser back to the Xamarin application, we need to write the redirection codes for the Android and iOS projects separately.
You can find the code related to the Google redirection from the browser in the Android project from the following link.
The code related to redirection in iOS is in the following link.
For Xamarin iOS, we need to specify the URL types:
- Go to the Plist file in the Xamarin iOS project and click the Advanced tab.
- Click Add URL Type and provide a name for the identifier field.
- In the Credentials tab in the Google developer console for your iOS credentials give the Bundle Identifier of the application.
- Provide the reverse of the iOS Client ID as “iOS URL scheme”.
https://console.developers.google.com/apis/credentials
- Select the role **Editor** and save the file. These steps are necessary for redirection in Xamarin.iOS.
Conclusion
I hope you have a clear idea of integrating Google login into your Xamarin.Forms mobile application now. Use this to provide a hassle-free login experience to your mobile application users.
Syncfusion provides 65+ lightweight, modern, and responsive Xamarin UI controls such as DataGrid, ListView, and Charts. You can use these controls to speed up your Xamarin.Forms application development. If you are an existing Syncfusion user, please download the latest version from the License and Downloads page and try these controls yourself. Also, our NuGet packages are available on NuGet.org. If you aren’t a customer yet, you can try our 30-day free trial to check out these controls.
If you liked this article, we think you’ll also enjoy the following free eBook and blog posts:
- [Ebook] Xamarin.Forms Succinctly
- [Blog] Easily Animate Your Xamarin Applications with Lottie Animation
- [Blog] 7 Ways to Boost Your Xamarin Development Productivity
- [Blog] Designing an Airfare Calendar in Xamarin.Forms
The post Google Login Integration in Xamarin Forms: A Complete Guide appeared first on Syncfusion Blogs.


Top comments (0)